Home>Gardening & Outdoor>Outdoor Entertaining>How To Make A Picnic Blanket
Outdoor Entertaining
How To Make A Picnic Blanket
Modified: October 27, 2024
Learn how to make a picnic blanket for your outdoor entertaining needs. Follow our easy DIY guide for a perfect addition to your next picnic or outdoor gathering.
(Many of the links in this article redirect to a specific reviewed product. Your purchase of these products through affiliate links helps to generate commission for Storables.com, at no extra cost. Learn more)
Introduction
Welcome to the wonderful world of outdoor entertaining! Picnics are a delightful way to savor the great outdoors while enjoying good food and company. A key component of any successful picnic is a comfortable and stylish picnic blanket. While there are countless options available for purchase, there's something truly special about creating your own picnic blanket. Not only does it allow for personalization and creativity, but it also provides a sense of pride and accomplishment when you spread it out for a picnic.
In this guide, we will walk you through the process of making your very own picnic blanket. Whether you're a seasoned crafter or a novice DIY enthusiast, this project is both fun and rewarding. By selecting your preferred materials and colors, you can tailor the design to suit your unique style and outdoor aesthetic.
As we embark on this creative journey, we'll explore the essential materials needed, the step-by-step process of making a picnic blanket, and valuable tips for using and maintaining your masterpiece. So, gather your supplies and get ready to craft a beautiful and functional picnic blanket that will elevate your outdoor gatherings to a whole new level of enjoyment.
Key Takeaways:
- Crafting your own picnic blanket allows for personalization and creativity, adding a special touch to outdoor gatherings while showcasing your unique style and craftsmanship.
- By following care tips, your handmade picnic blanket will remain a cherished companion for outdoor leisure, enhancing gatherings and creating memorable moments for years to come.
Read more: How To Wash Picnic Blanket
Materials Needed
Before diving into the crafting process, it’s essential to gather the necessary materials for making your picnic blanket. Here’s a list of items you’ll need to bring your vision to life:
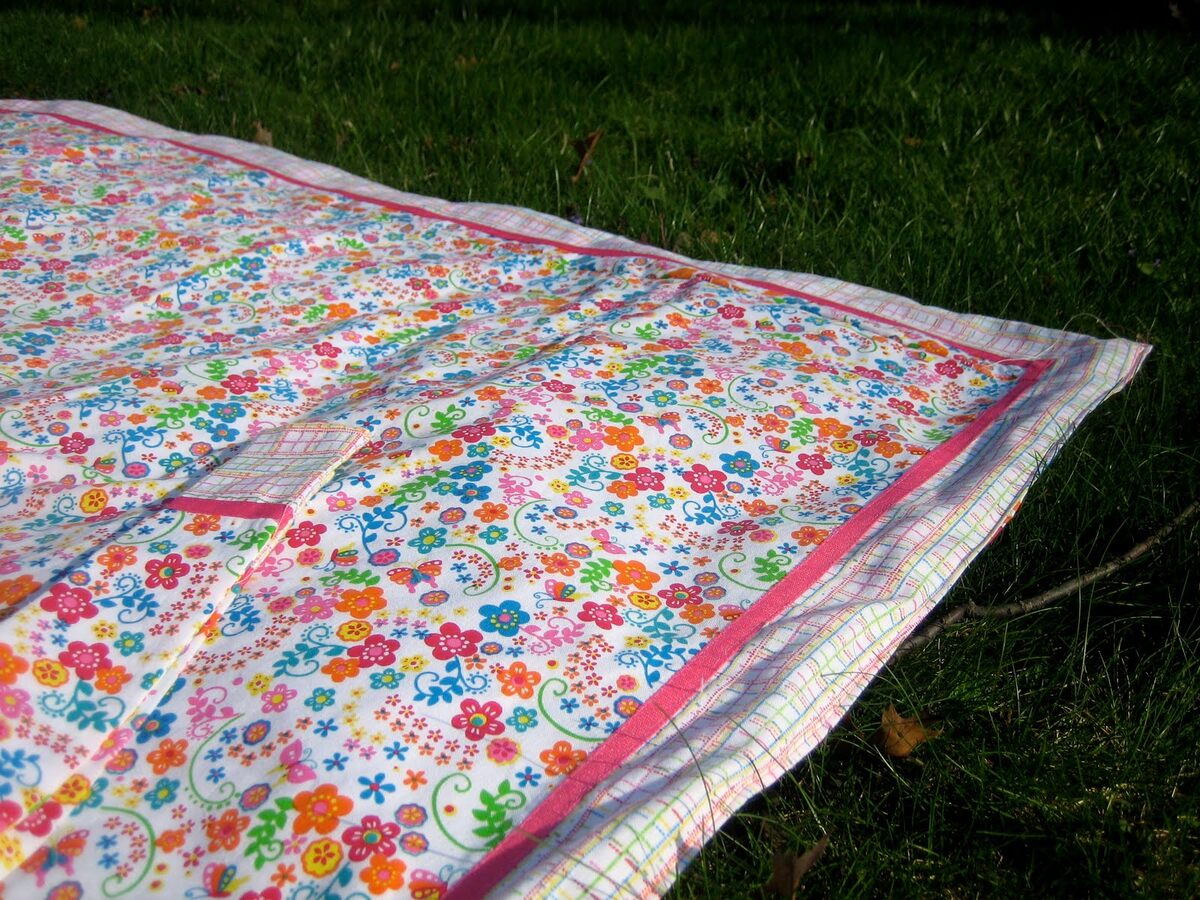
- Fabric: Choose a durable, washable fabric that suits your preferences. Consider the size of the blanket you want to make and ensure you have enough fabric for the top and bottom layers. Cotton, canvas, or outdoor fabric are excellent choices for picnic blankets.
- Thread: Select high-quality, durable thread that complements the color of your chosen fabric. A sturdy thread will ensure the longevity of your picnic blanket.
- Measuring Tape: A flexible measuring tape is essential for accurately determining the dimensions of your blanket and cutting the fabric to the desired size.
- Scissors: Sharp fabric scissors are a must for clean and precise cutting. Ensure that your scissors are suitable for cutting through the chosen fabric.
- Sewing Machine (optional): While hand-sewing is an option, using a sewing machine can expedite the process and provide neat, secure seams.
- Pins or Clips: These are useful for securing the fabric layers together before sewing, preventing any shifting during the sewing process.
- Waterproof Backing (optional): If you plan to use your picnic blanket on damp grass or surfaces, consider adding a waterproof backing to one side of the blanket to provide a moisture barrier.
- Decorative Elements (optional): If you wish to add a personal touch, consider embellishments such as fabric paint, appliques, or embroidery to customize your picnic blanket.
- Carrying Strap or Bag: To conveniently transport your picnic blanket, consider adding a carrying strap or sewing a complementary bag for storage and portability.
Once you have gathered these materials, you’re ready to embark on the exciting journey of creating your very own picnic blanket. The next step involves bringing these elements together to craft a beautiful and functional outdoor essential.
Steps to Make a Picnic Blanket
Now that you have all the necessary materials at your disposal, it’s time to embark on the creative process of making your own picnic blanket. Follow these step-by-step instructions to bring your vision to life:
- Choose and Prepare the Fabric: Select the fabric for your picnic blanket, ensuring that it is durable and washable. If necessary, pre-wash and iron the fabric to prevent shrinkage and ensure a smooth surface for crafting.
- Determine the Size: Use a measuring tape to determine the desired dimensions of your picnic blanket. Consider the number of people it should comfortably accommodate and the space you have available for outdoor gatherings.
- Cut the Fabric: Using sharp fabric scissors, carefully cut the fabric to the chosen dimensions, ensuring that both the top and bottom layers are equal in size.
- Optional: Add Waterproof Backing: If you anticipate using the picnic blanket on damp surfaces, consider adding a waterproof backing to one side of the fabric to provide protection from moisture.
- Layer and Pin the Fabric: Place the top and bottom layers of the fabric together with the right sides facing inward. Pin or clip the layers together around the edges to keep them in place during the sewing process.
- Sew the Edges: Using a sewing machine or hand-sewing with a durable thread, sew around the edges of the fabric, leaving a small opening to facilitate turning the blanket right side out.
- Turn the Blanket Right Side Out: Carefully pull the fabric through the opening to invert the blanket and reveal the right sides of the fabric. Use a blunt tool, such as a knitting needle, to gently push out the corners for a crisp finish.
- Close the Opening: After turning the blanket right side out, neatly hand-stitch or machine-sew the opening closed to complete the sewing process.
- Optional: Add Decorative Touches: If desired, personalize your picnic blanket by adding decorative elements such as fabric paint, appliques, or embroidery to enhance its visual appeal.
- Attach a Carrying Strap or Bag: For added convenience, consider sewing a carrying strap directly onto the blanket or creating a complementary bag for easy transport and storage.
By following these steps, you’ll have successfully crafted a beautiful and functional picnic blanket that is tailored to your preferences and ready to accompany you on outdoor adventures. Now, it’s time to explore essential tips for using and maintaining your handmade masterpiece.
When making a picnic blanket, choose a durable and washable fabric like canvas or outdoor fabric. Consider adding a waterproof layer underneath to keep the blanket dry and easy to clean.
Tips for Using and Maintaining the Picnic Blanket
Once your picnic blanket masterpiece is complete, it’s important to ensure that it remains in top condition for many outdoor gatherings to come. Here are some valuable tips for using and maintaining your handmade picnic blanket:
- Choose Suitable Locations: When selecting a spot for your picnic, opt for areas with relatively flat and clean surfaces to minimize the risk of dirt or debris transferring onto the blanket.
- Utilize Waterproof Backing: If your picnic blanket is not already equipped with a waterproof backing, consider placing a tarp or waterproof layer underneath it when picnicking on damp grass or soil to prevent moisture from seeping through.
- Shake Off Debris: After each use, gently shake the picnic blanket to remove any loose debris or crumbs. This simple practice helps maintain its cleanliness and prevents particles from settling into the fabric.
- Spot Clean Stains Promptly: In the event of spills or stains, attend to them promptly by spot cleaning the affected area with a mild detergent and water. Blot the stain gently to avoid spreading it further.
- Regularly Launder the Blanket: Depending on the frequency of use, launder the picnic blanket as needed according to the fabric care instructions. Use a gentle cycle and mild detergent to preserve the fabric’s integrity.
- Avoid Direct Heat and Sunlight: When drying or storing the picnic blanket, avoid direct exposure to heat and sunlight, as prolonged UV exposure can cause fading and deterioration of the fabric.
- Store Properly: When not in use, store the picnic blanket in a clean and dry area to prevent musty odors or mildew. If possible, fold it neatly or roll it up and secure it with a carrying strap to maintain its pristine condition.
- Embrace Versatility: Beyond picnics, explore the versatility of your picnic blanket by using it for outdoor concerts, beach outings, or as a cozy layer for stargazing in the evenings.
- Share the Joy of Crafting: If you’ve thoroughly enjoyed the process of making your picnic blanket, consider sharing your crafting experience with friends and family, or even hosting a picnic to showcase your creation.
By incorporating these tips into your picnic blanket care routine, you’ll ensure that your handmade creation remains a cherished companion for outdoor leisure and entertainment. With proper maintenance and thoughtful usage, your picnic blanket will continue to enhance your outdoor experiences for years to come.
Conclusion
Congratulations on successfully crafting your very own picnic blanket! By engaging in this creative endeavor, you’ve not only personalized an essential outdoor accessory but also infused it with your unique style and craftsmanship. As you venture into the great outdoors with your handmade creation, you’ll find that it adds an extra layer of comfort and charm to your picnics, outdoor gatherings, and leisurely moments in nature.
Through the careful selection of durable fabrics, meticulous sewing, and perhaps the addition of personalized touches, you’ve imbued your picnic blanket with character and functionality. The process of making a picnic blanket is a testament to the joy of crafting and the satisfaction of creating something practical and beautiful with your own hands.
As you spread out your picnic blanket in scenic outdoor settings, whether it’s a lush meadow, a sandy beach, or a tranquil park, take pride in knowing that it’s a reflection of your creativity and a symbol of memorable moments shared with loved ones. Your picnic blanket is not just a piece of fabric; it’s a canvas for delightful experiences and cherished memories.
Embrace the versatility of your picnic blanket, using it as a gathering place for shared meals, a cozy spot for relaxation, or a backdrop for outdoor festivities. Its durability and personalized design make it a reliable companion for countless outdoor adventures, adding a touch of warmth and comfort to every occasion.
By following the tips for maintaining and caring for your picnic blanket, you’ll ensure that it remains a beloved fixture in your outdoor escapades for years to come. With proper upkeep and thoughtful usage, your picnic blanket will continue to serve as a testament to your creativity and a source of joy during outdoor leisure activities.
So, as you embark on new outdoor adventures with your handmade picnic blanket, may it serve as a reminder of the joy of crafting, the beauty of the natural world, and the simple pleasures of sharing special moments with those dear to you. Here’s to many more picnics, gatherings, and cherished memories made all the more delightful with your one-of-a-kind picnic blanket.
Frequently Asked Questions about How To Make A Picnic Blanket
Was this page helpful?
At Storables.com, we guarantee accurate and reliable information. Our content, validated by Expert Board Contributors, is crafted following stringent Editorial Policies. We're committed to providing you with well-researched, expert-backed insights for all your informational needs.

0 thoughts on “How To Make A Picnic Blanket”