Articles
How To Make Coconut Oil Candles
Modified: October 27, 2024
Learn how to make coconut oil candles with our informative articles. Create beautiful and natural candles at home with just a few simple steps.
(Many of the links in this article redirect to a specific reviewed product. Your purchase of these products through affiliate links helps to generate commission for Storables.com, at no extra cost. Learn more)
Introduction
Welcome to the world of DIY candles! Making your own candles can be a rewarding and creative endeavor. Not only do candles add a cozy and ambient atmosphere to your space, but they also make fantastic homemade gifts for friends and family. If you’re looking to try something new, why not try making coconut oil candles?
Coconut oil candles are a fantastic alternative to traditional wax candles. Not only do they smell incredible, but they also have several other benefits that make them a popular choice among candle enthusiasts. In this article, we will walk you through the step-by-step process of making your own coconut oil candles.
Before we dive into the process, let’s take a moment to explore the various benefits of using coconut oil as a candle-making ingredient. Coconut oil is a natural and renewable resource that offers a unique set of advantages over traditional candle waxes. It burns cleaner and produces less soot, making it healthier for both you and the environment. Additionally, coconut oil candles have a longer burn time and a more even distribution of fragrance, resulting in a more enjoyable and aromatic experience.
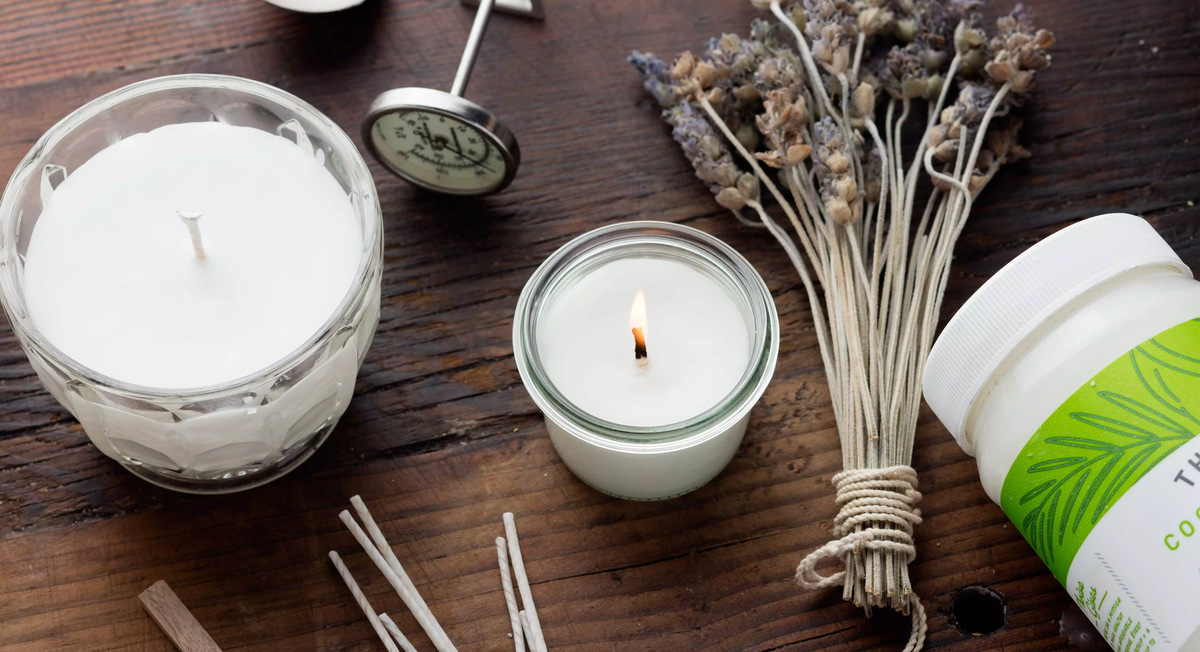
Now that you know why coconut oil candles are worth exploring, let’s gather the materials you’ll need to get started. Don’t worry, the list is short and simple!
Key Takeaways:
- Create cleaner, longer-lasting, and customizable coconut oil candles with natural benefits. Enjoy the process of making personalized candles for a cozy and aromatic atmosphere.
- Embrace the art of candle-making with coconut oil for a rewarding, eco-friendly, and creative endeavor. Explore endless possibilities and share the warmth of homemade candles with loved ones.
Read more: How To Make Massage Oil Candles
Benefits of Coconut Oil Candles
Coconut oil candles offer several unique benefits that set them apart from traditional wax candles. Here are some of the key advantages of using coconut oil as a candle-making ingredient:
- Cleaner and Healthier Burn: One of the biggest advantages of coconut oil candles is that they produce minimal soot when burned. Traditional wax candles, on the other hand, can release black soot particles into the air, which can contribute to poor indoor air quality and respiratory issues. Coconut oil candles provide a cleaner and healthier burn, making them ideal for those with allergies or sensitivities.
- Longer Burn Time: Coconut oil has a higher melting point compared to wax, which means that coconut oil candles have a longer burn time. You can enjoy the gentle flickering glow and wonderful scent of a coconut oil candle for extended periods, making them more cost-effective in the long run.
- Fragrance Distribution: Coconut oil has better fragrance-holding properties compared to traditional candle waxes. This means that coconut oil candles tend to release their fragrance more evenly and consistently throughout the entire burn time. You can enjoy a delightful and long-lasting aroma without any overpowering or weak spots.
- Natural and Renewable Resource: Coconut oil is derived from coconuts, which are abundant and readily available. Using coconut oil as a candle-making ingredient promotes the use of natural and renewable resources, making it an eco-friendly choice for environmentally conscious individuals.
- Easy to Customize: Another benefit of coconut oil candles is that they can be easily customized to suit your preferences. You can add essential oils, dried flower petals, or natural colorants to create unique and personalized candles. The versatility of coconut oil allows you to unleash your creativity and experiment with different scents, colors, and designs.
With these incredible benefits, it’s no wonder that coconut oil candles are gaining popularity among DIY candle enthusiasts. Now that you know why they’re so special, let’s move on to the materials you’ll need to make your own coconut oil candles!
Materials Needed
Before you get started, gather the following materials to make your coconut oil candles:
- Coconut oil: Look for pure, unrefined coconut oil. You can find it at your local grocery store or online.
- Candle wicks: Choose wicks specifically designed for coconut oil candles. They should be lead-free and have a suitable length for your chosen container size.
- Containers: Select heat-resistant containers that can withstand the melting temperature of coconut oil. Mason jars, glass votives, or ceramic containers work well.
- Fragrance oils or essential oils (optional): If you want scented candles, choose high-quality fragrance oils or essential oils that are safe for candle-making.
- Colorants (optional): Natural colorants like dried herbs or flowers can be used to add a touch of color to your candles.
- Candle thermometer: This will help you monitor the temperature of the melted coconut oil to ensure it’s at the right consistency for pouring.
- Double boiler or a heat-safe container and saucepan: You’ll need a way to melt the coconut oil without direct heat. A double boiler set-up or a heat-safe container placed in a saucepan with water works well.
- Stick or skewer: This will be useful for centering and holding the wick in place while pouring the melted coconut oil.
- Scissors: You’ll need scissors to trim the wicks once the candles have cooled and solidified.
Once you have all the necessary materials, you’re ready to start making your coconut oil candles! In the next section, we’ll guide you through the step-by-step process of creating your own beautiful and aromatic candles.
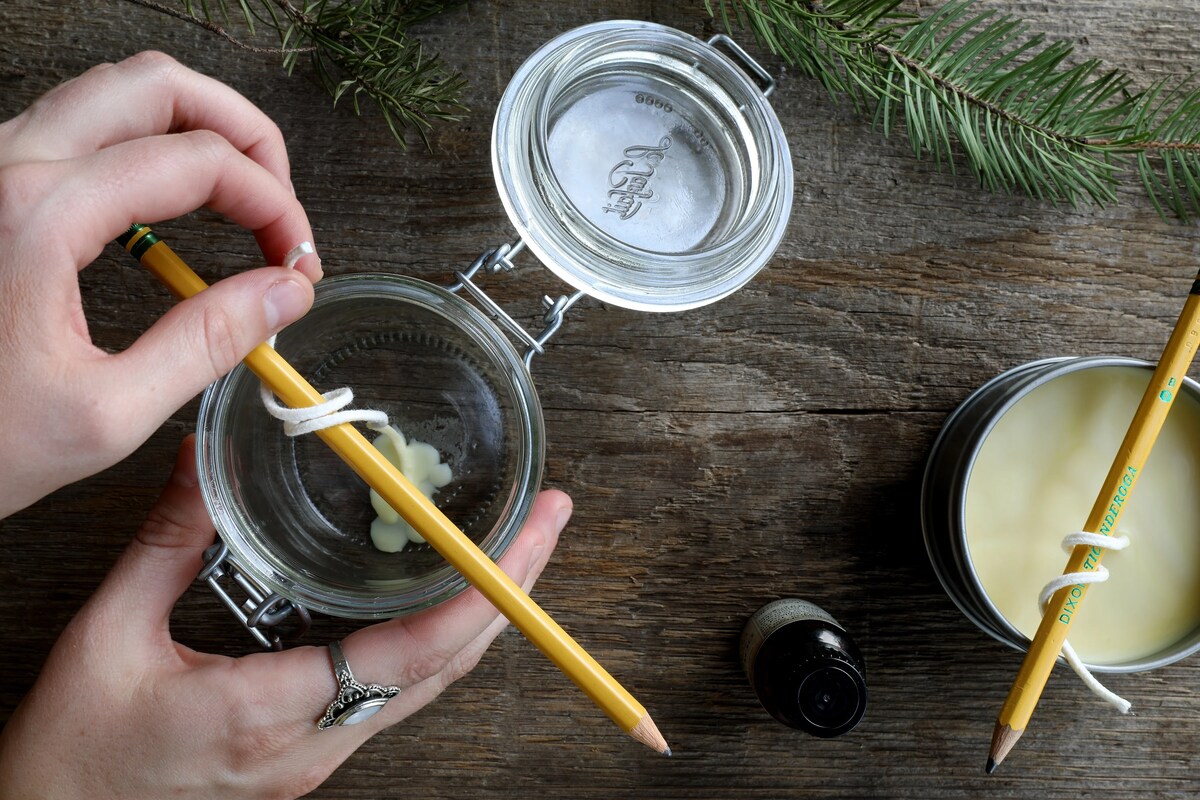
Step 1: Preparing the Container
The first step in making coconut oil candles is to prepare the container that will hold your candle. Here’s what you need to do:
- Clean the Container: Start by ensuring that your container is clean and free from any dirt or debris. Wash it with soap and water, and dry it thoroughly before proceeding.
- Secure the Wick: Take your candle wick and attach it to the bottom of the container. There are a few ways to do this. You can use a small amount of melted wax or a sticky adhesive pad to secure the wick to the center of the container. Alternatively, you can use a hot glue gun to glue the wick tab to the bottom of the container. Make sure the wick is centered and straight.
- Secure the Wick on Top: To ensure that the wick stays in place during the pouring process, you can wrap the top end around a stick or skewer and rest it on top of the container. This will keep the wick taut and centered.
- Prepare Multiple Containers: If you plan to make multiple coconut oil candles, repeat these steps for each container you’ll be using.
By properly preparing the container, you’ll ensure that the wick stays in place and the candle has a secure base. Now that your containers are ready, let’s move on to the next step: melting the coconut oil.
Step 2: Melting the Coconut Oil
Now that you’ve prepared your containers, it’s time to melt the coconut oil. Here’s how:
- Measure the Coconut Oil: Determine the amount of coconut oil you’ll need for your candles based on the size of your containers. A general rule of thumb is to use approximately 1 ounce (30 grams) of coconut oil per 1 inch (2.5 centimeters) of container diameter.
- Create a Double Boiler: Fill a saucepan with a few inches of water and place a heat-safe container on top. Make sure the bottom of the container is not in direct contact with the water. This creates a double boiler setup, which provides gentle and indirect heat for melting the oil. Alternatively, you can use a dedicated double boiler if you have one.
- Add Coconut Oil to the Container: Place the measured amount of coconut oil into the heat-safe container. The heat from the boiling water will gradually melt the solid oil into a liquid state. Stir occasionally with a heat-resistant spatula or spoon to ensure even melting.
- Monitor the Temperature: Use a candle thermometer to monitor the temperature of the melted coconut oil. The ideal temperature range for pouring coconut oil candles is typically between 120°F and 140°F (49°C and 60°C).
- Remove from Heat: Once the coconut oil has completely melted and reached the desired temperature, carefully remove the heat-safe container from the double boiler or turn off the heat source if using a dedicated double boiler. Be cautious when handling the hot container, as it may be hot to the touch.
By properly melting the coconut oil, you’ll ensure that it’s in a suitable consistency for pouring into your prepared containers. In the next step, we’ll guide you through adding the wick to the melted coconut oil.
When making coconut oil candles, use a high-quality, pure coconut oil for the best results. Avoid using coconut oil that has been mixed with other additives or fragrances.
Read more: How To Make Pine Oil For Candles
Step 3: Adding the Wick
Now that you have the melted coconut oil ready, it’s time to add the wick to your containers. Follow these steps to ensure the wick is properly secured in the melted oil:
- Check the Temperature: Before adding the wick, double-check that the melted coconut oil has reached a temperature of around 120°F to 140°F (49°C to 60°C). This temperature range ensures that the oil is not too hot, which could damage the wick or cause the container to crack, and not too cool, which may prevent the wick from adhering properly.
- Dip and Coat the Wick: Carefully dip the top end of the wick into the melted coconut oil. This will help the wick adhere to the candle and stay in place. Gently swirl the wick around in the oil to ensure it is fully coated.
- Center the Wick: With the coated wick, carefully lower it into the prepared container. Keep the wick centered and straight as you lower it into the melted coconut oil. The bottom of the wick should be touching the bottom of the container, aligning with the secured wick at the bottom.
- Hold the Wick in Place: To prevent the wick from moving or leaning while the coconut oil solidifies, use a stick or skewer placed across the top of the container. Wrap the wick around the stick or skewer, making sure to keep it taut and centered.
By following these steps, you’ll ensure that the wick is properly positioned and anchored in the melted coconut oil. The next step involves pouring the coconut oil into your prepared containers. Let’s get started!
Step 4: Pouring the Melted Coconut Oil
With the wick securely in place, it’s time to pour the melted coconut oil into your prepared containers. Follow these steps to ensure a successful pour:
- Prepare a Stable Surface: Place your containers on a stable surface that is heat-resistant and won’t be easily disturbed. This will prevent any accidents or spills during the pouring process.
- Slow and Controlled Pour: Using a steady and controlled motion, pour the melted coconut oil into your containers. Start pouring from the side of the container, allowing the oil to fill up gradually. Avoid pouring too quickly, as this can cause the oil to splash or overflow.
- Fill to Desired Level: Leave a small gap at the top of the container, typically around ½ inch (1.3 centimeters), to allow room for the oil to expand as it solidifies. Fill the containers to your desired level, but be mindful not to overfill.
- Avoid Disturbing the Wick: Take extra care not to disturb the wick while pouring the melted coconut oil. If needed, gently adjust the wick’s position using a stick or skewer.
- Remove any Air Bubbles: After pouring the coconut oil, gently tap the bottom of the container against a hard surface to remove any air bubbles trapped within. This will help ensure an even burn and appearance of the finished candle.
By pouring the melted coconut oil carefully and with control, you’ll create beautiful and evenly filled candles. Now, it’s time to let the coconut oil cool and solidify. Move on to the next step to find out how!
Step 5: Allowing the Candle to Cool and Solidify
Once you have poured the melted coconut oil into your containers, it’s important to allow the candles to cool and solidify. Follow these steps to ensure proper cooling:
- Settle the Wick: Check that the wick is still centered and straight in the container. Gently adjust it if needed, using a stick or skewer.
- Choose an Undisturbed Location: Place the containers in an undisturbed location where they won’t be accidentally bumped or moved. A flat surface away from direct sunlight or drafts is ideal.
- Patience is Key: Allow the candles to cool and solidify completely. The amount of time this takes will vary depending on factors such as the temperature of the room and the size of the candles. Generally, it can take anywhere from a few hours to overnight.
- Do Not Move or Disturb: It’s essential to resist the temptation to move or disturb the candles while they are cooling. Moving them prematurely can cause the wax to ripple or create uneven surfaces.
By practicing patience and allowing the candles to cool undisturbed, you’ll achieve the best results in terms of appearance and performance. Once the candles have solidified, it’s time to move on to the final step: trimming the wick.
Step 6: Trimming the Wick
After the coconut oil candles have fully solidified, it’s important to trim the wick before lighting them. Follow these steps to properly trim the wick:
- Check the Wick Length: Take a look at the length of the wick protruding from the candle’s surface. It’s best to trim it to a length of about ¼ inch (0.6 centimeters) for optimal burning and to prevent excessive smoke or soot.
- Use Scissors or Wick Trimmers: Using a pair of scissors or dedicated wick trimmers, carefully trim the wick to the desired length. Make sure to cut it evenly and avoid leaving any stray pieces of wick behind.
- Remove the Trimmed Wick: After trimming the wick, it’s a good idea to remove the excess wick from the candle’s surface. This will prevent any loose pieces from interfering with the flame when the candle is lit.
By trimming the wick to the appropriate length, you’ll ensure a clean and efficient burn when you light your coconut oil candles. Now, your homemade candles are ready to bring a warm and inviting atmosphere to your space.
Remember, always exercise caution when burning any candles and follow standard safety practices. Never leave a burning candle unattended and keep them away from flammable objects.
With these simple steps, you can enjoy the satisfaction of creating your own coconut oil candles. Get creative with different containers, scents, and colors to personalize your candles and enjoy the calming ambiance they provide.
Happy candle-making!
Read more: How To Store Infused Coconut Oil
Conclusion
Congratulations! You’ve learned how to make your own coconut oil candles from start to finish. By using coconut oil as the main ingredient, you’ve created candles that offer a cleaner burn, longer burn time, and even fragrance distribution. Not to mention, they’re eco-friendly and customizable to suit your preferences.
Throughout the process, you’ve prepared the containers, melted the coconut oil, added and secured the wick, poured the melted oil into the containers, allowed the candles to cool and solidify, and finally, trimmed the wick to the desired length. Each step plays a crucial role in creating beautiful and functional coconut oil candles.
Now that you have your homemade candles, remember to follow proper candle safety practices. Always keep an eye on burning candles, place them on heat-resistant surfaces, and keep them away from flammable objects. With careful attention and care, you can enjoy the comforting glow and delightful scent of your coconut oil candles.
Don’t limit yourself to just one batch of candles. Experiment with different container shapes and sizes, mix various scents, and explore adding natural colorants for a personalized touch. With your newfound knowledge and creativity, the possibilities for creating unique coconut oil candles are endless.
Whether you’re making candles for yourself or as thoughtful gifts, you’ll take pride in the fact that you’ve crafted them with love and care. So go ahead, immerse yourself in the art of candle-making, and let the warm and inviting glow of your homemade coconut oil candles fill your space with tranquility and serenity.
Happy candle-making and enjoy the cozy ambiance!
Frequently Asked Questions about How To Make Coconut Oil Candles
Was this page helpful?
At Storables.com, we guarantee accurate and reliable information. Our content, validated by Expert Board Contributors, is crafted following stringent Editorial Policies. We're committed to providing you with well-researched, expert-backed insights for all your informational needs.


0 thoughts on “How To Make Coconut Oil Candles”