
Articles
How To Move An Upright Piano Upstairs
Modified: August 22, 2024
Learn the step-by-step process of moving an upright piano up stairs in this comprehensive guide. Find helpful articles and tips to ensure a safe and successful move.
(Many of the links in this article redirect to a specific reviewed product. Your purchase of these products through affiliate links helps to generate commission for Storables.com, at no extra cost. Learn more)
Introduction
Moving an upright piano up stairs can be a daunting task. The sheer size and weight of the instrument, combined with the delicate nature of its internal components, make it a challenging endeavor. However, with careful planning, proper equipment, and the assistance of professionals, moving an upright piano upstairs can be done safely and efficiently.
In this article, we will walk you through the step-by-step process of moving an upright piano up stairs. From assessing the feasibility of the move to using proper lifting techniques and navigating through narrow spaces, we’ll cover all the necessary information to help you successfully complete this challenging task.
Before you begin the process, it’s important to determine whether moving an upright piano upstairs is feasible in your specific situation. Consider factors such as the size and weight of the piano, the width and stability of the stairs, and the presence of any obstacles or obstructions. If you have any doubts about the feasibility or safety of the move, it’s best to consult with professionals or consider alternative options.
Once you’ve determined that moving the upright piano upstairs is possible, it’s essential to gather the necessary equipment and tools. This includes heavy-duty straps or harnesses, moving blankets or pads to protect the piano from scratches or damage, and any additional tools needed to detach and reassemble removable parts of the instrument.
Next, you’ll need to measure the stairs and doorways to ensure there is enough clearance for the piano. Take precise measurements of the width, height, and depth of the stairs, as well as any turns or landings along the way. This will help you plan the most efficient route and determine if any modifications or additional assistance are needed.
Securing professional help or hiring a moving company experienced in piano moving is highly recommended. Their expertise and specialized equipment will greatly reduce the risk of damage to the piano and personal injury during the move. If you decide to undertake the task yourself, enlist the help of strong and capable individuals who understand the importance of proper lifting techniques and safety precautions.
Prior to moving the piano, it’s crucial to clear the pathway and remove any furniture, rugs, or other potential obstacles. This will create a safe and unobstructed route for maneuvering the piano. Additionally, take the time to assess the staircase and make any necessary repairs or reinforcements to ensure its stability and load-bearing capacity.
Detaching removable parts of the upright piano, such as the legs, lyre, and music rack, will make the overall weight more manageable and decrease the risk of damage. Refer to the piano’s instruction manual or consult a professional for guidance on safely removing and storing these components during the move.
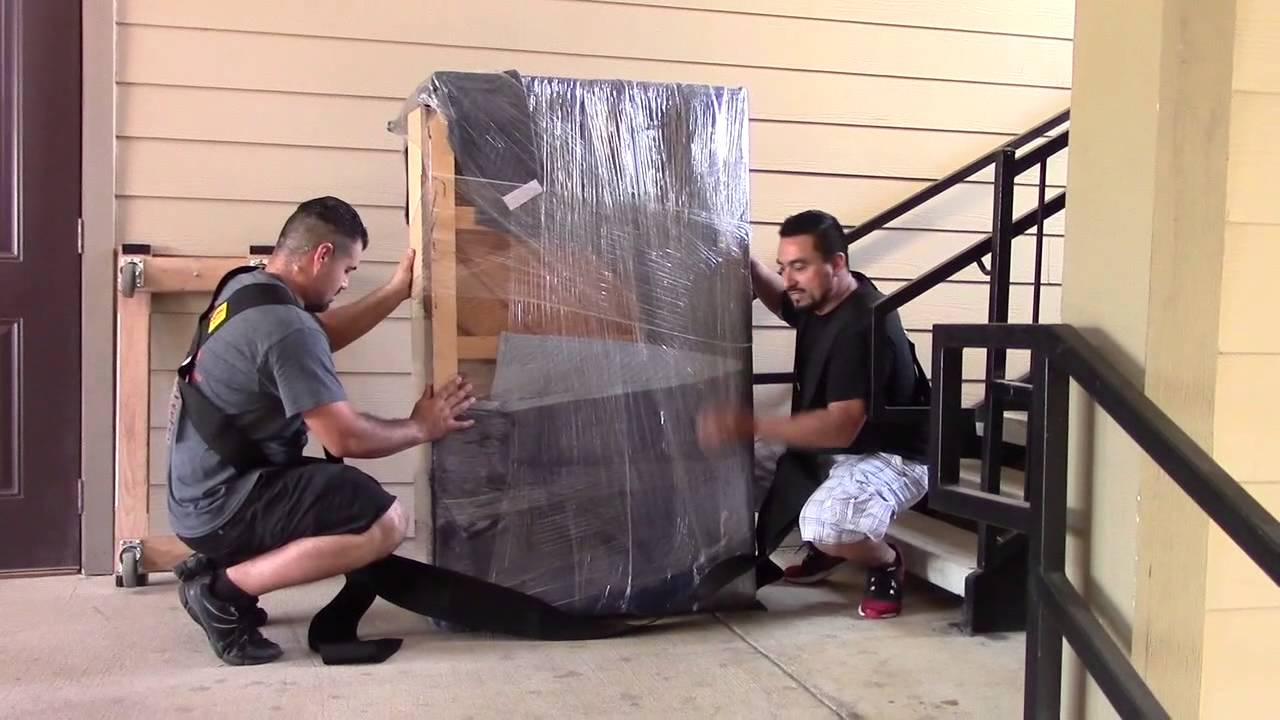
When it comes time to lift and secure the piano, use heavy-duty straps or harnesses designed specifically for moving large and heavy objects. Distribute the weight evenly to avoid putting excessive strain on any one part of the piano. Proper lifting techniques, such as bending at the knees, using your legs and core muscles, and avoiding twisting motions, are essential for preventing injuries and safely navigating the stairs.
Key Takeaways:
- Moving an upright piano upstairs requires careful planning, proper equipment, and prioritizing safety. Professional assistance and proper lifting techniques are crucial for a successful and safe relocation.
- Clearing pathways, detaching removable parts, and using proper lifting techniques are essential for minimizing the risk of damage when moving an upright piano upstairs. Prioritizing safety and seeking professional assistance when needed are key to a successful relocation.
Read more: How To Move Couch Upstairs
Assessing the Feasibility of Moving an Upright Piano Upstairs
Moving an upright piano up stairs requires careful consideration and assessment to determine if it is feasible and safe. Here are some factors to consider before attempting the move:
1. Size and Weight: Upright pianos can vary in size and weight, with some weighing several hundred pounds. It’s crucial to know the exact dimensions and weight of your piano to assess its movability. Measure the height, width, and depth of the piano and compare it to the width and height of the stairs and doorways it needs to pass through.
2. Staircase Width and Stability: Measure the width of the staircase to ensure that there is enough space for the piano to fit comfortably. If the staircase is narrow, it may be challenging to maneuver the piano around tight corners or turns. Additionally, consider the stability of the staircase. Ensure that it is structurally sound and can handle the weight of the piano.
3. Obstacles and Obstructions: Take note of any obstructions along the pathway, such as furniture, doors, or fixtures. These can impede the movement of the piano and increase the risk of damage. Ensure there is a clear and unobstructed route from the piano’s current location to its destination upstairs.
4. Professional Advice: If you are unsure about the feasibility of moving your upright piano upstairs, seek professional advice. Consult with a piano technician, a moving company experienced in piano relocation, or a professional piano mover. They can assess the situation and provide expert guidance on the best course of action.
5. Accessibility: Consider the accessibility of the stairs and the surrounding area. Are there any tight spaces or low ceilings that may pose a challenge? If the piano needs to be transported through narrow doorways or hallways, ensure that there is sufficient space to maneuver it without causing damage.
6. Personal Safety: Moving an upright piano upstairs can be physically demanding and potentially dangerous. Assess your own physical capabilities and those of anyone assisting you in the move. If you or your helpers are not experienced in lifting heavy objects or have any physical limitations, it may be best to hire professionals to ensure the safety of both the piano and individuals involved.
By carefully considering these factors, you can gauge the feasibility of moving your upright piano upstairs. Remember, it is essential to prioritize the safety of yourself, your helpers, and the piano throughout the entire moving process. If in doubt, consult with professionals who can provide guidance and ensure a successful and stress-free relocation.
Gathering Necessary Equipment and Tools
When embarking on the task of moving an upright piano upstairs, it is crucial to gather the necessary equipment and tools to ensure a safe and successful move. Here are the essential items you will need:
1. Heavy-Duty Straps or Harnesses: These are specifically designed to secure and lift heavy objects like pianos. Make sure to choose straps or harnesses that are strong, durable, and capable of supporting the weight of your piano.
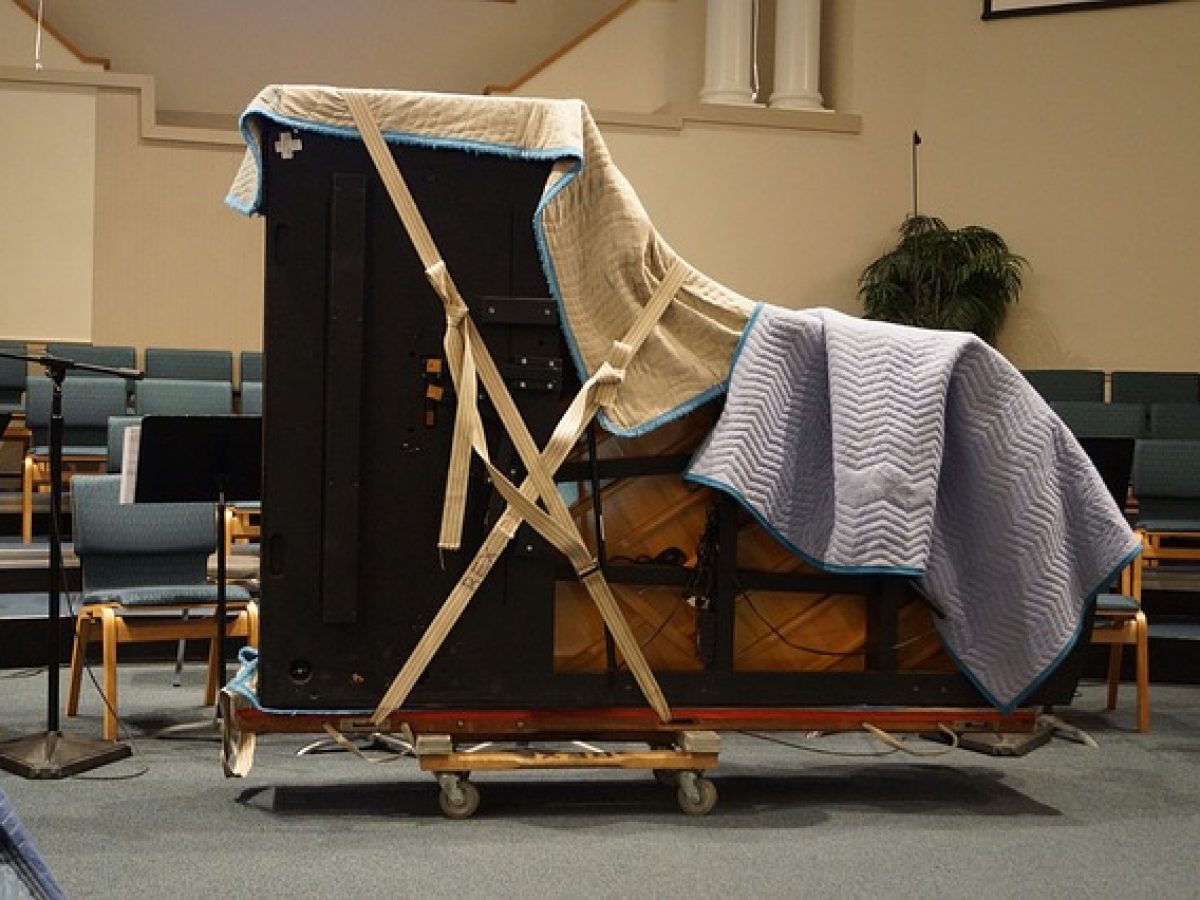
2. Moving Blankets or Pads: These are essential for protecting the piano from scratches, dents, and other damage during the move. Wrap the piano with moving blankets or pads and secure them with tape or straps to provide a protective barrier against potential impact.
3. Piano Dollies: A piano dolly is a specialized moving tool with wheels that allows for easier transport of large and heavy items such as pianos. Look for a piano dolly with sturdy construction and non-slip surfaces to ensure stability during transportation.
4. Tools for Detaching Removable Parts: Depending on your piano model, there may be removable parts such as legs, lyre, or music rack that need to be detached before moving. Gather the appropriate tools, such as wrenches or screwdrivers, to safely remove these components.
5. Packing Materials: In addition to moving blankets or pads, you may need additional packaging materials such as bubble wrap, foam padding, or packing peanuts to further protect delicate parts of the piano during the move.
6. Moving Straps or Securement Devices: Use additional straps or securement devices to keep the piano in place during transportation. These can help prevent the piano from shifting or falling over and minimize the risk of damage.
7. Lifting Equipment: Depending on the weight and size of your piano, you may need additional lifting equipment, such as a furniture dolly or a hydraulic lift, to safely lift and maneuver the piano up the stairs. These tools can reduce the strain on your body and minimize the risk of injuries.
8. Personal Protective Equipment (PPE): Always prioritize safety during the move. Wear sturdy and non-slip footwear, such as work boots, to provide stability while lifting and carrying the piano. Consider wearing gloves to protect your hands and reduce the risk of injury.
When gathering your equipment, ensure that everything is in good working condition and capable of handling the weight and size of your piano. It is also a good idea to have someone assist you in the process, as this will make it easier to handle the equipment and ensure the safety of everyone involved.
By having the necessary equipment and tools on hand, you will be well-prepared to tackle the challenge of moving an upright piano upstairs. Remember to always prioritize safety and take the necessary precautions to protect both the piano and yourself throughout the entire process.
Measuring the Stairs and Doorways for Clearance
Before attempting to move an upright piano upstairs, it is essential to measure the stairs and doorways to ensure there is enough clearance for the piano to pass through comfortably. Here’s a step-by-step guide to help you accurately measure the space:
1. Gather Measuring Tools: You will need a measuring tape, preferably a flexible one that can bend around corners and obstacles, to measure the width, height, and depth of the stairs and doorways.
2. Measure the Staircase Width: Begin by measuring the width of each individual step. Start from the narrowest part of the step, typically the tread, and measure from one side to the other. Do this for each step, as the width may vary from step to step.
3. Measure the Staircase Height: Ascend the staircase and measure the height of each step, also known as the riser. Start from the bottom of the first step and measure up to the top of the next step. Repeat this process for each step, as the height may vary.
4. Measure the Staircase Depth: Measure the depth of each step, also known as the tread. Begin from the back of the step and measure horizontally to the front edge. Again, repeat this process for each step, as the depth may differ.
5. Measure the Staircase Angle: If your staircase has any turns, angles, or landings, it’s crucial to measure these as well. Use a protractor to determine the angle of each turn or landing. This will help you plan the best path for maneuvering the piano.
6. Measure the Doorway Width: Measure the width of any doorways the piano needs to pass through. Measure from the inside edges of the door frame to ensure accuracy. Consider any door frames or moldings that may reduce the width of the opening.
7. Measure the Doorway Height: Measure the height of the doorway from the floor to the top of the door frame. Take note of any higher or lower clearance areas within the doorway, such as arches or transoms, as these may affect the piano’s ability to pass through.
When measuring, be as precise as possible to ensure there is ample clearance for the piano. It’s important to account for the width and height of the piano itself, as well as any additional space needed for maneuvering and safety purposes. Remember to consider all dimensions, including the widest part of the piano, such as the keyboard or the case.
If the measurements indicate that the piano cannot fit through the stairs or doorways, you may need to consider alternative options, such as hiring professional piano movers or exploring other access points in your home, such as windows or balconies.
By taking the time to measure the stairs and doorways, you can better plan the logistics of moving the upright piano upstairs and minimize the risk of damage or accidents during the process. Remember, safety should always be the top priority when moving heavy and valuable items like pianos.
Securing Professional Help or Hiring a Moving Company
When it comes to moving an upright piano upstairs, securing professional help or hiring a moving company experienced in piano relocation is highly recommended. Here are some key reasons why professional assistance is beneficial:
1. Expertise and Experience: Professional piano movers have extensive experience in handling pianos of all sizes and types. They are familiar with the intricacies of piano moving and have the knowledge and skills to navigate through challenging situations. Their expertise ensures that your piano is handled with care and safely transported upstairs.
2. Specialized Equipment: Moving an upright piano requires specialized equipment and tools. Professional moving companies are equipped with piano skids, dollies, straps, and other necessary equipment to safely lift, secure, and transport the piano. This specialized equipment greatly reduces the risk of damage to the piano and minimizes the strain on the movers.
3. Protection and Insurance: Reputable moving companies carry insurance that covers any potential damages or accidents during the move. This provides peace of mind, knowing that your piano is protected and that you will be compensated in the unlikely event of any mishaps. Professional movers take extra precautions to ensure the safety and security of your piano throughout the entire process.
4. Time and Efficiency: Moving an upright piano upstairs requires careful planning and execution. Professional movers understand the most efficient techniques for disassembling, lifting, and maneuvering the piano through narrow spaces and staircases. Their efficiency saves you time and effort, allowing you to focus on other aspects of the move.
5. Emergency Situations: Moving a heavy and bulky object like a piano can present unexpected challenges, such as accidents or injuries. Professional movers are trained to handle such situations and have protocols in place to ensure the safety of everyone involved. They are prepared to handle emergencies and can resolve any issues quickly and efficiently.
6. Customized Solutions: Every piano moving situation is unique. Professional movers can provide customized solutions based on the specific requirements and constraints of your home. They can assess the layout, dimensions, and any obstacles or challenges you may face during the move. This ensures that the piano is moved safely and efficiently, tailored to your specific circumstances.
While hiring professionals does come with a cost, the benefits and peace of mind they provide outweigh the potential risks and challenges of moving an upright piano upstairs on your own. However, if you opt to undertake the task yourself, ensure that you have a team of capable individuals who understand the importance of proper lifting techniques and safety precautions.
Remember to research and choose a reputable and experienced moving company that specializes in piano relocation. Read online reviews, ask for recommendations, and check for any certifications or affiliations within the industry. With professional help, you can ensure the safe and secure transportation of your upright piano to its new location upstairs.
Read more: How To Move A Washing Machine Upstairs
Clearing the Pathway and Ensuring Safety Measures
Before moving an upright piano upstairs, it is crucial to clear the pathway and implement safety measures to ensure a smooth and accident-free relocation. Here are some important steps to take:
1. Remove Obstacles and Furniture: Clear the entire pathway from the current location of the piano to its destination upstairs. Remove any furniture, rugs, plants, or other objects that may obstruct the movement of the piano. This will create a clear and unobstructed route for maneuvering the instrument.
2. Secure Loose Carpeting or Flooring: Check for any loose carpeting, rugs, or slippery flooring along the pathway. Secure them firmly to the floor or temporarily remove them to prevent tripping hazards or instability under the weight of the piano. Smooth and level surfaces are essential for safe piano transportation.
3. Double-Check Staircase Stability: Assess the stability and condition of the staircase before moving the piano. Ensure that there are no loose steps, broken handrails, or other potential hazards that may compromise safety. Repair any issues or reinforce the staircase to enhance stability and ensure it can support the weight of the piano.
4. Cover Doorways and Corners: Protect the edges of doorways, corners, and walls along the pathway by using corner guards or padding. These protective measures will prevent the piano from accidentally scraping or damaging the walls during the move.
5. Check Lighting and Visibility: Adequate lighting is essential to ensure good visibility along the pathway, especially if the move is happening in low-light conditions or at night. Make sure all areas are well-lit to minimize the risk of tripping or accidents while moving the piano.
6. Communicate and Coordinate: If multiple people are involved in the move, establish clear communication and coordination. Assign specific roles and responsibilities to each person to ensure a synchronized and safe movement of the piano. Use verbal cues or hand signals to communicate effectively during the process.
7. Use Proper Lifting Techniques: Before lifting the piano, ensure that everyone involved understands and follows proper lifting techniques. Bend at the knees, use your legs and core muscles to lift, and avoid bending or twisting your back. Distribute the weight evenly and communicate with your team to coordinate and execute the lift safely.
8. Take Breaks and Hydrate: Moving an upright piano upstairs is physically demanding, and it’s important to take regular breaks to rest and hydrate. Overexertion can lead to fatigue, decreased focus, and injuries. Listen to your body and communicate with your team to ensure everyone stays safe and healthy throughout the process.
By clearing the pathway and implementing these safety measures, you create a safer environment for moving the upright piano upstairs. These precautions reduce the risk of accidents, protect the piano from damage, and prioritize the well-being of those involved in the move.
Remember, if you are unsure about your ability to move the piano safely or encounter any unexpected challenges, it is best to seek professional assistance. Professional piano movers have the expertise, equipment, and experience to ensure a smooth and secure relocation of your upright piano upstairs.
Detaching Removable Parts of the Upright Piano
Before moving an upright piano upstairs, it is often necessary to detach certain removable parts to make the overall weight more manageable and reduce the risk of damage. Here are the steps to safely detach these parts:
1. Refer to the Instruction Manual: Consult the instruction manual for your specific upright piano model, if available. The manual will provide guidance on which parts are removable and how to detach them safely. If you don’t have the manual, you can try searching for the manufacturer’s instructions online or contact a professional for guidance.
2. Prepare a Clean and Safe Workspace: Find a clean and spacious area to lay out the detachable parts. Use a soft and padded surface, such as a blanket or carpet, to prevent any scratches or damage to the parts. Ensure that the workspace is well-illuminated for better visibility.
3. Gather the Necessary Tools: Depending on your piano model, you may need specific tools to detach the removable parts. Common tools include wrenches, screwdrivers, or Allen keys. Check the instruction manual or consult a professional to determine the tools required for your specific piano model.
4. Protect the Piano: Before detaching any parts, take measures to protect the main body of the piano. Cover the piano with moving blankets or padding to prevent any scratches or dents during the detachment process. Secure the blankets or padding with tape or straps to keep them in place.
5. Start with the Legs: Most upright pianos have detachable legs. Locate the screws or bolts that secure the legs to the piano. Use the appropriate tools to loosen and remove these screws or bolts, ensuring that each leg is detached carefully. Place the legs aside in a safe location.
6. Remove the Lyre and Music Rack: Some upright pianos have a lyre, which is the decorative piece that holds the pedals, and a music rack where sheet music is placed. Refer to the instruction manual or consult a professional to learn how to detach these parts properly. Use the necessary tools to loosen and remove any screws or bolts holding them in place.
7. Label and Store Detached Parts: As you detach the parts, label them or keep them organized to ensure easy reassembly later. Store the detached parts in a safe place where they won’t get damaged or lost during the move. Wrap them in protective material to prevent any scratches or other damage.
8. Reinforce the Main Body: Once the removable parts have been detached, reinforce the main body of the piano to ensure its stability during the move. This can include using straps or securement devices to keep the lid closed and securing any loose panels or covers.
Remember, if you are unsure about detaching any parts of your upright piano or encounter any difficulties, it is best to seek professional assistance. Piano technicians or movers with experience in upright piano relocation can provide guidance and ensure the safe removal and storage of removable parts.
By properly detaching the removable parts, you reduce the weight and size of the piano, making it easier to navigate the stairs and reduce the risk of damage. Taking the necessary precautions during this process will help ensure a successful and stress-free move of your upright piano upstairs.
Use a heavy-duty dolly and straps to secure the piano. Have at least 4 strong people to lift and guide the piano up the stairs, taking breaks as needed.
Lifting and Securing the Piano with Straps or Harnesses
When moving an upright piano upstairs, it is essential to use the proper lifting techniques and secure the piano with straps or harnesses to ensure its stability and minimize the risk of damage. Here are the steps to safely lift and secure the piano:
1. Gather the Necessary Equipment: Ensure that you have heavy-duty straps or harnesses that are specifically designed for moving large and heavy objects like pianos. Choose straps or harnesses that are strong, durable, and capable of supporting the weight of your particular piano model.
2. Position the Straps or Harnesses: Position the straps or harnesses under the bottom of the piano, near where the legs were detached. The straps should be placed evenly to distribute the weight and avoid putting excessive strain on one specific area of the piano. Secure the ends of the straps or harnesses to ensure they will not come loose during the lifting process.
3. Ensure Proper Weight Distribution: Check that the weight is evenly distributed before lifting the piano. An uneven weight distribution can lead to instability and potential damage. Adjust the straps or harnesses as needed to ensure a balanced load.
4. Communicate and Coordinate: If multiple people are involved in lifting the piano, ensure clear communication and coordination. Assign specific roles to each person and establish signals or verbal cues to ensure a synchronized lift. Coordination is crucial to maintaining control and preventing accidents.
5. Use Proper Lifting Techniques: Before lifting the piano, refresh your knowledge of proper lifting techniques. Bend your knees, not your back, and engage your leg and core muscles to lift. Avoid twisting or jerking motions and maintain a straight back throughout the lift. Lift with your legs, not your back, to minimize the risk of injury.
6. Lift with Care: Once everyone is in position and ready, lift the piano slowly and steadily. Ensure that everyone lifts at the same time and maintains a steady grip on the straps or harnesses. Lift using your legs and core, keeping your back straight and avoiding any sudden movements.
7. Communicate during the Ascent: As you navigate the stairs, communicate with your team and proceed slowly and carefully. Take one step at a time, ensuring that everyone is coordinated and maintaining a firm grip on the piano. Use verbal cues or hand signals to signal for breaks, adjustments, or any obstacles along the way.
8. Secure the Piano: Once you have successfully navigated the stairs, carefully place the piano down on a stable surface. Use additional straps or securement devices to hold the piano securely in place and prevent it from shifting or falling over during transport.
Remember, if you feel unsure about lifting and securing the piano yourself or if it poses a significant risk due to its weight or size, it is best to seek professional assistance. Experienced piano movers have the expertise, equipment, and training to safely handle the lifting and securing of upright pianos.
By following these steps and using the proper lifting techniques and securement methods, you can ensure the safety and stability of the piano while moving it upstairs. Prioritizing safety throughout the entire process is crucial to protect both yourself and the valuable instrument you are relocating.
Using Proper Lifting Techniques to Safely Navigate the Stairs
Moving an upright piano upstairs requires not only proper lifting techniques but also careful navigation of the stairs to ensure the safety of both the movers and the piano. Here are the steps to safely navigate the stairs using proper lifting techniques:
1. Assess the Staircase: Before starting the ascent, carefully assess the condition of the staircase. Look for any loose steps, damaged railings, or potential hazards that may compromise safety. It’s crucial to address any issues or make necessary repairs before attempting to move the piano.
2. Coordinate with Your Team: Clear communication and coordination are essential during the movement of the piano up the stairs. Discuss and plan the strategy beforehand, designating specific roles to each team member. This coordination will help ensure a synchronized effort and reduce the risk of accidents.
3. Bend Your Knees: Before lifting the piano, remember to always bend your knees, not your back. Squat down and use the strength of your legs and core muscles to lift the piano. This technique will help protect your back from strain and reduce the risk of injury.
4. Maintain a Firm Grip: While lifting the piano, maintain a firm grip on the straps or harnesses. Keep your hands and fingers away from any potential pinch points. Avoid gripping too tightly, as this may hinder your stability and dexterity while navigating the stairs.
5. Lift with a Straight Back: Throughout the ascent, maintain a straight back and avoid any twisting or jerking motions. Keep your upper body aligned with your lower body to distribute the weight properly and maintain balance. Any sudden movements or improper posture can increase the risk of accidents.
6. Ascend Step by Step: Take the stairs one step at a time, ensuring that each person is coordinated and in sync with the movement. Ascend slowly and cautiously, allowing each person to adjust their footing and grip at each step. This deliberate approach helps maintain stability and control during the ascent.
7. Use a Spotter, if Possible: If the staircase allows for it, having a designated spotter is beneficial. The spotter can stand alongside the piano and provide guidance, ensuring that it is lifted and navigated with precision and care. They can help communicate any potential obstructions or hazards ahead.
8. Communicate Clearly: Maintain clear and concise communication with your team throughout the entire process. Use verbal cues or hand signals to convey when to pause, adjust, or continue. Pay close attention to any directions or warnings given by your team members to ensure a smooth and safe movement.
Remember, safety should always be the top priority when navigating the stairs with an upright piano. If the stairs prove to be too narrow, steep, or unsafe, it is best to seek professional assistance. Professional piano movers have the expertise and experience to navigate challenging staircases safely.
By using proper lifting techniques, coordinating with your team, and proceeding with caution, you can safely navigate the stairs while moving the upright piano. Prioritize safety, communicate effectively, and take the time needed to ensure a successful, injury-free relocation.
Read more: How To Store A Piano
Maneuvering the Piano Through Narrow Spaces and Corners
When moving an upright piano upstairs, you may encounter narrow spaces and corners that pose challenges during the relocation process. Maneuvering the piano carefully through these areas is crucial to avoid damage to the piano and other surroundings. Here are some steps to successfully navigate narrow spaces and corners:
1. Assess the Pathway: Before attempting to maneuver the piano, carefully assess the pathway and identify any potential obstacles or tight spaces. Take note of the width of the pathway, the size of the piano, and any corners or turns that must be maneuvered.
2. Measure the Piano Width: Measure the width of the piano, including any protrusions such as keys or case decorations. This will help you determine the minimum width needed for the pathway and any potential areas where the piano may require additional maneuvering.
3. Clear the Pathway: Remove any furniture, rugs, or other potential obstacles along the pathway to create a clear and unobstructed space for moving the piano. If necessary, temporarily remove doors or hinges to provide a wider opening for maneuvering.
4. Tilt the Piano if Possible: In some situations, tilting the piano slightly can help navigate tight spaces or corners. However, exercise caution when tilting to avoid putting excessive strain on the piano or destabilizing it. Ensure that all team members are aware of and comfortable with the tilting process.
5. Use Proper Lifting Techniques: When lifting the piano to move it through narrow spaces or corners, remember to use proper lifting techniques. Bend at the knees, engage your leg and core muscles, and maintain a straight back. This will help you maintain better control and minimize the risk of injuries.
6. Communicate and Coordinate: Clear and effective communication with your team is crucial during the maneuvering process. Designate a leader or spotter who can guide the movement of the piano from a vantage point with a clear view of the pathway and corners. Use verbal cues or hand signals to communicate and coordinate movements.
7. Move Slowly and Cautiously: When navigating tight spaces and corners, it is important to move slowly and carefully. Take your time to ensure that the piano is securely held and can be maneuvered smoothly. Rushing can lead to accidents and potential damage to the instrument or surroundings.
8. Protect Surrounding Areas: Use protective measures to safeguard the piano and surrounding walls or objects while maneuvering through narrow spaces and corners. This can include using padding or protective coverings to prevent scratches or dents. Pay attention to any potential pinch points and take care to avoid bumping or scraping against surfaces.
9. Make Adjustments as Needed: Be prepared to make adjustments and modifications to the angle of the piano or the position of team members as you navigate through tight spaces. Flexibility and teamwork are key in finding the best approach to successfully maneuver the piano.
10. Seek Professional Assistance, if Necessary: If the piano cannot be maneuvered safely through a narrow space or corner, it may be best to seek professional assistance. Professional piano movers have the experience, knowledge, and specialized equipment to navigate challenging scenarios safely.
By following these steps and exercising caution, you can successfully maneuver the piano through narrow spaces and corners during the relocation process. Prioritize the safety of the piano, yourself, and your team members to ensure a smooth and damage-free move.
Reassembling the Detached Parts of the Piano
After safely moving an upright piano upstairs, it’s time to reassemble the detached parts to restore the instrument to its original state. Reassembling the piano requires attention to detail and careful handling of the components. Here are the steps to successfully reassemble the detached parts:
1. Retrieve the Detached Parts: Locate the detached parts of the piano that were previously removed, such as the legs, lyre, or music rack. Ensure that these parts are in a safe and easily accessible location.
2. Clean and Inspect the Parts: Before reattaching the parts, take a moment to clean and inspect them. Remove any dust or debris that may have accumulated during the move. Check for any signs of damage or wear, and ensure that the parts are in good condition before proceeding.
3. Align and Position the Parts: Pay close attention to the alignment and positioning of each part. Consult the instruction manual or reference pictures if you’re unsure of the correct placement. Take care to match the screw holes or attachment points on both the piano and the detached parts.
4. Secure the Parts: Once the parts are properly aligned, use the appropriate tools, such as a wrench or screwdriver, to secure them in place. Be mindful of the recommended torque specifications to avoid over-tightening or damaging the parts.
5. Take Time for Adjustments: After attaching each part, take a moment to ensure that it is securely fastened and properly aligned. Make any necessary adjustments to ensure a snug fit and proper functionality. This includes adjusting the tension of the lyre or ensuring that the legs are firmly attached and level.
6. Test the Functionality: Once all the detached parts are reassembled, test the functionality of the piano. Check that the pedals of the piano operate smoothly and that the music rack remains steady. Play a few notes to verify that the piano is in tune and that the sound is unaffected by the reassembly process.
7. Fine-Tune and Make Adjustments: If you notice any issues or inconsistencies during the functionality test, consider contacting a piano technician. They can fine-tune the piano and make any necessary adjustments to ensure optimal performance. Additionally, they can address any concerns or questions you may have about the reassembled parts.
8. Play the Piano with Care: Take care when playing the piano after reassembling the parts. Start with gentle and cautious playing to ensure that everything is functioning properly. Gradually increase the intensity of playing while monitoring for any signs of issues or loose parts.
It’s important to note that reassembling the detached parts of an upright piano can vary based on the specific piano model. If you encounter any difficulties or are uncertain about the process, consult the manufacturer’s instructions or seek professional assistance from a piano technician or experienced piano mover.
By following these steps and exercising patience and precision, you can successfully reassemble the detached parts of the piano and restore it to its original form. Taking the time to properly reassemble the piano ensures its longevity and optimal performance for years to come.
Final Tips and Considerations for Moving an Upright Piano Upstairs
Moving an upright piano upstairs can be a challenging task that requires careful planning, proper equipment, and adherence to safety measures. To ensure a successful and smooth relocation, here are some final tips and considerations:
1. Take Measurements: Accurate measurements of the stairs, doorways, and any other areas the piano needs to pass through are crucial. This helps determine if the piano can physically fit and allows for proper planning of the moving process.
2. Use Protective Coverings: Invest in heavy-duty moving blankets, pads, or other protective coverings to shield the piano from scratches, dents, and other damage during the move. Secure these coverings using tape or straps to ensure they remain in place throughout the process.
3. Prioritize Safety: The safety of both the piano and the individuals involved in the move should be the utmost priority. Use proper lifting techniques, enlist the help of capable individuals, and consider seeking professional assistance if you have any doubts about your ability to safely move the piano.
4. Communicate and Coordinate: Clear communication and coordination among the moving team are essential. Establish a plan and designate specific roles to each team member. Use verbal cues or hand signals to ensure everyone is on the same page during the move.
5. Take Breaks: Moving an upright piano upstairs is physically demanding work. It’s important to take regular breaks to rest, rehydrate, and prevent fatigue. Listen to your body’s signals and pace yourself accordingly to avoid overexertion.
6. Recheck the Staircase Stability: Before initiating the move, double-check the stability of the staircase. Ensure that it can withstand the weight of the piano and any added stress during the process. Reinforce or repair any loose steps or railing that may compromise safety.
7. Consider Professional Assistance: If you’re unsure about the feasibility or safety of the move, or if the piano is particularly large or valuable, consider hiring professional piano movers. They have the experience, specialized equipment, and knowledge to handle the job efficiently and minimize the risk of damage.
8. Plan for Additional Assistance: Moving an upright piano upstairs typically requires more than one set of hands. Ensure that you have enough capable individuals available to assist with the move. Clear communication and coordination among the team are key to a successful relocation.
9. Secure a Pathway: Clear the pathway of any obstacles or potential tripping hazards. Remove furniture, rugs, or other belongings that could impede the movement of the piano. Ensure that the pathway is clear, well-lit, and wide enough to comfortably accommodate the piano and its movers.
10. Consider Insurance: If the upright piano holds significant monetary or sentimental value, consider obtaining insurance coverage for the move. This provides peace of mind and financial protection in case of any unexpected damage or accidents.
Moving an upright piano upstairs requires careful planning, attention to detail, and a focus on safety. By following these final tips and considerations, you can successfully navigate the challenges and ensure a smooth and secure move for your upright piano.
Remember, if you have any doubts about your ability to move the piano safely or encounter any unexpected difficulties, it’s always best to seek professional assistance. Their expertise and experience will help ensure the safety of your piano and a stress-free moving experience.
Conclusion
Moving an upright piano upstairs can be a task that requires careful planning, technical knowledge, and physical strength. Throughout this article, we have covered various aspects of moving an upright piano upstairs, including assessing the feasibility, gathering necessary equipment, measuring spaces, securing professional help, clearing pathways, detaching and reassembling parts, and using proper lifting techniques.
By carefully assessing the feasibility of the move, measuring the stairs and doorways, securing professional help or hiring a moving company, and ensuring safety measures are in place, you can greatly increase the chances of a successful and safe piano relocation.
Clearing the pathway, detaching removable parts, and using straps or harnesses to lift and secure the piano are important steps for minimizing the risk of damage. Additionally, understanding how to navigate narrow spaces and corners and properly reassembling the detached parts are critical for a smooth transition.
Throughout the process, it is essential to prioritize safety for both yourself and the piano. Communicate effectively, use proper lifting techniques, and seek professional assistance if needed. Taking breaks, staying hydrated, and being mindful of your physical limitations will help prevent injuries and ensure a successful move.
In conclusion, moving an upright piano upstairs is a challenging endeavor that requires careful planning, proper equipment, and adherence to safety measures. By following the guidelines and tips outlined in this article, you can navigate through the complexities, reduce the risk of damage, and ensure the safe relocation of your upright piano.
Remember, if you feel unsure or overwhelmed at any point during the process, it is always recommended to seek professional assistance from piano technicians or experienced piano movers. Their expertise and experience can alleviate much of the stress and ensure a seamless and successful move.
With the right preparations and execution, you can safely and efficiently move your upright piano upstairs, preserving its beauty and ensuring continued enjoyment for years to come.
Frequently Asked Questions about How To Move An Upright Piano Upstairs
Was this page helpful?
At Storables.com, we guarantee accurate and reliable information. Our content, validated by Expert Board Contributors, is crafted following stringent Editorial Policies. We're committed to providing you with well-researched, expert-backed insights for all your informational needs.








0 thoughts on “How To Move An Upright Piano Upstairs”