
Furniture
How To Pack A Chandelier For Moving
Modified: August 17, 2024
Learn how to properly pack and protect your furniture, including delicate chandeliers, for a seamless and stress-free moving experience.
(Many of the links in this article redirect to a specific reviewed product. Your purchase of these products through affiliate links helps to generate commission for Storables.com, at no extra cost. Learn more)
Introduction
Moving can be a daunting and stressful task, especially when it comes to packing delicate and valuable items such as chandeliers. These exquisite lighting fixtures not only add elegance and charm to our homes but often come with intricate designs and fragile materials. Properly packing a chandelier is essential to ensure its safety during transportation and to avoid any damage or breakage.
In this article, we will guide you through the step-by-step process of packing a chandelier for moving. From gathering the necessary supplies to safely transporting and unpacking the chandelier, we will provide you with valuable tips and techniques to ensure a successful relocation of this beautiful centerpiece.
Before we dive into the packing process, it’s important to mention that if you feel uncomfortable or unsure about handling a chandelier yourself, it’s always best to reach out to professional movers or specialized technicians who can ensure a safe and hassle-free relocation. However, if you choose to take on the task yourself, let’s get started on how to pack a chandelier to ensure it remains intact during the move.
Key Takeaways:
- Safely transporting a chandelier involves careful preparation, proper wrapping, and secure labeling to minimize the risk of damage during a move. Seek professional assistance if unsure about any step.
- Unpacking and reassembling a chandelier requires attention to detail and caution to restore its beauty and functionality in a new space. Consult professionals for guidance if encountering difficulties.
Read more: How To Pack A Mattress For Moving
Gathering the Necessary Supplies
Before you begin packing your chandelier, it’s crucial to gather all the required supplies to ensure a smooth and efficient packing process. Here are the essential items you’ll need:
- Packing Paper: This will be used to wrap delicate parts of the chandelier, providing cushioning and protection.
- Bubble Wrap: Use bubble wrap to provide an extra layer of protection to the chandelier’s crystals, glass components, or any fragile elements.
- Cardboard Boxes: Choose sturdy boxes that are appropriate in size to accommodate the chandelier. It’s advisable to find a box specifically designed for chandelier transport, or you can opt for a double-layered corrugated box.
- Box Inserts and Dividers: These can be useful to separate and secure individual components of the chandelier, preventing them from bumping into each other and causing damage during transit.
- Packing Tape: Use quality packing tape to seal the boxes securely to avoid any accidental openings during transport.
- Zip Ties or Twist Ties: These can be handy for securing loose cords or cables associated with the chandelier.
- Marker: Use a permanent marker to label the boxes for easy identification.
- Packing Gloves: Consider wearing packing gloves to protect your hands and provide a better grip when handling the chandelier.
- Step Stool or Ladder: Depending on the height and location of the chandelier, you may need a step stool or ladder to safely detach it from the ceiling.
- Blankets or Furniture Pads: These can be used to cover and protect the chandelier while it’s being transported in a moving vehicle.
By ensuring you have all the necessary supplies beforehand, you can streamline the packing process and safeguard your chandelier against any potential damage during the move.
Preparing the Chandelier
Before you start the packing process, it’s important to ensure that the chandelier is in optimal condition and properly prepared for the move. Here are the steps to follow:
- Clean the chandelier: Dust and debris on the chandelier can cause scratches or damage during transportation. Use a soft cloth or duster to gently clean all the surfaces of the chandelier, including the crystals or glass components. Avoid using harsh chemicals or abrasive cleaners that could harm the chandelier.
- Take photographs: It’s a good idea to take photographs of the chandelier from different angles before you start disassembling it. This will help you remember how to reassemble it at your new location.
- Inspect for damages: Carefully examine the chandelier for any existing damages or loose parts. Take note of any issues so you can address them before packing. It’s essential to fix any problems before transporting the chandelier to prevent further damage.
- Remove decorative elements: If your chandelier has any removable decorative elements such as crystals or ornaments, carefully detach them and store them separately. Wrap them individually in packing paper or bubble wrap, and label them appropriately.
- Secure loose cables: If there are any loose cables or cords associated with the chandelier, make sure to secure them using zip ties or twist ties. This will prevent them from tangling during transit and minimize the risk of damage.
- Measure the dimensions: Take measurements of the chandelier, including its height, width, and depth. This will help you determine the appropriate size of the box required for packing.
By properly preparing the chandelier, you can minimize the risk of damage and ensure that it is ready for safe and secure packing. Taking the time to clean, inspect, and address any existing issues will contribute to a smooth and successful move for your cherished chandelier.
Detaching the Chandelier from the Ceiling
Before you can pack your chandelier for moving, you’ll need to safely detach it from the ceiling. Here are the steps to follow:
- Turn off the power: First and foremost, turn off the power supply to the chandelier at the circuit breaker or by shutting off the appropriate switch.
- Gather necessary tools: Use a step stool or ladder to reach the chandelier safely. Have a partner or friend help you if needed. Also, have screwdrivers or pliers on hand, depending on the type of chandelier mounting.
- Support the chandelier: To prevent the chandelier from falling or swinging freely, use your free hand to gently hold it or carefully lower it onto a soft surface such as a blanket or folded towel.
- Disconnect the electrical connections: Identify the electrical connections that attach the chandelier to the ceiling wires. Depending on the type of wiring, you may need to unscrew wire nuts, untwist wires, or remove screws that secure the connections.
- Remove mounting hardware: Locate the mounting bracket or screws that secure the chandelier to the ceiling. Use appropriate tools to remove the hardware, ensuring that you have a firm grip on the chandelier to prevent it from falling.
- Lower the chandelier: Once the mounting hardware is removed, lower the chandelier carefully and place it on a soft and padded surface to avoid any damages. If it’s a large or heavy chandelier, ask for assistance or use additional support to ensure a safe descent.
It’s essential to handle the chandelier with care during the detachment process. If you are unsure about the electrical connections or feel uncomfortable performing this task, it’s best to consult with a professional electrician or chandelier specialist. They can ensure the safe and proper disconnection of the chandelier.
Once the chandelier is successfully detached from the ceiling, you can proceed to the next steps of wrapping and packing it securely for the move.
Wrapping the Chandelier Properly
Properly wrapping your chandelier is crucial to protect it from any potential damage during transit. Follow these steps to ensure your chandelier is wrapped securely:
- Start with packing paper: Begin by wrapping the chandelier with packing paper. Start from the top and work your way down, ensuring all parts of the chandelier are covered. Use additional layers of paper for delicate or intricate areas.
- Use bubble wrap for extra protection: Once the chandelier is wrapped with packing paper, apply a layer of bubble wrap around it. The bubble wrap will provide an additional cushioning effect and protect the chandelier from any impacts during the move.
- Secure the wrapping with tape: Use packing tape to secure the packing paper and bubble wrap in place. Make sure the tape is applied tightly but not too tight to avoid damaging the chandelier’s delicate components.
- Wrap individual crystal or glass pieces: If your chandelier has detachable crystal or glass pieces, wrap them individually with packing paper or bubble wrap. This will protect them from scratching or chipping during transport.
- Secure loose parts: If there are any movable parts or components that could come loose during the move, secure them with tape or zip ties. It’s important to ensure that all elements of the chandelier are well-protected and won’t shift during transportation.
Additionally, if you have a particularly large or delicate chandelier, you may want to consider using foam padding or batting to further protect it. Wrap the foam padding around the chandelier before applying packing paper and bubble wrap.
Remember, it’s essential not to wrap the chandelier too tightly, as excessive pressure can damage fragile elements. Strike a balance between providing adequate protection and allowing for some cushioning and movement within the wrapping.
By taking the time to wrap your chandelier properly, you’ll significantly reduce the risk of damage during the moving process and ensure its safe arrival at your new home.
When packing a chandelier for moving, remove any delicate parts and wrap them individually in bubble wrap. Use a sturdy box and plenty of packing material to cushion the chandelier during transit.
Read more: How To Pack A Dresser For Moving
Securing the Chandelier in a Box
Once your chandelier is properly wrapped and protected, it’s time to secure it in a box for transportation. Follow these steps to ensure your chandelier is safely packed:
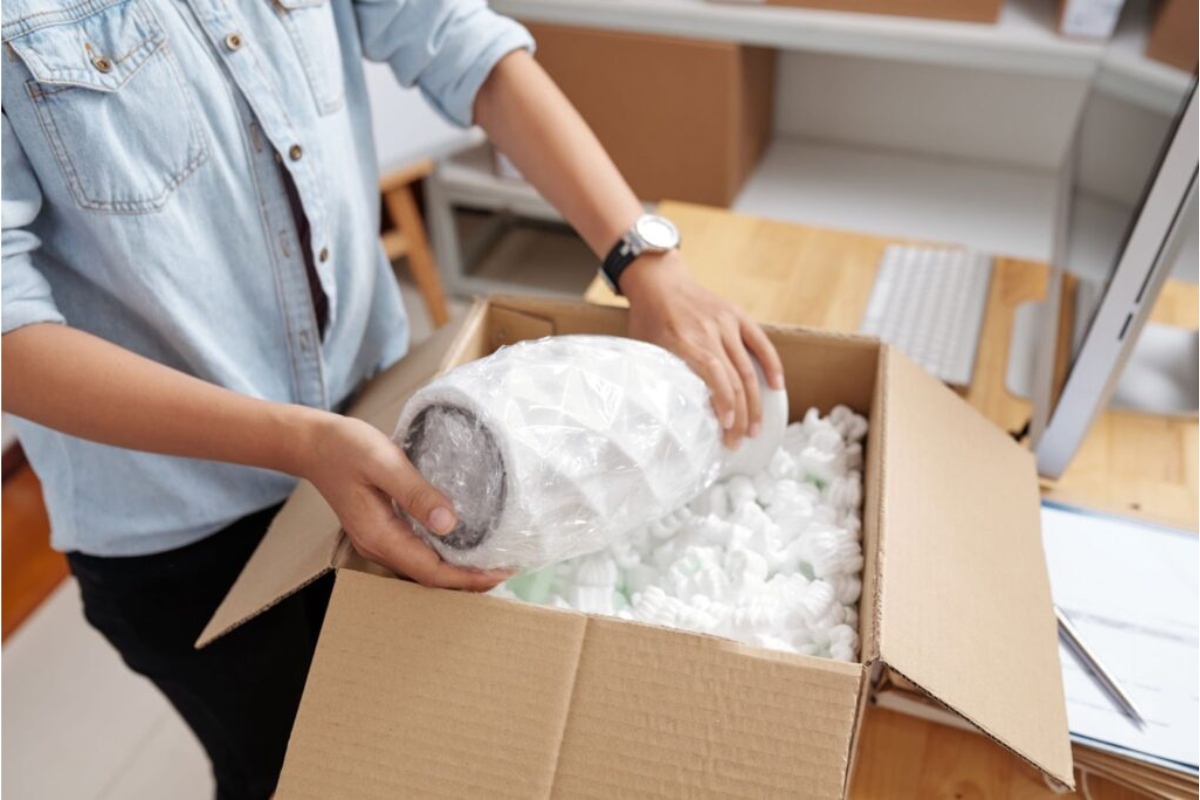
- Choose the right size box: Select a box that is large enough to accommodate the wrapped chandelier and provide some extra space for padding. It’s important not to choose a box that is too small, as this can put excessive pressure on the chandelier.
- Add extra padding: Before placing the chandelier in the box, add a layer of padding at the bottom. This can be in the form of packing paper, bubble wrap, or foam padding. The padding will provide additional cushioning and prevent any movement inside the box.
- Place the wrapped chandelier inside: Carefully place the wrapped chandelier inside the box, ensuring that it is centered and not touching the sides of the box. If there is any empty space remaining after placing the chandelier, use additional padding materials to fill the gaps and provide stability.
- Secure the chandelier: Once the chandelier is in the box, secure it in place using packing paper, bubble wrap, or foam padding. This will prevent the chandelier from shifting during transit and minimize the risk of damage.
- Seal the box: Close and seal the box using high-quality packing tape. Make sure all seams are securely sealed to prevent the box from opening during transportation.
- Label the box: Use a permanent marker to label the box with relevant information, such as “Fragile – Chandelier,” the room it belongs to, and any handling instructions. This will alert movers or anyone handling the box to exercise caution.
It’s important to note that if you have a particularly large or heavy chandelier, it may be necessary to use a crate or custom-built wooden box for added strength and protection. In this case, consult with professional movers or custom crating services to ensure the chandelier is correctly secured.
By securing your chandelier in a well-padded box and properly labeling it, you’ll minimize the risk of damage and ensure it arrives safely at your new location.
Labeling and Handling Instructions for the Box
Properly labeling and providing handling instructions for the box containing your chandelier is essential to ensure that it receives the necessary care and attention during transit. Follow these guidelines to effectively label and provide handling instructions:
- Use clear and visible labeling: Ensure that the label on the box is clear, legible, and easily visible. Use a bold and noticeable font, preferably in a contrasting color, to make it stand out.
- Include the word “Fragile”: Clearly indicate on the label that the contents of the box are fragile. This will alert anyone handling the box to exercise extra caution and care when transporting it.
- Specify “Chandelier”: Clearly state that the box contains a chandelier. This will help ensure that the box is handled appropriately and treated with the necessary care during the moving process.
- Add room identification: Include the name of the room where the chandelier will be placed in your new location. This will help movers or unpackers identify the correct destination for the box.
- Provide handling instructions: If there are any specific instructions or guidelines for handling the chandelier, include them on the label. For example, you might specify “Handle with Care” or “Keep Upright” to guide those responsible for transporting the box.
- Mention weight restrictions: If your chandelier is particularly heavy, indicate the weight on the label. This will ensure that the box is handled by individuals capable of safely lifting and carrying heavier objects.
- Include contact information: Write your name and contact details on the label. This way, in case of any questions or concerns about the handling of the chandelier, the movers or carriers can easily reach out to you for clarification.
- Apply additional warning labels: Consider adding additional warning labels such as “This Side Up” or “Do Not Stack” to further safeguard the chandelier during transportation.
Remember, clear labeling and specific handling instructions will help ensure that your chandelier receives the necessary care and attention throughout the moving process, reducing the risk of damage or mishandling.
Transporting the Chandelier Safely
Transporting your chandelier safely is crucial to ensure its protection during the move. Consider the following steps to ensure a secure transportation process:
- Engage professional movers: If your chandelier is particularly delicate, valuable, or large, it is advisable to hire professional movers with experience in handling fragile items. They have the necessary expertise and equipment to transport your chandelier safely.
- Secure the chandelier in the vehicle: When loading the chandelier into the moving vehicle, make sure it is placed upright and secured to prevent it from moving or shifting during transportation. Use blankets, furniture pads, or straps to hold the chandelier firmly in place.
- Avoid direct contact with other items: Ensure that the chandelier does not come into direct contact with other items during transit. This can be achieved by keeping it separate from other belongings or using dividers to create a designated space for the chandelier.
- Drive with caution: If you are transporting the chandelier yourself, drive with caution to minimize the risk of sudden movements or impacts that could damage the chandelier. Avoid sharp turns, sudden stops, and rough road conditions.
- Consider climate control: If you are moving in extreme weather conditions, such as extreme heat or cold, consider using a climate-controlled moving vehicle. This will help maintain a stable temperature and protect the chandelier from potential damage caused by temperature fluctuations.
- Periodically check on the chandelier: If you are transporting the chandelier yourself, periodically check on its condition during stops or breaks. Ensure that it remains secure and undamaged throughout the journey.
- Insure your chandelier: Consider obtaining insurance coverage for your chandelier during the move. This will provide you with added peace of mind in case of any unforeseen incidents or damages.
Remember, if you are uncertain about safely transporting your chandelier, it is best to consult professionals who specialize in moving delicate and valuable items. They have the expertise and resources to handle your chandelier with the utmost care, ensuring it arrives at its new location unharmed.
By following these guidelines and taking necessary precautions, you can transport your chandelier securely and minimize the risk of damage during the move.
Unpacking and Reassembling the Chandelier
Once your chandelier has safely arrived at its new location, it’s time to unpack and reassemble it. Here’s a step-by-step guide to help you through the process:
- Find a suitable location: Before unpacking the chandelier, choose a suitable location where it will be installed. Make sure the area is clean, free from obstructions, and has appropriate ceiling support to bear the weight of the chandelier.
- Unpack the box with caution: Carefully open the box containing the chandelier, taking care not to damage the wrapping or any fragile components. Remove each layer of wrapping and set them aside safely.
- Inspect for any damages: Once unpacked, inspect the chandelier for any damages that might have occurred during transit. Check for loose parts or any signs of breakage. If you notice any issues, take photographs and contact your moving company for resolution.
- Refer to your photographs: If you took photographs of the chandelier before the move, refer to them now to assist in reassembling the chandelier correctly. Take note of the order and placement of crystals, arms, and other components.
- Reassemble the chandelier: Begin reassembling the chandelier by attaching the crystals or glass components first. Follow the order and placement you noted from the photographs. Take your time and handle each piece with care to avoid any breakage or damage.
- Connect the electrical wiring: If you had disconnected the electrical connections during the packing process, now is the time to reconnect them. Follow the manufacturer’s instructions and use caution when dealing with electrical wiring. If unsure, it’s best to consult a professional electrician.
- Attach the chandelier to the ceiling: Once the chandelier is fully reassembled, carefully mount it to the ceiling. Follow the installation instructions provided with the chandelier, ensuring it is securely fastened and aligned properly.
- Test the chandelier: Before fully completing the installation, turn on the power and test the chandelier to ensure it is functioning correctly. Adjust any loose crystals or elements if needed.
- Properly dispose of packing materials: Dispose of the unpacking materials responsibly, recycling or discarding them appropriately. Ensure they are safely removed from the installation area.
Remember, if you encounter any difficulties or feel unsure about reassembling the chandelier, it’s best to consult a professional chandelier installer or electrician. They can provide expert guidance to ensure the chandelier is assembled correctly and safely.
By following these steps, you can successfully unpack and reassemble your chandelier, restoring it to its former beauty and illuminating your new space.
Read more: How To Pack Pillows For Moving
Conclusion
Moving a chandelier can be a delicate and intricate process, but with the right knowledge and care, you can successfully pack and transport it to your new home. By following the steps outlined in this article, you can ensure the safe and secure relocation of your valuable chandelier.
Throughout the packing process, it’s important to gather the necessary supplies, properly prepare the chandelier, detach it from the ceiling with caution, and wrap it adequately to protect its delicate components. Securing the chandelier in a suitable box and providing clear labeling and handling instructions will further safeguard it during transportation.
When it comes to transporting the chandelier, employing professional movers or handling it yourself with caution will ensure its safety on the journey. And once you arrive at your new location, carefully unpacking and reassembling the chandelier, following any photographs or notes you took prior to the move, will help restore its beauty and functionality in its new space.
Remember, if you are uncomfortable or unsure about any step of the process, it’s always best to seek assistance from professionals experienced in handling chandeliers or consult with a specialized technician for guidance.
By taking the time and care to properly pack, transport, and reassemble your chandelier, you can enjoy the beauty and radiance of this exquisite lighting fixture in your new home, making it a centerpiece that enhances the ambiance and elegance of your living space.
Frequently Asked Questions about How To Pack A Chandelier For Moving
Was this page helpful?
At Storables.com, we guarantee accurate and reliable information. Our content, validated by Expert Board Contributors, is crafted following stringent Editorial Policies. We're committed to providing you with well-researched, expert-backed insights for all your informational needs.


0 thoughts on “How To Pack A Chandelier For Moving”