Articles
How To Quilt For Beginners
Modified: October 20, 2024
Learn the art of quilting for beginners with our informative articles, providing step-by-step guidance and tips to get you started.
(Many of the links in this article redirect to a specific reviewed product. Your purchase of these products through affiliate links helps to generate commission for Storables.com, at no extra cost. Learn more)
Introduction
Welcome to the world of quilting! Whether you’ve been inspired by the stunning quilts you’ve seen or have a desire to create something beautiful and meaningful, this article is here to guide you through the process of quilting for beginners. Quilting is not only a creative and fulfilling hobby, but it also allows you to create functional and personalized pieces of art that can be cherished for generations.
In this article, we will cover the essential steps and techniques needed to get started on your quilting journey. From gathering supplies to finishing touches, each step plays a vital role in creating a beautiful quilt that you will be proud of.
So, let’s dive in and discover the wonderful world of quilting!
Key Takeaways:
- Quilting is a timeless and rewarding craft that allows you to express creativity, connect with a vibrant community, and create beautiful, meaningful pieces of art. Embrace the challenges, enjoy the process, and let your imagination soar!
- From gathering supplies to adding finishing touches, quilting for beginners is a journey of exploration and creativity. Each quilt is a unique reflection of personal style and taste, making it a cherished and fulfilling endeavor.
Read more: How To Machine Quilt For Beginners
Gathering Supplies
Before you embark on your quilting adventure, it’s important to gather all the necessary supplies. Here’s a list of essential items you’ll need:
- Fabric: Choose high-quality quilting fabric in a variety of colors and patterns. Consider the theme and style you want for your quilt.
- Thread: Opt for a durable and high-quality thread that matches or complements your fabric.
- Cutting Tools: Invest in a rotary cutter, cutting mat, and rulers for precise and efficient fabric cutting.
- Needles and Pins: Get a selection of sewing needles for hand stitching and quilting, as well as straight pins for securing fabric layers.
- Quilting Batting: This is the middle layer of the quilt, providing warmth and thickness. Choose batting that suits your desired level of comfort and durability.
- Backing Fabric: Select a fabric for the back of your quilt. Consider using a solid or coordinating pattern that complements your quilt top.
- Quilting Machine or Sewing Machine: Depending on your preference and budget, either a quilting machine or a sewing machine will be necessary for stitching your quilt layers together.
- Quilting Rulers and Templates: These tools help with creating precise shapes and designs on your quilt top.
- Quilting Marking Tools: Use fabric markers or pencils to mark your quilting lines or designs.
- Iron and Ironing Board: An essential tool for pressing fabric and achieving crisp seams.
- Quilting Reference Books or Magazines: These resources are helpful for learning new techniques, finding inspiration, and troubleshooting any issues along the way.
- Storage Containers and Organization Tools: Keep your supplies organized and easily accessible with storage containers, bins, and dividers.
By gathering these essential supplies, you’ll have everything you need to begin your quilting journey.
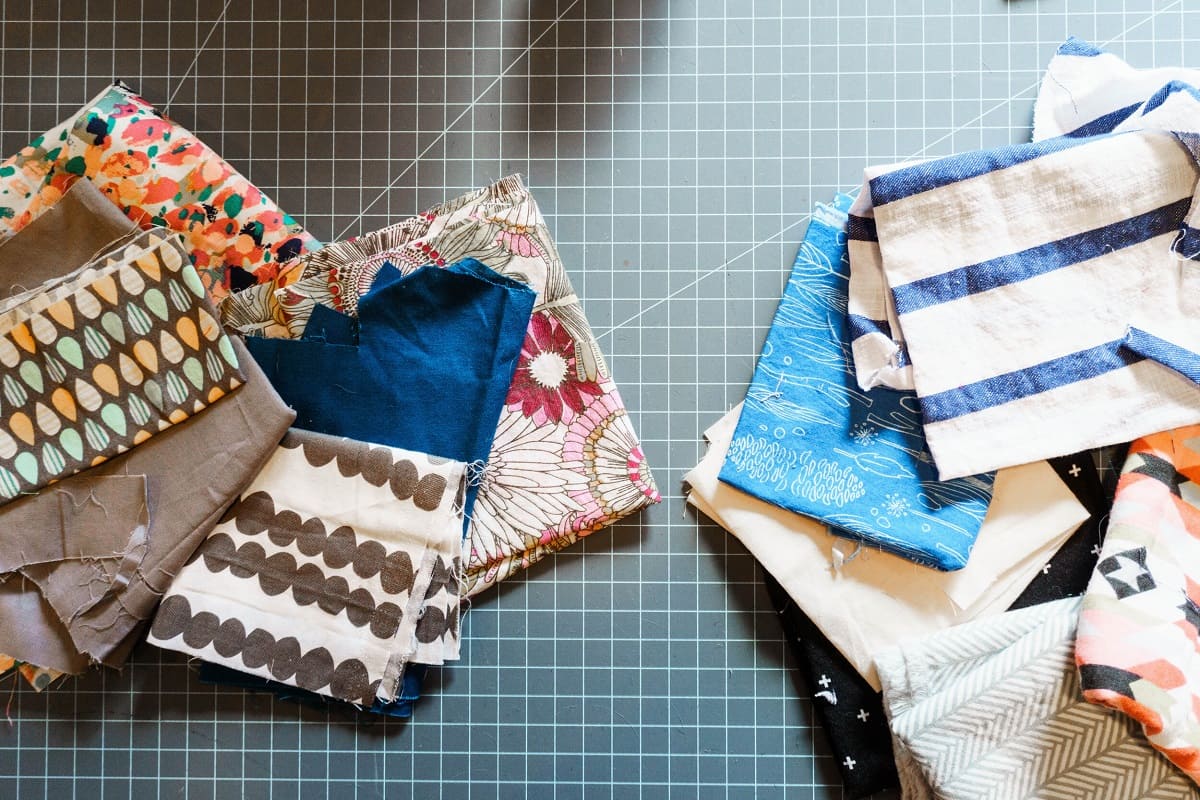
Choosing Fabric
One of the most exciting aspects of quilting is selecting the fabric for your project. The fabric you choose will set the tone and style of your quilt. Here are some tips to help you navigate the fabric selection process:
- Consider Your Quilt’s Purpose: Is your quilt intended for a specific occasion or recipient? If so, consider their preferences and the purpose of the quilt when choosing fabric. For example, soft pastels may be suitable for a baby quilt, while bold and vibrant colors may be more appropriate for a modern quilt.
- Coordinate Colors and Prints: Pay attention to color coordination and fabric prints to achieve a cohesive and visually pleasing quilt. Choose a color scheme that complements each other and consider using fabrics with different scales of prints to add visual interest.
- Quality Matters: Select high-quality fabrics that will withstand the test of time. Quilts are meant to be cherished heirlooms, so investing in durable and long-lasting fabrics is essential.
- Texture and Design: Consider mixing fabrics with different textures and designs to add depth and dimension to your quilt. Consider incorporating solid-colored fabrics, small-scale prints, and larger focal prints for balance.
- Fabric Precautions: If you plan to wash your quilt frequently, be mindful of choosing fabrics that are pre-washed or have minimal shrinkage to prevent distortion after washing. Also, consider using fabrics that are easy to care for and maintain.
- Personal Style and Taste: Ultimately, let your personal style and taste shine through in your fabric choices. Have fun exploring different colors, patterns, and fabric types to create a quilt that reflects your unique personality.
Remember, there are no strict rules when it comes to fabric selection for quilting. Allow yourself to explore and experiment with different combinations until you find the fabric that speaks to you and fits your project vision.
Selecting a Quilt Pattern
The quilt pattern you choose will dictate the overall design and layout of your quilt. Whether you prefer traditional blocks, modern designs, or improvisational piecing, there are countless patterns to choose from. Here are some considerations to help you select the perfect quilt pattern:
- Skill Level: Assess your skill level as a quilter. If you’re a beginner, choose a pattern that is labeled as suitable for beginners. As you gain more experience, you can gradually challenge yourself with more advanced patterns.
- Size and Purpose: Consider the intended size and purpose of your quilt. Are you making a baby quilt, a lap quilt, or a bed-sized quilt? Ensure that the pattern you choose is appropriate for the size you desire.
- Visual Appeal: Look for patterns that resonate with you visually. Whether you prefer geometric shapes, intricate designs, or simple and clean lines, select a pattern that aligns with your personal taste and aesthetic preferences.
- Techniques: Some quilt patterns may involve specific quilting techniques, such as appliqué, paper piecing, or curves. Consider the techniques you’re comfortable with or eager to learn and choose a pattern that aligns with your interests.
- Resources: Take advantage of quilt pattern books, magazines, and online resources. These platforms provide a wealth of inspiration and patterns to choose from. You can also browse through quilt forums and social media groups to see quilts made from different patterns and gather ideas.
- Adaptability: Keep in mind that you can modify and customize quilt patterns to make them your own. Feel free to adjust colors, swap out blocks, or add borders to tailor the pattern to your liking.
Ultimately, the quilt pattern you choose should excite and inspire you. It’s an opportunity to unleash your creativity and express your unique style through the art of quilting. Take your time exploring patterns, and don’t be afraid to step out of your comfort zone to discover new and exciting possibilities.
Cutting Fabric
Accurate cutting is a crucial step in the quilting process. Properly cut fabric pieces ensure that your quilt blocks come together smoothly and accurately. Here are some tips for cutting fabric:
- Preparation: Before you begin cutting, make sure your fabric is pre-washed and pressed to remove any wrinkles and sizing. This will ensure accurate measurements and a clean finish.
- Measure Twice, Cut Once: The old adage holds true in quilting – double-check your measurements before making a cut. Use a quilting ruler and a rotary cutter for precise and even cuts.
- Self-Healing Cutting Mat: Invest in a self-healing cutting mat to protect your work surface and prolong the life of your rotary cutter blade. The markings on the mat will help you align and measure your fabric accurately.
- Use a Rotary Cutter: A rotary cutter provides clean, straight cuts and allows for efficient cutting of multiple layers of fabric. Always use a sharp blade to ensure clean cuts and replace the blade as necessary.
- Square Up the Fabric: Align the selvage edges of the fabric to create a straight line. Use a quilting ruler to trim off the uneven edges, ensuring that the cut edges are at a 90-degree angle to the selvage.
- Follow the Pattern: Refer to your chosen quilt pattern for specific cutting instructions. Pay attention to the size and shape of the fabric pieces required for each block.
- Label Cut Pieces: To keep track of your fabric pieces, use sticky notes or fabric markers to label each piece according to the pattern. This will prevent confusion and make it easier to organize your quilt blocks.
- Organize Cut Pieces: Once you’ve cut your fabric pieces, separate and organize them by block or section. This will make it easier to assemble your quilt top later on.
- Save Your Scraps: Instead of discarding fabric scraps, save them for future projects. Scraps can be used for appliqué, small projects, or even piecing together a scrappy quilt.
Remember to work carefully and patiently when cutting fabric. Take your time to ensure accurate measurements and clean cuts. Proper cutting will set the foundation for a successful quilting project.
Read more: How To Quilt A Table Runner For Beginners
Piecing the Quilt Top
Now that you have your fabric pieces cut and organized, it’s time to piece them together to create the quilt top. Piecing refers to sewing together the individual fabric blocks or units to form the desired design. Here are the key steps to piecing your quilt top:
- Layout: Refer to your quilt pattern for the layout and arrangement of the fabric blocks. Lay out the pieces on a design wall or large flat surface to visualize how they will come together.
- Block Assembly: Start by sewing together the individual fabric pieces within each block according to the pattern instructions. Use a ¼ inch seam allowance and press the seams open or to one side, depending on your preference.
- Row Assembly: Once your blocks are complete, begin sewing the blocks together to form rows. Align the seams and use pins to secure the fabric pieces before stitching.
- Pressing: After each row is sewn, press the seams to set them and create a flat and professional-looking quilt top. Use an iron on a gentle heat setting and press from the back of the fabric to avoid distorting the blocks.
- Joining Rows: Once all the rows are complete, sew them together to form the complete quilt top. As with the block assembly, align the seams and use pins to secure the pieces before stitching.
- Final Pressing: Once the quilt top is fully assembled, give it a final press to ensure all seams are flat and the quilt top is wrinkle-free. Take care not to stretch or distort the fabric while pressing.
Throughout the piecing process, accuracy and attention to detail are crucial. Take your time to ensure precise seam allowances and aligning of fabric pieces. If you encounter any challenges, such as mismatched seams or blocks, don’t panic. Quilting is a forgiving art form, and there are techniques and solutions to fix common issues.
As you finish piecing your quilt top, step back and admire your progress. You’ve successfully brought your fabric pieces together, and your quilt top is starting to take shape!
When starting out, choose simple quilt patterns and fabrics to build your skills. Practice accurate cutting and piecing to improve your quilting technique.
Pressing and Squaring Blocks
After piecing your quilt blocks, the next important step is pressing and squaring them. Proper pressing ensures that your blocks lay flat and helps maintain accuracy when assembling your quilt top. Squaring ensures that all the blocks are the same size and allows for easier alignment during the quilting process. Here are the steps to effectively press and square your quilt blocks:
- Press Seams: Start by pressing the seams on the back of each quilt block. Set the seam by pressing it with an iron, then open it up and press the seam allowances to one side or open, based on your preference or the pattern instructions.
- Use Steam: Use steam to help set the seams and remove any wrinkles. Hold the iron slightly above the fabric surface and release bursts of steam while pressing. Be careful not to stretch or distort the fabric.
- Pressing Direction: Consider the pressing direction to minimize bulk and ensure the blocks fit together smoothly. Alternate the pressing direction on adjacent blocks to easily nest the seams when joining the blocks together.
- Squaring: Lay out one quilt block on a cutting mat, ensuring that the seam lines align with the vertical and horizontal markings on the mat. Use a quilting ruler to trim the excess fabric and square up the block to the desired size.
- Measure and Trim: Carefully measure the dimensions specified in your quilt pattern or the desired size for your blocks. Align the ruler with the edges of the block and trim any excess fabric to create a straight and square block.
- Repeat: Repeat the pressing and squaring process for each quilt block, ensuring that they are all uniformly sized and squared.
Pressing and squaring your blocks may seem like an additional step, but it ensures that your quilt blocks fit together accurately, resulting in a more polished and professional-looking quilt top. Taking the time to press and square the blocks will make the quilting process smoother and yield better end results.
Remember, accuracy is key when pressing and squaring, so take your time and double-check your measurements. With each block properly pressed and squared, your quilt top will be ready for the next step – assembling the quilt sandwich.
Assembling the Quilt Sandwich
After you have pressed and squared your quilt blocks, it’s time to move on to assembling the quilt sandwich. The quilt sandwich consists of three layers: the quilt top, batting, and backing fabric. This step is essential in preparing your quilt for quilting. Here’s how to assemble the quilt sandwich:
- Lay Out the Backing Fabric: Start by laying out your backing fabric on a large, flat surface with the wrong side facing up. Smooth out any wrinkles or creases to create a taut surface.
- Secure the Backing: Use masking tape or quilt basting spray to secure the backing fabric to the surface. This prevents it from shifting while you add the other layers.
- Add the Batting: Place the batting on top of the backing fabric, ensuring it is centered and extends slightly beyond the edges of the quilt top. Smooth out any wrinkles or folds in the batting.
- Layer the Quilt Top: Carefully place the quilt top on top of the batting, making sure it is centered. Smooth out any wrinkles or creases. The right side of the quilt top should be facing up.
- Baste the Layers: To hold the layers together, use safety pins or temporary basting stitches to secure the layers. Begin in the center of the quilt and work your way outwards, spacing the pins or stitches a few inches apart.
- Trim Excess Fabric: Trim the excess batting and backing fabric, leaving a margin of approximately 1-2 inches beyond the quilt top on all sides. This allows room for quilting and binding later on.
Once you have assembled the quilt sandwich, take a step back and check that all layers are smooth and even. Smooth out any wrinkles or puckers as needed. With the layers securely basted, your quilt sandwich is now ready for quilting.
Remember, the quality and stability of your quilt sandwich will impact the ease of quilting and the overall result of your quilt. Take your time to ensure that each layer is smooth and secured properly. Now, you’re ready to move on to exploring different quilting techniques to bring your quilt to life.
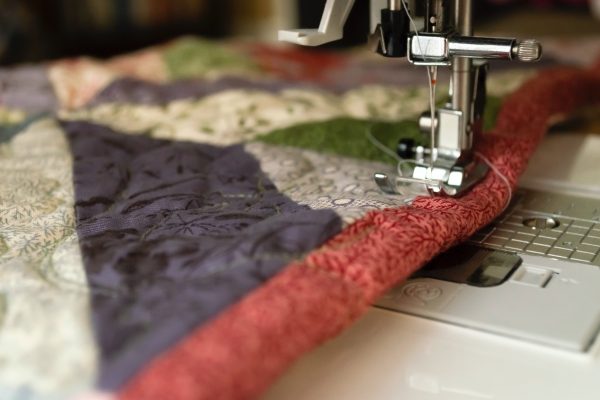
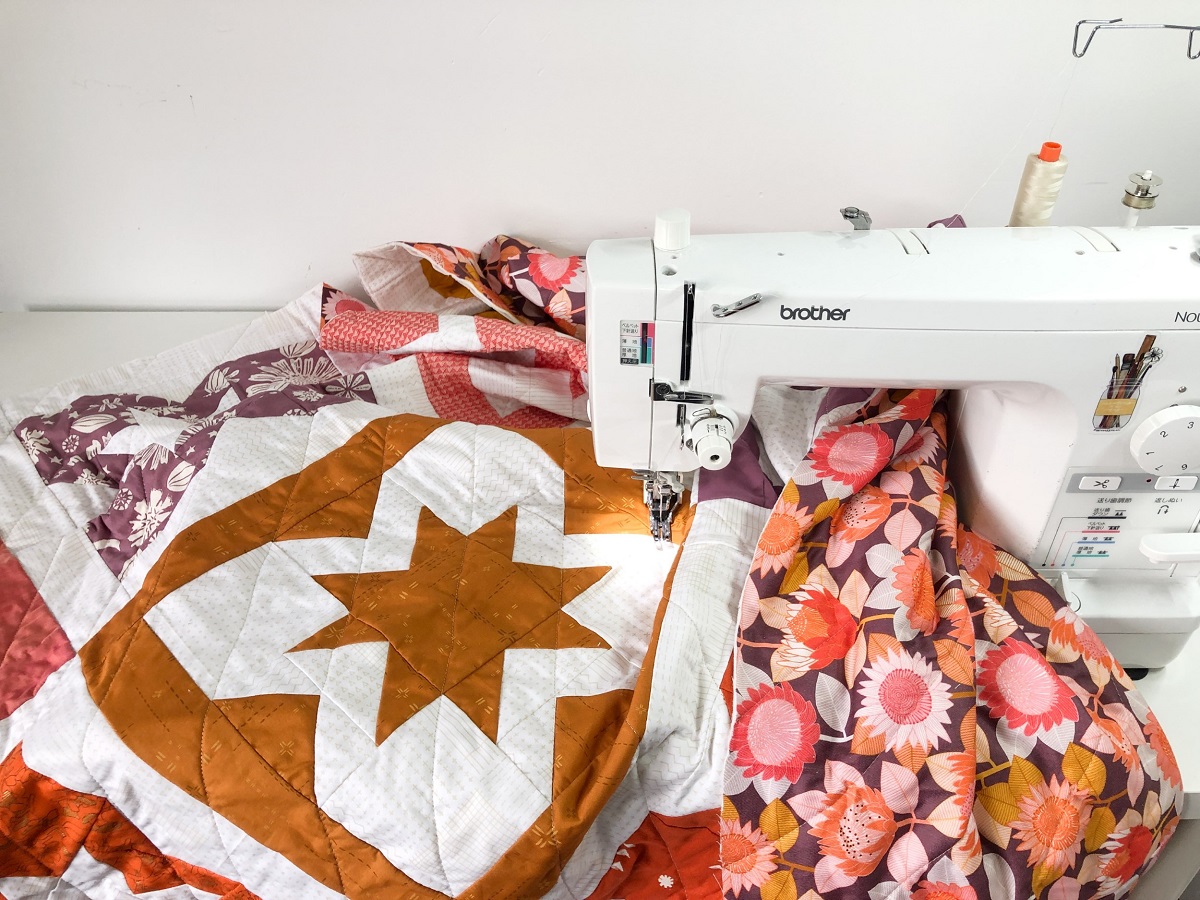
Quilting Techniques
Quilting techniques refer to the stitching patterns or designs used to secure the layers of the quilt sandwich together. Quilting adds texture, durability, and visual interest to your quilt. There are various quilting techniques you can explore to enhance the beauty of your quilt. Here are a few common quilting techniques:
- Hand Quilting: Hand quilting involves stitching the layers together by hand using a quilting needle and thread. This technique allows for intricate and detailed quilting designs. It requires patience and practice but creates a truly handcrafted look and feel.
- Machine Quilting: Machine quilting involves using a sewing machine with a quilting foot or a specialized quilting machine to stitch the layers together. This technique offers greater speed and precision compared to hand quilting. Free-motion quilting and straight-line quilting are popular machine quilting techniques.
- Longarm Quilting: Longarm quilting refers to quilting using a longarm quilting machine, which has a long and adjustable arm. Longarm machines are used by professional quilters or can be rented from quilting studios. This technique allows for large-scale and intricate quilting designs.
- Quilting Stencils and Templates: Quilting stencils and templates are tools used to guide the quilting lines. They come in various shapes and designs, allowing you to create consistent and symmetrical quilting patterns. Simply trace the design onto the quilt top and stitch along the lines.
- Free-Motion Quilting: Free-motion quilting involves using a sewing machine with the feed dogs lowered, allowing you to move the quilt sandwich freely under the needle. This technique allows for creative and unique quilting designs, as you are not restricted by preset stitching lines.
- Straight-Line Quilting: Straight-line quilting involves stitching parallel lines or grids across the quilt top using either a walking foot or regular sewing foot. This technique creates a clean and modern look and is well-suited for geometric designs or minimalist quilts.
- Echo Quilting: Echo quilting involves stitching a series of parallel lines around a shape or motif, creating a surrounding “echo” effect. This technique adds dimension and texture to your quilt, highlighting specific design elements.
These are just a few examples of quilting techniques you can explore. Remember to practice on scrap fabric or make a small quilt sandwich to test out different techniques and find the one that suits your style and desired quilt design. Don’t be afraid to experiment and combine different quilting techniques to create unique and visually stunning quilts.
The quilting process is an opportunity to let your creativity shine and add your personal touch to each quilt. Take your time, enjoy the process, and embrace the joy of quilting.
Binding the Quilt
Binding is the final step in completing your quilt and provides a clean, finished edge. It not only adds durability but also frames and enhances the overall appearance of your quilt. Here’s a step-by-step guide on binding your quilt:
- Prepare the Binding: Determine the width of your binding strip, typically 2.5 inches when folded and sewn. Calculate the total length of binding needed by measuring the perimeter of your quilt and adding a few extra inches for seam allowances and joining the ends. Cut enough fabric strips, generally from the same fabric as the backing or a coordinating fabric, to reach the desired length.
- Joining the Strips: To create continuous binding, join the fabric strips together at a 45-degree angle by matching the raw ends, right sides together. Sew a diagonal seam, trim the excess fabric, and press the seams open or to one side.
- Pressing the Binding: Fold the binding in half lengthwise with wrong sides together and press it to create a crisp fold. Ensure the raw edges are aligned.
- Attaching the Binding: Starting along one side of the quilt, leave a few inches of the binding loose and align the raw edges of the binding with the raw edge of the quilt top. Use pins or Wonder Clips to secure the binding in place.
- Machine Stitching: Using a straight stitch, sew the binding to the front of the quilt, keeping close to the folded edge. Sew all the way around the quilt, mitering the corners for a neat finish. Stop stitching a few inches away from the starting point, leaving a gap for joining the ends.
- Joining the Ends: Trim the excess binding on one end, leaving a small overhang. Fold the other end of the binding back and overlap it onto the trimmed end, creating a neat and even finish. Mark the overlap point, trim the excess, and sew the ends together with a diagonal seam.
- Completing the Stitching: Finish stitching the binding to the quilt, making sure to close the gap left earlier. Backstitch at the start and end of your stitching for reinforcement. Press the binding away from the quilt.
- Finishing Touches: Finally, fold the binding over the raw edge of the quilt to the back and pin or use binding clips to hold it in place. Hand stitch the binding to the back of the quilt using a blind stitch or a whip stitch, taking care to catch only a small amount of the quilt backing with each stitch.
Once the binding is securely in place, trim any excess threads and give your quilt a final press. Admire your finished quilt, knowing that the binding adds the perfect finishing touch.
Remember, practice makes perfect when it comes to binding. It may take a few tries to achieve a consistently even and neat binding. Don’t be discouraged if it takes time to master this skill. With each quilt you make, your binding technique will improve, resulting in beautifully bound quilts.
Finishing Touches
As you near the completion of your quilt, there are a few finishing touches you can add to make your quilt truly special. These final details will enhance the overall appearance and ensure your quilt is ready to be enjoyed for years to come. Here are some finishing touches you can consider:
- Labeling: Adding a label to your quilt is a wonderful way to provide information and a personal touch. Include your name, the date, and any other details you’d like to share. Labels can be made using fabric pens, embroidery, or printed labels.
- Quilt Labels: Adding a label to your quilt is a wonderful way to provide information and a personal touch. Include your name, the date, and any other details you’d like to share. Labels can be made using fabric pens, embroidery, or printed labels.
- Quilt Sleeve: If you plan to hang your quilt, consider adding a quilt sleeve to the back. This narrow fabric tube allows a rod to be inserted for hanging, ensuring your quilt is displayed beautifully.
- Quilting Embellishments: Depending on your style and the theme of your quilt, you can add embellishments such as buttons, beads, or appliqué to enhance certain areas of the quilt top. Be mindful of the practicality and the care instructions for your specific quilt.
- Quilt Care Instructions: Include care instructions for your quilt if it will be gifted or displayed. Provide information on washing and drying to help preserve the quilt’s beauty and longevity.
- Photographing Your Quilt: Capture the beauty of your quilt by taking high-quality photographs. Find good lighting, neatly arrange your quilt, and experiment with different angles to showcase the design and patterns. Share these photographs with pride or use them for future reference.
- Sharing Your Quilt: Sharing your quilt with others is one of the joys of quilting. Display it in your home, give it as a gift to someone special, or enter it into local quilt shows or competitions to inspire and delight others with your creativity.
These finishing touches are the final steps to completing your quilt and adding that personal touch that makes it uniquely yours. Take the time to consider these options and choose the ones that resonate with you and your quilt project.
Congratulations on completing your quilt! Take a step back, admire your hard work, and relish in the knowledge that you’ve created a beautiful and meaningful piece of art.
Conclusion
Congratulations! You have reached the end of this comprehensive guide on quilting for beginners. You’ve learned about the essential steps and techniques needed to create a beautiful and meaningful quilt. From gathering supplies and choosing fabric to piecing the quilt top, pressing and squaring blocks, assembling the quilt sandwich, exploring quilting techniques, binding the quilt, and adding finishing touches, you have gained valuable knowledge and skills to embark on your quilting journey.
Quilting is a timeless and rewarding craft that allows you to express your creativity, create functional works of art, and connect with a vibrant quilting community. Remember, practice is key, and each quilt you make will improve your skills and understanding of quilting techniques.
As you continue your quilting journey, don’t hesitate to explore new patterns, experiment with fabric combinations, and develop your unique style. Quilting is a personal and creative endeavor, and you have the freedom to let your imagination soar.
Enjoy the process of quilting, embrace the challenges and successes along the way, and be proud of each quilt you create. Whether you quilt for yourself, as a gift for loved ones, or to contribute to the quilting community, the joy and sense of accomplishment that comes from quilting are immeasurable.
Now, gather your supplies, choose a pattern or design that speaks to you, and dive into the world of quilting. Let your creativity flourish, and with each stitch, create something truly beautiful, unique, and cherished.
Happy quilting!
Frequently Asked Questions about How To Quilt For Beginners
Was this page helpful?
At Storables.com, we guarantee accurate and reliable information. Our content, validated by Expert Board Contributors, is crafted following stringent Editorial Policies. We're committed to providing you with well-researched, expert-backed insights for all your informational needs.


0 thoughts on “How To Quilt For Beginners”