Articles
How To Machine Quilt A Large Quilt
Modified: August 22, 2024
Learn how to machine quilt a large quilt with our step-by-step articles. Master the art of quilting with expert tips and techniques.
(Many of the links in this article redirect to a specific reviewed product. Your purchase of these products through affiliate links helps to generate commission for Storables.com, at no extra cost. Learn more)
Introduction
Machine quilting is a popular technique used by quilters to add beautiful designs and textures to their quilts. When it comes to quilting large quilts, the process can seem daunting. However, with the right tools, techniques, and a little bit of patience, you can successfully machine quilt a large quilt and create a stunning finished piece. In this article, we will guide you through the step-by-step process of machine quilting a large quilt, from preparing the quilt sandwich to adding the finishing touches.
Quilting a large quilt requires careful planning and attention to detail. It’s important to have a spacious work area and the right equipment to ensure smooth and precise quilting. Before diving into the quilting process, take the time to gather all the necessary supplies and familiarize yourself with the steps involved. Let’s get started!
Key Takeaways:
- Prepare your quilt sandwich with care by pressing the quilt top, trimming the batting, and basting the layers together to create a stable foundation for successful machine quilting.
- Choose the right quilting design that complements your quilt’s theme and style, and enjoy the creative process of quilting the main design and borders to add a personalized touch to your masterpiece.
Read more: How To Wash A Quilt In A Washing Machine
Step 1: Prepare the Quilt Sandwich
Before you begin machine quilting your large quilt, you need to prepare the quilt sandwich. The quilt sandwich consists of three layers: the quilt top, batting, and backing fabric. Here’s how to prepare the quilt sandwich:
- Press the quilt top: Start by pressing your quilt top with an iron to remove any wrinkles or creases. This will ensure smooth and even quilting.
- Trim the batting: Measure and trim the batting to the size of your quilt top. It’s essential to use a high-quality batting that provides the desired loft and durability.
- Prepare the backing fabric: Lay the backing fabric on a flat surface, wrong side up. Smooth out any wrinkles or folds and ensure it’s larger than the quilt top to allow for quilting and binding.
- Layer the quilt sandwich: Begin by placing the trimmed batting on top of the backing fabric. Ensure it’s centered and smooth. Then, carefully place the quilt top on the batting, right side up. Make sure it’s aligned with the backing fabric and batting.
- Baste the layers together: To hold the layers in place during quilting, you’ll need to baste them together. There are several methods you can use, such as safety pins, basting spray, or hand basting with thread. Choose the method that works best for you and secure the layers at regular intervals.
By properly preparing the quilt sandwich, you create a stable foundation for your machine quilting. It’s important to ensure the layers are smooth and securely held together to prevent slipping or shifting during quilting.
Step 2: Choosing the Right Quilting Design
Choosing the right quilting design for your large quilt is a crucial step in the machine quilting process. The design you select will enhance the overall appearance and texture of the quilt. Here are some factors to consider when choosing a quilting design:
- Quilt’s theme and style: Take into account the theme and style of your quilt. Is it traditional, modern, or art-inspired? The quilting design should complement and enhance the quilt’s overall aesthetic.
- Quilt’s purpose: Consider the purpose of the quilt. Is it meant to be an heirloom, a wall hanging, or a functional quilt? The purpose can influence the design choice.
- Quilt size and shape: The size and shape of your quilt may dictate the type of quilting design that works best. For a large quilt, you may want to choose a design that can be easily repeated or adapted to cover a larger area.
- Time and skill level: Assess the amount of time you’re willing to invest in the quilting process and your skill level. Intricate designs may require more time and experience, while simpler designs can be achieved by beginners.
- Personal preference: Ultimately, choose a quilting design that you personally love and feel excited about. Your passion and enthusiasm will shine through in the finished quilt.
There are various types of quilting designs to consider, such as stippling, meandering, straight-line quilting, free-motion quilting, or custom designs. You can also explore pre-designed quilting patterns or create your own. Take the time to research and experiment with different quilting designs to find the one that suits your quilt and quilting style.
Remember, there’s no right or wrong choice when it comes to selecting a quilting design. It’s your quilt, and your creativity should guide your decision-making process.
Step 3: Basting the Layers Together
In order to ensure that the layers of your large quilt stay securely in place during machine quilting, it’s important to properly baste them together. Basting involves temporarily joining the quilt top, batting, and backing fabric so that they don’t shift or wrinkle during the quilting process. Here’s how to baste the layers together:
- Prepare your workspace: Find a large, flat surface where you can lay out your quilt sandwich. A large table or clean floor works well for this purpose.
- Smooth out the backing fabric: Lay the backing fabric on the workspace, wrong side facing up. Smooth out any wrinkles or folds, ensuring the fabric is taut and flat.
- Layer the batting: Place the batting on top of the backing fabric, aligning the edges. Smooth out any wrinkles or creases in the batting to create an even surface.
- Add the quilt top: Carefully place the quilt top on the batting, right side facing up. Align the edges of the quilt top with those of the batting and backing fabric.
- Pin or spray baste: Choose your preferred method of basting. One popular option is using safety pins to hold the layers together. Space the pins approximately 4-6 inches apart across the entire quilt. Another option is using a basting spray, which temporarily adheres the layers together. Follow the instructions on the spray can for best results.
- Check for smoothness and security: Once you have completed the basting process, check that the quilt layers are smooth and secure. Smooth out any wrinkles or puckers, and ensure that the layers are firmly connected.
Basting is a crucial step in the quilting process, as it prevents the layers from shifting or bunching up during machine quilting. Take your time to baste your large quilt thoroughly, ensuring that the layers are secure and ready for quilting.
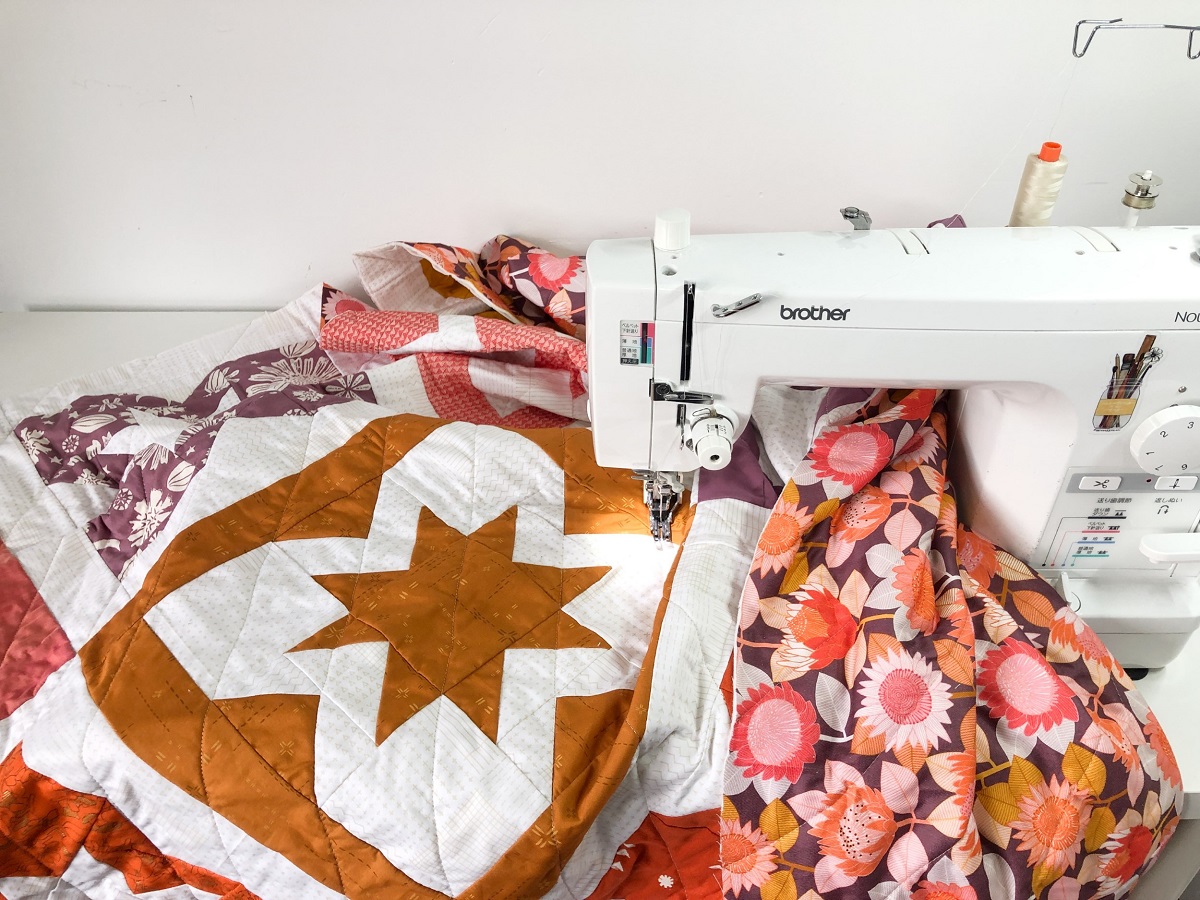
Step 4: Setting up your Sewing Machine
Before you begin machine quilting your large quilt, it’s essential to properly set up your sewing machine to ensure smooth and consistent stitching. Here are the key steps to follow when setting up your sewing machine for quilting:
- Clean and oil your machine: Start by cleaning any lint or debris from your sewing machine, particularly from the bobbin area and needle plate. Then, oil the machine as per the manufacturer’s instructions to keep it running smoothly.
- Choose the right needle and thread: Select a needle suitable for quilting, such as a quilting needle or a universal needle with a sharp point. Consider the thickness of your quilt and choose an appropriate thread weight that will complement your quilting design.
- Install a walking foot or quilting foot: A walking foot, also known as an even feed foot, helps to evenly feed the layers of your quilt through the machine, preventing fabric shifting. If you don’t have a walking foot, a quilting foot or an open-toe foot can also be used for quilting.
- Adjust the stitch length and tension: Set your stitch length to accommodate the quilting design you’ve chosen. Typically, a stitch length of 2.5mm to 3mm is suitable for machine quilting. Adjust the tension according to your machine’s specifications and perform test stitching to ensure the stitches are balanced and even.
- Prepare your machine’s extension table: If you have an extension table for your sewing machine, attach it to provide extra support for the weight of the quilt. This will help prevent the quilt from dragging and causing uneven stitches.
- Thread the machine and bobbin: Use a thread color that complements your quilt top or choose a neutral color for a seamless look. Thread the machine and bobbin following the manufacturer’s instructions, making sure the thread tension is properly adjusted.
Setting up your sewing machine correctly is crucial for successful machine quilting. Taking the time to prepare your machine and ensuring it’s in good working condition will make the quilting process much smoother and enjoyable.
When machine quilting a large quilt, start from the center and work your way out to minimize puckering and ensure even quilting. Use quilting gloves to improve grip and control.
Read more: How To Quilt A Jelly Roll Race Quilt
Step 5: Starting the Quilting Process
Now that you have prepared your quilt sandwich and set up your sewing machine, it’s time to start the machine quilting process. Follow these steps to begin quilting your large quilt:
- Select a starting point: Choose a starting point for your quilting. It’s often recommended to start in the center of the quilt or near the top edge. This allows you to work towards the outer edges, minimizing any fabric bunching or distortion.
- Lower the presser foot: Lower the presser foot of your sewing machine to secure the layers together. This will ensure proper tension and prevent fabric shifting as you quilt.
- Hold the quilt layers taut: As you begin quilting, hold the quilt layers slightly taut with your hands in front and behind the needle. This helps to maintain smooth and even stitches throughout the process.
- Start stitching: Begin stitching along your chosen quilting line or design. Use a consistent speed and apply gentle pressure on the quilt layers to guide them through the machine. Take your time and focus on maintaining a steady pace.
- Practice first: It’s a good idea to practice the quilting design on a fabric scrap before moving to the actual quilt. This allows you to familiarize yourself with the stitching pattern and adjust your technique if needed.
- Continue stitching: Once you are comfortable with the quilting process, continue stitching along your desired path. Take breaks as needed, but try to maintain a consistent quilting rhythm to ensure even stitches and flow.
- Quilt in sections: Depending on the size of your quilt, it may be more manageable to quilt in sections rather than attempting to quilt the entire quilt at once. Quilting in sections allows for better control and helps prevent fabric bunching or distortion.
Starting the quilting process can be exciting and sometimes a bit nerve-wracking. But with practice and patience, you will gain confidence and find your rhythm. Remember to relax, enjoy the process, and embrace any imperfections as part of the handmade charm of your quilt.
Step 6: Quilting the Main Design
Quilting the main design on your large quilt is where your creativity truly shines. This step allows you to showcase your chosen quilting design and add intricate details to enhance the overall visual appeal of your quilt. Follow these steps to quilt the main design:
- Refer to your quilting plan: Take a moment to review your quilting plan or design sketch. This will serve as your roadmap and ensure consistency throughout the quilting process.
- Choose the appropriate quilting technique: Depending on your quilting design, you may need to switch to a specific quilting technique. Options include free-motion quilting, walking foot quilting, or using a quilting ruler for precision.
- Start from the center: Begin quilting the main design from the center of the quilt and work your way outward. This helps distribute any fabric tension and minimizes the risk of puckering or distortion.
- Follow the design lines: Stitch along the design lines of your chosen pattern. Take your time and make smooth, deliberate movements to maintain control and achieve consistent stitching.
- Fill in the design: Once you have stitched the main outlines of your design, fill in the spaces with additional quilting. This could include stippling, pebbling, or any other filler designs that complement your main design.
- Ensure even spacing: Aim for even spacing between your quilting lines or motifs. This creates a balanced and cohesive look across the quilt. You can use quilting guides or spacing templates to achieve consistent spacing.
- Pause and adjust as needed: Periodically step back and review your progress. Make any necessary adjustments to maintain the desired look and ensure your quilting lines are flowing smoothly.
- Take breaks if necessary: Quilting a large quilt can be a time-consuming process. Take breaks to rest your hands and eyes, ensuring that you maintain focus and accuracy throughout the quilting process.
Quilting the main design may require practice and patience, but the end result is worth the effort. Enjoy the creative process, embrace any imperfections, and remember that each stitch adds a unique touch to your quilt.
Step 7: Quilting the Borders
Quilting the borders of your large quilt is an important step that adds the finishing touch to your quilt. The border quilting enhances the overall design, provides stability, and frames the quilt beautifully. Here are the steps to quilt the borders:
- Plan the border design: Decide on the quilting design you want for the borders. It can be a continuation of the main design or a separate pattern that complements the quilt’s overall aesthetic.
- Mark the border: Use a fabric marker or masking tape to mark straight lines or guidelines along the borders. This will help you maintain consistency and ensure even quilting.
- Stitch along the border lines: Start quilting along the marked lines, following the border design you have chosen. Use a walking foot or a quilting foot to ensure smooth and even stitching as you move along the borders.
- Add extra decorative elements: Depending on your preference, you can add extra decorative elements to the border quilting. This may include echo quilting, swirls, feathers, or any other motifs that complement the quilt design.
- Maintain consistent tension and spacing: Pay attention to the tension of your stitches and strive for consistent spacing between your quilting lines in the borders. This will ensure a professional and cohesive look.
- Adjust as needed: Step back periodically to assess your progress and make adjustments as needed. Check that your border quilting is aligned and symmetrical with the rest of the quilt.
- Complete the border quilting: Work your way around the entire quilt, quilting all the borders until you reach the starting point. Take breaks if necessary and take your time to achieve the desired result.
- Secure loose threads: Once you have finished quilting the borders, don’t forget to secure any loose threads by tying them off or burying them within the quilt layers.
Quilting the borders adds a professional and polished look to your large quilt. Take your time, enjoy the process, and let your creativity shine as you quilt the beautiful borders.
Step 8: Finishing Touches
As you near the end of quilting your large quilt, it’s time to add the finishing touches. These final steps will give your quilt a polished and complete look. Here are the steps for adding those finishing touches:
- Trim the excess batting and backing fabric: Use fabric shears or a rotary cutter to trim the excess batting and backing fabric, ensuring that they are even with the edges of the quilt top.
- Prepare the binding: Choose a fabric for the binding that complements your quilt. Cut the binding strips and join them together to create one continuous piece. Fold and press the binding in half lengthwise.
- Attach the binding: Starting on one side of the quilt, align the raw edges of the binding with the edge of the quilt top. Sew the binding in place using a ¼-inch seam allowance, mitering the corners for a clean finish.
- Secure the binding: Fold the binding over the quilt edge to the back, fold under the raw edge, and hand stitch the binding in place using coordinating thread. Alternatively, you can use a decorative stitch on your sewing machine to secure the binding.
- Label your quilt: Add a personalized touch to your quilt by attaching a label that includes your name, the date, and any other significant details about the quilt. This is especially important for future reference or if you plan on gifting the quilt to someone.
- Give it a final press: Gently press your quilt using a steam iron to smooth out any wrinkles and give it a crisp, finished look. Be sure to use a pressing cloth or press from the back to avoid damaging the quilting stitches.
- Enjoy your finished quilt: Now that you’ve completed all the quilting and finishing steps, it’s time to step back and admire your beautiful, finished quilt. Display it with pride or give it as a cherished gift to someone special.
The finishing touches not only complete the look of your quilt but also add durability and longevity. Taking the time to properly trim, bind, label, and press your quilt ensures that it will be enjoyed for years to come.
Read more: How Large Is A Shot Glass
Conclusion
Congratulations! You have successfully machine quilted your large quilt. It may have required time, effort, and patience, but the end result is a beautiful masterpiece that you can be proud of. By following the steps outlined in this article, you were able to prepare the quilt sandwich, choose the right quilting design, baste the layers together, set up your sewing machine, start the quilting process, quilt the main design, quilt the borders, and add the finishing touches.
Machine quilting a large quilt can be an enjoyable and rewarding experience. It allows you to showcase your creativity, attention to detail, and quilting skills. Throughout this process, you have likely encountered challenges and learned valuable lessons along the way. Each quilt is unique, and each quilting journey is a personal one. Embrace any imperfections and remember that they add character to your quilt.
As you continue your quilting journey, don’t be afraid to experiment with different quilting designs, techniques, and styles. Each quilt is an opportunity to refine your skills and explore new possibilities. With practice, your quilting abilities will grow, and your confidence will soar.
Remember, the joy of quilting is not only in the finished product but also in the journey itself. Cherish the moments spent at your sewing machine, creating something with your own hands. Your quilt is a labor of love, and it carries with it the warmth and beauty that only a handmade item can provide.
Whether you keep the quilt for yourself, gift it to a loved one, or even enter it into a quilt show, your machine quilted large quilt is a testament to your dedication and creativity. So, take a moment to savor your achievement and bask in the satisfaction of completing a remarkable quilting project.
Now, it’s time to find your next quilting endeavor and let your creativity soar once again. Happy quilting!
Frequently Asked Questions about How To Machine Quilt A Large Quilt
Was this page helpful?
At Storables.com, we guarantee accurate and reliable information. Our content, validated by Expert Board Contributors, is crafted following stringent Editorial Policies. We're committed to providing you with well-researched, expert-backed insights for all your informational needs.


0 thoughts on “How To Machine Quilt A Large Quilt”