Articles
How To Read Calipers With Dial
Modified: April 22, 2024
Learn how to read calipers with dial accurately and easily with our informative articles. Master the art of using calipers for precise measurements today.
(Many of the links in this article redirect to a specific reviewed product. Your purchase of these products through affiliate links helps to generate commission for Storables.com, at no extra cost. Learn more)
Introduction
Calipers with dial are precision measuring tools used in various industries to measure the dimensions of objects with high accuracy. These tools consist of a sliding jaw, a fixed jaw, and a dial gauge that displays the measurement readings. They are commonly used in fields such as manufacturing, engineering, carpentry, and metalworking.
In this article, we will explore how to read calipers with a dial and understand the different parts of these measuring instruments. We will also provide useful tips and best practices for accurate readings and highlight common mistakes to avoid when using calipers with a dial.
Whether you are a beginner or have some experience with calipers, this guide will help you enhance your understanding and proficiency in using this essential tool for precise measurements.
Key Takeaways:
- Mastering the art of reading calipers with dial is crucial for professionals and enthusiasts in various industries. Proper calibration, attention to incremental lines, and avoiding common mistakes are key to achieving accurate and reliable measurements.
- By understanding the parts of calipers with dial and following best practices, you can confidently use this precision tool for accurate measurements. Take multiple readings, pay attention to incremental lines, and store the calipers properly to maintain accuracy and longevity.
Read more: How Do You Read Calipers
Understanding Calipers With Dial
Calipers with dial, also known as dial calipers or dial gauge calipers, are a type of caliper that incorporates a dial gauge to provide precise measurements. They are designed to measure the distance between two opposite surfaces of an object, such as the diameter of a hole or the thickness of a material.
One of the key advantages of calipers with dial is their high level of accuracy. The dial gauge allows for more precise readings compared to regular vernier calipers or digital calipers. The dial gauge typically has a graduated scale that displays measurements in both inches and millimeters, making it versatile for various measurement systems.
These calipers are commonly used in applications where extremely precise measurements are required, such as in scientific research, engineering projects, and quality control processes. They are also widely used by machinists, metalworkers, and carpenters for precise measurement tasks.
In addition to their accuracy, another advantage of calipers with dial is their ease of use. They have a simple design that makes them suitable for both experienced professionals and beginners. The dial gauge provides a clear and easy-to-read display of measurements, eliminating the need for complex calculations.
Calipers with dial come in various sizes and configurations to accommodate different measurement needs. They can have a sliding or a non-sliding jaw, and the dial gauge can be mounted on the top or the side of the caliper body. The choice of caliper depends on the specific application and the desired level of precision.
Parts of Calipers With Dial
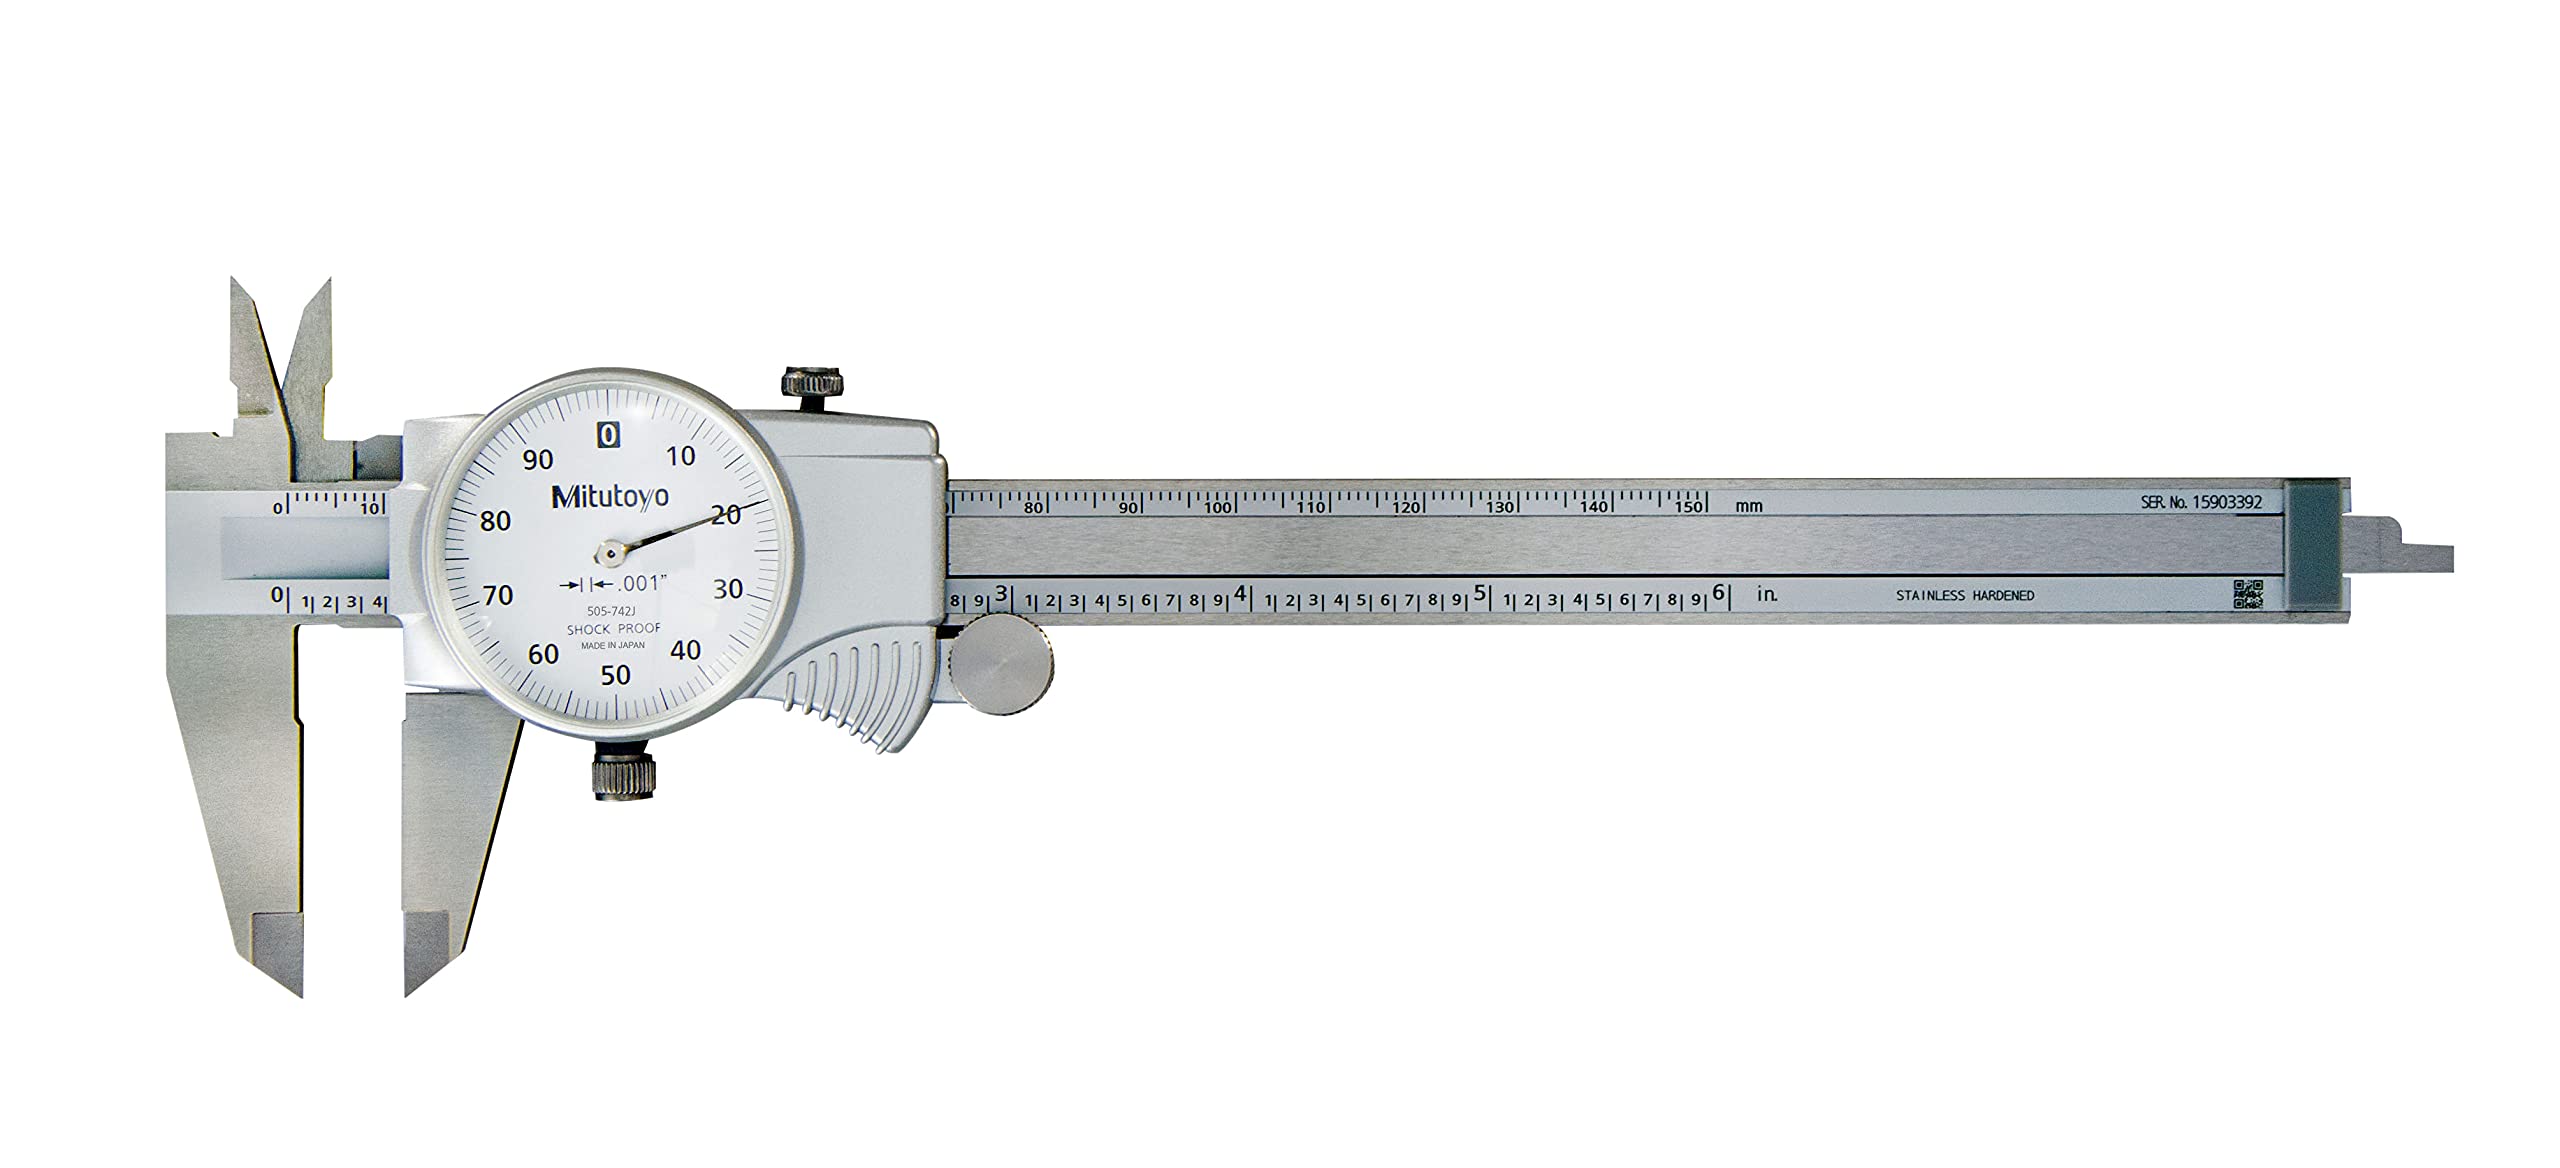
Calipers with dial consist of several key parts that work together to provide accurate measurements. Understanding these parts will help you better navigate and utilize the tool for precise measurements. Let’s explore the main components of calipers with dial:
- Frame: The frame is the main body of the caliper that houses the various components. It provides stability and support to the rest of the parts.
- Sliding Jaw: The sliding jaw is the movable part of the caliper that glides along the frame. It adjusts according to the size of the object being measured.
- Fixed Jaw: The fixed jaw is the stationary part of the caliper that remains in place during measurements. It provides a reference point for accurate readings.
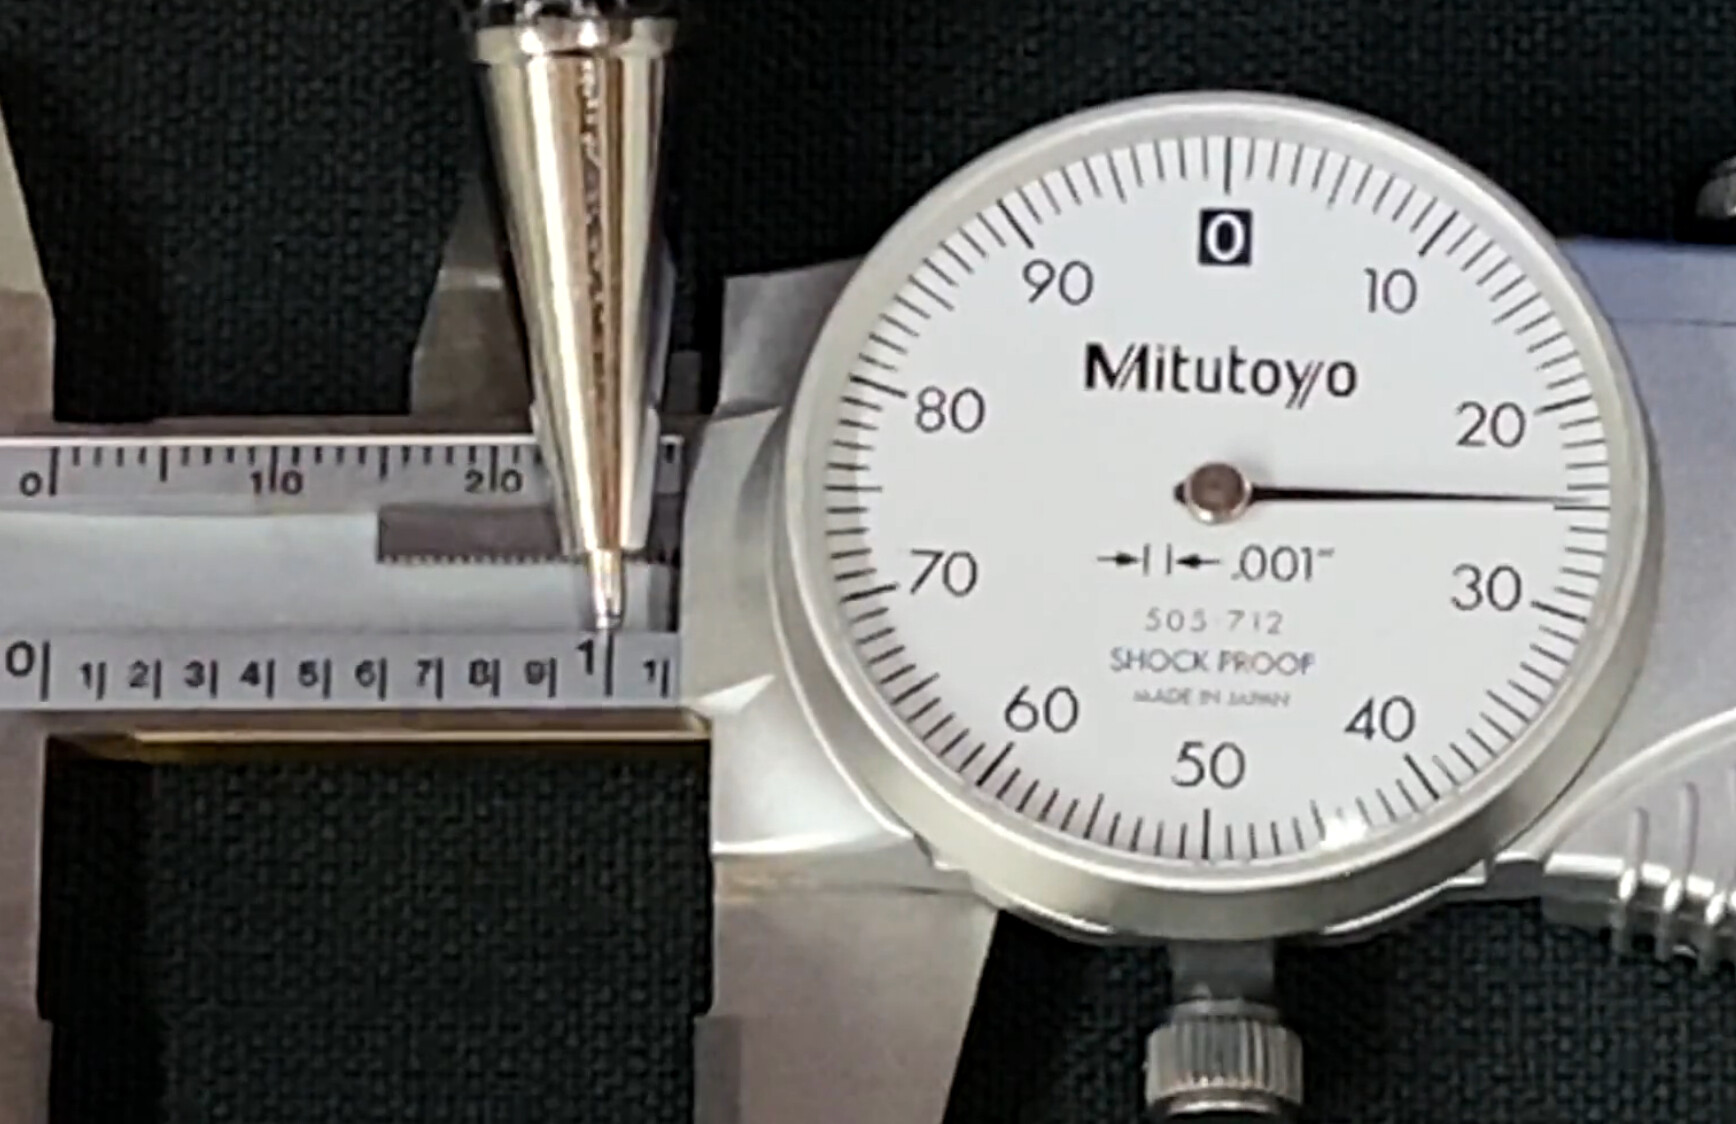
- Dial Gauge: The dial gauge, also known as the dial indicator or dial scale, is the key feature of calipers with dial. It displays the measurements with high precision. The dial gauge consists of a rotating dial with a needle or pointer that indicates the measurement readings on a graduated scale.
- Bezel or Rotating Ring: The bezel or rotating ring surrounds the dial gauge and can be rotated to set a zero reference point. Rotating the bezel allows you to compensate for any measurement deviation or calibration error.
- Thumbscrew or Locking Screw: The thumbscrew or locking screw is located near the dial gauge and is used to lock the sliding jaw in place once the desired measurement is achieved. It ensures that the measurement remains consistent during use.
- Depth Rod: Some calipers with dial also feature a depth rod. The depth rod is a cylindrical extension that protrudes from the frame and allows for accurate depth measurements.
Understanding the different parts of calipers with dial will help you effectively operate and interpret the measurements provided by this precision measuring tool. Familiarize yourself with the components and their functions to ensure accurate and reliable measurements.
Reading Measurements on Calipers With Dial
Reading measurements on calipers with dial is a straightforward process once you understand the key features and graduations on the dial gauge. It is important to follow these steps to ensure accurate and consistent readings:
- Zero Calibration: Before taking any measurements, calibrate the calipers by zeroing the dial gauge. Ensure that the sliding jaw and the fixed jaw are in contact with each other. Rotate the bezel or rotating ring to align the needle with the zero mark on the dial gauge. This step sets the baseline for your measurements.
- Placing and Adjusting the Calipers: Position the calipers around the object being measured, ensuring that both the sliding jaw and the fixed jaw make contact with the opposite surfaces of the object. Gently squeeze the calipers until the sliding jaw is securely in place.
- Read the Dial Gauge: Once the calipers are properly adjusted, observe the dial gauge to read the measurement. The needle or pointer on the dial gauge will indicate the distance between the sliding jaw and the fixed jaw. Read the measurement value directly from the graduated scale on the dial.
- Interpreting Decimal Measurements: The graduations on the dial gauge represent the increments of measurement, typically in both inches and millimeters. For decimal measurements, read the corresponding value based on the position of the needle or pointer. Use the smaller incremental lines for more precise measurements.
- Recording the Measurement: After taking the measurement, record it for future reference or further calculations. Make note of the unit of measurement used, whether it is in inches or millimeters.
- Releasing the Calipers: Once the measurement is recorded, release the calipers by loosening the thumbscrew or locking screw. This will allow you to remove the calipers from the object being measured.
Remember to handle the calipers with care and avoid applying excessive force during measurements to prevent any damage or inaccuracies. Practice using the calipers with dial on known objects or calibrations to enhance your skills in reading measurements accurately.
When reading calipers with a dial, make sure to take the measurement at eye level to avoid parallax error. Also, ensure the jaws are clean and properly aligned for accurate readings.
Tips and Best Practices for Reading Calipers With Dial
To ensure accurate and consistent measurements when using calipers with dial, it is helpful to follow certain tips and best practices. Here are some useful guidelines to keep in mind:
- Ensure Proper Calibration: Before taking any measurements, always zero or calibrate the calipers by aligning the needle with the zero mark on the dial gauge. This step establishes a baseline for accurate readings.
- Take Multiple Measurements: When measuring an object, take multiple readings at different points to ensure accuracy. This helps identify any inconsistencies or variations in the dimensions of the object.
- Use the Right Measurement Unit: Calipers with dial provide measurements in both inches and millimeters. Ensure that you are using the correct unit of measurement based on your needs and the requirements of your project.
- Pay Attention to Incremental Lines: The dial gauge has incremental lines that represent different measurements. Pay attention to the smaller lines for more precise readings.
- Avoid Parallax Errors: Parallax errors can occur when the line of sight is not perpendicular to the dial gauge. To avoid this, position yourself directly in front of the dial gauge and ensure that your line of sight is perpendicular to the graduations.
- Take Precautions with Fragile Objects: When measuring delicate or fragile objects, apply gentle pressure on the calipers to avoid damaging the object. Ensure that the sliding jaw does not dig into the object’s surface.
- Practice Hand-Eye Coordination: Reading measurements on a dial gauge requires good hand-eye coordination. Practice using the calipers regularly to develop a steady hand and improve your accuracy.
- Keep the Calipers Clean: Dust, debris, or oil particles can affect the accuracy of the measurements. Regularly clean the calipers and ensure that the dial gauge is free from any obstructions.
- Store the Calipers Properly: When not in use, store the calipers in a protective case or pouch to prevent damage and maintain their accuracy for future measurements.
Following these tips and best practices will help you achieve precise and consistent measurements with calipers with dial. Regular practice and attention to detail will further enhance your proficiency in reading measurements accurately.
Read more: How To Read Vernier Calipers
Common Mistakes to Avoid When Using Calipers With Dial
While using calipers with dial, it is important to be aware of common mistakes that can lead to inaccurate measurements. By avoiding these errors, you can ensure reliable and precise results. Here are some common mistakes to watch out for:
- Insufficient Zero Calibration: Neglecting to properly zero or calibrate the calipers can introduce significant errors in measurements. Always ensure that the needle aligns with the zero mark on the dial gauge before taking any measurements.
- Inconsistent Pressure: Applying inconsistent pressure while measuring can yield inconsistent readings. Be sure to apply consistent and gentle pressure on the sliding jaw to maintain a stable position throughout the measurement process.
- Parallax Errors: Parallax errors occur when the line of sight is not perpendicular to the graduations on the dial gauge. Ensure that you are looking directly at the dial gauge from a perpendicular angle to avoid misinterpretation of measurements.
- Ignoring Incremental Lines: Not paying attention to the smaller incremental lines on the dial gauge can result in imprecise measurements. Use the smaller lines for more accurate readings, especially when dealing with fine measurements.
- Using Excessive Force: Applying excessive force can cause the sliding jaw to dig into the object being measured, leading to inaccurate readings. Use a gentle and controlled force to avoid damaging the object or distorting the measurement.
- Measuring on Uneven Surfaces: Placing the calipers on uneven or irregular surfaces can lead to skewed measurements. Ensure that the object being measured is placed on a flat and stable surface to obtain accurate results.
- Overlooking Dirt or Debris: Dirt, debris, or oil particles on the calipers can affect the smooth movement of the sliding jaw and the accuracy of the measurements. Regularly clean the calipers and ensure that the dial gauge is free from any obstructions.
- Skipping Multiple Measurements: Relying on a single measurement may not account for irregularities in the object being measured. Take multiple measurements at different points to identify variations and ensure accuracy.
- Not Storing Properly: Improper storage can lead to damage or misalignment of the calipers, resulting in inaccurate measurements. Always store the calipers in a protective case or pouch to preserve their accuracy.
Avoiding these common mistakes and adopting good measurement practices will help you achieve reliable and precise results with calipers with dial. Regular practice and attention to detail will further enhance your measurement skills and ensure accurate readings.
Conclusion
Calipers with dial are essential tools for precise measurements in various industries and applications. Understanding how to read these calipers accurately is valuable knowledge for professionals and enthusiasts alike. By following the tips and best practices outlined in this article, you can achieve reliable and consistent measurements with calipers with dial.
Ensure that you properly calibrate the calipers by zeroing the dial gauge before taking any measurements. Pay attention to the incremental lines on the dial gauge and use the smaller lines for more precise readings. Avoid common mistakes such as inconsistent pressure, parallax errors, and excessive force to obtain accurate results.
Remember to take multiple measurements at different points to account for any irregularities in the object being measured. Keep your calipers clean and store them properly to maintain their accuracy and longevity.
By developing your hand-eye coordination, practicing regularly, and paying attention to detail, you can become proficient in reading measurements with calipers with dial. Whether you are involved in manufacturing, engineering, carpentry, or any other field that requires precise measurements, mastering the use of calipers with dial will greatly enhance your work.
With a solid understanding of the various parts of calipers with dial and how to interpret measurements, you can confidently use this precision tool to achieve the highest level of accuracy in your projects.
So go ahead, grab your calipers with dial, and start measuring with precision and confidence!
Frequently Asked Questions about How To Read Calipers With Dial
Was this page helpful?
At Storables.com, we guarantee accurate and reliable information. Our content, validated by Expert Board Contributors, is crafted following stringent Editorial Policies. We're committed to providing you with well-researched, expert-backed insights for all your informational needs.


0 thoughts on “How To Read Calipers With Dial”