Articles
How To Remove A Chimney Breast
Modified: March 2, 2024
Learn how to safely remove a chimney breast with our informative articles. Get expert tips and advice for a successful chimney removal project.
(Many of the links in this article redirect to a specific reviewed product. Your purchase of these products through affiliate links helps to generate commission for Storables.com, at no extra cost. Learn more)
Introduction
Removing a chimney breast is a major undertaking that requires careful planning, proper tools, and knowledge of safety protocols. Whether you want to create more space in your home or upgrade your heating system, removing a chimney breast can be a challenging but rewarding project.
Before you start, it’s important to understand that removing a chimney breast involves structural changes to your home. Therefore, it’s crucial to approach the task with caution and follow all necessary safety precautions.
In this article, we will guide you through the step-by-step process of removing a chimney breast, from gathering the necessary tools and materials to cleaning up the debris. By following these instructions and taking the proper precautions, you can successfully remove a chimney breast and transform your living space.
Key Takeaways:
- Safety First
Removing a chimney breast requires meticulous planning and strict adherence to safety precautions. Prioritize protective gear, utility shut-off, and structural assessment to ensure a secure and successful project. - Methodical Approach
Approach the chimney breast removal process with patience and attention to detail. From workspace preparation to debris disposal, working methodically ensures a smooth and professional outcome while minimizing potential risks.
Read more: What Is Chimney Breast
Safety Precautions
Before embarking on the removal of a chimney breast, it is vital to prioritize safety. The process involves working with heavy materials and potentially hazardous substances. Here are some essential safety precautions to follow:
- Protective Gear: Wear appropriate protective gear, including safety goggles, gloves, a dust mask, and a hard hat. This will minimize the risk of injury from falling debris, dust, and other potential hazards.
- Secure the Area: Clear the work area of any valuable or fragile items and block off the area to prevent accidental access. Use caution tape or barriers to keep people away from the workspace.
- Shut Off Utilities: Before starting the removal process, ensure that all utilities connected to the chimney, such as gas or electrical lines, are turned off. Contact a professional if you are unsure about disconnecting these utilities.
- Structural Assessment: Determine whether the chimney breast is load-bearing or if it supports the structure above. If it is load-bearing, consult with a structural engineer or a professional contractor to devise a proper removal plan.
- Proper Ladder Safety: If you need to work at height, use a sturdy ladder and ensure it is set up correctly. Place the ladder on solid ground and secure it to prevent accidents or falls.
- Asbestos Testing: Check for the presence of asbestos in the chimney lining or any associated materials. If asbestos is found, it’s crucial to hire a licensed professional for its safe removal as asbestos is a hazardous substance.
- Electrical Safety: Be aware of any electrical wiring within the chimney breast or near the work area. Ensure that power outlets, switches, and circuits are appropriately isolated before starting any demolition work.
- Fire Safety: Have fire extinguishing equipment readily available, such as a fire extinguisher or a bucket of water, in case of any accidental fires.
Remember, safety should always be the top priority when undertaking any home improvement project. Taking precautions and working responsibly will help prevent accidents and ensure the successful completion of the chimney breast removal.
Step 1: Gather the Necessary Tools and Materials
Before you begin the process of removing a chimney breast, it’s vital to ensure that you have all the necessary tools and materials on hand. Having the right equipment will make the job easier and safer. Here’s a list of what you’ll need:
- Protective Gear: Safety goggles, gloves, a dust mask, and a hard hat to protect yourself from debris and dust.
- Demolition Tools: A sledgehammer and a crowbar will help you remove bricks and masonry.
- Power Tools: A reciprocating saw or angle grinder with a masonry cutting blade for precision cutting.
- Supporting Tools: Acrow props, strong metal supports, and wooden beams to temporarily support the structure during the removal process.
- Dust Extraction System: A high-powered vacuum or dust extraction system to minimize dust and debris accumulation.
- Measuring Tools: A tape measure, level, and chalk line to mark the removal area accurately.
- Wall Repair Materials: Plasterboard, plaster, joint compound, sandpaper, and paint for repairing the wall and ceiling after the chimney breast removal.
- Cleaning Supplies: Brooms, dustpans, garbage bags, and a skip or waste disposal service to clean up and dispose of debris.
- Additional Materials: Plastic sheets or tarps to protect the surrounding area from dust and debris, as well as drop cloths to cover furniture and flooring.
It’s important to gather all the necessary tools and materials before starting the project to ensure a smooth workflow. This will prevent delays and the need to interrupt the process to acquire missing items.
Before using any power tools, familiarize yourself with their operation and safety guidelines. Always follow the manufacturer’s instructions and use the appropriate safety precautions.
Once you have gathered all the required tools and materials, you are ready to move on to the next step: preparing the workspace.
Step 2: Prepare the Workspace
Preparing the workspace is an essential step in removing a chimney breast. By taking the time to properly prepare the area, you can ensure safety and efficiency during the removal process. Here’s what you need to do:
- Clear the Area: Remove any furniture, decorations, or other items from the vicinity of the chimney breast. This will prevent them from getting damaged and make it easier to work.
- Protect the Surrounding Area: Cover nearby furniture, flooring, and other surfaces with plastic sheets or tarps. This will protect them from dust, debris, and potential damage during the removal process.
- Create a Containment Zone: Use plastic sheets, zip walls, or temporary barriers to create a containment zone around the chimney breast. This will help contain the dust and debris and prevent it from spreading to other areas of your home.
- Ventilation: Ensure that the workspace is well-ventilated by opening windows and doors, if possible. This will help in the circulation of fresh air and remove dust and fumes.
- Turn off HVAC Systems: It’s advisable to turn off any heating, ventilation, and air conditioning (HVAC) systems during the removal process. This will prevent the circulation of dust and debris throughout your home.
- Set Up a Temporary Workstation: Arrange a temporary workstation nearby with all the necessary tools and materials within reach. This will save you time and effort by minimizing the need to constantly move back and forth.
- Protective Clothing and Gear: Put on your protective clothing, including safety goggles, gloves, a dust mask, and a hard hat, before entering the workspace. This will safeguard you from potential hazards.
By taking the time to properly prepare the workspace, you’ll create a safe and organized environment for the chimney breast removal project. This will streamline the process and minimize any potential risks or disruptions. Once the workspace is prepared, you can move on to the next step: shutting off utilities and removing surrounding materials.
Step 3: Shut Off Utilities and Remove Surrounding Materials
Before proceeding with the removal of a chimney breast, it’s crucial to shut off any utilities connected to the chimney. This will ensure your safety and prevent any damage or accidents during the process. Here’s what you need to do:
- Gas: If your chimney is connected to a gas appliance, such as a fireplace or boiler, turn off the gas supply. Locate the gas valve near the appliance or contact your gas provider for assistance.
- Electricity: Shut off the electricity supply to any electrical outlets or fixtures near the chimney breast. Turn off the circuit breaker or remove the corresponding fuse from the electrical panel.
- Water: If there are any water pipes running through or near the chimney, shut off the water supply using the appropriate valve. This will prevent any accidental water leaks during the removal process.
- Remove Surrounding Materials: Carefully remove any materials surrounding the chimney breast, such as mantels, tiles, or plasterboard. Use a pry bar or crowbar to detach these materials from the wall. Take caution to avoid damaging the surrounding area.
- Disconnect Appliances: If there are any appliances connected to the chimney, such as a stove or oven, disconnect them according to the manufacturer’s guidelines. This will ensure that they are safely removed and will not cause any obstructions or hazards during the chimney breast removal.
- Cover and Protect: Once the utilities have been shut off and the surrounding materials removed, cover any open ends or exposed pipes with plastic sheeting or duct tape. This will prevent debris from entering these areas and causing damage.
By shutting off utilities and removing surrounding materials, you mitigate potential risks and create a safer environment for the demolition process. It’s essential to follow these steps carefully and reach out to professionals if you are unsure about any aspect of utility shut-off or appliance disconnection.
After completing step 3, you are now ready to move on to step 4: calculating and marking the removal area.
Read more: How Much Is It To Remove A Chimney
Step 4: Calculate and Mark the Removal Area
Calculating and marking the removal area is a crucial step in successfully removing a chimney breast. This ensures that you have a clear understanding of the scope of the project and helps you maintain accuracy during the removal process. Follow these steps:
- Measure the Dimensions: Use a tape measure to determine the width, height, and depth of the chimney breast. Record these measurements to ensure proper planning.
- Consider Load-Bearing Walls: Identify any walls adjacent to the chimney breast that may be load-bearing. These are walls that support the weight of the structure above. Consult with a professional if you are unsure about the structural implications of removing the chimney breast.
- Evaluate Structural Considerations: Determine if any structural elements, such as beams or lintels, support the chimney breast. These elements may need to be temporarily supported during the removal process to maintain structural integrity.
- Mark the Removal Area: Use a pencil or chalk to mark the boundaries of the chimney breast removal area on the walls and ceiling. Measure and mark the dimensions obtained earlier to ensure accuracy.
- Use Level and Plumb Line: To ensure straight and level cuts, use a level and plumb line to guide the marking process. This will help maintain the integrity of the surrounding walls and ceiling.
- Double-Check Measurements: Take a final look at the marked removal area to confirm that it aligns with your desired scope. Make any necessary adjustments before proceeding to the next step.
By accurately calculating and marking the removal area, you can proceed with confidence, knowing that you have a clear plan and an understanding of the structural implications. Remember to consult with professionals if you have any doubts or concerns about the calculations or marking process.
After completing step 4, you are now ready to move on to step 5: removing the bricks or masonry.
Before removing a chimney breast, consult a structural engineer to ensure it won’t compromise the building’s stability. Also, check for any gas or electrical connections. Always use proper safety equipment and consider hiring a professional for this job.
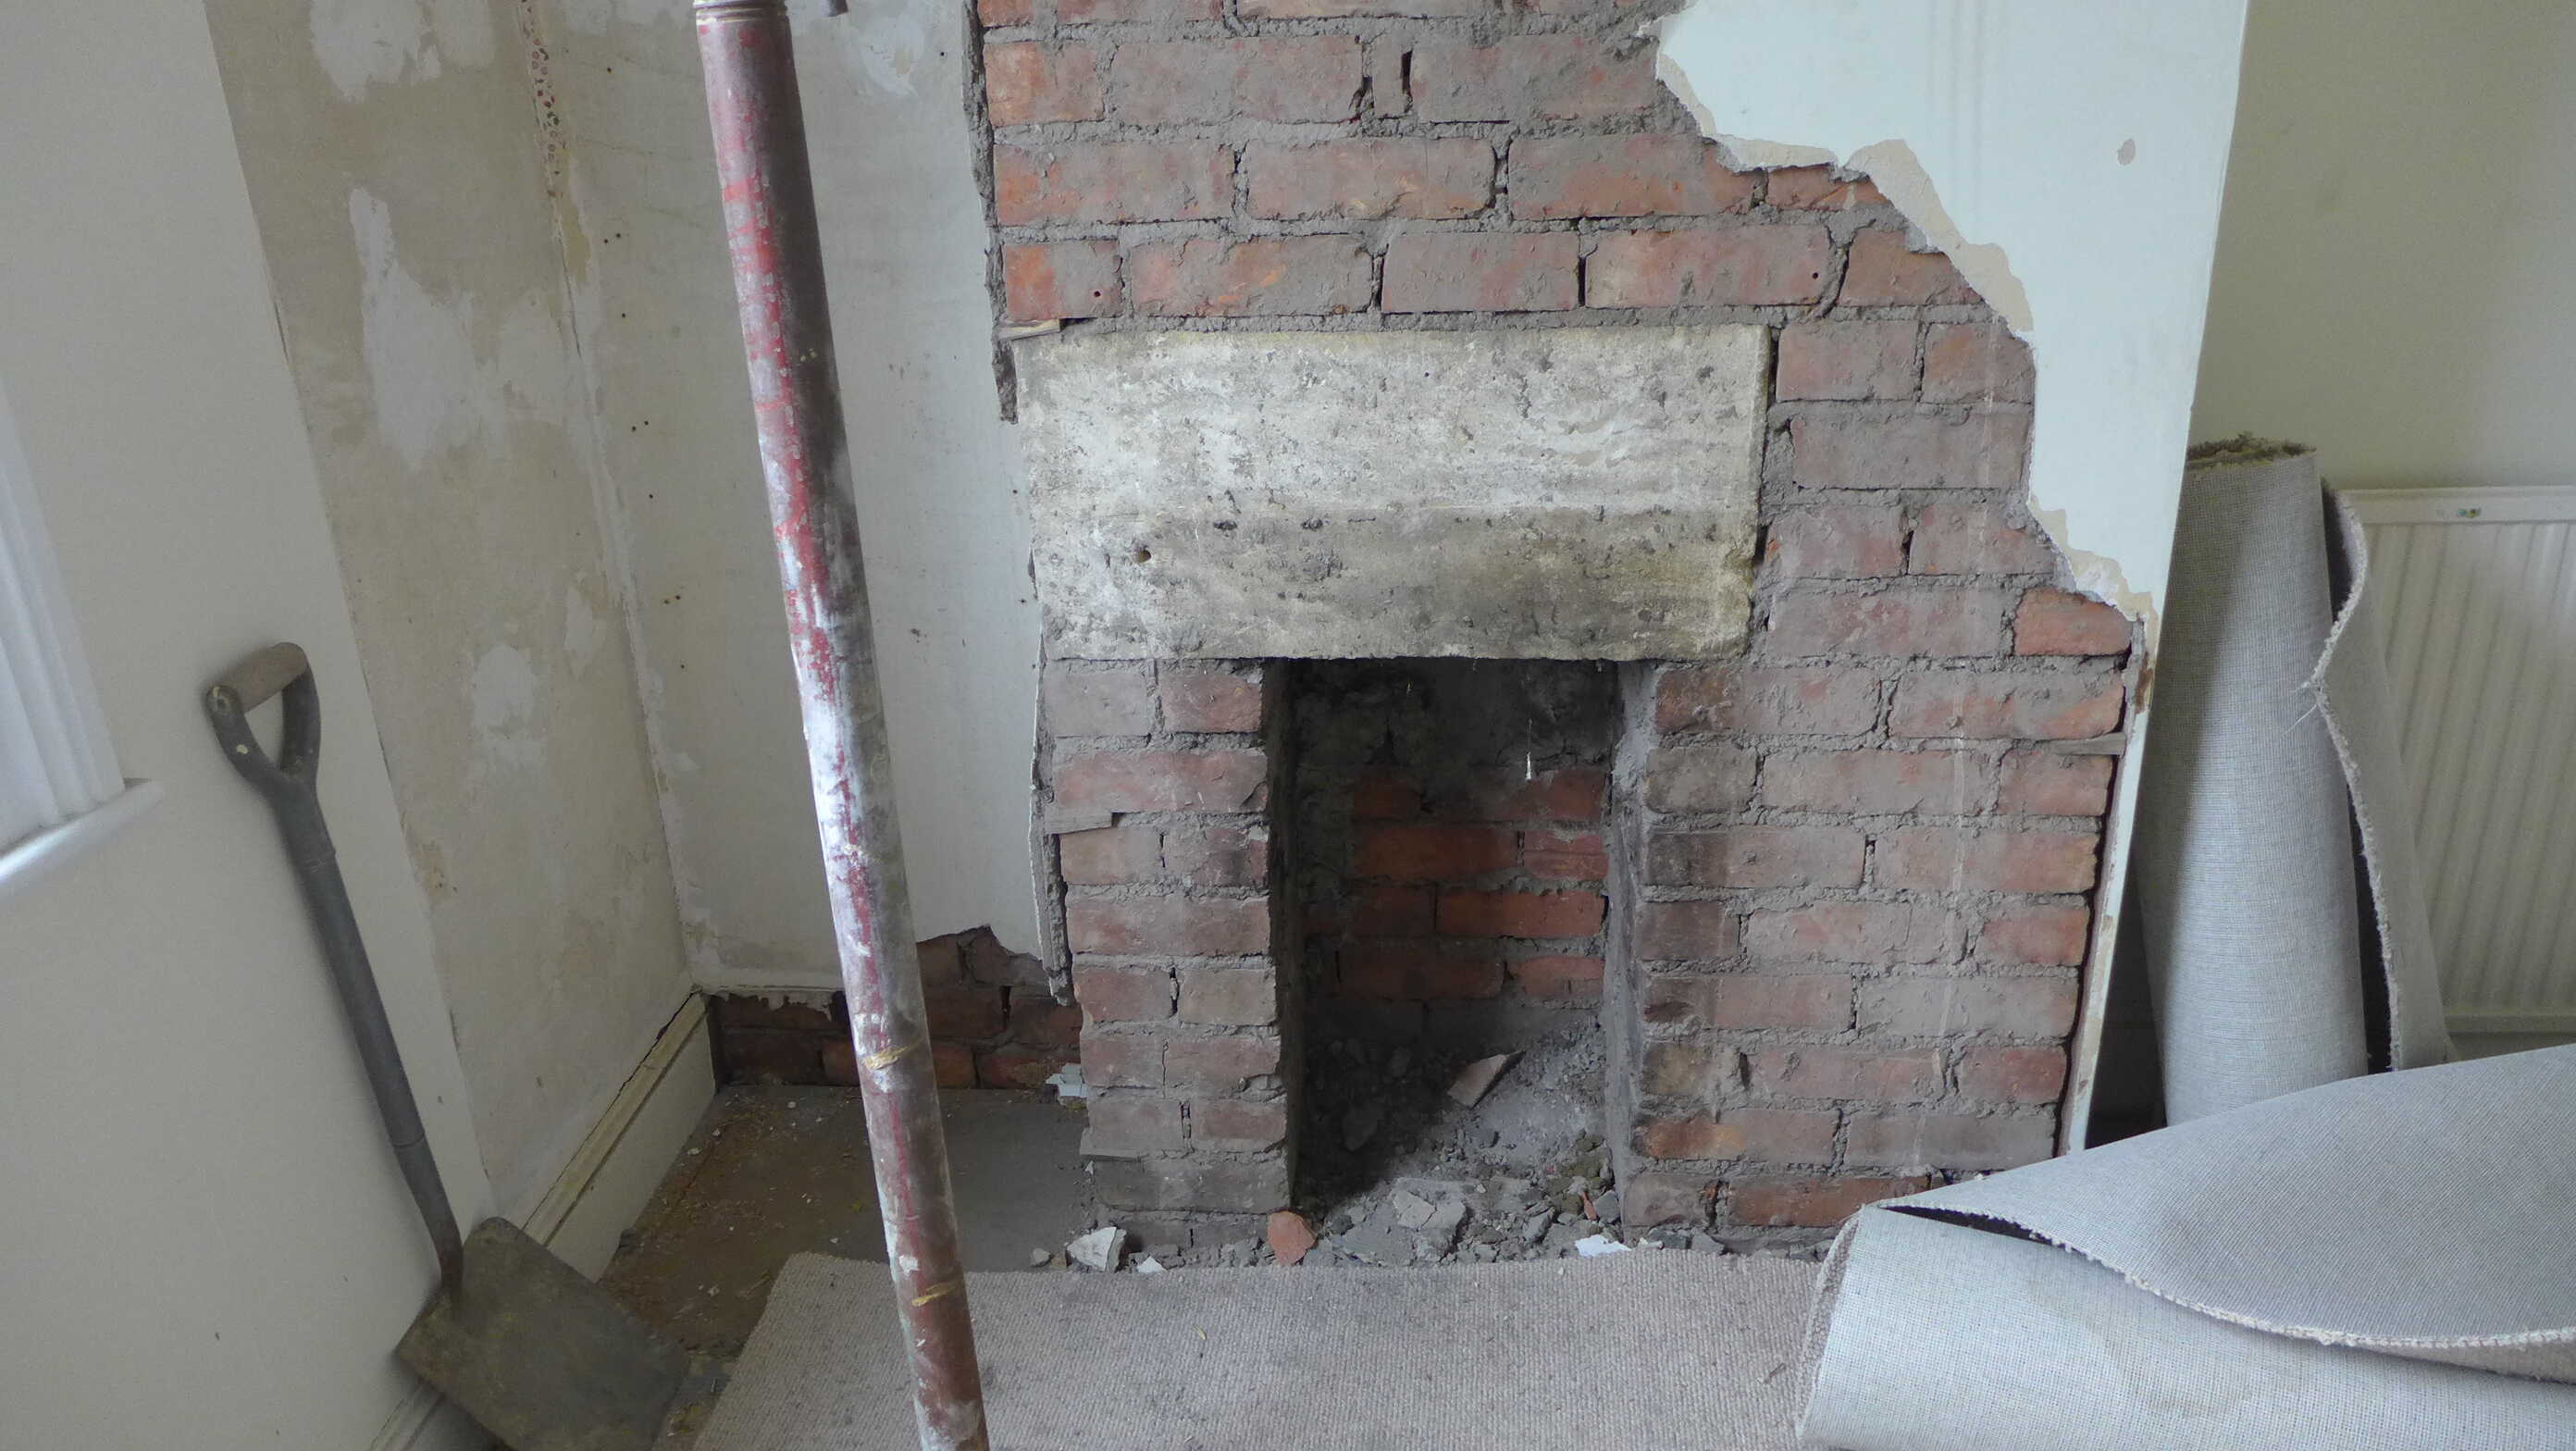
Step 5: Remove the Bricks or Masonry
Now that you have calculated and marked the removal area, it’s time to proceed with the actual removal of the bricks or masonry. This step requires careful demolition to ensure a safe and successful chimney breast removal. Follow these guidelines:
- Start from the Top: Begin removing the bricks or masonry from the top of the chimney breast. This allows for easier access and prevents debris from falling onto lower sections.
- Work in Sections: Divide the removal area into manageable sections. Start by removing bricks or masonry from one section before moving on to the next. This allows for better control and reduces the chances of causing unnecessary damage.
- Use Appropriate Tools: Depending on the type of bricks or masonry, use a combination of the sledgehammer, crowbar, and power tools with masonry cutting blades to carefully remove them. Exercise caution and follow proper safety techniques when using these tools.
- Protect Surrounding Areas: Place drop cloths or sheets over the surrounding floor, furniture, and other areas to protect them from debris and dust. This will make the cleanup process easier once the demolition is complete.
- Dispose of Debris: As you remove bricks or masonry, place them in containers or heavy-duty bags for disposal. Avoid overfilling containers to prevent injuries while carrying them. If the quantity of debris is significant, consider hiring a waste disposal service or renting a skip.
- Check for Hidden Obstacles: While removing bricks or masonry, keep an eye out for potential hidden obstacles, such as electrical wiring or plumbing pipes. If you encounter any, consult with professionals to handle their safe removal or relocation.
- Work Methodically: Take your time and work methodically through each section of the removal area. Ensure that you maintain control over the demolition process and avoid damaging other parts of the structure.
Removing the bricks or masonry requires patience and careful attention to safety guidelines. By following these steps and exercising caution, you can successfully clear the removal area and move on to the next phase of the chimney breast removal process.
After completing step 5, you are now ready to proceed to step 6: removing the support structure.
Step 6: Remove the Support Structure
With the bricks or masonry removed, it’s now time to focus on removing the support structure that was holding up the chimney breast. This step requires attention to detail and careful execution to ensure the stability and safety of the surrounding area. Follow these guidelines:
- Assess the Support Structure: Examine the support structure, which may include wooden beams, acrow props, or metal supports. Determine how they were installed and their role in supporting the chimney breast.
- Take Precautions: Before removing any supporting elements, ensure that proper precautions are in place. This may involve installing temporary supports to maintain the stability of the structure during the removal process.
- Remove Supports Methodically: Start by removing one support structure element at a time. Gradually work your way through the entire support system, taking care to distribute the load and maintain stability throughout the process.
- Use Proper Tools: Depending on the type of support structure, you may need tools such as a drill, screwdriver, or lever. Follow the manufacturer’s instructions or consult with professionals for guidance on safe removal techniques.
- Ensure Structural Integrity: As you remove each support element, assess the impact on the stability of the surrounding structure. If any concerns arise, seek the advice of a structural engineer or professional contractor to address potential issues.
- Dispose of Removed Materials: As you remove the support structure elements, ensure proper disposal of the materials. Place them in containers or heavy-duty bags for disposal, as with the bricks or masonry debris.
- Communicate with Professionals: If you encounter any challenges or uncertainties during the removal of the support structure, do not hesitate to seek guidance from professionals. They can provide valuable insights and ensure the safety of the overall project.
Successfully removing the support structure is crucial for the stability and safety of your home. Take your time, work meticulously, and consult with professionals as needed to ensure the proper removal of the supporting elements.
After completing step 6, you are now ready to move on to step 7: repairing the wall and ceiling.
Step 7: Repair the Wall and Ceiling
Now that the chimney breast and its support structure have been removed, it’s time to focus on repairing the wall and ceiling in the area where the chimney breast once stood. This step is essential to restore the structural integrity and aesthetic appeal of the space. Follow these guidelines to effectively repair the wall and ceiling:
- Assess the Damage: Inspect the wall and ceiling for any visible damage, such as holes, cracks, or uneven surfaces. Identify any areas that require repair or smoothing.
- Make Necessary Repairs: Fill any holes or gaps in the wall using an appropriate filler, such as joint compound or plaster. Smooth out the filler using a putty knife or a trowel to create a seamless surface.
- Sand and Smooth: Once the filler has dried, use sandpaper or a sanding block to smooth any rough areas on the wall and ceiling. This will create a uniform finish and prepare the surface for painting or further treatment.
- Apply a Primer: Before painting, apply a coat of primer to the repaired wall and ceiling area. This will help the paint adhere better and provide a more even finish. Follow the manufacturer’s instructions for the specific primer you’re using.
- Paint or Finish: Choose a paint color that matches the surrounding area or your desired aesthetic. Apply a fresh coat of paint to the repaired wall and ceiling, ensuring full coverage and a smooth finish. Alternatively, you can apply wallpaper or other decorative finishes.
- Clean the Area: Once the wall and ceiling repairs are complete, thoroughly clean the surrounding area to remove any dust, debris, or paint splatters. Use a broom, vacuum, or damp cloth, depending on the surface and the type of debris.
Repairing the wall and ceiling after removing the chimney breast not only ensures a seamless integration with the existing space but also brings a fresh, updated look to the area. Take your time, follow the necessary steps, and pay attention to detail to achieve the desired results.
After completing step 7, you are now ready to move on to the final step: cleaning up and disposing of debris.
Read more: How Hard Is It To Remove A Chimney
Step 8: Clean up and Dispose of Debris
After completing the removal and repair work, it’s important to properly clean up and dispose of the debris generated during the chimney breast removal process. Following these guidelines will help ensure a tidy and safe environment:
- Sweep and Vacuum: Start by using a broom or brush to sweep the area, removing loose debris and dust. Use a vacuum cleaner to thoroughly clean any hard-to-reach corners, nooks, and crannies.
- Collect Debris: Gather all the debris, including bricks, masonry, and any other waste materials, into heavy-duty bags or containers. Ensure that the containers are secure and can safely hold the weight and type of debris being disposed of.
- Dispose of Debris Responsibly: Check with your local waste management authorities or recycling centers to determine the proper disposal methods for the debris. Some materials, such as bricks, may be recyclable, while others may require specific disposal procedures.
- Hire a Skip or Waste Removal Service: If the amount of debris is substantial, consider renting a skip or hiring a waste removal service. They will provide a container and handle the proper disposal of the debris, saving you time and effort.
- Clean the Work Area: Once the debris has been removed, thoroughly clean the work area to remove any remaining dust or residue. Use a damp cloth or mop to wipe down surfaces and ensure a clean and presentable space.
- Inspect for Safety: Take a final look around the area to ensure that no potential hazards or sharp objects remain. Double-check that all safety precautions, like turning utilities back on and securing any temporary supports, have been properly addressed.
Taking the time to clean up and dispose of debris properly is essential for the overall success and satisfaction of your chimney breast removal project. It helps create a safe and organized space, and ensures that waste materials are handled responsibly.
With step 8 completed, you have successfully completed the chimney breast removal process. Congratulations on your accomplishment!
Remember, if at any point during the process you feel unsure or encounter unexpected challenges, it’s always wise to consult with professionals who can provide expertise and guidance.
Conclusion
Removing a chimney breast is a significant undertaking that requires careful planning, adherence to safety precautions, and proper execution. By following the step-by-step process outlined in this article, you can successfully remove a chimney breast and transform your living space.
From gathering the necessary tools and materials to cleaning up the debris, each step plays a crucial role in ensuring a smooth and successful chimney breast removal. It’s essential to prioritize safety at every stage, donning protective gear and shutting off utilities to mitigate any potential risks.
Throughout the process, it’s important to approach the project with patience and attention to detail. Taking your time and working methodically will help minimize errors, protect the structural integrity of your home, and achieve a professional-looking result.
Remember to consult with professionals whenever necessary, especially when dealing with structural elements, electrical wiring, or asbestos. Their expertise and guidance will ensure that you tackle the project safely and effectively.
Lastly, don’t forget the importance of cleaning up and responsibly disposing of the debris generated during the chimney breast removal. A thorough cleanup will leave your space immaculate and ready for the next phase of your home improvement journey.
By following the guidelines provided in this article, you can confidently remove a chimney breast and enjoy the benefits of a more efficient use of space or an upgraded heating system.
Good luck with your chimney breast removal project, and may your home undergo a beautiful transformation!
Frequently Asked Questions about How To Remove A Chimney Breast
Was this page helpful?
At Storables.com, we guarantee accurate and reliable information. Our content, validated by Expert Board Contributors, is crafted following stringent Editorial Policies. We're committed to providing you with well-researched, expert-backed insights for all your informational needs.


0 thoughts on “How To Remove A Chimney Breast”