Articles
How To Replace The Swivel Nuts On Kegerator
Modified: October 20, 2024
Learn the step-by-step process of replacing swivel nuts on your kegerator with our informative articles. Master the art of kegerator maintenance and keep your beer flowing smoothly.
(Many of the links in this article redirect to a specific reviewed product. Your purchase of these products through affiliate links helps to generate commission for Storables.com, at no extra cost. Learn more)
Introduction
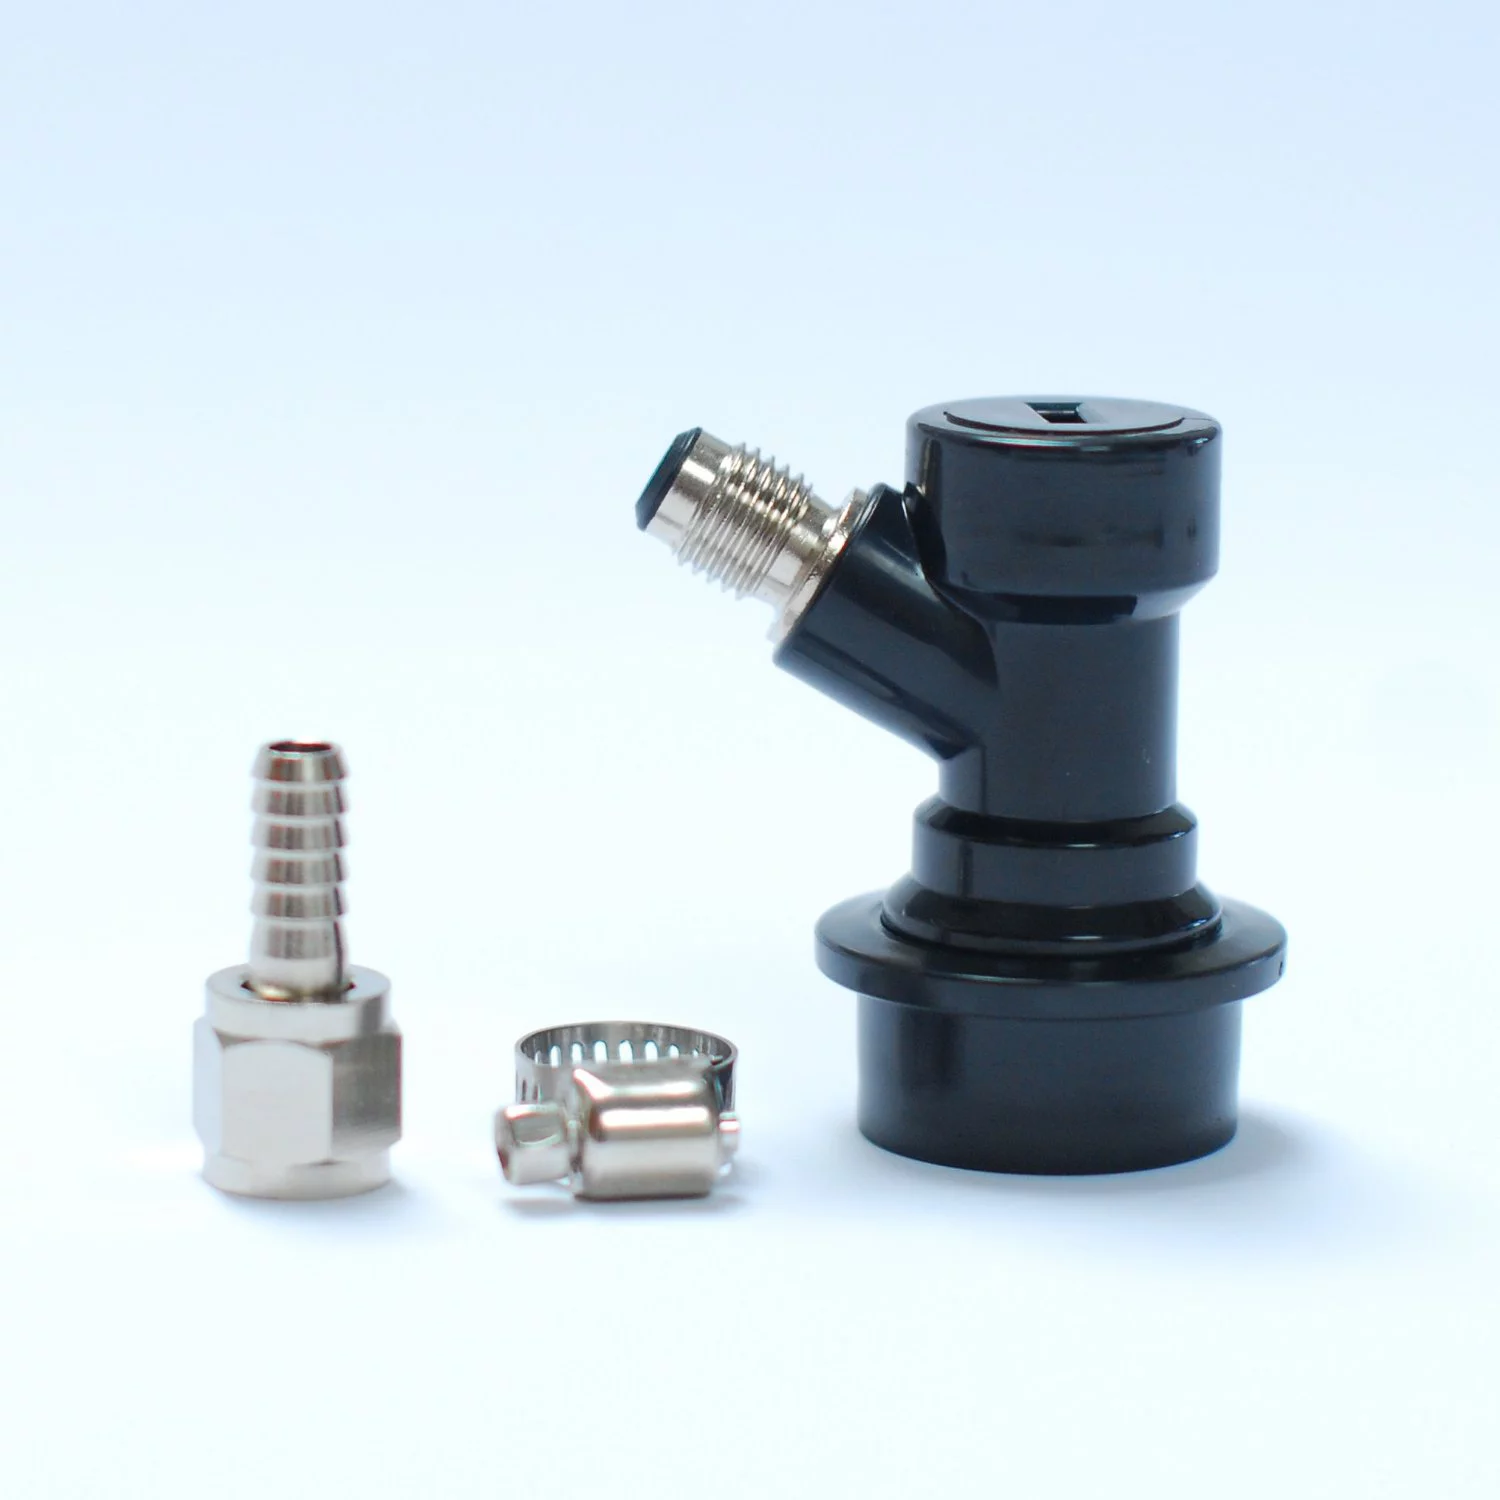
Welcome to this guide on how to replace the swivel nuts on your kegerator. If you are a beer enthusiast or simply enjoy having a cold one on tap at home, it’s essential to ensure that your kegerator is in optimal condition. Swivel nuts are an integral part of the kegerator setup, connecting the beer line to the keg coupler. Over time, these swivel nuts can become worn or damaged, leading to leaks and a less-than-ideal pouring experience.
In this article, you will learn step-by-step instructions on how to replace the swivel nuts on your kegerator. We will walk you through the process, from gathering the necessary tools and materials to reassembling and testing your kegerator. By following these instructions, you can ensure that your kegerator operates smoothly, delivering refreshing, properly poured drafts every time.
Before we dive into the details, it’s important to note that while this guide provides a general overview, specific kegerator models may have slight variations in design and assembly. Always consult your kegerator’s instruction manual or contact the manufacturer for model-specific information and recommendations.
Now, without further ado, let’s get started on replacing those swivel nuts and restoring your kegerator to its optimal performance!
Key Takeaways:
- Regularly replacing worn or damaged swivel nuts on your kegerator is crucial for maintaining optimal performance and preventing leaks, ensuring a refreshing and properly poured draft every time.
- By following the step-by-step guide, you can confidently gather the necessary tools, disconnect, replace, and test the swivel nuts, ensuring a smooth and enjoyable pouring experience for your favorite on-tap beers.
Read more: How To Replace The Faucet On My Kegerator
Step 1: Gather the necessary tools and materials
Before you begin the process of replacing the swivel nuts on your kegerator, it’s important to gather all the tools and materials you will need. By having everything prepared beforehand, you can ensure a smooth and efficient repair process. Here’s a list of the items you’ll need:
- Adjustable wrench
- Flathead screwdriver
- Replacement swivel nuts
- Clean cloth or paper towels
- Sanitizing solution or beer line cleaner
Make sure to check the specifications of your kegerator and the current swivel nuts to ensure you purchase the correct replacement parts. Swivel nuts come in different sizes, so it’s crucial to select the ones that match your kegerator’s fittings.
Once you have gathered all the necessary tools and materials, you can proceed to the next step of the process. Remember to work in a well-lit and clean area to avoid any accidents or contamination.
It’s also a good idea to have a workspace with a soft surface, such as a towel or a rubber mat, to keep the kegerator and its components protected from scratches or damage.
With everything in place, you’re ready to move on to step two: turning off and disconnecting the kegerator.
Step 2: Turn off and disconnect the kegerator
Before you begin the process of replacing the swivel nuts on your kegerator, it’s important to properly turn off and disconnect the kegerator to ensure your safety and prevent any damage to the equipment.
Start by locating the power switch or dial on your kegerator and turn it off. This will prevent any accidental activation of the kegerator while you are working on it.
Next, unplug the kegerator from the power source. This step is crucial as it eliminates the risk of electric shock during the repair process.
Once the kegerator has been turned off and unplugged, it’s time to disconnect any beer lines or connections. Begin by removing the keg from the kegerator, ensuring that it is safely placed in a secure location.
Locate the swivel nuts that need to be replaced. Using an adjustable wrench, carefully and gently loosen the nuts by turning them counterclockwise. Be cautious not to apply too much force, as this can damage the fittings or the kegerator itself.
If there are any clamps or connectors securing the beer lines to the swivel nuts, use a flathead screwdriver to loosen or remove them. Take note of the orientation of the connectors to ease reassembly later.
With the swivel nuts and connectors removed, carefully detach the beer lines from the kegerator. Take your time to avoid any spills or damage to the lines.
Once the beer lines have been safely disconnected, use a clean cloth or paper towels to wipe away any excess liquid or residue from the swivel nut fittings and the surrounding areas. This will help ensure a clean and seamless installation of the new swivel nuts.
With the kegerator turned off, unplugged, and the necessary components disconnected, you are now ready to move on to the next step: removing the existing swivel nuts.
Step 3: Remove the existing swivel nuts
Now that you have turned off and disconnected your kegerator, it’s time to remove the existing swivel nuts. These nuts are what connect the beer lines to the keg coupler, and over time, they may become worn or damaged, resulting in leaks or poor performance.
Start by using an adjustable wrench to grip the first swivel nut firmly. Hold the keg coupler steady to prevent it from moving while you loosen the swivel nut. Rotate the wrench counterclockwise to loosen the nut until it breaks free from the fitting.
Once the nut is loose, carefully unscrew it by hand and set it aside. Repeat this process for any additional swivel nuts that need to be removed.
If the swivel nuts are stubborn and difficult to loosen, you can apply a small amount of penetrating oil to the threads to help lubricate them. Be sure to wipe away any excess oil before installing the new swivel nuts.
With the existing swivel nuts removed, take a moment to inspect the fittings for any signs of wear or damage. If you notice any noticeable cracks, dents, or abnormalities, it’s recommended to replace the fittings as well. Consult your kegerator’s manual or contact the manufacturer for guidance.
Once you have successfully removed the old swivel nuts and inspected the fittings, you’re ready to move on to step four: cleaning the threads on the kegerator.
When replacing swivel nuts on a kegerator, make sure to use the correct size wrench to avoid damaging the fittings. Apply a small amount of food-grade lubricant to the threads to ensure a tight seal.
Step 4: Clean the threads on the kegerator
After removing the old swivel nuts, it’s important to clean the threads on the kegerator to ensure a proper seal when installing the new swivel nuts. Over time, dirt, debris, and residue can accumulate on the threads, which can affect the tightness and functionality of the connections.
Start by inspecting the threads for any visible dirt or grime. If you notice any buildup, gently wipe the threads with a clean cloth or paper towel to remove it. Be careful not to apply too much pressure or use any abrasive materials that could damage or scratch the threads.
Next, you will want to sanitize the threads to ensure a clean and hygienic installation. You can use a commercial beer line cleaner or a sanitizing solution specifically designed for kegerators. Follow the manufacturer’s instructions on how to properly dilute and apply the sanitizer.
Dampen a clean cloth or paper towel with the sanitizing solution and wipe the threads thoroughly. Pay close attention to the areas where the swivel nuts will be installed, as well as the surrounding fittings. This will help eliminate any bacteria or contaminants that could impact the quality and taste of your beer.
Once you’ve cleaned and sanitized the threads, give them a final wipe with a dry cloth or paper towel to remove any excess moisture. The threads should now be clean and ready for the installation of the new swivel nuts.
With the threads cleaned, you’re now ready to move on to step five: installing the new swivel nuts.
Read more: How To Stop A Swivel Recliner From Swiveling
Step 5: Install the new swivel nuts
Now that you have cleaned the threads on the kegerator, it’s time to install the new swivel nuts. These nuts are responsible for creating a secure and leak-free connection between the beer lines and the keg coupler.
Start by taking one of the new swivel nuts and aligning it with the corresponding fitting on the kegerator. Make sure the threads match and that the nut is oriented correctly.
Using your hand, start screwing the swivel nut onto the fitting clockwise. Make sure it is aligned properly and threads easily onto the fitting. Once you’ve hand-tightened the swivel nut, use an adjustable wrench to gently tighten it further. Be careful not to overtighten, as this can damage the fittings or cause leaks.
Repeat this process for any additional swivel nuts that need to be installed.
Once you have installed all the new swivel nuts, take a moment to double-check the tightness of each nut. Ensure that they are snug, but not overly tightened. This will help ensure a proper seal and prevent any leaks.
If the swivel nuts are difficult to screw on or if you encounter any resistance, stop and reassess the alignment of the threads. It’s crucial to ensure the proper fit to prevent any damage to the kegerator or the new swivel nuts.
With the new swivel nuts securely installed, you’re ready to move on to the next step: reconnecting and testing the kegerator.
Step 6: Reconnect and test the kegerator
Now that you have successfully installed the new swivel nuts, it’s time to reconnect and test your kegerator to ensure that everything is functioning properly.
Start by carefully reattaching the beer lines to the swivel nuts. Align the connectors with the swivel nuts and push them firmly into place. If there were clamps or connectors removed earlier, secure them back onto the connections to ensure a tight fit.
Once the beer lines are securely attached, it’s time to reconnect the keg coupler. Place the keg back into the kegerator, aligning the coupler with the keg valve. Firmly press the coupler down until it locks into place.
Now, it’s time to test the kegerator. Plug it back into the power source and turn it on. Allow the kegerator to cool for a while before testing the tap.
Get a glass and position it under the tap. Open the tap slowly and watch for any leaks or abnormal pouring. If you notice any leaks, immediately turn off the tap and check the connections. Ensure that the swivel nuts are tightened securely and that the beer lines are properly connected.
If everything looks good, pour yourself a refreshing glass of beer and enjoy!
It’s always a good idea to monitor the kegerator and check for any leaks or issues in the following days. If you notice any problems, consult your kegerator’s instruction manual or contact the manufacturer for further troubleshooting.
Congratulations! You have successfully replaced the swivel nuts on your kegerator and can now enjoy your favorite on-tap beers with confidence.
Remember to practice regular maintenance and inspections to keep your kegerator in optimal condition. This includes cleaning the beer lines, sanitizing the system, and periodically checking for any wear or damage on the fittings.
Thank you for following this step-by-step guide, and we hope you enjoy many delicious pours from your newly replaced swivel nuts!
Conclusion
Replacing the swivel nuts on your kegerator is a simple yet essential maintenance task that ensures the proper functioning of your beer dispenser. By following the step-by-step instructions in this guide, you have learned how to gather the necessary tools and materials, turn off and disconnect the kegerator, remove the existing swivel nuts, clean the threads on the kegerator, install the new swivel nuts, and finally reconnect and test the kegerator.
By replacing worn or damaged swivel nuts, you have taken a proactive step in maintaining your kegerator and ensuring a smooth pouring experience. Properly functioning swivel nuts create a secure connection between the beer lines and the keg coupler, preventing leaks that can result in wasted beer and a less-than-optimal drinking experience.
Remember to always consult your kegerator’s instruction manual or reach out to the manufacturer for model-specific information and recommendations. Different kegerators may have slight variations in design and assembly, and it’s crucial to follow the guidelines provided to avoid any complications.
Regular maintenance is key to enjoying fresh and correctly poured beer from your kegerator. In addition to replacing swivel nuts, be sure to clean and sanitize the beer lines, inspect the fittings, and monitor for any leaks or issues. By maintaining your kegerator properly, you can ensure the longevity of the equipment and continue to enjoy the convenience of tap beer at home.
We hope this guide has been helpful in guiding you through the process of replacing the swivel nuts on your kegerator. Now, raise a glass and savor the satisfaction of a job well done!
Frequently Asked Questions about How To Replace The Swivel Nuts On Kegerator
Was this page helpful?
At Storables.com, we guarantee accurate and reliable information. Our content, validated by Expert Board Contributors, is crafted following stringent Editorial Policies. We're committed to providing you with well-researched, expert-backed insights for all your informational needs.


0 thoughts on “How To Replace The Swivel Nuts On Kegerator”