Home>Articles>How To Restore Griswold Waffle Iron Nickel Plated Handles
Articles
How To Restore Griswold Waffle Iron Nickel Plated Handles
Modified: September 1, 2024
Learn how to restore Griswold waffle iron with nickel plated handles by reading our informative articles on the process and tips for achieving professional results.
(Many of the links in this article redirect to a specific reviewed product. Your purchase of these products through affiliate links helps to generate commission for Storables.com, at no extra cost. Learn more)
Introduction
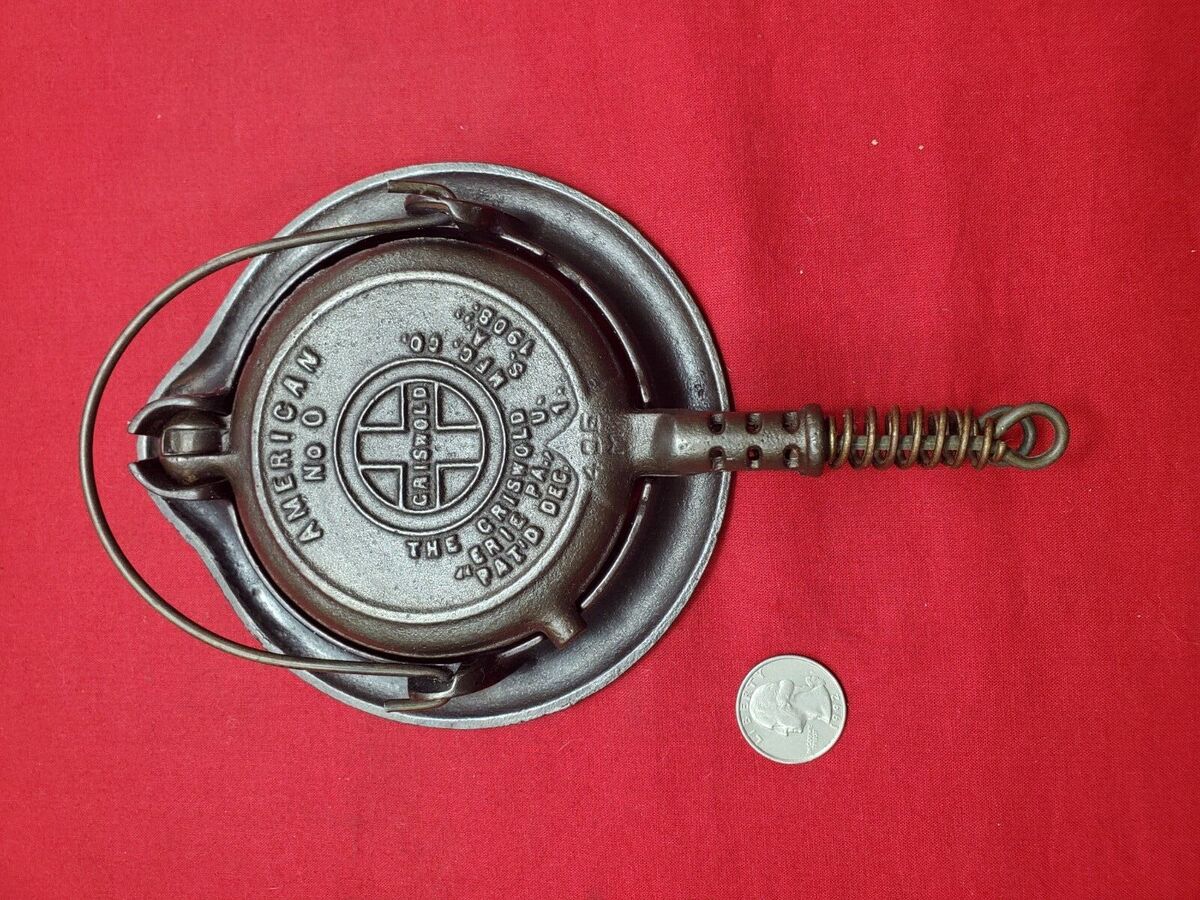
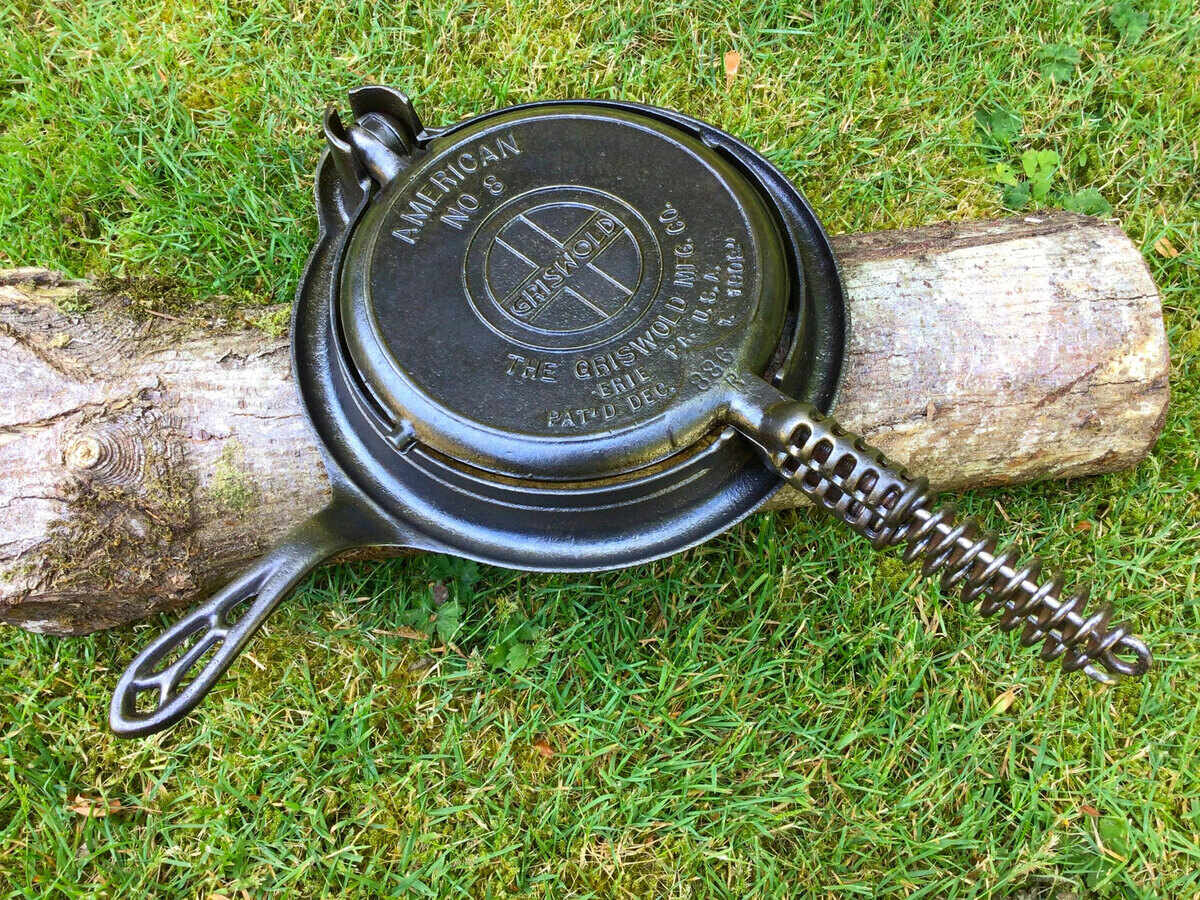
Welcome to this comprehensive guide on how to restore nickel plated handles on a Griswold waffle iron. The Griswold waffle iron is a timeless kitchen appliance that has been treasured by many generations. However, over time, the nickel plating on the handles may deteriorate, leaving them looking dull and worn out.
Restoring the nickel plated handles is a rewarding project that can bring back the original beauty and functionality of your Griswold waffle iron. Whether you want to preserve a family heirloom or simply revitalize a vintage find, this guide will provide you with step-by-step instructions on how to successfully restore the nickel plated handles.
Before we dive into the restoration process, it is important to gather the necessary tools and materials. You will need a few common household items, such as mild soap, a soft brush, sandpaper (in various grits), nickel plating solution, and a polishing compound. Additionally, you will need protective gear, such as gloves and safety goggles, to ensure your safety throughout the process.
Now that you have your supplies ready, let’s begin the journey of restoring your Griswold waffle iron’s nickel plated handles. This rewarding process will not only give your waffle iron a fresh new look but also provide you with a sense of accomplishment as you bring new life to a cherished kitchen appliance.
Key Takeaways:
- Restoring the nickel plated handles on a Griswold waffle iron is a rewarding and meticulous process that requires attention to detail, patience, and a step-by-step approach to achieve a professional and polished finish.
- By following the comprehensive guide, you can successfully bring new life to a cherished kitchen appliance, preserving culinary history and creating a visually appealing and functional waffle iron that can be enjoyed for years to come.
Preparing the Waffle Iron for Restoration
Before you can begin the restoration process, it is important to properly prepare the waffle iron. Start by disconnecting the waffle iron from any power source and ensure that it is completely cool.
Next, inspect the waffle iron for any existing damage or rust. If you notice any rust spots or areas of corrosion, you will need to address these issues before proceeding with the restoration. Use a mild soap and a soft brush to gently clean the surface of the waffle iron, ensuring that you remove any dirt or debris that may be present.
If there are rust spots, you can use a rust remover or a mixture of vinegar and baking soda to eliminate them. Apply the rust remover to the affected areas and let it sit for several minutes. Then, use a soft brush or a sponge to gently scrub away the rust. Rinse the waffle iron thoroughly and dry it completely before moving on to the next step.
Once the waffle iron is clean and dry, you may need to disassemble it to access the handles more easily. Check if there are any screws or bolts holding the handles in place and carefully remove them. Keep track of the hardware to ensure that you can reassemble the waffle iron properly later on.
With the waffle iron disassembled, you can now focus on the handles themselves. Inspect the handles for any signs of damage or excessive wear. If the nickel plating is peeling or flaking off, it will need to be removed before proceeding with the restoration process.
If the handles are still in good condition but have lost their shine, you may be able to skip the removal step and move directly to the cleaning and polishing stage. However, if the nickel plating is damaged, it is crucial to remove it completely to achieve a smooth and even finish.
Now that you have prepared the waffle iron for restoration, you can move on to the next step of removing the existing nickel plating.
Removing the Existing Nickel Plating
Removing the existing nickel plating is a crucial step in the restoration process, as it will create a clean and smooth surface for the new plating to adhere to. There are a few methods you can use to remove the old nickel plating, depending on your preference and the condition of the handles.
One method is to use a chemical paint stripper specifically designed for metal surfaces. Apply the paint stripper to the handles, following the manufacturer’s instructions. Use a brush or sponge to spread the stripper evenly and let it sit for the recommended amount of time. After the designated time has passed, use a scraper or a soft cloth to gently remove the softened nickel plating. Be cautious not to damage the underlying metal. Repeat this process until the old plating is completely removed.
If you prefer a more natural approach, you can try a mixture of vinegar and salt. Create a paste-like consistency by mixing equal parts vinegar and salt. Apply the mixture to the handles and let it sit for a few minutes. Then, use a soft brush or sponge to scrub away the old plating. Rinse the handles thoroughly with water to remove any residue.
Another option is to use sandpaper to manually sand away the old nickel plating. Start with a coarse grit sandpaper (around 80 or 120 grit) to remove the majority of the plating. Use gentle, circular motions to avoid scratching the metal underneath. Once the majority of the plating is removed, switch to a finer grit sandpaper (around 220 or 320 grit) to smooth out the surface. Make sure to sand evenly and remove any remaining traces of the old plating.
After removing the old nickel plating, it is essential to thoroughly clean the handles to remove any residue or debris. Use a mild soap and warm water to clean the handles, ensuring that all traces of the stripping agent or sanding dust are removed. Rinse the handles well and dry them completely before moving on to the next step.
With the old nickel plating removed and the handles cleaned, you are now ready to proceed with the next stage of the restoration process: cleaning and sanding the handles.
Cleaning and Sanding the Handles
Now that the old nickel plating has been removed from the handles, it is time to focus on cleaning and sanding them to prepare for the new plating. This step is crucial in ensuring a smooth and polished finish for your Griswold waffle iron handles.
Start by cleaning the handles with a mild soap and warm water to remove any dirt or residue. Use a soft brush or sponge to gently scrub the handles, paying attention to any crevices or hard-to-reach areas. Rinse the handles thoroughly with water and pat them dry with a clean towel.
Once the handles are clean and dry, it is time to sand them to create a smooth surface for the new nickel plating. Begin with a medium-grit sandpaper, around 220 or 320 grit, and gently sand the handles in a circular motion. This will help to remove any remaining imperfections or roughness on the surface. Be sure to sand evenly and apply light pressure to avoid damaging the handles.
After sanding with the medium-grit sandpaper, move on to a fine-grit sandpaper, around 400 or 600 grit, to further refine the surface. This will help to smooth out any remaining roughness and ensure a polished finish. Again, use a circular motion and apply light pressure as you sand the handles.
Periodically check the handles to assess their smoothness and remove any inconsistencies. If necessary, you can switch to an even finer-grit sandpaper, such as 800 or 1000 grit, for a more refined surface. The goal is to create a handle surface that is free of imperfections and ready for the new nickel plating.
After sanding, clean the handles once again to remove any dust or particles from the sanding process. Use a soft cloth or sponge and warm water to wipe down the handles, ensuring they are completely free of any debris.
Now that the handles are clean and properly sanded, it is time to move on to the next step of the restoration process: applying the new nickel plating.
To restore nickel-plated handles on a Griswold waffle iron, gently clean with a mild soap and water, then use a metal polish to remove tarnish and restore shine. Avoid abrasive cleaners to prevent damage to the nickel plating.
Applying the New Nickel Plating
With the handles of your Griswold waffle iron clean and sanded, it’s time to apply the new nickel plating. This step will give your handles a fresh, shiny look and protect them from future wear and tear. Before proceeding, make sure you have a nickel plating solution and all the necessary equipment.
Start by applying a thin layer of nickel plating solution to the handles. You can use a brush or a sponge to evenly distribute the solution, making sure to cover the entire surface of each handle. Follow the instructions provided with the nickel plating solution, as different brands may have specific guidelines.
Once the solution is applied, carefully place the handles in a designated area where they can be left undisturbed for the recommended amount of time. This allows the nickel plating to bond properly to the handles and create a durable finish. Maintain the recommended temperature and humidity conditions as specified by the manufacturer.
During the plating process, periodically check the handles to ensure that the nickel plating is developing evenly. If you notice any areas that seem uneven or have not been coated, you can gently brush or dab more nickel plating solution onto those spots. Be cautious not to overapply, as this can result in an uneven or lumpy finish.
After the desired plating time has elapsed, carefully rinse the handles with clean water to remove any excess nickel plating solution. Pay close attention to ensure that no residue remains. Use a soft cloth or sponge to gently dry the handles, ensuring that they are completely dry before proceeding.
At this point, you can assess the quality of the nickel plating. If you are satisfied with the appearance and coverage, you can move on to the next step of the restoration process. However, if you notice any imperfections or unevenness, you can repeat the plating process, ensuring that you maintain the recommended temperature and humidity conditions for optimal results.
Now that you have successfully applied the new nickel plating to your Griswold waffle iron handles, it’s time to move on to the next step: polishing and finishing.
Polishing and Finishing the Handles
After applying the new nickel plating to the handles of your Griswold waffle iron, it’s time to give them a final polish and finish. This step will enhance the shine and overall appearance of the handles, giving them a professional and polished look.
Start by using a fine-grit sandpaper, around 1000 or 1200 grit, to gently smooth out the surface of the nickel plating. Lightly sand the handles in a circular motion, being careful not to apply too much pressure. This will help to remove any minor imperfections and make the surface even smoother.
After sanding, clean the handles with warm water and a mild soap to remove any debris or residue. Use a soft cloth or sponge to gently wipe down the surface, ensuring that the handles are completely clean.
Next, apply a small amount of a suitable polishing compound to the handles. You can use a soft cloth or a polishing pad to rub the compound onto the surface of the nickel plating. Work in small circular motions, applying light to moderate pressure, until the plating starts to shine and the surface becomes even more smooth.
Continue polishing the handles until you achieve the desired level of shine. Take your time and be patient, as this step can greatly enhance the overall appearance of your Griswold waffle iron handles. Periodically check the handles to assess the progress and make any necessary adjustments.
Once you are satisfied with the shine and smoothness of the handles, use a clean, soft cloth to remove any excess polishing compound from the surface. Gently buff the handles in a circular motion to further enhance their shine and remove any remaining residue.
Finally, protect the newly polished nickel plating by applying a thin layer of clear lacquer or a protective metal coating. This will help to prevent tarnishing and ensure the longevity of the restored handles. Follow the instructions provided with the chosen protective coating and allow it to dry completely before handling the handles.
Now that you have polished and finished the handles, you are ready for the final step of the restoration process: reattaching them to the waffle iron.
Reattaching the Handles to the Waffle Iron
After completing the restoration process and achieving beautifully polished handles, it’s time to reattach them to the Griswold waffle iron. This final step will bring your waffle iron back to its functional state, ready to create delicious homemade waffles.
First, gather all the screws and bolts that you had removed previously when disassembling the waffle iron. Ensure that they are clean and in good condition before proceeding.
Carefully align the handles with the designated holes on the sides of the waffle iron. Insert the screws or bolts through the holes, keeping the handles in place. Use a screwdriver or an appropriate tool to tighten the screws, ensuring that the handles are secure but not overly tightened.
As you tighten the screws, double-check that the handles are properly aligned and centered on the waffle iron. Take your time to make any necessary adjustments before fully tightening the screws.
Once the handles are securely attached, test them by gently pulling on them to ensure that they are stable and will not come loose during use. If the handles feel secure, you can proceed with confidence to the final step of the process.
Before using your restored Griswold waffle iron, it is important to clean it once again. Use mild soap and warm water to clean the surface of the waffle iron, making sure to remove any dust or debris that may have accumulated during the restoration process.
Rinse the waffle iron thoroughly with water and pat it dry with a clean towel. Ensure that it is completely dry before plugging it in or using it to prevent any potential electrical hazards.
Now, with your Griswold waffle iron restored to its former glory, you are ready to enjoy making delicious waffles once again. Gather your favorite waffle batter, get your toppings ready, and savor the joy of homemade waffles with the satisfaction of restoring a cherished piece of culinary history.
Congratulations on successfully restoring the nickel plated handles on your Griswold waffle iron. May it continue to bring you many years of culinary delight!
Conclusion
Restoring the nickel plated handles on your Griswold waffle iron is a rewarding project that allows you to bring new life to a cherished kitchen appliance. By following the steps outlined in this comprehensive guide, you can successfully restore the handles and enhance the overall beauty and functionality of your waffle iron.
Throughout the restoration process, you have learned how to prepare the waffle iron for restoration, remove the existing nickel plating, clean and sand the handles, apply the new nickel plating, polish and finish the handles, and finally, reattach them to the waffle iron.
By investing the time and effort into restoring your Griswold waffle iron’s nickel plated handles, you have not only preserved a piece of culinary history but also created a functional and visually appealing kitchen appliance that can be enjoyed for years to come.
Remember, the key to a successful restoration is attention to detail and patience. Take your time at each step, ensuring that you follow the instructions carefully and work with precision. This will ultimately result in a high-quality restoration that exceeds your expectations.
Now that you have completed the restoration process, take the time to admire your work and appreciate the craftsmanship of your newly restored Griswold waffle iron. Share your achievement with friends and family, and enjoy the delicious homemade waffles that this treasured appliance can now create.
Thank you for joining us on this restoration journey, and congratulations on successfully restoring the nickel plated handles on your Griswold waffle iron. May it bring you many memorable breakfast moments and continue to be a beloved kitchen heirloom for generations to come!
Frequently Asked Questions about How To Restore Griswold Waffle Iron Nickel Plated Handles
Was this page helpful?
At Storables.com, we guarantee accurate and reliable information. Our content, validated by Expert Board Contributors, is crafted following stringent Editorial Policies. We're committed to providing you with well-researched, expert-backed insights for all your informational needs.


0 thoughts on “How To Restore Griswold Waffle Iron Nickel Plated Handles”