Articles
How To Store Charcuterie Board
Modified: December 7, 2023
Learn how to store and preserve charcuterie boards with our comprehensive articles. Discover the best practices and tips for keeping your board fresh and flavorful.
(Many of the links in this article redirect to a specific reviewed product. Your purchase of these products through affiliate links helps to generate commission for Storables.com, at no extra cost. Learn more)
Introduction
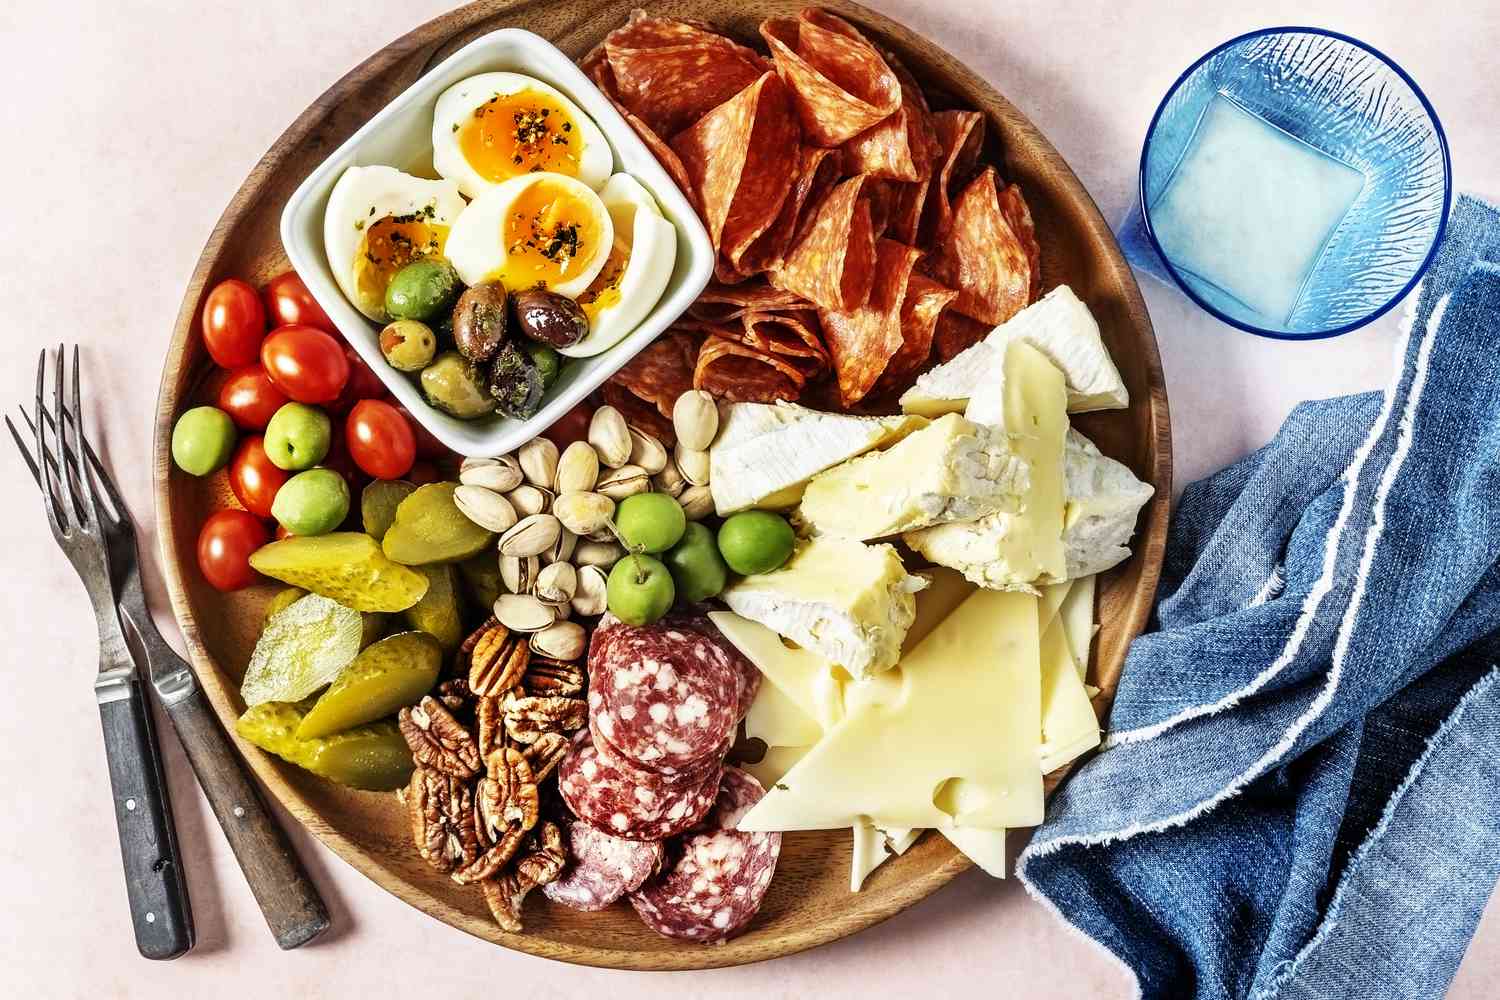
Welcome to the world of charcuterie! A charcuterie board, with its assortment of cured meats, cheeses, fruits, and accompaniments, has become a popular choice for gatherings, parties, and even for casual dinners at home. However, once you have created your beautiful charcuterie board, you might wonder how to store it to maintain its freshness and flavors.
In this article, we will guide you through the process of storing a charcuterie board properly, ensuring that your ingredients stay fresh and delicious for as long as possible. So let’s dive in and explore the steps to keep your charcuterie board in tip-top shape!
Key Takeaways:
- Elevate your gatherings with a perfectly stored charcuterie board! Gather diverse ingredients, select the right board, and follow proper storage techniques to maintain freshness and savor the flavors for longer.
- Impress your guests with a visually stunning and delicious charcuterie board. From assembling to storing, follow the steps and tips to ensure optimal freshness and enjoy every bite to the fullest.
Read more: How To Organize A Charcuterie Board
Gathering the Ingredients
Before you can even think about storing your charcuterie board, you need to gather the right ingredients. One of the key aspects of a charcuterie board is the variety it offers. Here are some key elements to consider:
- Cured Meats: Select a variety of cured meats such as salami, prosciutto, or chorizo. Aim for a balance of different flavors and textures.
- Cheeses: Choose a mix of soft, semi-soft, and hard cheeses. Consider options like brie, cheddar, gouda, goat cheese, or blue cheese to cater to different palates.
- Fruits: Add a pop of freshness and sweetness with seasonal fruits like grapes, strawberries, figs, or sliced apples.
- Nuts: Include a variety of nuts like almonds, walnuts, or pistachios to provide a crunchy texture and savory taste.
- Accompaniments: Consider adding condiments such as honey, mustard, jams, or chutneys to complement the flavors of the meats and cheeses.
- Bread and Crackers: Provide a variety of bread and crackers for guests to enjoy alongside the charcuterie. Baguette slices, breadsticks, or artisanal crackers work well.
When selecting your ingredients, it’s important to consider the preferences and dietary restrictions of your guests. Offering options for vegetarians or those with allergies ensures everyone can enjoy the charcuterie board.
Once you have gathered all the ingredients, it’s time to move on to selecting the right board to showcase your charcuterie masterpieces!
Choosing the Right Board
The presentation of a charcuterie board is just as important as the ingredients themselves. The right board can elevate the visual appeal of your charcuterie and make a lasting impression on your guests. Here are a few factors to consider when choosing the perfect board:
- Size and Shape: Consider the number of guests and the amount of food you plan to serve. A larger board allows for more variety, while a smaller one creates an intimate setting. Rectangular or round boards are the most common choices.
- Material: Wooden or marble boards are popular options that provide a rustic and elegant look. Alternatively, slate or ceramic boards offer a modern and sleek aesthetic. Choose a material that complements your personal style.
- Sections and Compartments: Some boards come with built-in sections or compartments, making it easier to organize and separate different ingredients. This can be useful if you want to keep flavors from mixing or if you have guests with specific dietary needs.
- Handles or Grips: If you plan to transport or move the board, consider opting for one with handles or grips for easy maneuverability.
Ultimately, choose a board that fits your personal style and makes you excited to showcase your charcuterie creation. Once you have selected the perfect board, it’s time to prepare and arrange the ingredients.
Preparing the Board
Preparing the board before assembling the charcuterie is an important step to ensure a visually appealing presentation. Here are some tips to prepare your charcuterie board:
- Clean and Dry: Start by cleaning your board thoroughly with mild soap and water. Rinse it well and let it dry completely before proceeding.
- Seasoning: If you have a wooden board, you may consider applying a food-safe oil or beeswax to prevent the wood from absorbing any liquids and flavors. This helps maintain the integrity of the board and prolong its lifespan.
- Garnish: Before arranging the ingredients, you can add some decorative elements to enhance the board’s aesthetic appeal. Fresh herbs, edible flowers, or small bowls of olives can add a splash of color and visual interest.
Once the board is prepped and ready, it’s time to bring all the delicious components together in an eye-catching display.
When storing a charcuterie board, wrap the meats and cheeses separately in plastic wrap or wax paper to prevent them from drying out. Store any leftover fruits and nuts in airtight containers in the refrigerator.
Assembling the Charcuterie
The art of assembling a charcuterie board lies in creating a visually pleasing and balanced arrangement of ingredients. Follow these steps to assemble your charcuterie masterpiece:
- Start with Cheeses: Begin by placing the cheeses on the board. If using whole cheeses, cut them into bite-sized pieces or slices. Spread them out to create a good distribution throughout the board.
- Layer the Cured Meats: Add the cured meats next, arranging them in a way that complements the cheeses. Consider folding or rolling the slices for an added touch of elegance.
- Add Fruits and Nuts: Scatter the fruits and nuts around the board to break up the textures and add pops of color. You can create small clusters or group them adjacent to the related meats and cheeses.
- Fill in the Empty Spaces: Fill any remaining space on the board with bread and crackers. It’s best to keep them separate from the meats and cheeses to prevent them from becoming soggy.
- Arrange the Accompaniments: Place small bowls or jars of condiments strategically around the board. Ensure they are easily accessible and visually appealing.
- Garnish and Finishing Touches: Use fresh herbs or edible flowers to garnish the charcuterie board. These final touches not only add visual interest but also impart subtle flavors.
As you assemble the board, consider creating different levels and heights by using rolled meats or raised plates. This adds dimension and makes the charcuterie more visually appealing.
Remember, there’s no right or wrong way to arrange a charcuterie board. Let your creativity shine and have fun with it!
Read more: How To Store Cutting Board
Storing the Charcuterie Board
Once you have enjoyed your charcuterie board and there are leftovers, it’s important to store it properly to maintain the freshness of the ingredients. Here are some guidelines to follow:
- Separate and Wrap: Before storing, separate the different components of the charcuterie board. Place the cheeses in airtight containers or wrap them tightly with plastic wrap to prevent them from drying out and absorbing other flavors.
- Store Meats and Fruits: Cured meats and fruits should be stored in separate containers or bags to avoid cross-contamination. Use airtight containers or resealable bags to maintain their freshness.
- Refrigerate Promptly: Place all the stored components of the charcuterie board in the refrigerator as soon as possible. Aim to store the leftovers within two hours of serving to ensure food safety.
- Label and Date: If you have multiple containers, it’s helpful to label them with the contents and date. This will make it easier to identify and consume the leftovers in a timely manner.
It’s important to note that charcuterie ingredients can have varying storage times. Check the individual items for their specific storage recommendations to ensure the best quality.
When you’re ready to enjoy the leftovers, take them out of the refrigerator and allow them to come to room temperature for about 15-30 minutes. This will enhance the flavors and textures before serving.
Now that you know how to store your charcuterie board, let’s explore some tips to help maintain freshness and quality.
Tips for Maintaining Freshness
To ensure your charcuterie board stays fresh and delicious, here are some helpful tips to keep in mind:
- Proper Temperature: Keep your charcuterie board refrigerated until you’re ready to serve. Cold temperatures slow down bacterial growth and help maintain the freshness of the ingredients.
- Avoid Moisture: Moisture can cause the bread and crackers to become soggy and the cheeses to lose their texture. Store the cheeses separately from the bread and crackers to prevent them from absorbing moisture.
- Wrap and Seal: Use airtight containers or resealable bags to store individual components of the charcuterie, such as cheeses, cured meats, and fruits. This will help preserve their flavors and prevent cross-contamination.
- Consume Within a Few Days: While some ingredients like hard cheeses and cured meats have longer shelf lives, it’s best to consume your charcuterie board within a few days for optimal freshness. Check individual items for specific storage guidelines.
- Refresh and Replenish: If you plan to serve the charcuterie board again or enjoy the leftovers, replenish any consumed ingredients with fresh ones. This ensures each serving is as fresh and delicious as the first.
- Use Quality Ingredients: Selecting high-quality ingredients from reputable sources helps ensure the best flavors and longevity of your charcuterie board. Fresh fruits, properly cured meats, and well-aged cheeses make all the difference.
By following these tips, you can prolong the freshness of your charcuterie board and continue to enjoy its delectable flavors.
Conclusion
Creating and enjoying a charcuterie board is a delightful experience. From selecting the perfect ingredients to arranging them in an artful display, every step contributes to a visually appealing and delicious spread.
When it comes to storing your charcuterie board, proper handling and storage techniques are essential. Remember to separate and wrap the components, refrigerate promptly, and label containers for easy identification. By following these steps, you can extend the freshness of your charcuterie and savor the flavors for longer.
Additionally, implementing tips such as maintaining proper temperature, preventing moisture, and using quality ingredients can further enhance the longevity and enjoyment of your charcuterie creations.
Whether you’re hosting a party or indulging in a cozy night at home, properly storing your charcuterie ensures that the flavors remain vibrant and the textures are preserved. So go ahead and savor every bite, knowing that you have mastered the art of storing your charcuterie board.
Now that you have all the knowledge and tips necessary, it’s time to start planning your next charcuterie board and impress your guests with a fresh and visually stunning display of flavors.
Frequently Asked Questions about How To Store Charcuterie Board
Was this page helpful?
At Storables.com, we guarantee accurate and reliable information. Our content, validated by Expert Board Contributors, is crafted following stringent Editorial Policies. We're committed to providing you with well-researched, expert-backed insights for all your informational needs.


0 thoughts on “How To Store Charcuterie Board”