Articles
How To Store Homemade Wine
Modified: October 18, 2024
Learn the best methods for storing your homemade wine with these informative articles. Discover tips and tricks to preserve the flavor and quality of your delicious creations.
(Many of the links in this article redirect to a specific reviewed product. Your purchase of these products through affiliate links helps to generate commission for Storables.com, at no extra cost. Learn more)
Introduction
Making homemade wine is a labor of love. From carefully selecting the grapes to monitoring the fermentation process, every step is crucial in creating a delicious and satisfying beverage. But once your wine is ready, proper storage becomes essential to preserve its taste and aroma.
In this article, we will guide you through the process of storing your homemade wine to ensure that it matures correctly and retains its quality over time. From selecting the right containers to monitoring and aging, we will provide you with valuable tips and insights that will help you enjoy your homemade wine for years to come.
So, let’s dive in and discover the secrets of storing homemade wine!
Key Takeaways:
- Proper storage of homemade wine is crucial for preserving its taste and aroma. Select the right containers, clean and sanitize equipment, seal bottles properly, and store in a cool, dark place to ensure optimal aging and enjoyment.
- Monitoring and aging homemade wine is a patient and rewarding process. Keep detailed records, regularly taste and adjust the wine, and savor the journey of witnessing its transformation. Enjoy the fruits of your labor by sharing and celebrating your winemaking achievements.
Read more: How To Store Homemade Boba
Step 1: Selecting the Right Containers
Choosing the appropriate containers for storing your homemade wine is the first and crucial step in ensuring its longevity. The ideal containers are typically made of glass or food-grade plastic. These materials do not react chemically with the wine and provide a stable environment for aging.
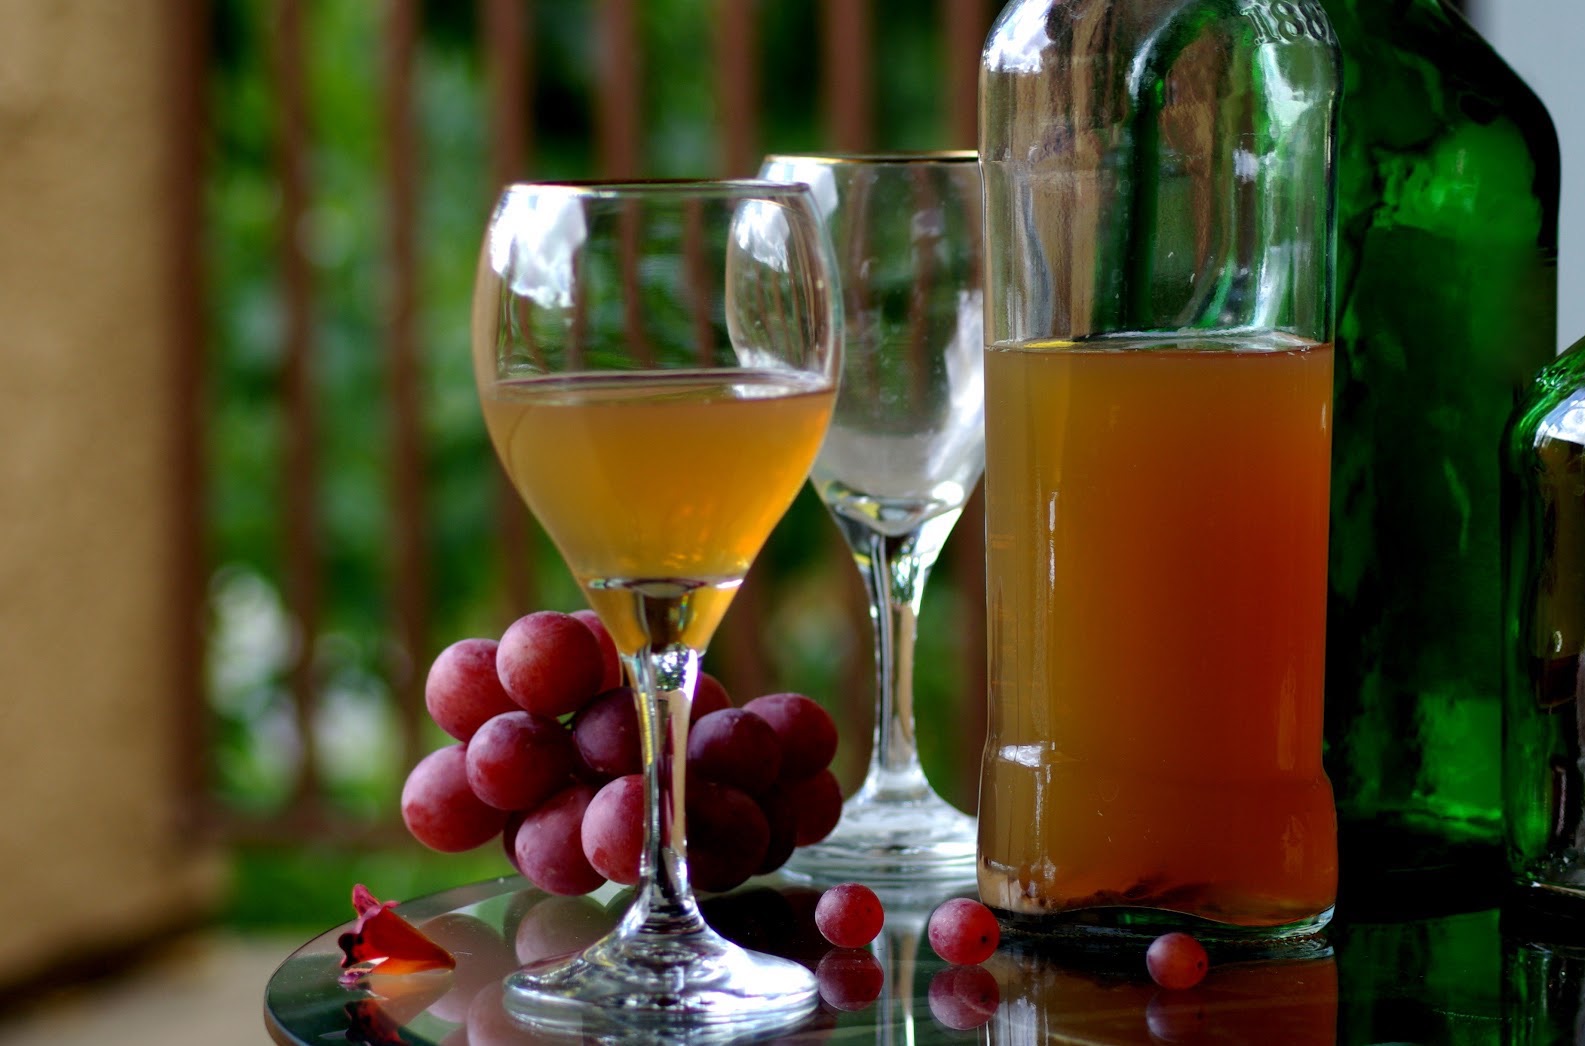
Glass bottles are a popular choice for long-term storage. They come in various sizes and shapes, allowing you to select the most suitable option based on the quantity of wine you have. Look for bottles with airtight closures such as cork or screw caps to prevent oxygen from entering and spoiling the wine.
If you prefer plastic containers, make sure they are specifically designed for storing food and beverages. Look for containers made of PET (polyethylene terephthalate) as it is a safe and non-reactive material. Avoid using containers made of HDPE (high-density polyethylene) as it can affect the flavor of the wine over time.
Remember to thoroughly clean and sanitize the containers before transferring your homemade wine into them. Residual dirt or bacteria can spoil the wine and lead to off flavors. Use a mild detergent and warm water to clean the containers, rinsing them thoroughly to remove any soap residue.
Once cleaned, sanitize the containers by using a solution of Campden tablets or a food-grade sanitizer. Follow the instructions on the packet for the correct dosage and contact time. Sanitizing is crucial to eliminate any potential contaminants that could affect the quality of the wine during storage.
After cleaning and sanitizing, allow the containers to dry completely before transferring the wine into them. Any moisture left behind can promote the growth of mold or mildew, which can ruin the wine.
By carefully selecting the right containers and ensuring they are clean and sanitized, you are setting the foundation for proper wine storage and the preservation of its quality and flavor.
Step 2: Cleaning and Sanitizing
Properly cleaning and sanitizing your equipment is crucial when it comes to storing homemade wine. Any residue or bacteria left behind can contaminate the wine and compromise its quality. Follow these steps to ensure your equipment is clean and ready for use.
1. Start by disassembling all the equipment used in the winemaking process. This includes fermenting vessels, airlocks, siphoning equipment, and any other tools that came into contact with the wine.
2. Rinse all the equipment with hot water to remove any visible debris or sediment. This step will help remove any larger particles that could interfere with the cleaning process.
3. Prepare a cleaning solution by mixing a mild detergent or specialized winemaking cleaner with warm water. Follow the instructions provided by the manufacturer for the correct dilution ratio.
4. Use a soft brush or sponge to scrub the equipment, paying special attention to the areas that come into direct contact with the wine. Ensure that all surfaces are thoroughly cleaned, including crevices and hard-to-reach areas.
5. Rinse all the equipment with hot water to remove any traces of the cleaning solution. It is important to rinse thoroughly to ensure that no residue is left behind.
6. Once the equipment is clean, it is time to sanitize. Sanitizing helps eliminate any remaining bacteria or contaminants that may still be present. There are several options for sanitizing, including using Campden tablets, a winemaking sanitizer, or a solution of food-grade hydrogen peroxide.
7. Follow the instructions provided by the sanitizer manufacturer for the correct dosage and contact time. Make sure to sanitize all the equipment thoroughly, including the airlocks, siphoning tubes, and any other tools that come into contact with the wine.
8. After sanitizing, give the equipment a final rinse with hot water. This step helps remove any residual sanitizer and ensures that the equipment is ready for use.
By taking the time to properly clean and sanitize your equipment, you are reducing the risk of contamination and ensuring that your homemade wine is stored in a clean and safe environment. This will contribute to the longevity and quality of your wine.
Step 3: Filling the Bottles
Once your homemade wine is ready to be bottled, it’s important to handle the process with care to maintain its quality. Follow these steps to ensure a smooth and successful bottling process.
1. Prepare the bottles: Before filling the bottles, make sure they are clean and sanitized. Inspect each bottle for any chips or cracks and discard any damaged ones. Depending on the size of your batch, you may need to sterilize and prepare a large number of bottles.
2. Set up your bottling station: Create a clean and organized area dedicated to the bottling process. This can be a table or countertop covered with a clean towel or sheet. Place your sanitized bottles, a siphoning tube, and an auto-siphon nearby for easy access.
3. Siphon the wine: Attach the siphoning tube to the auto-siphon and place the other end in the container where your homemade wine is stored. Begin the siphoning process by priming the tube and allowing the wine to flow into the bottles. Be careful not to disturb the sediment at the bottom, as it can affect the clarity and taste of your wine.
4. Fill the bottles: Gently position the auto-siphon inside the first bottle and start filling it with wine. Leave a small amount of headspace at the top of each bottle to allow for expansion during aging. Fill the bottles using a slow and steady motion to prevent splashing and oxidation.
5. Cap or cork the bottles: Once each bottle is filled, cap it immediately with an airtight closure. If you are using cork closures, use a corking tool to securely seal the bottles. Ensure that the closures are properly applied to maintain a tight seal and prevent air from entering the bottles.
6. Label the bottles: It’s important to label your wine bottles with information such as the date, grape variety, and any other relevant details. This will help you keep track of your wine collection and provide useful information when it comes time to enjoy your homemade wine.
7. Store the filled bottles: After bottling, store the wine in a cool and dark place. The ideal temperature for storing wine is between 55 to 59 degrees Fahrenheit (12 to 15 degrees Celsius). Avoid storing the bottles near sources of heat or light, as they can degrade the wine over time.
By following these steps, you can ensure that the bottling process is handled correctly, preserving the quality and flavor of your homemade wine. Properly filled and sealed bottles will contribute to the long-term storage and enjoyment of your wine.
Store homemade wine in a cool, dark place with a consistent temperature, such as a cellar or basement. Keep the bottles on their side to keep the cork moist and prevent oxidation. Avoid storing in areas with strong odors or vibrations.
Step 4: Sealing the Bottles
Properly sealing your homemade wine bottles is essential for maintaining the quality and freshness of the wine during storage. When done correctly, the seal will prevent oxygen from entering the bottles and keep the wine in optimal condition. Follow these steps to ensure a proper seal on your wine bottles.
1. Choose the right closures: There are several options available for sealing wine bottles, including corks, screw caps, and synthetic closures. Each type has its advantages and considerations, so choose a closure that suits your preferences and the type of wine you have made.
2. Prepare the closures: If you are using natural corks, they will need to be sanitized and moistened before insertion. Soak the corks in a sanitizing solution and then moisten them in a container of sanitizer or warm water. This step helps prevent the corks from drying out and shrinking, ensuring a proper seal.
3. Insert the closures: Once the corks are prepared, use a corker tool to insert them into the bottles. Position the corking tool over the bottle opening and apply gentle pressure to insert the cork. Make sure the cork is inserted fully and level with the top of the bottle.
4. Check the seal: After inserting the corks or other closures, ensure they are securely in place and providing a tight seal. Gently twist the closure to check for any movement or looseness. A properly sealed bottle should have no gaps or any sign of leakage.
5. Consider wax sealing: If you want to add an extra layer of protection and elegance to your wine bottles, you can consider applying a wax seal over the closures. This is purely optional but can provide a visually appealing and secure seal. Follow the instructions provided with the wax sealing kit for the best results.
6. Store the sealed bottles: Once the bottles are properly sealed, store them in a cool and dark place. Maintain a consistent temperature to ensure the longevity and quality of the wine. Avoid storing the bottles in areas that are subject to extreme temperature fluctuations or direct sunlight.
By following these steps and choosing the appropriate closures, you can ensure that your homemade wine bottles are properly sealed. This will preserve the quality and taste of the wine during storage, allowing you to enjoy it at its best when the time comes.
Read more: How To Store Homemade Pies
Step 5: Storing in a Cool and Dark Place
Proper storage conditions are vital for maintaining the quality and flavor of your homemade wine. Exposure to light, heat, and fluctuations in temperature can cause the wine to deteriorate quickly. Follow these steps to ensure that your wine is stored in a cool and dark place.
1. Find an appropriate storage location: Look for a space in your home that is consistently cool and dark. Ideally, the temperature should be between 55 to 59 degrees Fahrenheit (12 to 15 degrees Celsius). Avoid areas near heating vents, direct sunlight, or other sources of heat, as they can cause the wine to spoil.
2. Consider a wine cellar or wine refrigerator: If you have a larger wine collection, investing in a wine cellar or a wine refrigerator can provide the optimal storage conditions. These specialized storage units are designed to maintain a consistent temperature and humidity level, keeping the wine in perfect condition.
3. Store the bottles horizontally: If you are using cork closures, store the bottles horizontally rather than vertically. This allows the wine to keep the cork moist, preventing it from drying out and allowing air to seep into the bottle.
4. Protect from light: Keep your wine bottles away from direct sunlight and fluorescent lighting, as they can degrade the wine over time. UV rays can cause the wine to age prematurely and develop off-flavors. Store your bottles in a dark area or use protective covers or wine racks that block out light.
5. Maintain humidity levels: While it is important to avoid high humidity that can cause labels to peel off or mold to grow, it is also crucial to prevent low humidity levels that can dry out the corks. Aim for a humidity level between 60 to 70 percent to keep the corks in good condition.
6. Minimize vibrations: Vibrations can disturb the sediments in the wine and affect its flavor. Avoid storing the bottles next to appliances or areas with high foot traffic, as these can cause unnecessary vibrations. Opt for a quiet and stable location for your wine storage.
By following these steps, you can create an ideal environment for storing your homemade wine. A cool and dark place with stable temperature and humidity levels will allow the wine to age gracefully, preserving its quality and ensuring an enjoyable drinking experience.
Step 6: Monitoring and Aging the Wine
As your homemade wine matures in storage, it is important to monitor its progress and ensure that it is aging properly. By regularly checking on the wine and making necessary adjustments, you can ensure that it develops the desired flavors and characteristics. Follow these steps to effectively monitor and age your wine.
1. Maintain a wine journal: Keep a record of important details such as the date of bottling, grape variety, and any specific techniques or additives used during the winemaking process. This information will help you track the wine’s development and make informed decisions about when to open a bottle.
2. Taste testing: Regularly sample your stored wine to assess its flavor and aroma. This will help you determine whether the wine is aging well and developing the desired characteristics. Take note of any changes, positive or negative, and make adjustments accordingly.
3. Adjusting storage conditions: If you notice any issues with the stored wine, such as a vinegar-like smell or off-flavors, it may indicate a problem with the storage conditions. Check the temperature, humidity, and light exposure to ensure they are within the recommended ranges. Make any necessary adjustments to create a more suitable environment for aging.
4. Aging potential: Different types of wine have varying aging potential. Research the specific grape variety and consult resources or experts in winemaking to understand the optimal aging period for your wine. Some wines may benefit from extended aging, while others are better enjoyed in their youth.
5. Patience is key: Aging wine is a patient process. Some wines may require months or even years to reach their peak flavor. Avoid the temptation to open bottles too early. Give the wine adequate time to develop and mature, respecting its aging potential.
6. Rotate bottles: If you have a larger wine collection, try rotating the bottles in your storage to ensure even aging. This can help distribute any sediment that may have settled over time and allow the wine to develop more consistently.
7. Enjoying the journey: Aging wine is not just about the end result, but also the joy of witnessing its transformation. Take pleasure in the gradual evolution of flavors and aromas, and savor the experience of opening a well-aged bottle of your homemade wine.
By actively monitoring and aging your wine, you can ensure that it reaches its full potential. Regular tastings and adjustments, along with patience and careful storage, will contribute to the development of a fine wine that reflects your winemaking expertise and dedication.
Step 7: Enjoying the Fruits of Your Labor
After all the hard work and patience, the time has finally come to enjoy the fruits of your labor. Opening a bottle of your homemade wine is a moment of celebration and satisfaction. Follow these steps to fully appreciate and savor the wine that you have carefully stored and aged.
1. Properly decant the wine: Before serving, consider decanting the wine to enhance its flavors and aromas. Gently pour the wine into a decanter, leaving behind any sediment at the bottom of the bottle. This step helps to improve the wine’s clarity and allows it to breathe, releasing its full potential.
2. Set the right serving temperature: Different wines have different optimal serving temperatures. Consult resources or experts to determine the ideal temperature for your specific type of wine. Avoid serving the wine too cold or too warm, as extreme temperatures can mask or alter its flavors.
3. Use the appropriate glassware: Invest in quality wine glasses to fully appreciate the complexity and nuances of your homemade wine. Choose glasses that have a tulip-shaped bowl, which helps concentrate the aromas and directs them towards the nose.
4. Take note of the wine’s aromas and flavors: Before taking a sip, take a moment to observe the wine’s color, clarity, and viscosity. Swirl the wine gently in the glass to release its aromas, and inhale deeply to fully appreciate its bouquet. Take small sips and allow the flavors to unfold on your palate.
5. Pairing with food: Consider pairing your homemade wine with complementary foods to enhance the overall dining experience. The right choice of food can elevate the flavors of the wine and vice versa. Experiment with different pairings to find the perfect combination.
6. Share the experience: Wine is meant to be enjoyed with good company. Invite friends and loved ones to savor your homemade wine and share in the pride of your winemaking journey. Discuss the flavors, share tasting notes, and appreciate the communal experience of enjoying a glass of wine together.
7. Reflect on your achievements: As you savor your homemade wine, take a moment to reflect on all the hard work, patience, and dedication that went into creating it. Celebrate the success of your winemaking endeavors and appreciate the unique taste of a wine that is truly your own.
By following these steps to enjoy your homemade wine, you can fully immerse yourself in the experience and savor the culmination of your winemaking efforts. Raise a glass and toast to your success!
Frequently Asked Questions about How To Store Homemade Wine
Was this page helpful?
At Storables.com, we guarantee accurate and reliable information. Our content, validated by Expert Board Contributors, is crafted following stringent Editorial Policies. We're committed to providing you with well-researched, expert-backed insights for all your informational needs.


0 thoughts on “How To Store Homemade Wine”