Articles
How To Store Homemade Yogurt
Modified: December 7, 2023
Learn the best techniques for storing homemade yogurt and keep it fresh and delicious with these helpful articles.
(Many of the links in this article redirect to a specific reviewed product. Your purchase of these products through affiliate links helps to generate commission for Storables.com, at no extra cost. Learn more)
Introduction
Welcome to the world of homemade yogurt! Making your own yogurt from scratch is not only a fun and rewarding culinary adventure, but it also allows you to control the ingredients and customize the taste to your liking. In this article, we will guide you through the process of storing homemade yogurt to ensure its freshness and quality.
Yogurt is a nutritious and versatile food that can be enjoyed on its own or used as an ingredient in a wide variety of dishes. It is packed with beneficial probiotics, vitamins, and minerals, making it an excellent addition to a healthy diet. By making your own yogurt at home, you have the freedom to choose the quality of ingredients, avoid preservatives and additives, and experiment with different flavors and textures.
Storing homemade yogurt properly is essential to maintain its taste and texture. Whether you make a small batch for personal consumption or a larger quantity for sharing with family and friends, following the correct storage techniques will ensure that your yogurt stays fresh and delicious for as long as possible.
Before we dive into the specifics of yogurt storage, let’s take a look at the benefits of homemade yogurt and the key factors to consider when choosing the right ingredients.
Key Takeaways:
- Enjoy the freedom of creating your own homemade yogurt, customizing flavors, and controlling ingredients to savor a delicious and nutritious treat with beneficial probiotics.
- Properly store homemade yogurt in airtight containers, label and date them, and refrigerate to maintain freshness and quality, ensuring a delightful treat for up to a week.
Read more: How To Store Yogurt
Benefits of Homemade Yogurt
Homemade yogurt offers several advantages over commercially-produced yogurt. Here are some of the key benefits:
1. Control Over Ingredients: When you make yogurt at home, you have complete control over the ingredients you use. You can choose high-quality milk, add your preferred sweeteners or flavors, and avoid any additives or preservatives that may be present in store-bought yogurt.
2. Probiotic Power: Yogurt is known for its probiotic content, which promotes a healthy gut by replenishing beneficial bacteria. Homemade yogurt allows you to maximize the probiotic benefits by choosing a yogurt starter with live and active cultures.
3. Customization: Making your own yogurt opens up a world of possibilities for customization. You can experiment with different flavors, fruits, and toppings to create your own unique yogurt combinations. This allows you to tailor the taste and texture to suit your preferences.
4. Cost-Effective: Making your own yogurt can be a more budget-friendly option in the long run. While there might be an initial investment in equipment, the cost per serving of homemade yogurt is generally lower compared to store-bought varieties.
5. Environmental Impact: Producing yogurt at home can reduce your environmental footprint. You can avoid the single-use plastic containers that come with commercial yogurt and instead store your homemade yogurt in reusable glass jars or containers.
6. Educational and Fun: Making yogurt from scratch can be a great learning experience for both adults and children. It’s a hands-on process that allows you to understand and appreciate the science behind fermentation and food preservation.
With these benefits in mind, let’s move on to the next section, where we will discuss the importance of choosing the right ingredients for your homemade yogurt.
Choosing the Right Ingredients
The quality of the ingredients you use plays a crucial role in the taste, texture, and overall success of your homemade yogurt. Here are some key considerations when selecting your ingredients:
1. Milk: The primary ingredient in yogurt is milk. It is important to choose fresh, high-quality milk for the best results. Opt for whole milk if you prefer a creamier and richer yogurt, or use low-fat or skim milk for a lighter option.
2. Yogurt Starter: You will need a yogurt starter culture to kick-start the fermentation process. This can be store-bought plain yogurt with live and active cultures or a powdered yogurt starter culture. Look for a starter that suits your taste preferences and dietary needs.
3. Sweeteners and Flavors: If you prefer sweetened yogurt, you can add natural sweeteners such as honey, maple syrup, or agave nectar to your liking. For flavor variations, you can incorporate fruit preserves, vanilla extract, or spices like cinnamon or nutmeg.
4. Optional Add-ins: Get creative with your yogurt by adding in additional ingredients like fresh fruits, nuts, granola, or chia seeds. These additions can enhance the taste, texture, and nutritional value of your yogurt.
5. Organic and Local: If possible, choose organic milk and other ingredients. Organic milk comes from cows that have been raised without hormones and antibiotics, resulting in a purer product. Similarly, using locally sourced ingredients supports the local economy and reduces your carbon footprint.
6. Quality Control: Making your own yogurt allows you to have full control over the ingredients used. You can avoid artificial flavors, colors, and preservatives commonly found in store-bought yogurts, ensuring a healthier end product.
By carefully selecting your ingredients, you can create a homemade yogurt that meets your preferences and dietary needs. Now that we have covered the importance of ingredient selection, let’s move on to the necessary equipment for making yogurt at home.
Necessary Equipment
To successfully make and store homemade yogurt, you will need a few essential pieces of equipment. Here are the items you’ll need:
1. Saucepan: A medium-sized saucepan is necessary for heating the milk. Choose a saucepan with a thick bottom to prevent scorching and ensure even heat distribution.
2. Thermometer: A digital or instant-read thermometer is crucial for monitoring the temperature of the milk. Yogurt fermentation requires precise temperature control, so having an accurate thermometer is essential.
3. Yogurt Maker or Insulated Container: While not mandatory, a yogurt maker or insulated container can make the incubation process more convenient and consistent. These containers help maintain the ideal temperature for the yogurt to ferment properly.
4. Glass Jars or Containers: Once your yogurt is ready, you’ll need storage containers to keep it fresh. Opt for glass jars or containers with airtight lids. Glass is preferable as it is non-reactive and won’t affect the taste or quality of the yogurt.
5. Strainer (Optional): If you prefer a thicker Greek-style yogurt, you may need a fine mesh strainer or cheesecloth to strain the yogurt and remove excess liquid.
6. Labels and a Pen: It’s helpful to have labels and a pen on hand to mark the date of when the yogurt was made. This will ensure that you consume the yogurt within a recommended timeframe.
7. Refrigerator: Lastly, a refrigerator is essential for storing and extending the shelf life of your homemade yogurt. Once your yogurt has completed incubation, it needs to be properly chilled to slow down the fermentation process.
With these essential equipment items, you’ll be well-prepared to embark on your homemade yogurt-making journey. In the next section, we will guide you through the step-by-step process of storing homemade yogurt to maintain its freshness and quality.
Step 1: Heating the Milk
The first step in making homemade yogurt is heating the milk. This process helps to sterilize the milk, eliminate competing bacteria, and create an ideal environment for the yogurt cultures to thrive. Here’s how to do it:
1. Start with Clean Equipment: Ensure that all your equipment, including the saucepan and thermometer, is clean and sterilized before you begin. This helps to prevent any unwanted bacteria from contaminating the milk.
2. Pour the Milk: Pour the desired amount of milk into the saucepan. You can use any type of milk, such as whole, low-fat, or skim, based on your preference.
3. Heat the Milk: Place the saucepan over low to medium heat and slowly heat the milk. Stir the milk occasionally to prevent it from scorching or sticking to the bottom of the pan. Use a thermometer to monitor the temperature.
4. Bring to the Desired Temperature: Heat the milk until it reaches a temperature of 180°F (82°C). This process helps to denature the proteins in the milk, resulting in a thicker yogurt consistency.
5. Maintain the Temperature for a Few Minutes: Once the milk reaches the desired temperature, let it simmer for a few minutes while stirring continuously. This ensures that any potential harmful bacteria are killed.
6. Cool the Milk: Remove the saucepan from the heat and allow the milk to cool. You can either let it cool naturally or speed up the process by placing the saucepan in an ice bath. Cool it to around 110°F (43°C), which is the optimal temperature for adding the yogurt starter.
Heating the milk is an important step in preparing the perfect environment for the yogurt cultures to thrive. In the next step, we will discuss how to add the yogurt starter to kick-start the fermentation process.
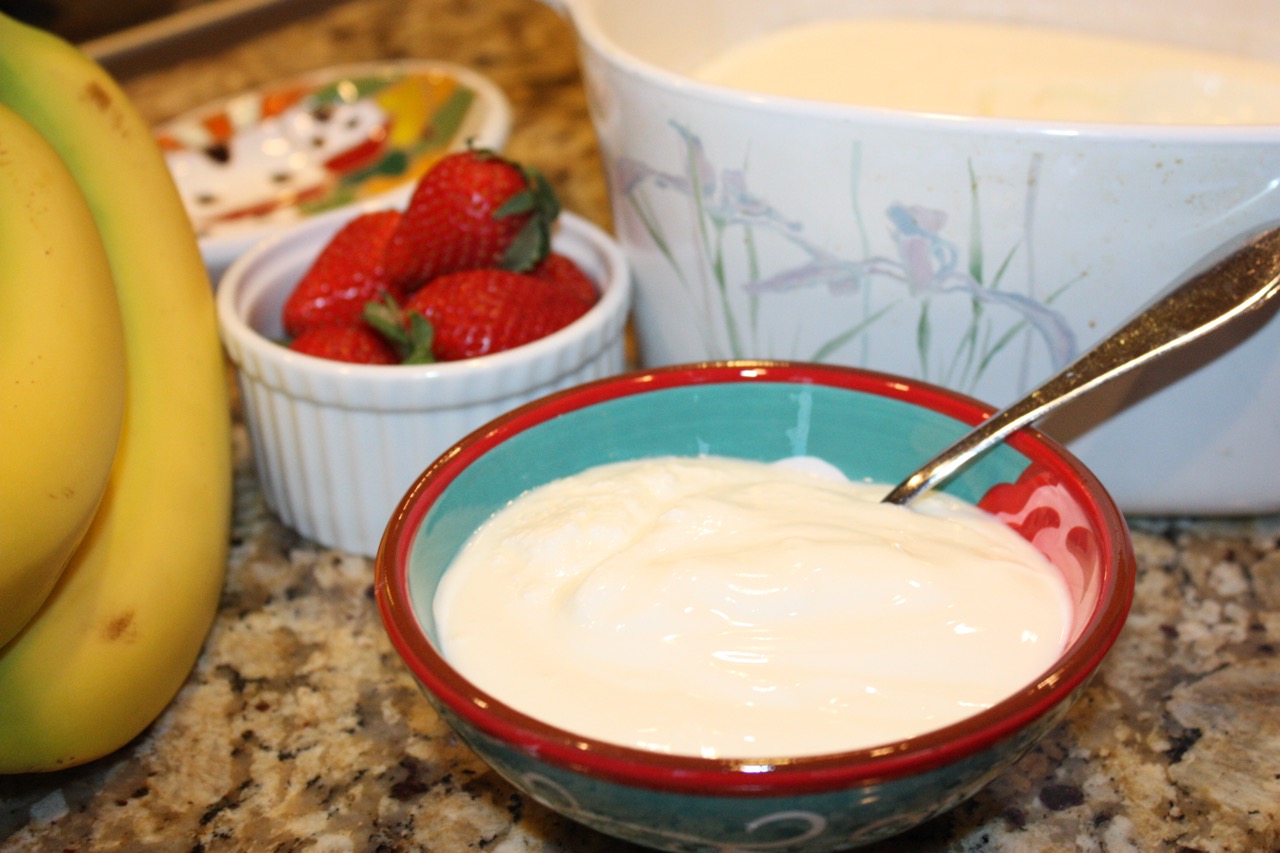
After making homemade yogurt, store it in a clean, airtight container in the refrigerator. It will keep for up to 2 weeks.
Read more: How To Store Frozen Yogurt
Step 2: Adding the Starter Culture
Once the milk has been heated and cooled to the proper temperature, it’s time to add the starter culture. The starter culture contains live bacteria that will ferment the milk and turn it into yogurt. Here’s how to proceed:
1. Choose the Starter Culture: You have two options for the starter culture. You can use a store-bought plain yogurt with live and active cultures, or you can use a powdered yogurt starter that is specifically designed for making yogurt at home. Follow the instructions on the packaging for the recommended amount to use.
2. Prepare the Starter: If you are using store-bought yogurt as a starter, whisk it in a separate bowl until it becomes smooth and creamy. This ensures that the live cultures are evenly distributed throughout the yogurt.
3. Add the Starter to the Milk: Pour the prepared starter culture into the cooled milk. Use a whisk or spoon to gently stir the milk and starter together, ensuring that they are well combined.
4. Mix Thoroughly: Make sure the starter is evenly incorporated into the milk by thoroughly mixing it. This helps to distribute the live bacteria throughout the mixture, ensuring proper fermentation.
5. Cover and Keep Warm: Cover the saucepan or transfer the mixture to an insulated container or yogurt maker. The temperature needs to be maintained around 110°F (43°C) to allow the cultures to work their magic. Follow the instructions of your equipment for the best results.
6. Incubate for the Recommended Time: The incubation time can vary depending on the desired level of tartness and thickness. Typically, yogurt is incubated for 6 to 12 hours. The longer the incubation period, the tangier and thicker the yogurt will become.
Adding the starter culture is a crucial step in the yogurt-making process, as it introduces the bacteria necessary for fermentation. In the next step, we will discuss how to properly incubate the yogurt for the optimal results.
Step 3: Incubating the Yogurt
During the incubation step, the yogurt cultures work their magic, transforming the milk into creamy and tangy yogurt. Proper incubation is crucial to ensure the desired texture and flavor. Here’s how to incubate your homemade yogurt:
1. Maintain the Ideal Temperature: It’s important to keep the yogurt at a consistent temperature throughout the incubation period. If you are using a yogurt maker, follow the manufacturer’s instructions for temperature settings and duration. If using an insulated container, wrap it in a towel or place it in a warm spot, like an oven with the light turned on.
2. Avoid Disturbing the Yogurt: Once you have set up the incubation environment, avoid disturbing or moving the yogurt. Any disturbances can disrupt the fermentation process, potentially resulting in a thinner consistency or uneven fermentation.
3. Determine the Incubation Time: The incubation time can vary depending on several factors, such as the desired tartness and thickness, as well as the specific strain of bacteria in the starter culture. Typically, incubation periods range from 6 to 12 hours. For a milder flavor, go for a shorter incubation time, while a longer time will result in a tangier yogurt.
4. Check for Doneness: After the initial incubation period, check the yogurt for doneness. It should have a slightly thickened consistency and a tangy taste. If it’s still too thin or has a mild flavor, you can continue incubation for an additional hour or two, checking at regular intervals.
5. Stop the Fermentation: Once the yogurt has reached the desired taste and thickness, it’s time to stop the fermentation process. Place the yogurt in the refrigerator to cool and chill it. This helps to preserve its texture and flavor and slows down the bacterial activity.
6. Patience is Key: Remember that the fermentation process takes time, and the yogurt may not be perfect on your first try. Experimentation and observation will help you determine the optimal incubation time for your preferred taste and consistency.
Properly incubating the yogurt allows the cultures to convert the milk into rich and creamy yogurt. In the next step, we will explore how to cool and store the yogurt to maintain its freshness and quality.
Step 4: Cooling and Storing the Yogurt
Once the yogurt has reached the desired consistency and taste during the incubation process, it’s time to cool it down and store it properly. Here are the steps to follow:
1. Transfer to Containers: Carefully pour the yogurt into clean, airtight glass jars or containers. Avoid using metal or plastic containers, as they can affect the flavor and quality of the yogurt.
2. Allow it to Cool: Let the yogurt cool at room temperature for about 1 hour. This allows the yogurt to set further and reach its optimal thickness.
3. Seal the Containers: Once the yogurt has cooled, seal the containers tightly with their lids. This helps to maintain the freshness, texture, and flavors of the yogurt.
4. Refrigerate: Place the sealed containers in the refrigerator and let the yogurt chill for at least 4 hours or overnight. Chilling is important as it slows down the bacterial activity and helps to preserve the yogurt’s quality.
5. Enjoy within a Week: Homemade yogurt is best consumed within a week of making it. Over time, the flavor and texture may change, so it’s recommended to consume it within this timeframe to ensure the best taste and quality.
6. Save Some as a Starter: If you plan to make more yogurt in the future, save a small portion of your homemade yogurt as a starter for the next batch. This way, you can maintain the desired culture and continue making fresh batches of yogurt.
Proper cooling and storage of the yogurt help maintain its freshness, taste, and texture over time. In the next section, we will provide some valuable tips for successful yogurt storage to extend its shelf life.
Tips for Successful Yogurt Storage
To ensure the longevity and quality of your homemade yogurt, follow these helpful tips for successful yogurt storage:
1. Use Airtight Containers: Store your yogurt in airtight glass jars or containers to prevent air exposure and maintain its freshness. This also helps to prevent any odors or flavors from other foods in the refrigerator from affecting the yogurt.
2. Label and Date: It’s a good practice to label the containers with the date of preparation. This allows you to keep track of the yogurt’s freshness and consume it within a week, the recommended shelf life for homemade yogurt.
3. Avoid Contamination: Always use clean utensils when scooping out yogurt. Avoid introducing any foreign substances or bacteria as this can affect the quality and safety of the yogurt.
4. Separate Containers for Flavored Yogurt: If you want to flavor some of your yogurt with fruits, honey, or other additives, store those separately from plain yogurt. This way, you can enjoy plain yogurt as a base and add flavorings as desired.
5. Keep Refrigerated: Yogurt should be stored in the refrigerator at a temperature below 40°F (4°C). Lower temperatures help to slow down bacterial activity and maintain the yogurt’s freshness and texture.
6. Avoid Freezing Yogurt: While you can technically freeze yogurt, the texture may change, becoming grainy or watery. It’s best to consume yogurt fresh or within the recommended storage period.
7. Monitor Smell and Texture: Regularly check your stored yogurt for any off smells or unusual textures. If the yogurt smells sour, has an off-putting odor, or develops mold, it’s best to discard it.
8. Plan Batch Sizes Accordingly: Consider your consumption habits when making yogurt. It’s better to make smaller batches more frequently rather than making a large batch that might go to waste due to limited storage time.
9. Experiment with Different Storage Containers: While glass jars or containers are ideal for storing yogurt, you can also try using small pouches or silicone molds for individual servings. This allows for easy portion control and on-the-go snacking.
By following these tips, you can ensure the longevity and quality of your homemade yogurt. While enjoying its delicious taste and health benefits, don’t forget to share your homemade yogurt with friends and family as well!
With all these steps and tips in mind, you are now equipped with the knowledge to successfully store homemade yogurt. Enjoy the satisfaction of knowing exactly what goes into your yogurt and savor the delightful flavors you create.
Remember, homemade yogurt is a versatile ingredient that can be enjoyed on its own or used in various recipes. So, get creative, experiment with different flavors, and continue to refine your yogurt-making skills. Happy yogurt making and bon appétit!
Read more: How To Store Opened Yogurt
Conclusion
Congratulations! You have now learned the steps and tips for storing homemade yogurt like a pro. Making your own yogurt is not only a rewarding and cost-effective endeavor, but it also allows you to have full control over the ingredients and flavors. By following the proper techniques for heating the milk, adding the starter culture, incubating, and cooling the yogurt, you can enjoy a delicious and nutritious homemade treat.
Homemade yogurt offers numerous benefits, including the ability to customize flavors, control the quality of ingredients, and ensure the presence of beneficial probiotics. By choosing the right ingredients, such as high-quality milk and a suitable yogurt starter, you lay the foundation for a successful homemade yogurt adventure.
Remember to equip yourself with the necessary equipment, such as a saucepan, thermometer, and storage containers, to make the yogurt-making process seamless. Properly heating the milk, adding the starter culture, and incubating the yogurt at the optimal temperature will yield the best results in terms of taste and texture.
Once your yogurt is ready, ensure proper cooling and storage. Use airtight containers to maintain its freshness, and label and date the containers to keep track of the yogurt’s shelf life. Always keep the yogurt refrigerated and avoid freezing to preserve its quality.
With these steps and tips in mind, you’re now ready to embark on your homemade yogurt journey. Enjoy the freedom to experiment with flavors, toppings, and textures as you create your own signature yogurt. Share this delightful treat with your loved ones and embrace the many health benefits it offers.
So, let your creativity flourish, and enjoy the satisfaction that comes with crafting your own homemade yogurt. Happy yogurt making and bon appétit!
Frequently Asked Questions about How To Store Homemade Yogurt
Was this page helpful?
At Storables.com, we guarantee accurate and reliable information. Our content, validated by Expert Board Contributors, is crafted following stringent Editorial Policies. We're committed to providing you with well-researched, expert-backed insights for all your informational needs.


0 thoughts on “How To Store Homemade Yogurt”