
Articles
How To Tie A Quilt
Modified: August 16, 2024
Learn how to tie a quilt with our informative articles and step-by-step guides. Discover the best techniques for creating beautiful and secure quilt knots.
(Many of the links in this article redirect to a specific reviewed product. Your purchase of these products through affiliate links helps to generate commission for Storables.com, at no extra cost. Learn more)
Introduction
Quilting is a beloved craft that has been passed down through generations, showcasing both artistry and functionality. A well-tied quilt not only provides warmth and comfort but also serves as a beautiful heirloom piece. Tying a quilt is an essential step in the quilting process, as it secures the layers together and adds texture and dimension to the finished product.
In this article, we will guide you through the step-by-step process of tying a quilt, from preparing your quilt to finishing touches. Whether you’re a beginner quilter or an experienced enthusiast looking for a refresher, this comprehensive guide will help you achieve professional-looking results.
Before we dive into the details, let’s go over the materials needed to tie a quilt:
Key Takeaways:
- Tying a quilt is a creative and practical process that adds texture and personality to your masterpiece. Follow the comprehensive guide to confidently tie your quilt and create a professional, durable outcome.
- Embrace your inner quilter, gather your materials, and let your imagination soar. Tying a quilt is a labor of love that showcases your time, effort, and creativity in every stitch. Happy quilting!
Read more: How To Make A Tie Quilt With Fleece
Materials Needed
- A completed quilt top
- A quilt batting (preferably cotton or polyester blend)
- A backing fabric (larger than the quilt top)
- Quilting thread (choose a color that complements your quilt)
- A tapestry needle or quilting needle
- Quilter’s safety pins or quilting tacks
- A pair of scissors
Now that we have gathered our materials, let’s move on to the first step of tying a quilt: preparing your quilt.
Key Takeaways:
- Tying a quilt is a creative and practical process that adds texture and personality to your masterpiece. Follow the comprehensive guide to confidently tie your quilt and create a professional, durable outcome.
- Embrace your inner quilter, gather your materials, and let your imagination soar. Tying a quilt is a labor of love that showcases your time, effort, and creativity in every stitch. Happy quilting!
Read more: How To Make A Tie Quilt With Fleece
Materials Needed
Before you begin tying your quilt, it’s important to gather all the necessary materials. Having everything you need at hand will make the process smoother and more efficient. Here is a list of the materials you will need:
- A Completed Quilt Top: This is the decorative layer of the quilt that you have already pieced together with your desired fabric patterns and designs.
- A Quilt Batting: The batting is the layer of insulation that provides warmth and gives the quilt its thickness. Choose a batting made of cotton or a cotton-polyester blend for optimal softness and durability.
- A Backing Fabric: The backing fabric is the large piece of fabric that will be placed on the back of the quilt. Ensure that it is larger than the quilt top to allow for seam allowances.
- Quilting Thread: Choose a sturdy thread specifically designed for quilting. Opt for a thread color that complements your quilt’s design or choose a neutral color that will blend in.
- A Tapestry Needle or Quilting Needle: These needles have large eyes that can accommodate thick thread. They are perfect for tying the quilt layers together.
- Quilter’s Safety Pins or Quilting Tacks: These are used to temporarily hold the quilt layers in place during the tying process. Safety pins are easier to remove, while tacks offer a more secure hold.
- A Pair of Scissors: Sharp scissors are essential for trimming thread and any excess fabric.
Gather all the materials listed above and arrange them in your workspace. Having everything readily available will save you time and make the tying process more enjoyable.
Once you have assembled all the materials, you are ready to move on to the next step: preparing your quilt for tying.
Step 1: Prepare Your Quilt
Before you start tying your quilt, it’s important to properly prepare the layers to ensure a smooth and even finish. Follow these steps to prepare your quilt:
- Lay the Backing Fabric: Start by laying the backing fabric on a clean and flat surface, wrong side facing up. Smooth out any wrinkles or creases to create a smooth base for your quilt.
- Place the Quilt Batting: Lay the quilt batting on top of the backing fabric, ensuring that it is centered and flat. Smooth out any lumps or bumps in the batting to create an even surface.
- Position the Quilt Top: Place the completed quilt top on the quilt batting, right side facing up. Align the edges of the quilt top with the edges of the backing fabric and batting.
- Smooth and Secure: Smooth out any wrinkles or puckers in the quilt layers, starting from the center and working your way towards the edges. Once the layers are smooth and taut, use quilter’s safety pins or quilting tacks to temporarily secure the layers together. Space the pins or tacks evenly across the quilt to prevent shifting during the tying process.
Preparing your quilt properly will help ensure that the layers stay aligned and that the finished quilt looks professional. Take your time to smooth out any imperfections in the layers, as this will result in a neater and more visually appealing quilt.
Now that your quilt is prepared, it’s time to move on to the next step: choosing your preferred method of tying.
Step 2: Choose Your Preferred Method
When it comes to tying a quilt, there are multiple methods you can choose from. The method you opt for will depend on your personal preference, the design of your quilt, and the level of durability you desire. Here are a few popular methods to consider:
- Traditional Hand-Tying: This is the most common method of tying a quilt. It involves using a needle and thread to create knots at regular intervals throughout the quilt. Hand-tying allows for a personalized touch and adds a charming handmade aesthetic to the quilt.
- Machine Tying: If you have access to a sewing machine with a darning or free-motion foot, you can opt for machine tying. This method involves using the machine to create ties or decorative stitches that secure the quilt layers together. Machine tying is faster than hand-tying but may not provide the same level of customization.
- Quilting Tacks: Quilting tacks, also known as safety pins or basting pins, are specifically designed for quilting. These large, curved pins can be easily inserted and removed, making them ideal for temporary holding the quilt layers together during the tying process. Quilting tacks provide a reliable hold and are often used in conjunction with hand-tying.
- Embroidery or Cross-Stitching: For those looking for a more intricate and decorative approach, embroidery or cross-stitching can be used to secure the quilt layers together. This method involves stitching through all layers of the quilt in a decorative pattern or design, creating a unique and personalized touch.
Consider your personal preferences, time constraints, and desired aesthetic when choosing your preferred method. Each method has its benefits and can achieve beautiful results, so choose the option that resonates with you the most.
Once you have decided on your preferred method of tying, it’s time to move on to the next step: threading your needle.
Read more: How To Organize Ties
Step 3: Thread Your Needle
Now that you have chosen your preferred method of tying, it’s time to thread your needle. Whether you are hand-tying or using embroidery techniques, threading the needle correctly is essential for a smooth and efficient tying process. Follow these steps to thread your needle:
- Select the Right Needle and Thread: Choose a needle that is appropriate for the method you have chosen. A tapestry needle or quilting needle with a large eye is ideal for hand-tying, while an embroidery needle with a sharp point is suitable for embroidery or cross-stitching. Select a quilting thread that matches your project and is strong enough to withstand the tying process.
- Cut a Length of Thread: Cut a length of thread that is manageable for you to work with. It should be long enough to tie multiple knots without constantly re-threading but not so long that it becomes tangled or difficult to manage.
- Thread the Needle: Insert one end of the thread through the eye of the needle, pulling it through until there is an equal length of thread on both sides. If you are having difficulty threading the needle, you can try moistening the end of the thread or using a needle threader for assistance.
- Tie a Knot: Once the needle is threaded, tie a small knot at the end of the thread to secure it. This will prevent the thread from slipping through the fabric as you work. You can double the thread for added strength by tying a second knot or making a loop and passing the needle through it.
Take your time to ensure that the thread is securely attached to the needle. A well-threaded needle will make your tying process more efficient and prevent unnecessary frustration down the line.
With your needle threaded and ready, you are now prepared for the next step: starting to tie your quilt!
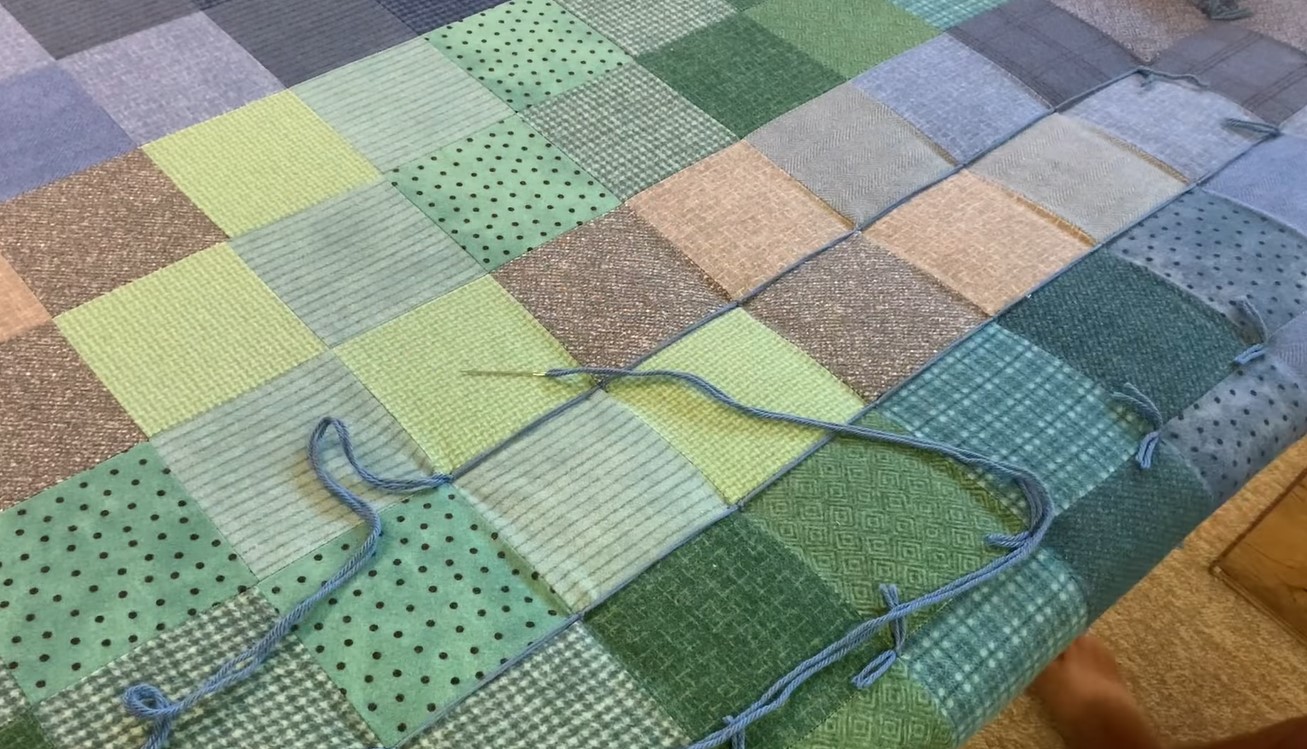
When tying a quilt, use a sturdy thread and a large-eyed needle to make the process easier. Make sure to tie the knots tightly to secure the layers together.
Step 4: Start Tying Your Quilt
With your needle threaded and ready, it’s time to begin tying your quilt. This step is where you will secure the layers together, adding texture and visual interest to your quilt. Follow these steps to start tying:
- Select your starting point: Choose a corner or a specific area of your quilt to begin tying. This will help you maintain a consistent pattern and prevent any mismatches or uneven distribution of ties.
- Insert the needle through all quilt layers: From the quilt top, insert the needle through all layers of the quilt, starting from the back and pulling it through to the front. Aim to pierce through all layers, including the backing fabric, quilt batting, and quilt top.
- Create a knot: Once the needle is through all layers, hold the thread taut and create a knot close to the surface of the quilt. You can loop the thread around your fingers or use a technique such as a quilter’s knot.
- Tighten the knot: Gently pull the thread to tighten the knot, ensuring that it is secure but not overly tight. You want the tie to lie flat against the quilt without distorting the fabric.
- Space out your ties: Continue tying knots throughout your quilt, spacing them out evenly according to your desired pattern. You can use a ruler or template to maintain consistent spacing or simply rely on your judgment. Consider the size of your quilt and the look you want to achieve when determining the distance between the ties.
As you progress, periodically check the back of your quilt to make sure the knots are neatly secured and the thread is not overly visible. Adjust your technique if needed to maintain a consistent and aesthetically pleasing appearance.
Remember to take breaks as needed to rest your hand and maintain your concentration. Tying a quilt can be a time-consuming process, so pace yourself and enjoy the meditative rhythm of the needle and thread.
With each knot and tie, your quilt will start to come to life, showcasing your creativity and craftsmanship. Keep going until you have tied your quilt to your satisfaction.
Once you have completed tying your quilt, it’s time to move on to the next step: securing the knots.
Step 5: Secure the Knots
After tying the knots in your quilt, it’s important to secure them to ensure they withstand the test of time. This step will prevent the knots from coming undone and ensure the longevity of your quilt. Follow these steps to secure the knots:
- Trim the excess thread: Using a pair of sharp scissors, carefully trim the excess thread close to the surface of the quilt. Be cautious not to cut too close to the knot, as this may cause it to come undone. Leave a small tail of thread to prevent it from unraveling.
- Examine the knots: Take a closer look at each knot you have tied. Check for any loose or uneven knots, and if necessary, re-tie them for a more secure hold. This attention to detail will ensure the overall quality and appearance of your quilt.
- Apply a dab of fabric glue: Optionally, you can apply a small dab of fabric glue to each knot for added security. This will help keep the knots in place and prevent them from loosening over time. Use a fabric glue that is specifically designed for quilting or fabric projects.
- Let the glue dry: Allow the fabric glue to dry completely before moving or using the quilt. Refer to the manufacturer’s instructions for the recommended drying time. This will ensure that the knots are securely held together.
Securing the knots not only adds strength to your quilt but also gives it a polished and professional finish. Take the time to carefully inspect and secure each knot to guarantee the durability of your quilt for years to come.
With the knots secured, your quilt is almost complete. However, there are a few more steps to add the finishing touches. Let’s move on to the next step: continuing tying your quilt.
Step 6: Continue Tying
Once you have secured the knots and ensured the durability of your quilt, it’s time to continue tying. This step involves completing the tying process throughout the entirety of your quilt. Follow these steps to continue tying:
- Work methodically: Start from where you left off and continue tying knots throughout your quilt, following your chosen pattern or spacing. Maintain a consistent rhythm to ensure even distribution of ties.
- Pay attention to tension: As you tie each knot, pay attention to the tension of the thread. Aim for a firm but not overly tight knot. Avoid pulling the thread too tight, as this may cause the fabric to pucker or distort.
- Be mindful of the backing fabric: While tying, keep an eye on the backing fabric to ensure it remains smooth and free of wrinkles or bunching. Adjust the fabric as needed and reposition any safety pins or tacks that may have shifted.
- Take breaks when needed: Tying a quilt can be a time-consuming process, so it’s important to take breaks when necessary. Rest your hand and eyes periodically to prevent fatigue. This will help maintain the quality of your work and reduce the risk of errors.
- Double-check your progress: Every so often, step back and review your work. Check the back and front of the quilt to ensure consistency in the placement and appearance of the knots. Make any adjustments or corrections as needed.
Continuing tying requires focus and attention to detail, but the result will be well worth the effort. Take your time and enjoy the satisfaction of each tie completed.
Once you have tied the entire quilt, it’s time to move on to the final step: adding the finishing touches.
Read more: How To Tie A Napkin Knot
Step 7: Finishing Touches
Congratulations! You have successfully completed the tying process for your quilt. Now it’s time to add the finishing touches that will elevate the overall appearance and functionality of your quilt. Follow these steps to complete the final touches:
- Remove the safety pins or tacks: Carefully remove the quilting tacks or safety pins that were holding the layers of your quilt together. Take your time and gently pull them out, being cautious not to snag or damage the fabric.
- Trim the excess batting and backing fabric: Use a pair of scissors to carefully trim any excess batting and backing fabric from the edges of your quilt. Trim it so that it is flush with the edges of the quilt top for a clean and professional finish.
- Press your quilt: Use a steam iron on a low heat setting to gently press your quilt. This will help flatten any wrinkles and creases, giving your quilt a crisp and finished appearance.
- Add binding (optional): If you prefer a more polished look and added durability, you can add binding to your quilt. Binding is a fabric strip that is sewn along the raw edges of the quilt to encase them. Follow a binding tutorial or consult a quilting book to learn the process of adding binding to your quilt.
- Label your quilt: Consider adding a personalized label to your quilt. This can be a small fabric piece with your name, the year, or a special message sewn onto the back of the quilt. It adds a personal touch and serves as a record of your quilting journey.
- Admire and enjoy your finished quilt: Take a moment to stand back and admire the beauty of your completed quilt. Wrap yourself in its warmth, display it on a bed or wall, or gift it to someone special. Your quilt is a work of art and a testament to your creativity and skill.
Finishing touches add that final layer of professionalism and polish to your quilt. Take the time to complete these steps and appreciate the masterpiece you have created.
Now that you have completed the tying and finished touches, you can proudly display or use your quilt for years to come. Enjoy the comfort, beauty, and sentimental value it brings to your life.
Congratulations again on completing your quilt tying journey!
Conclusion
Tying a quilt is not just a practical step in the quilting process, but a creative endeavor that adds texture and personality to your masterpiece. By following the steps outlined in this comprehensive guide, you have learned how to tie a quilt with confidence and precision.
Throughout this article, we discussed the materials needed for tying a quilt, how to prepare your quilt for tying, choosing your preferred method, threading your needle, starting to tie the quilt, securing the knots, continuing tying, and adding the finishing touches to complete your quilt. Each step contributes to the overall quality and aesthetic of your quilt, ensuring a professional and durable outcome.
Remember, quilting is a skill that can be honed and improved with practice. As you gain experience, you may develop your techniques and preferences that suit your unique style. Don’t be afraid to experiment and explore different methods to achieve the desired look and feel for your quilts.
Whether you are creating a quilt for personal use, as a gift, or as a work of art, the process of tying brings your vision to life. It is a labor of love that showcases the time, effort, and creativity invested in every stitch. Take pride in your quilting journey and cherish the finished quilt as a beautiful and meaningful representation of your skills and passion.
So embrace your inner quilter, gather your materials, and let your imagination soar. Happy quilting!
Frequently Asked Questions about How To Tie A Quilt
Was this page helpful?
At Storables.com, we guarantee accurate and reliable information. Our content, validated by Expert Board Contributors, is crafted following stringent Editorial Policies. We're committed to providing you with well-researched, expert-backed insights for all your informational needs.



0 thoughts on “How To Tie A Quilt”