Articles
How To Make A Tie Quilt With Fleece
Modified: August 17, 2024
Discover how to create a cozy tie quilt with fleece fabric. Our informative articles provide step-by-step instructions to help you master this craft.
(Many of the links in this article redirect to a specific reviewed product. Your purchase of these products through affiliate links helps to generate commission for Storables.com, at no extra cost. Learn more)
Introduction
Making a tie quilt with fleece is a fun and rewarding project that allows you to create a cozy and personalized quilt for yourself or as a gift. Fleece is a popular fabric choice for tie quilts due to its softness, warmth, and durability. Whether you are a beginner or an experienced crafter, this step-by-step guide will walk you through the process of making a tie quilt with fleece.
A tie quilt is a type of quilt that is assembled by tying knots at regular intervals to hold the layers of fabric together, instead of traditional quilting techniques. This makes it a great option for those who are new to quilting or prefer a simpler method of construction. Plus, tie quilts have a charming and rustic look that adds a touch of handmade charm to any space.
Before getting started, it’s important to gather all the materials you’ll need for this project. So let’s dive in and explore the materials needed for making a tie quilt with fleece.
Key Takeaways:
- Making a tie quilt with fleece is a delightful and personalized project that allows for creativity and warmth. From choosing contrasting fabrics to adding final touches, this guide empowers crafters to create a unique and cozy quilt.
- Creating a tie quilt with fleece is not only a creative endeavor but also a heartfelt gift for loved ones. The process, from fabric selection to finishing touches, results in a one-of-a-kind expression of love and care.
Read more: How To Make A No Sew Fleece Quilt
Materials Needed
To make a tie quilt with fleece, you will need the following materials:
- Fleece fabric: Choose two contrasting colors or patterns of fleece fabric. The amount will depend on the desired size of your quilt, but a good starting point is 2 ½ yards of each fabric.
- Fabric scissors: Make sure you have a sharp pair of fabric scissors for cutting the fleece fabric.
- Measuring tape or ruler: This will help you measure and cut the fabric into equal-sized squares.
- Pins: Pins will be helpful for securing the fabric layers together.
- Thread: Choose a thread color that matches one of the fabrics or select a neutral color that will blend in.
- Sewing machine: While the majority of the quilt assembly is done through tying knots, a sewing machine will be needed for finishing touches and securing the edges.
- Optional: Rotary cutter and mat – If you’re comfortable using a rotary cutter, it can be a faster and more precise way to cut the fabric squares.
Once you have gathered all the necessary materials, you are ready to start making your tie quilt. In the next steps, we will guide you through the process of choosing the fleece fabric and preparing it for the quilt construction.
Step 1: Choosing the Fleece Fabric
The first step in making a tie quilt with fleece is selecting the right fabric. Look for fleece that is soft, durable, and easy to work with. You can find a wide range of colors and patterns to suit your personal style and preferences.
It’s essential to choose two contrasting colors or patterns of fleece fabric to create visual interest and make the knots stand out. For example, you can select a solid color for one fabric and a patterned fabric for the other. Alternatively, you can choose different shades of the same color for a more subtle effect.
Consider the size of the quilt you want to make when purchasing fabric. A good starting point is to get 2 ½ yards of each fabric, which will allow you to make a lap-sized quilt. If you’re making a larger or smaller quilt, adjust the amount of fabric accordingly.
While purchasing the fabric, inspect it closely to ensure there are no flaws or defects. Check for any stains, discoloration, or irregularities in the fabric. It’s also a good idea to give the fabric a gentle tug to check for stretchiness and overall quality.
Once you have chosen your fleece fabrics, it’s time to move on to the next step: preparing the fabric for the quilt construction. This involves pre-washing and drying the fabric to prevent any shrinkage or color bleeding in the future. Let’s dive in and prepare the fabric for your tie quilt!
Step 2: Preparing the Fabric
Preparing the fabric for your tie quilt is an important step to ensure the longevity and quality of your finished quilt. By pre-washing and drying the fleece, you will eliminate any potential shrinkage and color bleeding that may occur during laundering. Follow these steps to properly prepare your fabric:
- Fill your washing machine with cold water and add a mild detergent.
- Place the fleece fabric in the washing machine and allow it to agitate for a few minutes.
- Once the fabric has been soaked, run a gentle cycle to wash the fabric.
- After washing, transfer the fabric to the dryer and tumble dry on low heat.
- Remove the fabric from the dryer as soon as it is dry to avoid excessive wrinkling.
By pre-washing and drying the fleece fabric, you are ensuring that any shrinkage occurs before assembling the quilt. This will prevent the finished quilt from becoming misshapen or distorted after its first wash.
Additionally, pre-washing helps to remove any excess dye, which reduces the likelihood of color bleeding when the quilt is laundered in the future. This step is especially important if you are using contrasting colors or patterns of fleece fabric.
Once the fabric is pre-washed and dried, it is now ready to be transformed into fabric squares for your tie quilt. In the next step, we will guide you through cutting the fabric into equal-sized squares.
Step 3: Cutting the Fabric Squares
Now that your fleece fabric is prepped and ready, it’s time to cut it into equal-sized squares. These squares will form the building blocks of your tie quilt. Follow these steps to ensure accurate and consistent cutting:
- Start by measuring and marking your desired square size on the fabric using a measuring tape or ruler. A common square size is 8 inches by 8 inches, but you can adjust the size to your preference.
- Using fabric scissors or a rotary cutter and mat, carefully cut along the marked lines to create your fabric squares. Take your time and make precise cuts to ensure uniformity.
- Continue measuring, marking, and cutting until you have the desired number of fabric squares for your quilt. The number of squares will depend on the size of the quilt you want to create.
Remember to match the contrasting colors or patterns of fleece fabric when cutting the squares. This will create an appealing visual effect when the quilt is assembled.
One helpful tip is to stack multiple layers of fabric and cut through them simultaneously. This can save time and ensure that each square is identical in size and shape.
As you cut the fabric squares, arrange them in a neat stack to keep them organized. This will make the next step of tying the squares together much easier.
Now that you have a stack of fabric squares, it’s time to move on to the next step: tying the fabric squares to create your tie quilt. This is where the magic happens, so let’s get started!
When making a tie quilt with fleece, be sure to use a sharp pair of fabric scissors to cut the fleece into strips for tying. This will make the process much easier and give you cleaner edges.
Read more: How To Tie A Quilt
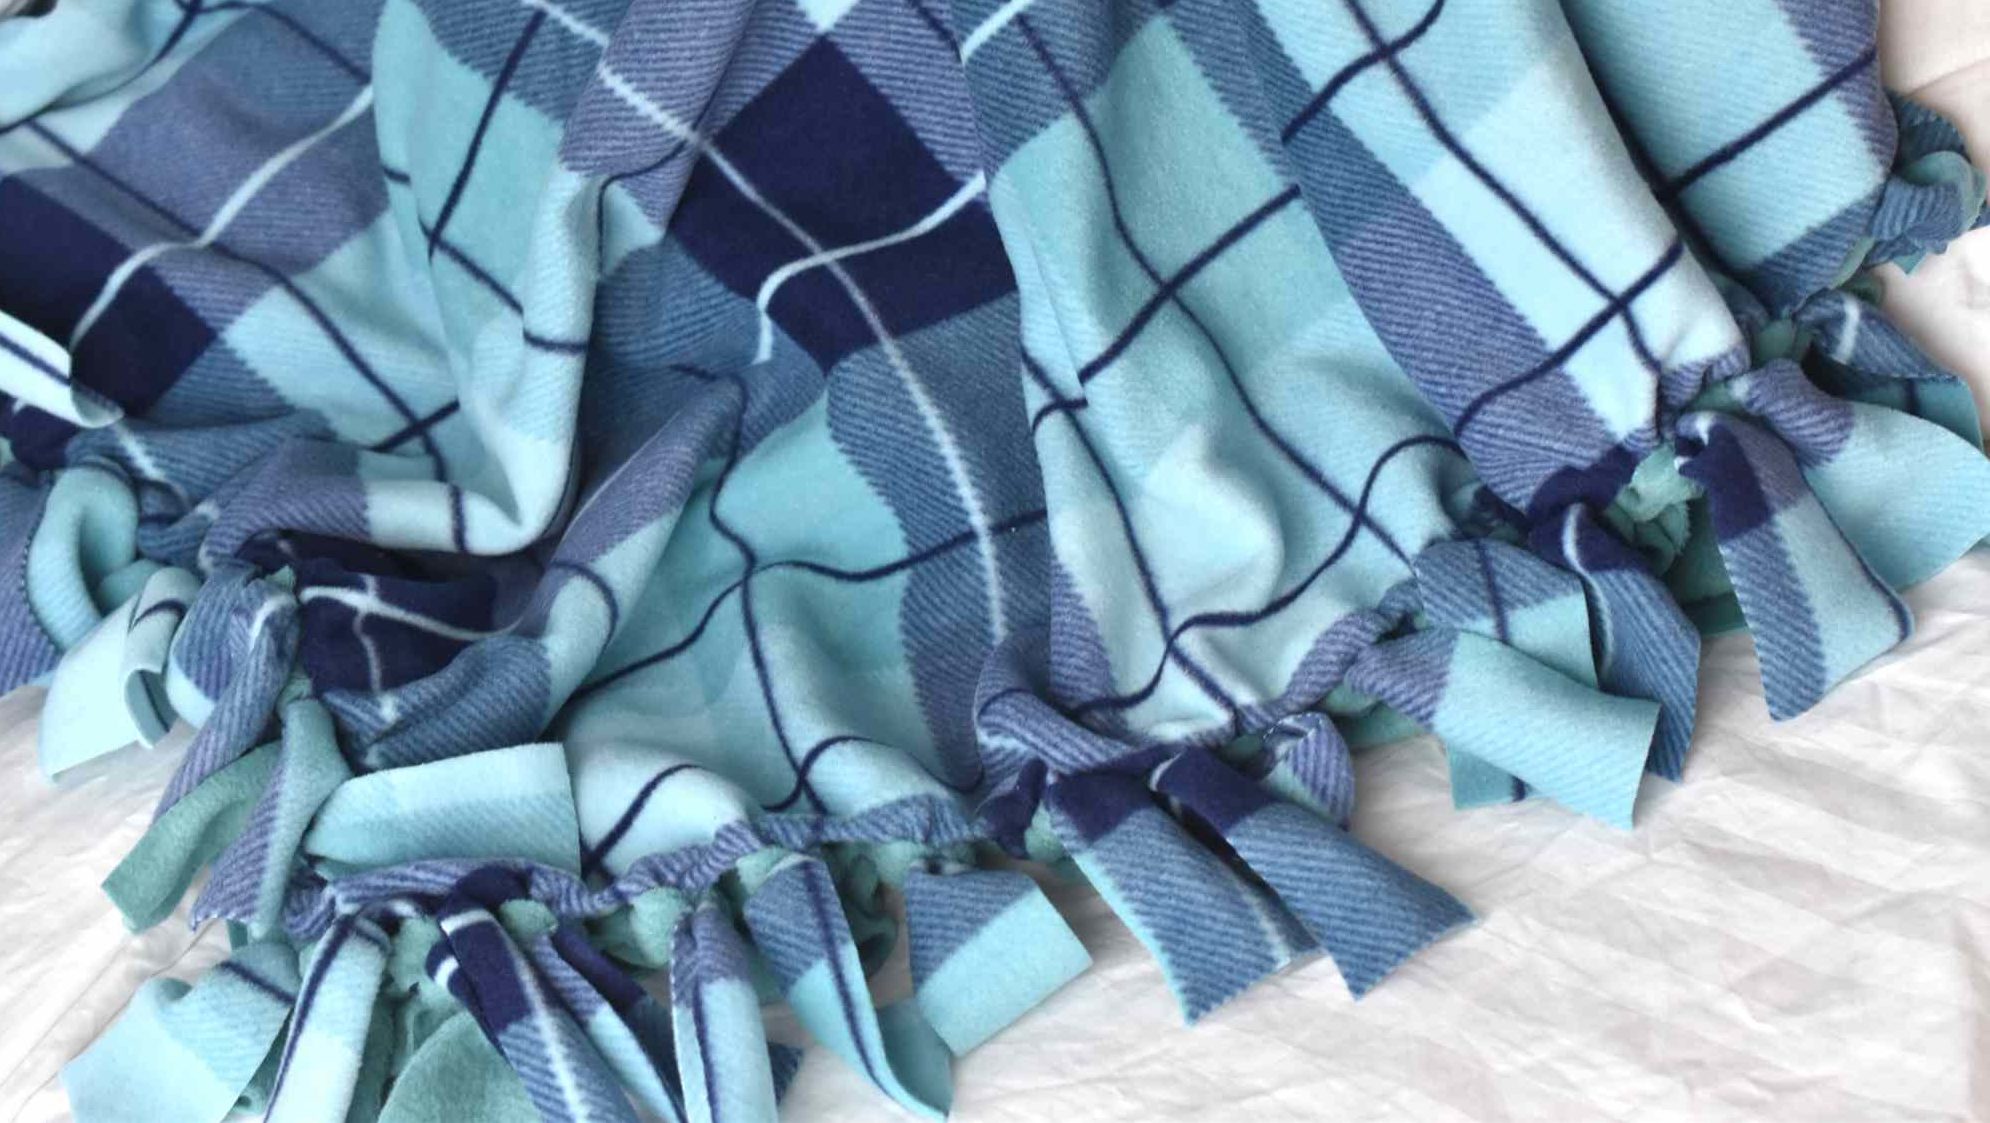
Step 4: Tying the Fabric Squares
Tying the fabric squares together is the key step in creating a tie quilt. This technique allows you to secure the layers of fabric without the need for traditional quilting. Follow these steps to tie the fabric squares and create a cozy quilt:
- Take two fabric squares that you want to tie together. Place them right sides together, ensuring that the contrasting colors or patterns are facing each other.
- Align the edges of the squares and pin them together to keep them in place. This step is optional but can be helpful, especially for beginners.
- Create a small slit or incision in both fabric squares, about 1 inch long and centered between the corners. Ensure that the slits on both squares line up.
- Take both fabric layers and push one end of a fabric strip through the slits, creating a loop. Pull the ends of the strip through the loop to form a knot. Tighten the knot securely.
- Continue tying knots at regular intervals, around 3 to 4 inches apart, along the edges of the fabric squares. This will secure the layers together and create the quilt’s distinctive tied look.
- Once all the squares are tied together, check for any loose knots and tighten them as needed.
You can vary the length and thickness of the fabric strips to add dimension and texture to your quilt. Experiment with different lengths and widths to achieve the desired aesthetic.
As you tie the fabric squares, you’ll notice the quilt taking shape and becoming more substantial. This technique allows for creativity and personalization, as you can choose different knot styles or even add decorative elements like beads or charms to the knots.
Once all the fabric squares are securely tied together, it’s time to move on to the next step: assembling the quilt. In the next step, we will guide you through the process of arranging the tied squares to create a visually pleasing layout for your quilt.
Step 5: Assembling the Quilt
Now that you have tied all the fabric squares together, it’s time to assemble your quilt. Follow these steps to arrange the tied squares and create a visually pleasing layout:
- Clear a large, flat surface such as a table or the floor where you can spread out the fabric squares.
- Take the first tied fabric square and decide on its placement in the quilt. You can arrange the squares in a random pattern or create a specific design by alternating colors or patterns.
- Lay the second fabric square adjacent to the first one, aligning the edges. Repeat this process with the remaining squares until all of them are arranged in the desired pattern.
- Step back and assess the overall layout of the quilt. Make any adjustments or rearrangements as necessary to achieve the desired visual effect.
As you assemble the quilt, keep in mind the size and shape you envision for the finished product. Adjust the number of squares and their arrangement to achieve the desired dimensions.
Once you are satisfied with the layout, take a moment to take a photo or make a sketch of the quilt’s design. This will serve as a useful reference when it’s time to sew the quilt together.
With the fabric squares assembled in the desired layout, it’s time to move on to the next step: sewing the quilt. In the following step, we will guide you through sewing the fabric squares together and adding the finishing touches.
Step 6: Sewing the Quilt
Once you have arranged the fabric squares in the desired layout, it’s time to sew them together to create a durable and long-lasting quilt. Follow these steps to sew the fabric squares and complete your tie quilt:
- Starting with the first row of fabric squares, pick up the first two squares that are adjacent to each other.
- Place them right sides together, aligning the edges evenly.
- Using a sewing machine, stitch a straight seam along the edge of the squares, about ¼ inch from the edge. Backstitch at the beginning and end of the seam to secure it.
- Repeat this process for each pair of adjacent fabric squares in the same row, until all the squares in the row are sewn together.
- Continue sewing rows together in the same manner until all the fabric squares are connected.
- Once all the rows are sewn together, press the seam allowances open or to one side, according to your preference. This will help the quilt lay flat and give it a polished look.
- If desired, you can add a border around the edges of the quilt for a finished look. Cut fabric strips of the desired width and sew them to the outer edges of the quilt using the same sewing techniques.
After sewing the quilt together, take a moment to inspect the seams and make any necessary adjustments. Trim any excess fabric or loose threads for a clean and professional finish.
Once the quilt is sewn and the edges are neat, it’s time to move on to the final step: adding the finishing touches to your tie quilt.
Step 7: Adding Final Touches
Congratulations! You’re in the final step of completing your tie quilt. Adding some final touches will enhance the overall look and longevity of your quilt. Follow these steps to give your quilt those finishing details:
- Trim any excess fabric around the edges of the quilt to create clean, straight lines.
- If desired, add a binding to the edges of the quilt for a polished finish. Cut fabric strips of the desired width and sew them around the perimeter of the quilt. Fold the binding over the raw edges and stitch it down either by hand or with a sewing machine.
- Inspect the entire quilt for any loose knots or threads, and secure them with additional stitching if needed.
- Once you’re satisfied with the quilt’s overall appearance and construction, give it a final press with an iron to set the seams and flatten any wrinkles.
- Consider adding a label to your quilt. You can embroider or sew a fabric label with your name or a special message onto the corner of the quilt. This personal touch adds a sentimental value to your creation.
- Finally, take a step back and admire your finished tie quilt! It’s now ready to be enjoyed or gifted to someone special.
Remember to follow any specific care instructions for the fleece fabric, as different types of fleece may have different washing and drying recommendations. Provide the recipient of the quilt with care instructions to ensure its longevity.
Making a tie quilt with fleece is a rewarding and creative project that allows you to create a beautiful and personalized handmade item. Whether you keep it for yourself or give it as a gift, the quilt will provide warmth and comfort for years to come.
Thank you for joining us on this journey of making a tie quilt with fleece. Enjoy your cozy new quilt and happy crafting!
Read more: How To Make A Quilt
Conclusion
Making a tie quilt with fleece is a delightful and fulfilling project that allows you to showcase your creativity while creating a cozy and personalized piece. This step-by-step guide has walked you through the process of making a tie quilt with fleece, from choosing the fabric to adding those final touches.
By selecting contrasting colors or patterns of fleece fabric, pre-washing and drying the fabric, cutting it into equal-sized squares, tying the squares together, sewing the quilt, and adding the finishing touches, you have created a beautiful and unique quilt that reflects your style and craftsmanship.
Remember to personalize your quilt by arranging the fabric squares in a way that suits your aesthetic preferences. Whether you choose a random layout or create a specific pattern, the end result will be a one-of-a-kind quilt that is full of warmth and character.
Not only is making a tie quilt with fleece a creative endeavor, but it also serves as a thoughtful and heartfelt gift for loved ones. The time and effort put into making a handmade quilt truly convey your love and care for the recipient.
As you embark on this journey of creating a tie quilt with fleece, don’t be afraid to experiment, make mistakes, and let your creativity flow. Each quilt you make will be a unique expression of your style and personality.
Now, armed with the knowledge and skills from this guide, you are ready to dive into the wonderful world of tie quilting with fleece. Enjoy the process, embrace your creativity, and create something truly special that will bring warmth and comfort to your life or the life of someone special.
Happy quilting, and may your tie quilt with fleece bring joy and coziness for years to come!
Frequently Asked Questions about How To Make A Tie Quilt With Fleece
Was this page helpful?
At Storables.com, we guarantee accurate and reliable information. Our content, validated by Expert Board Contributors, is crafted following stringent Editorial Policies. We're committed to providing you with well-researched, expert-backed insights for all your informational needs.


0 thoughts on “How To Make A Tie Quilt With Fleece”