Articles
How To Weld Pipe Fence
Modified: December 7, 2023
Learn the art of pipe fence welding with our informative articles. Discover essential tips, techniques, and welding equipment recommendations for successful projects.
(Many of the links in this article redirect to a specific reviewed product. Your purchase of these products through affiliate links helps to generate commission for Storables.com, at no extra cost. Learn more)
Introduction
Welcome to the world of welding! Creating a strong and durable pipe fence is not only a practical skill but also a satisfying and rewarding DIY project. Whether you are a seasoned welder or just starting out, this comprehensive guide will walk you through the process to ensure you achieve professional results.
When it comes to welding a pipe fence, it is crucial to understand the importance of safety precautions. Welding involves intense heat and the use of potentially dangerous tools, so protecting yourself and those around you should always be the top priority.
In this article, we will not only cover the safety precautions but also provide you with a list of essential tools and materials you’ll need to complete the project. We will guide you through choosing the right welding technique, preparing the pipe sections, setting up the welding equipment, and welding the sections together to create a solid pipe fence.
Once the welding is complete, we will discuss the importance of inspecting and testing the fence to ensure its structural integrity. Finally, we will touch on applying finishing touches to give your pipe fence an impressive and polished look.
So, let’s dive in and explore the step-by-step process of welding a pipe fence, ensuring safety and quality every step of the way.
Key Takeaways:
- Prioritize safety by wearing the appropriate personal protective equipment, working in a well-ventilated area, and securing the workpiece. Properly prepare the pipe sections and set up the welding equipment to achieve professional-grade results.
- Thoroughly inspect and test the welded pipe fence for quality and structural integrity. Apply finishing touches such as protective coatings and decorative elements to enhance its appearance and longevity. Regular maintenance will ensure the fence continues to serve its purpose effectively.
Read more: How To Put Up Welded Wire Fence
Safety Precautions
Before you begin any welding project, it is of utmost importance to prioritize safety. Welding involves high temperatures, sparks, and potentially hazardous fumes, so taking the necessary precautions will help prevent accidents and protect yourself and those around you.
Here are some essential safety precautions to keep in mind while welding a pipe fence:
- Wear Personal Protective Equipment (PPE): Always wear the appropriate PPE, including a welding helmet with a darkened lens to protect your eyes from the bright arc and flying sparks. Additionally, use welding gloves, a flame-resistant jacket, and sturdy boots to shield yourself from heat and hot metal.
- Work in a Well-Ventilated Area: Welding generates fumes that can be harmful if inhaled. Make sure you work in a well-ventilated area to minimize the concentration of fumes. If working indoors, consider using an exhaust fan or opening windows and doors to improve airflow.
- Remove Flammable Objects: Clear the welding area of any flammable objects such as paper, fabric, or chemicals. Sparks and hot metal can easily ignite these materials, so ensure a safe working environment by removing potential fire hazards.
- Secure the Workpiece: Properly secure the pipe sections you are welding to prevent movement or slipping during the welding process. This will ensure accurate and consistent welds and reduce the risk of accidents.
- Keep a Fire Extinguisher Nearby: Have a fire extinguisher easily accessible in case of emergencies. It’s better to be prepared than to risk a small fire turning into a larger, uncontrollable one.
- Practice Proper Electrical Safety: Ensure that the welding equipment is properly grounded and that all electrical connections are secure. Inspect the cables and plugs for any damage or fraying before each use.
- Stay Hydrated and Take Breaks: Welding can be physically demanding, so it’s essential to take regular breaks and stay hydrated. Keep a water bottle nearby and listen to your body’s signals to avoid exhaustion or dehydration.
Remember, safety should always be your top priority during any welding project. By following these safety precautions, you can minimize the risk of accidents and create a safe working environment for yourself and those around you.
Tools and Materials Needed
Before you start welding a pipe fence, it’s important to gather all the necessary tools and materials. Having everything on hand will save you time and ensure a smooth workflow. Here is a list of the essential tools and materials you’ll need:
Tools:
- Welding machine: Choose a machine suitable for pipe welding, such as a stick welder or MIG welder.
- Welding helmet: Protect your eyes from the intense arc light and flying sparks with a welding helmet fitted with a darkened lens.
- Welding gloves: Invest in a good pair of leather welding gloves to protect your hands from heat and sparks.
- Flux core wire or welding rod: Choose the appropriate wire or rod based on the material of the pipe you are welding.
- Angle grinder: Use an angle grinder with a grinding disc to clean the weld area and remove any rust or debris.
- Chipping hammer: Use a chipping hammer to remove slag and spatter from the welds.
- Wire brush: Use a wire brush to clean the surface of the pipes and ensure good weld penetration.
- Clamps or a vice: Secure the pipe sections in place with clamps or a vice to prevent movement during welding.
- Tape measure: Use a tape measure to accurately measure and mark the pipe sections for cutting and welding.
- Circular saw or pipe cutter: Cut the pipes to the desired length and shape using a circular saw or a specialized pipe cutter.
- Level: Ensure the pipe fence is properly aligned and level using a bubble level.
- Power drill: Use a power drill with appropriate drill bits to make any necessary holes for the fence attachments.
Materials:
- Pipe sections: Choose sturdy and durable pipes suitable for constructing a fence. Common options include steel or aluminum pipes.
- Welding wire or welding rods: Purchase the appropriate welding consumables based on the type of pipe and welding technique you’ll be using.
- Grinding discs: Have a supply of grinding discs ready to clean the weld area and prepare it for welding.
- Paint or primer: If desired, have paint or primer ready to apply to the welded pipe fence for added protection and a finished look.
- Fence attachments: Depending on the design and purpose of your pipe fence, gather any additional materials such as hinges, latches, or wire mesh for attachment.
Having all the necessary tools and materials on hand will make your welding project much easier and more efficient. Take the time to gather everything you need before you begin, ensuring a smooth and successful construction process.
Read more: How To Paint A Pipe Fence
Choosing the Right Welding Technique
When it comes to welding a pipe fence, there are a few different techniques you can choose from. The right technique depends on factors such as the material of the pipe and your level of welding experience. Let’s explore some common welding techniques used for pipe fence construction:
1. Shielded Metal Arc Welding (SMAW) / Stick Welding:
SMAW, also known as stick welding, is a popular welding technique for pipe fences. It is versatile, cost-effective, and suitable for both indoor and outdoor welding. SMAW uses a consumable electrode covered in a flux coating, with the heat generated by an electric arc melting the electrode and the base material, creating the weld joint.
This technique works well for thicker pipes and provides good penetration, strength, and durability. It is a great choice for novice welders as it is relatively easy to learn and forgiving of slight imperfections.
2. Gas Metal Arc Welding (GMAW) / MIG Welding:
GMAW, also known as MIG welding, is another commonly used technique for pipe fence construction. It involves using a wire electrode that is continuously fed through a welding gun, along with a shielding gas to protect the weld from contamination.
MIG welding offers a faster welding process, producing clean and smooth welds. It is suitable for thin to medium-thickness pipes and provides excellent control, making it a popular choice for experienced welders. However, MIG welding may require a higher level of skill and equipment setup compared to stick welding.
3. Flux Core Arc Welding (FCAW):
FCAW is a welding technique similar to MIG welding, but it uses a flux-cored wire that contains flux inside. The flux creates a shielding gas when heated, protecting the weld from contamination. FCAW is often chosen for outdoor welding or in windy conditions because it provides better protection against environmental factors.
This technique is suitable for various pipe thicknesses and can offer higher deposition rates compared to other welding methods. It provides good penetration and strength, making it a reliable choice for building sturdy and durable pipe fences.
The choice of welding technique ultimately depends on your preference, skill level, and the specific requirements of your pipe fence project. If you are unsure, consider consulting with an experienced welder or researching further to determine the best technique for your needs.
Preparing the Pipe Sections
Before diving into the welding process, it is crucial to properly prepare the pipe sections. Adequate preparation ensures better weld quality and helps to create a strong and durable pipe fence. Here are the steps to follow when preparing the pipe sections:
1. Clean the Pipe Surface:
Start by thoroughly cleaning the surface of the pipe sections. Use a wire brush or a grinder with a wire wheel attachment to remove any dirt, rust, or debris. Cleaning the pipes will promote better fusion and improve the strength of the weld.
2. Bevel the Pipe Ends (Optional):
If you want to enhance the strength and penetration of the weld, you can bevel the edges of the pipe ends. This involves using a grinder or a pipe bevelling tool to create a sloping angle on the pipe ends. Bevelling helps to create a wider weld area and ensures better fusion between the pipe sections.
3. Measure and Mark the Pipe Sections:
Accurate measurements are essential for a precise and well-aligned pipe fence. Use a tape measure to measure and mark the pipe sections at the desired lengths, taking into account any additional allowances for fittings or attachments. Double-check your measurements to avoid any errors during the welding process.
Read more: How To Weld Home Repairs
4. Cut the Pipe Sections:
Once the pipe sections are properly measured and marked, it’s time to cut them to the correct lengths. Use a circular saw with a metal cutting blade or a specialized pipe cutter to make clean and accurate cuts. Ensure that the cuts are perpendicular to the pipe axis for proper alignment during welding.
5. Deburr the Cut Ends:
After cutting the pipe sections, there may be sharp edges or burrs on the cut ends. Use a file or a deburring tool to smoothen out the edges and remove any burrs. This will create a clean surface for welding and prevent any interference during the process.
By following these steps, you will be well-prepared to start the welding process. Properly cleaned and prepared pipe sections ensure better weld quality and contribute to the overall strength and durability of your pipe fence.
Setting Up the Welding Equipment
Before you can start welding the pipe sections together, it’s essential to properly set up the welding equipment. Taking the time to set up your equipment correctly will ensure smooth operation and optimal weld quality. Follow these steps to set up your welding equipment:
1. Choose the Right Welding Machine:
Ensure that you have a welding machine suitable for the chosen welding technique. Different techniques may require specific types of machines or welders. Make sure your machine is in good working condition and has the appropriate power supply for the project at hand.
Read more: How To Read A Welding Blueprint
2. Select the Correct Welding Consumables:
Based on the welding technique you have chosen and the type of pipe material, select the appropriate welding consumables. This includes the correct welding wire or welding rod and any necessary shielding gas or flux for the chosen technique. Refer to the manufacturer’s recommendations for the specific consumables needed.
3. Install the Welding Consumables:
Set up the welding consumables by installing the welding wire or welding rod into the welding machine or welding gun, depending on the technique you are using. Follow the manufacturer’s instructions to ensure proper installation and alignment of the consumables.
4. Adjust the Welding Parameters:
Depending on the type of welding machine, you may need to adjust the welding parameters such as voltage, amperage, wire speed, or gas flow. Refer to the machine’s user manual or the welding consumable manufacturer’s guidelines for the recommended settings. Properly adjusting the parameters will allow for optimal weld penetration and quality.
5. Set Up the Work Area:
Prepare your work area by clearing any clutter and ensuring you have enough space to maneuver and weld safely. Make sure the grounded work surface can withstand heat and the weight of the pipe sections. Ensure proper ventilation if working indoors and consider using welding curtains or screens to protect others from the bright arc light.
Read more: How To Store Welding Rods
6. Test the Welder:
Before starting the actual welding process, perform a test weld on a scrap piece of the same pipe material. This will allow you to verify that the machine is set up correctly and that the weld quality meets your expectations. Adjust settings if necessary, ensuring proper penetration, weld bead appearance, and overall weld strength.
Taking the time to properly set up your welding equipment before starting the welding process will greatly contribute to the success of your project. By following these steps, you’ll have everything in place to proceed with confidence and achieve high-quality welds when connecting the pipe sections together.
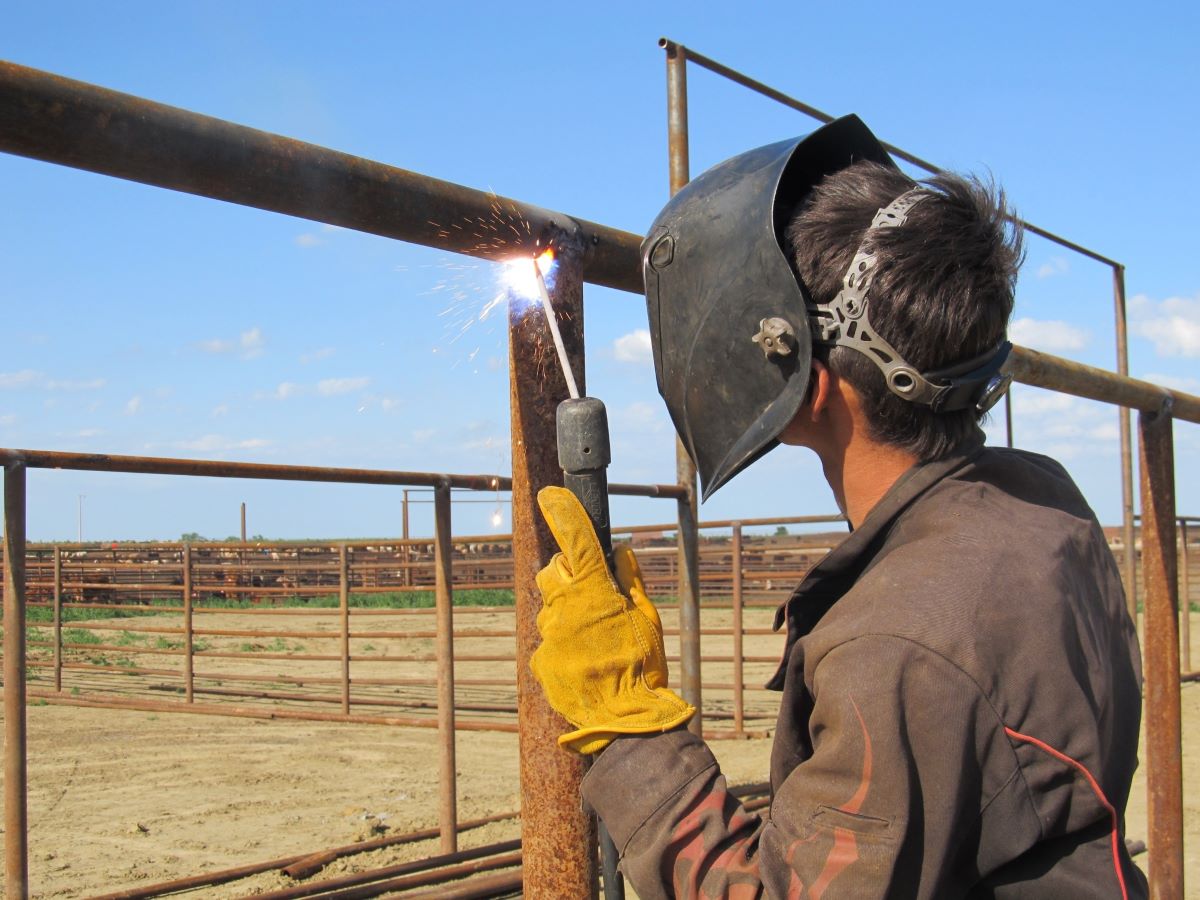
Welding the Pipe Sections Together
Now that you have prepared the pipe sections and set up your welding equipment, it is time to start welding the sections together to create a solid pipe fence. Follow these steps to ensure a successful welding process:
1. Position the Pipe Sections:
Place the prepared pipe sections in the desired alignment and orientation. Ensure that the sections are tightly secured with clamps or a vice to prevent movement during welding.
2. Start the Welding Process:
Hold the welding gun or electrode holder at a comfortable angle, keeping a steady hand and maintaining a consistent distance from the pipe. Begin the welding process by striking an arc in a clean spot on the pipe’s surface. Gradually move the arc to the joint area between the two pipe sections.
Read also: 13 Superior Welding Blanket for 2025
3. Control the Welding Speed:
Maintain a steady and controlled welding speed to ensure proper heat distribution and fusion. Move the welding gun or electrode holder in a controlled motion, following the joint line. Avoid moving too slowly, as this can result in excessive heat buildup and potential burn-through, or too quickly, which may result in poor fusion and weak welds.
4. Create Weld Beads:
As you weld, deposit weld beads along the length of the joint, overlapping each pass slightly to ensure proper fusion. The size and shape of the weld bead will depend on the welding technique, welding parameters, and the thickness of the pipe material. Aim for consistent and uniform weld beads to achieve strong and reliable welds.
5. Pause for Cooling:
After completing each weld bead, pause for a moment to allow the welded area to cool and solidify. This helps to avoid overheating and ensures the integrity of the weld. Observe the color and appearance of each weld bead to ensure proper penetration and fusion.
6. Continue Welding:
Repeat the welding process for each joint along the length of the pipe fence. Take breaks as needed to prevent overheating and fatigue. Inspect each weld bead as you progress to ensure quality and make any necessary adjustments to your welding technique or settings.
7. Remove Slag and Splatter:
After welding, use a chipping hammer or wire brush to remove any slag or splatter from the welds. This will reveal the clean and solid welds underneath, enhancing their appearance and quality.
By following these steps, you will be able to weld the pipe sections together effectively, creating strong and reliable joints for your pipe fence. Always prioritize safety, take breaks as needed, and maintain attention to detail throughout the welding process.
Inspecting and Testing the Welded Pipe Fence
Once you have completed welding the pipe sections together to create your pipe fence, it is crucial to inspect and test the welds to ensure their quality and structural integrity. Proper inspection and testing will help identify any potential issues and allow for necessary adjustments or repairs. Here are the steps to follow:
1. Visual Inspection:
Start by visually inspecting the welded joints. Look for any visible signs of defects such as cracks, porosities, insufficient penetration, or incomplete fusion. Check for uniformity and consistency in weld bead appearance along the entire length of the pipe fence.
2. Dimensional Inspection:
Measure the dimensions of the pipe fence, ensuring that it aligns with the specifications and design requirements. Check the vertical and horizontal alignments, as well as the distances between posts and attachments. Use a level or measuring tools to verify its straightness and overall dimensions.
Read more: Who Makes The Best Welding Hand Tools
3. Weld Strength Testing:
Perform strength tests on a sample of the welds to assess their integrity. This can include destructive tests such as bend tests, where a section of the weld is bent to evaluate its resistance to cracking or breaking. Non-destructive tests like ultrasonic testing or X-ray inspection can also be employed to detect any internal defects that may compromise the weld integrity.
4. Load Testing:
If possible, subject the pipe fence to a load test to simulate real-world conditions and assess its strength. Apply pressure or weight to determine if the fence can withstand the anticipated forces and stresses it will encounter. This will help identify any weak points or areas that require reinforcement.
5. Corrosion Protection:
Inspect the welds and overall surface of the pipe fence for any signs of corrosion. Corrosion can weaken the metal over time, compromising the integrity of the fence. Consider applying a protective coating such as paint or primer to prevent corrosion and prolong the lifespan of the fence.
6. Repairs and Adjustments:
If any defects, weaknesses, or issues are found during the inspection and testing process, take the necessary steps to repair or rectify them. This may involve re-welding specific joints, reinforcing weak areas, or addressing any dimension discrepancies. Make sure to follow proper welding procedures and seek professional advice if needed.
By thoroughly inspecting and testing your welded pipe fence, you can ensure that it meets the required standards and will provide the desired level of strength and durability. Taking the time to identify and address any potential issues will help create a safe and reliable pipe fence that will serve its purpose effectively for years to come.
Read more: How To Insulate Plumbing Pipes
Applying Finishing Touches
After inspecting and testing the welded pipe fence, it’s time to apply the finishing touches that will not only enhance its appearance but also provide additional protection and longevity. These finishing touches will make your pipe fence stand out and complete the overall look. Here are some steps to consider:
1. Clean and Remove Residue:
Thoroughly clean the entire surface of the pipe fence to remove any welding residue, dirt, or debris. Use a wire brush or a grinder with a wire wheel attachment to remove stubborn residues. Cleaning the fence will ensure a smooth and clean surface for further finishing applications.
2. Apply a Protective Coating:
To protect the welded pipe fence from corrosion and weathering, consider applying a protective coating. Choose a paint or primer that is suitable for the type of material used in your fence. Apply multiple coats, following the manufacturer’s instructions, to ensure proper coverage and protection. A protective coating will not only safeguard the fence but also enhance its visual appeal.
3. Add a Decorative Finish:
If you want to add a decorative touch to your pipe fence, consider using different finishing options. You can opt for powder coating to achieve a smooth and durable finish in various colors. Another option is to use metal patinas or stains to create unique and artistic effects on the surface of the fence. Explore different finishes that match your aesthetic preferences and complement the surrounding environment.
Read more: How To Replace Plumbing Pipes
4. Install Attachments and Accessories:
Based on your specific needs and preferences, now is the time to install any additional attachments or accessories to your pipe fence. This may involve attaching hinges, latches, or gate mechanisms for functional purposes. You can also incorporate ornamental elements such as caps, finials, or decorative panels to add personality and style to your fence.
5. Ensure Proper Gate Functionality:
If your pipe fence includes gates, double-check that they function smoothly and securely. Ensure that the hinges are properly aligned and lubricated for ease of movement. Test the latches or locks to ensure they engage correctly and provide reliable security.
6. Maintain Regular Cleaning and Inspections:
Once your pipe fence is complete, establish a regular maintenance routine. Regularly inspect the fence for any signs of damage, corrosion, or wear and promptly address any issues. Clean the fence periodically to remove dirt or debris that may accumulate over time. This will help preserve the integrity and appearance of your fence for years to come.
By applying these finishing touches, your welded pipe fence will have the desired aesthetic appeal and added protection against the elements. Take pride in your completed project and enjoy the functional and visual benefits it brings to your property.
Conclusion
Building a pipe fence through welding is a rewarding and practical DIY project that can provide you with a sturdy and durable fencing solution. By following the steps outlined in this comprehensive guide, you can confidently undertake the task of welding a pipe fence and achieve professional-grade results.
Throughout the process, it is important to prioritize safety by wearing the appropriate personal protective equipment and working in a well-ventilated area. Taking the time to prepare the pipe sections properly, set up the welding equipment correctly, and choose the right welding technique will greatly contribute to the success of your project.
By meticulously welding the pipe sections together, conducting thorough inspections, and testing the strength of the welds, you can ensure the structural integrity of your pipe fence. Applying finishing touches, such as cleaning the surface, applying protective coatings, and adding decorative elements, will not only enhance the appearance of the fence but also enhance its longevity and protection against the elements.
Remember to regularly maintain and inspect your pipe fence to address any potential issues and keep it in optimal condition. By doing so, you can ensure that your pipe fence continues to serve its purpose effectively for years to come.
With the knowledge and techniques shared in this guide, you are well-equipped to take on the challenge and enjoy the satisfaction of welding your own pipe fence. Embrace the craftsmanship, precision, and creativity involved in welding, and watch as your pipe fence becomes a functional and visually appealing addition to your property.
Frequently Asked Questions about How To Weld Pipe Fence
Was this page helpful?
At Storables.com, we guarantee accurate and reliable information. Our content, validated by Expert Board Contributors, is crafted following stringent Editorial Policies. We're committed to providing you with well-researched, expert-backed insights for all your informational needs.
0 thoughts on “How To Weld Pipe Fence”