Home>Home Maintenance>How To Weld Home Repairs
Home Maintenance
How To Weld Home Repairs
Modified: March 6, 2024
Learn how to weld for your home maintenance needs. Step-by-step guide to successful welding for home repairs and improvements.
(Many of the links in this article redirect to a specific reviewed product. Your purchase of these products through affiliate links helps to generate commission for Storables.com, at no extra cost. Learn more)
Introduction
Welcome to the world of welding! Whether you’re a seasoned DIY enthusiast or a homeowner looking to tackle some home repairs, learning the basics of welding can be a valuable skill. From fixing broken metal objects to reinforcing joints and creating custom pieces, welding opens up a world of possibilities for home maintenance projects.
Welding is a process that involves joining materials, usually metals, by melting and fusing them together. It provides a strong and durable bond, making it ideal for repairing or creating structures that require strength and stability. By understanding the different types of welding techniques, acquiring the necessary tools, and following proper safety measures, you can confidently take on a variety of welding projects around your home.
In this comprehensive guide, we will walk you through the various types of welding techniques, the tools and safety equipment you will need, and the step-by-step process for performing common home repairs. We’ll also share some essential safety tips and guidelines to ensure that you can complete your welding projects safely and effectively.
So, if you’re ready to dive into the world of welding and transform your home maintenance skills, let’s get started!
Key Takeaways:
- Welding is a valuable skill for home repairs, offering techniques like stick welding, MIG welding, and TIG welding. Prioritize safety, clean and maintain welds, and seek professional guidance for successful projects.
- Prepare your work area, set up your welding machine, and choose the right welding technique for each home repair project. Remember to prioritize safety, practice, and continue learning to enhance your welding skills.
Read more: How To Weld Pipe Fence
Understanding Welding
Before delving into the specific welding techniques and procedures, it’s important to have a basic understanding of how welding works. At its core, welding is the process of joining two or more pieces of metal together by melting and fusing them. The goal is to create a strong and permanent bond between the materials.
Welding relies on intense heat to melt the base metal and filler material (if used), which then solidifies to form a joint. The heat required for welding can be generated through a variety of methods, including electric arcs, gas flames, friction, or lasers.
One of the key factors in successful welding is selecting the appropriate welding technique for the job at hand. Some common welding techniques include:
- Shielded Metal Arc Welding (SMAW): Also known as stick welding, SMAW involves using a consumable electrode coated in flux. The flux acts as a shield to protect the arc from the surrounding atmosphere, preventing oxidation and ensuring a strong weld.
- Metal Inert Gas (MIG) Welding: MIG welding utilizes a wire electrode that is automatically fed through a welding gun. A shielding gas, usually a mixture of argon and carbon dioxide, is used to protect the arc and provide a clean weld.
- Tungsten Inert Gas (TIG) Welding: TIG welding uses a non-consumable tungsten electrode to create the arc. The weld area is protected by a shielding gas, typically argon or a mixture of argon and helium. TIG welding is known for its precision and is often used for delicate or intricate welds.
- Flux-Cored Arc Welding (FCAW): FCAW is similar to MIG welding but uses a tubular wire filled with flux. The flux creates a protective shield around the arc, preventing contamination and facilitating a strong weld.
Each welding technique has its own advantages and specific applications. The choice of technique will depend on factors such as the type of materials being joined, the thickness of the metal, and the desired result.
Now that you have a basic understanding of welding and the different techniques available, it’s time to gather the necessary tools and safety equipment before you begin your welding journey.
Types of Welding Techniques
Welding encompasses a wide range of techniques, each with its own unique characteristics and applications. Understanding these different types of welding techniques will help you determine the most appropriate method for your specific home repair needs.
1. Shielded Metal Arc Welding (SMAW): Commonly known as stick welding, this technique involves using a flux-coated electrode to create an electric arc between the electrode and the workpiece. The heat generated melts the electrode and the base metal, creating a strong bond as the materials cool and solidify.
2. Metal Inert Gas (MIG) Welding: MIG welding, also known as Gas Metal Arc Welding (GMAW), uses a continuous wire electrode and a shielding gas to protect the arc and weld pool from atmospheric contamination. It is a versatile technique suitable for a wide range of materials and thicknesses, making it popular for both home repairs and industrial applications.
3. Tungsten Inert Gas (TIG) Welding: TIG welding utilizes a non-consumable tungsten electrode to produce the weld. A separate filler rod may be used if necessary. The weld area is shielded by an inert gas, such as argon or helium, to protect it from oxidation. TIG welding offers excellent control and precision, making it ideal for delicate or critical welds.
4. Flux-Cored Arc Welding (FCAW): FCAW is similar to MIG welding, but instead of a solid wire, a tubular wire filled with flux is used. This flux creates a shielding gas when it melts and solidifies, protecting the weld pool. FCAW is commonly used in outdoor applications or situations where a shielding gas may be impractical.
5. Laser Welding: Laser welding uses a highly focused laser beam to melt and fuse the materials. It provides a precise and efficient method for joining metal parts, often used in industries such as automotive and electronics manufacturing. While laser welding is not typically used for home repairs, it’s worth mentioning as a high-tech welding option.
Each welding technique has its strengths and limitations. Factors to consider when choosing a welding technique include the type of material, thickness, accessibility, and desired weld quality. It’s important to research and understand the specific requirements of your home repair project to select the appropriate welding technique.
Now that we’ve covered the different types of welding techniques, let’s move on to the tools and safety equipment you’ll need to carry out your welding repairs safely and effectively.
Required Tools and Safety Equipment
Before you begin any welding project, it’s crucial to gather the necessary tools and safety equipment. Welding involves working with high temperatures and potentially hazardous materials, so taking the appropriate safety precautions is essential to protect yourself and those around you. Here are the essential tools and safety equipment you’ll need:
1. Welding Machine: The core of any welding setup is the welding machine itself. Depending on the welding technique you choose, you’ll need a machine that is compatible with that specific method. MIG welders, TIG welders, and stick welders are the most common types available for home use.
2. Electrodes, Filler Rods, or Wire: Depending on the welding technique, you’ll need the appropriate consumable materials. Stick welding utilizes electrodes, while MIG and TIG welding require filler rods or wire. These materials are essential for creating the weld and adding strength to the joint.
3. Welding Helmet: Protect your eyes and face from the intense light and sparks with a welding helmet. Look for helmets that are auto-darkening, meaning they adjust the lens shade automatically when the arc is struck. This provides optimal visibility and protection during the welding process.
4. Welding Gloves: Choose welding gloves that are flame-resistant to protect your hands from heat and sparks. Look for gloves made specifically for welding, as they provide better insulation and dexterity compared to ordinary work gloves.
5. Protective Clothing: Wear flame-resistant clothing made from natural fibers like cotton or wool. Long-sleeved shirts, long pants, and closed-toe shoes are a must to protect your body from sparks and potential burns. Avoid synthetic materials that may melt under high heat.
6. Welding Apron: A leather welding apron provides an additional layer of protection for your body and clothes. It shields you from sparks, hot metal fragments, and potentially harmful UV radiation emitted during welding.
7. Welding Shield or Safety Glasses: In addition to a welding helmet, you may need a welding shield or safety glasses to protect your eyes from flying debris and intense light during setup and cleanup.
8. Fire Extinguisher: Keep a fire extinguisher nearby in case of any welding-related fires. Be sure to choose a fire extinguisher suitable for extinguishing both electrical and flammable material fires.
9. Ventilation: Ensure proper ventilation in your work area to prevent the accumulation of hazardous fumes or gases produced during the welding process. Use fans, open windows, or work in well-ventilated areas to promote airflow.
10. Welding Table or Workbench: Set up a sturdy welding table or workbench to provide a stable surface for your projects. Make sure it is made of a non-flammable material and is properly grounded.
11. Clamps and Fixtures: Depending on your project, you may need clamps or fixtures to hold the workpieces securely in place during welding. This ensures accurate and stable welding joints.
Remember, safety should always be your top priority when welding. Investing in the right tools and safety equipment will help you complete your home repair projects with confidence and peace of mind.
Now that you have the necessary tools and safety equipment, it’s time to prepare your work area for welding. We’ll cover that in the next section.
Preparing the Work Area
Preparing the work area is a crucial step in ensuring a successful and safe welding project. Taking the time to set up your work area properly will not only enhance your welding experience but also minimize the risk of accidents and damage. Here are the essential steps to prepare your work area for welding:
1. Clear the Area: Start by removing any flammable materials, clutter, and debris from the work area. Ensure that there is sufficient space around the welding area to maneuver comfortably and that there are no tripping hazards.
2. Fire Safety: Welding involves open flames and sparks, so it’s crucial to take fire safety precautions. Keep a fire extinguisher within reach and ensure it is in good working condition. If working indoors, consider having a fire-resistant blanket or fire-resistant material nearby to cover any flammable objects.
3. Adequate Lighting: Welding requires good visibility to ensure accurate and quality welds. Ensure that the work area is well-lit, both directly over the welding area and around the surrounding space. Use additional lighting sources, such as work lights or spotlights, if necessary.
4. Grounding: Proper grounding is essential for safe welding. Ensure that your welding machine and workpiece are grounded. This helps prevent electrical shock and ensures the stability of the welding arc.
5. Welding Table or Workbench: Set up a sturdy and stable welding table or workbench to hold your workpiece securely. The table should be made of a non-flammable material, such as steel or heavy-duty wood, to withstand the heat generated during welding.
6. Welding Curtains or Barriers: Consider using welding curtains or barriers to protect the surrounding area from sparks and UV radiation. These curtains are made of flame-resistant material and can help contain the welding process and prevent any accidental damage.
7. Ventilation: Adequate ventilation is crucial in a welding environment to reduce the buildup of harmful fumes and gases. If working indoors, ensure there is proper airflow, open windows, or use fans to improve ventilation. If ventilation is insufficient, consider using a fume extraction system or welding in an outdoor area with good airflow.
8. Personal Protective Equipment (PPE): Before starting the welding process, put on your personal protective equipment, including a welding helmet, gloves, protective clothing, and safety glasses. Make sure all PPE is in good condition and fits properly to provide maximum protection.
By following these steps and taking the time to prepare your work area, you can ensure a safe and efficient welding process. With a properly set up workspace, you’re now ready to move on to the next stage: cleaning and priming the surfaces to be welded.
Read more: How To Read A Welding Blueprint
Cleaning and Priming Surfaces
Prior to welding, it is crucial to clean and prime the surfaces that will be joined. Properly preparing the surfaces ensures a clean and strong weld, free from contaminants and impurities. Here are the essential steps for cleaning and priming surfaces before welding:
1. Remove Any Coatings: Start by removing any coatings or paint from the surfaces to be welded. Coatings can interfere with the welding process and prevent proper bonding. Use a wire brush, sandpaper, or a chemical stripper to remove the coatings effectively.
2. Clean the Surfaces: Thoroughly clean the surfaces by removing any dirt, grease, rust, or other contaminants. Use a degreaser or a solvent to clean the surfaces, followed by a wire brush or sandpaper to remove any rust or corrosion. Ensure that the surfaces are clean and free from any debris or loose particles.
3. Bevel the Edges (if necessary): In some cases, it may be necessary to bevel the edges of the surfaces to be welded. Beveling helps create a V-shaped groove that provides better penetration and increases the strength of the weld joint. Use a grinder or a file to bevel the edges to the desired angle.
4. Apply a Weldable Primer (optional): Depending on the type of metal being welded and the environment in which it will be exposed, you may choose to apply a weldable primer. A weldable primer helps improve adhesion and provides additional corrosion resistance. Follow the manufacturer’s instructions when applying the primer, allowing it to dry or cure properly before welding.
5. Check for Proper Fit-up: Before welding, ensure that the surfaces are properly aligned and in the correct position for welding. Take the time to check the fit-up and make any necessary adjustments or alignments. Proper fit-up ensures that the weld joint will be strong and aligned correctly.
Remember, clean and properly prepared surfaces are essential for achieving high-quality and durable welds. Skipping or rushing through the surface cleaning and priming process can result in weak welds and potential failure. Take the time to thoroughly clean and prime the surfaces to ensure the best possible welding results.
Now that the surfaces are clean and primed, it’s time to set up the welding machine and get ready to perform your home repairs. We’ll cover the process of setting up the welding machine in the next section.
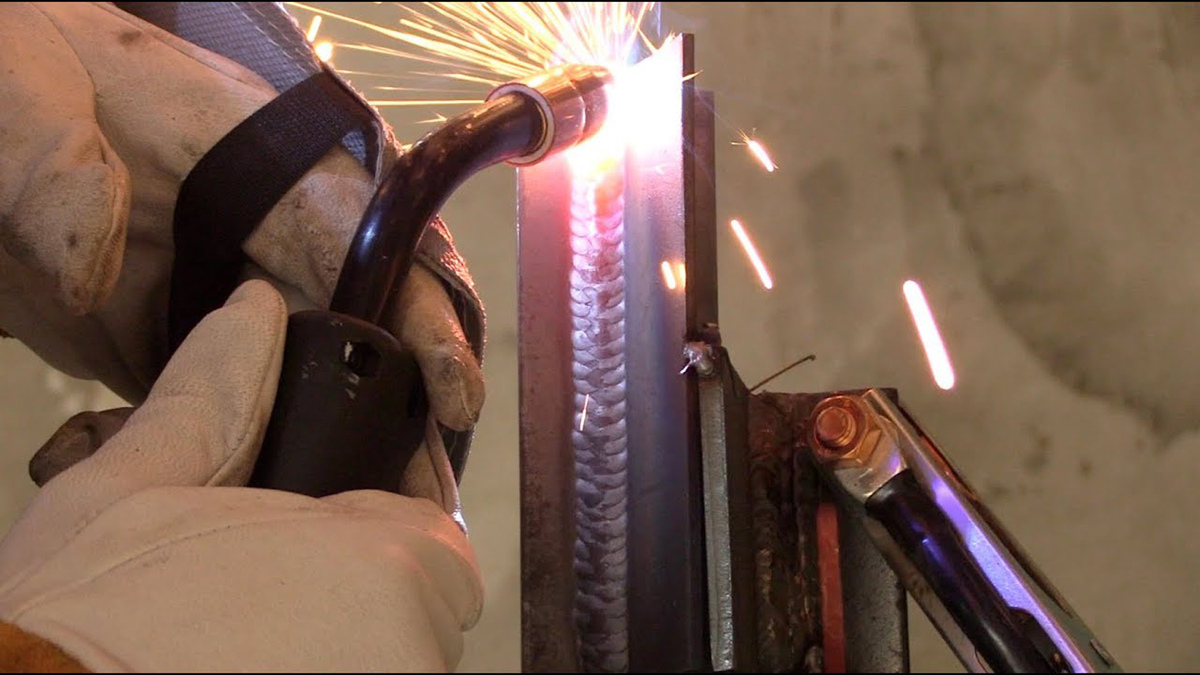
When welding home repairs, always wear protective gear such as gloves, a welding helmet, and long sleeves to protect yourself from sparks and UV rays.
Setting up the Welding Machine
Once you have prepared the surfaces and gathered the necessary tools and safety equipment, it’s time to set up your welding machine. Properly setting up the machine is crucial for ensuring smooth and efficient welding operations. Here are the steps to follow when setting up your welding machine:
1. Power Connection: Start by ensuring that your welding machine is connected to a reliable power source. Follow the manufacturer’s guidelines for power requirements and make sure to use the appropriate power outlet. If you are using an extension cord, ensure it is rated for the machine’s power needs.
2. Select the Welding Technique and Machine Settings: Choose the welding technique you will be using, such as SMAW, MIG, TIG, or FCAW. Set the machine to the correct welding mode or process by adjusting the appropriate switch or dial. Refer to the machine’s user manual for specific instructions on selecting the right settings based on your welding technique, material, and thickness.
3. Adjust Amperage/Current: The machine’s amperage or current settings will determine the heat intensity of the arc. Set the amperage to the appropriate level based on the material thickness and welding technique being used. It’s usually recommended to start with a lower amperage and make adjustments as needed during the welding process.
4. Attach the Ground Clamp: Connect the ground clamp securely to the workpiece or the welding table. Make sure the clamp’s connection point is clean and free from any paint, rust, or debris. Proper grounding is crucial for safety and for stabilizing the welding arc.
5. Install the Electrode, Filler Rod, or Wire: Depending on the welding technique, install the appropriate consumable material. For SMAW, insert the electrode into the electrode holder and ensure it is secured tightly. For MIG or FCAW, feed the filler wire through the machine’s wire feeder and ensure it is properly aligned and tensioned.
6. Set the Gas Flow Rate (if applicable): If you are using a shielding gas with your welding technique, set the appropriate flow rate. The flow rate will depend on the specific gas used and the welding process. Consult the user manual and refer to the gas supplier’s recommendations for the correct flow rate.
7. Test the Machine: Before starting your actual welding, perform a test run on scrap material to ensure that the machine is functioning properly and that the settings provide the desired weld quality. Adjust as necessary to achieve the desired results.
Properly setting up your welding machine is essential for achieving optimal results and maintaining a safe working environment. Take the time to familiarize yourself with your specific welding machine and its settings, and always refer to the manufacturer’s instructions for guidance.
Now that your machine is set up, you’re ready to explore the welding techniques used for common home repairs. We’ll cover those techniques in detail in the next section.
Welding Techniques for Common Home Repairs
Welding is a versatile skill that can be applied to various home repair projects. Whether you need to fix a broken metal object, reinforce a joint, or create custom structures, knowing the right welding techniques will help you achieve durable and lasting repairs. Here are some common welding techniques and their applications:
1. Shielded Metal Arc Welding (SMAW): SMAW, also known as stick welding, is a popular technique for general repairs and structural welding. It is commonly used to join thicker metals, such as steel beams, brackets, or fences. The simplicity and versatility of SMAW make it suitable for a wide range of home repair projects.
2. Metal Inert Gas (MIG) Welding: MIG welding is one of the most widely used techniques for home repairs. It is efficient and relatively easy to learn, making it suitable for beginners. MIG welding can be used for various repairs, such as fixing gates, metal furniture, or automotive components. It provides good control and produces clean welds with minimal splatter.
3. Tungsten Inert Gas (TIG) Welding: TIG welding is known for its precision and ability to produce high-quality welds. It is often used for delicate or decorative repairs, such as ornamental metalwork, stainless steel appliances, or aluminum fixtures. TIG welding allows for precise control of heat and provides excellent aesthetic results.
4. Flux-Cored Arc Welding (FCAW): FCAW is a versatile technique suitable for both outdoor and indoor repairs. It is commonly used for repairs involving thick or dirty metal surfaces. FCAW can be used for projects like repairing metal gates, fences, or agricultural equipment. The flux in the wire helps shield the welding arc from contaminants, making it ideal for outdoor repairs where wind or draft may affect the shielding gas in other techniques.
Each welding technique offers its own advantages and is suitable for different types of repairs. Consider the materials being welded, the thickness of the metal, and the desired strength and appearance when selecting the appropriate welding technique for your home repair project.
Remember that welding requires practice and patience. It’s always a good idea to start with small, simple repairs and gradually work your way up to more complex projects. If you’re new to welding, consider taking a course or seeking guidance from experienced welders to enhance your skills and ensure successful repairs.
Now that you’re familiar with the various welding techniques, it’s crucial to prioritize safety. Let’s explore some essential welding safety tips to keep you protected during your home repair projects.
Welding Safety Tips
Welding involves working with high temperatures, intense light, and potentially hazardous materials. It is crucial to prioritize safety to protect yourself and those around you during the welding process. Here are some essential welding safety tips to keep in mind:
1. Personal Protective Equipment (PPE): Always wear the appropriate personal protective equipment, including a welding helmet, safety glasses, welding gloves, and flame-resistant clothing. This protective gear will shield you from sparks, UV radiation, heat, and potential burns.
2. Proper Ventilation: Ensure that your work area is well-ventilated to prevent the buildup of harmful fumes and gases. Welding produces gases, such as nitrogen oxides, that can be hazardous when inhaled. If you’re working indoors, use exhaust fans or work near open windows or doors to improve airflow.
3. Fire Safety: Welding involves open flames and sparks, making fire safety a top priority. Remove any flammable materials from the work area and keep a fire extinguisher nearby. Cover flammable objects with fire-resistant blankets or materials to prevent accidental ignition.
4. Grounding: Proper grounding is essential to prevent electrical shock and ensure a stable welding arc. Always connect the workpiece and welding machine to a grounding point or a designated grounding clamp. Improper grounding can lead to electric shock and damage to the welding equipment.
5. Eye Protection: Protect your eyes from intense light and UV radiation by using a welding helmet with a proper shade for the type of welding you’re performing. Additionally, wear safety glasses with side shields to protect your eyes from sparks and debris during setup and cleanup.
6. Safe Work Area: Keep your work area clean and free from clutter to avoid tripping hazards. Inspect your work area for any potential safety hazards before beginning a welding project. Ensure that there are no flammable materials, loose cables, or obstructions in your workspace.
7. Welding Curtain or Barrier: Use welding curtains or barriers to confine the welding area and prevent sparks and UV radiation from spreading. These curtains are made of heat-resistant material and provide an additional layer of protection for yourself and the surrounding environment.
8. Limit Exposure: Minimize the amount of time you spend directly in front of the welding arc to reduce your exposure to UV radiation. Prolonged exposure can result in arc eye, a painful condition similar to sunburn on the eyes. Take frequent breaks and utilize the correct shade in your welding helmet.
9. Regular Equipment Maintenance: Ensure that your welding equipment is regularly inspected, maintained, and in good working condition. Faulty equipment can increase the risk of accidents and compromise weld quality. Replace damaged cables, worn-out welding tips, or faulty electrical connections promptly.
10. Training and Experience: Obtain proper training and experience in welding before attempting complex projects. Engage in welding courses, workshops, or seek guidance from experienced welders. This will help you develop the necessary skills and knowledge to safely and effectively complete your home repair projects.
Remember, safety should always be your top priority when welding. By following these safety tips, you can minimize the risk of accidents, protect yourself and others, and ensure successful and enjoyable welding experiences.
Once you’ve completed your welding repairs, it’s important to take care of the welds and perform any necessary maintenance. We’ll discuss post-welding care and maintenance in the next section.
Read more: How To Store Welding Rods
After Welding Care and Maintenance
After completing your welding project, it’s important to provide proper care and maintenance for the welds to ensure their longevity and durability. Here are some essential steps for post-welding care and maintenance:
1. Allow Cooling Time: Allow sufficient time for the welds to cool down before handling. Welded metal can remain hot for a considerable period, and touching it too soon can result in burns. Follow the recommended cooling time based on the materials and welding technique used.
2. Inspect the Welds: Thoroughly inspect the welds for any signs of defects, such as cracks, porosity, or insufficient penetration. Check for proper fusion between the base metal and filler material. If any issues are found, consult with an experienced welder or repair the welds if necessary.
3. Clean the Welded Surfaces: After cooling, clean the welded surfaces to remove any slag, spatter, or loose particles. Use a wire brush or grinder to clean the welds, ensuring that the area around the weld is free from debris. Cleaning the welds prevents the buildup of corrosion and improves their overall appearance.
4. Perform Post-Weld Heat Treatment (if applicable): In some cases, post-weld heat treatment may be necessary for specific applications or to relieve welding-induced stress. This process involves heating the welded area to a specific temperature and then allowing it to cool slowly. If post-weld heat treatment is required, consult with an experienced welder for proper guidance.
5. Protect Against Corrosion: Welded metal is prone to corrosion, especially in outdoor or humid environments. Consider applying a protective coating, such as paint, primer, or a corrosion-resistant solution to the welded surfaces. This helps prevent rust and extends the lifespan of the welds.
6. Regular Maintenance Checks: Periodically inspect the welds to ensure they remain in good condition. Look for signs of wear, cracks, or any deterioration. Performing regular maintenance checks allows you to identify and address any issues early on, preventing further damage or potential failure.
7. Follow Proper Usage Guidelines: If your welding repairs involve functional objects or equipment, ensure that they are used and operated according to their intended purpose. Improper usage can put additional stress on the welds and compromise their structural integrity.
8. Seek Professional Help if Needed: If you are unsure about the condition or maintenance requirements of the welded area, consult with a professional welder or engineer. They can provide guidance and ensure that the welds meet the necessary standards and specifications.
Proper care and maintenance of your welds will help ensure that your repairs last and maintain their strength over time. By following these guidelines, you can enjoy the benefits of your welding projects without concerns of premature failure or deterioration.
Now that you understand the importance of post-welding care and maintenance, let’s recap what we’ve covered in this comprehensive guide on welding for home repairs.
Conclusion
Congratulations! You’ve now learned the basics of welding for home repairs. From understanding the different welding techniques to preparing the work area, cleaning and priming surfaces, setting up the welding machine, and following safety measures, you are well-equipped to embark on your own welding projects with confidence.
Welding is a valuable skill that allows you to tackle a wide range of home repairs, from fixing broken metal objects to creating custom structures. By mastering the various welding techniques and investing in the right tools and safety equipment, you can successfully complete repairs and improve the functionality and aesthetics of your home.
Always prioritize safety when welding. Use the appropriate personal protective equipment, ensure proper ventilation, and take necessary precautions to prevent accidents and protect yourself and others.
Remember to properly clean, inspect, and maintain your welds after completing a project. By following post-welding care and maintenance guidelines, you can ensure the durability and longevity of your repairs.
If you’re new to welding, continue to practice and improve your skills. Take advantage of welding courses, workshops, or seek guidance from experienced welders. With time and experience, you will develop the expertise needed to tackle more complex welding projects.
Never stop learning and expanding your knowledge of welding techniques and processes. Stay updated on industry advancements and best practices to continue enhancing your welding skills.
Now, armed with your newfound knowledge and skills, you’re ready to take on your next home maintenance project. Welding opens up a world of possibilities, allowing you to repair, strengthen, and create with confidence. So, roll up your sleeves, ignite the welding arc, and let your creativity and expertise shine through!
Frequently Asked Questions about How To Weld Home Repairs
Was this page helpful?
At Storables.com, we guarantee accurate and reliable information. Our content, validated by Expert Board Contributors, is crafted following stringent Editorial Policies. We're committed to providing you with well-researched, expert-backed insights for all your informational needs.


0 thoughts on “How To Weld Home Repairs”