Articles
When To Stain A New Cedar Fence
Modified: September 2, 2024
Looking for articles on when to stain a new cedar fence? Discover the best time and techniques to protect and enhance your Cedar fence's natural beauty.
(Many of the links in this article redirect to a specific reviewed product. Your purchase of these products through affiliate links helps to generate commission for Storables.com, at no extra cost. Learn more)
Introduction
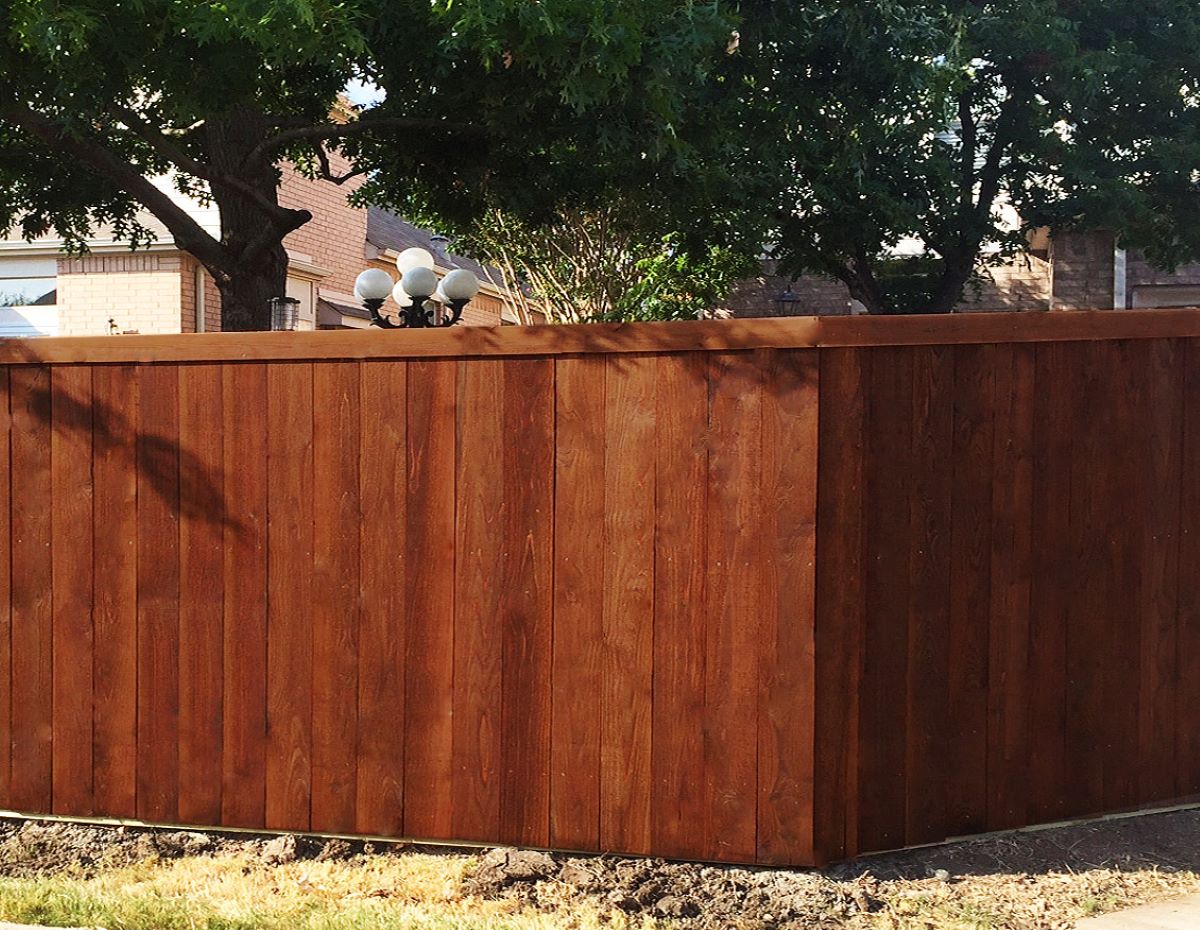
A new cedar fence can be a beautiful addition to your property, providing privacy, security, and a touch of natural elegance. However, to ensure its longevity and appearance, it’s important to properly care for and protect your cedar fence. One of the most effective ways to do this is by staining the wood.
In this article, we will explore the best practices and considerations for staining a new cedar fence. We’ll discuss the benefits of staining, the factors to consider before staining, the optimal time to apply the stain, the types of stain available, and how to properly maintain and care for your stained cedar fence.
Understanding the unique qualities of cedar wood is crucial when it comes to staining. Cedar is a popular choice for outdoor applications because of its natural resistance to rot, decay, and insect damage. It has natural oils and preservatives that make it highly durable, which means it can withstand the elements and remain beautiful for many years.
However, these natural qualities do not make cedar immune to the effects of sunlight, moisture, and other environmental factors. Over time, cedar can develop a grayish color and become susceptible to cracking, splitting, and warping. Staining helps to protect the wood from these issues, preserving its natural beauty and extending its lifespan.
When considering whether to stain your new cedar fence, it’s important to weigh the benefits. Staining not only enhances the appearance of the wood but also provides a protective barrier against moisture, UV rays, and other damaging elements. Additionally, staining can help to prevent the growth of mold and mildew, which can be common in outdoor environments.
Before you jump into staining your new cedar fence, there are a few factors to consider. The first is the age of the wood. It’s generally recommended to wait at least a few weeks before staining a new fence to allow the wood to properly dry and acclimate to its surroundings. Staining too soon can trap moisture within the wood, leading to premature degradation.
Another important factor to consider is the current condition of the wood. If the cedar already has signs of grayness or weathering, it may need to be cleaned and prepped before staining. This can involve using a wood cleaner or a power washer to remove dirt, debris, and any existing stain or sealant.
In the next section, we will discuss how to test the wood’s readiness for staining and the best time to proceed with the staining process for your new cedar fence.
Key Takeaways:
- Staining a new cedar fence enhances its natural beauty, protects against moisture and UV rays, and prolongs its lifespan. Proper preparation, timing, and maintenance are essential for achieving stunning and long-lasting results.
- Understanding cedar wood’s unique qualities and choosing the right type of stain are crucial for preserving the beauty and durability of a new cedar fence. Regular maintenance, including cleaning and reapplication of stain, is essential for long-term protection.
Read more: How To Seal Cedar Fence
Understanding Cedar Wood
Cedar wood is highly sought after for outdoor applications, including fence construction, due to its natural beauty, durability, and resistance to decay and insect damage. It is known for its distinct reddish-brown color, rich grain patterns, and pleasant aroma.
There are several varieties of cedar wood used for fences, but the most common are Western Red Cedar and Eastern White Cedar. Western Red Cedar, which is often found in the western parts of North America, is known for its vibrant color and natural resistance to decay. Eastern White Cedar, on the other hand, is lighter in color and commonly found in the eastern parts of the United States and Canada.
One of the remarkable characteristics of cedar wood is its natural oils and preservatives. These oils act as a natural insect repellent and make the wood resistant to decay. This resistance is due to the presence of chemical compounds such as thujaplicin, which is unique to cedar wood and helps protect it against fungal growth and insect infestation.
In addition to its natural resistance, cedar wood is also dimensionally stable, meaning it remains relatively unaffected by changes in temperature and humidity. This stability is attributed to the cell structure of the wood, which allows it to expand and contract without warping, twisting, or splitting.
Cedar wood’s durability and resistance to decay make it an excellent choice for outdoor applications such as fences. However, it’s important to understand that even cedar wood requires proper care and maintenance to ensure its longevity.
Over time, cedar wood exposed to the elements will naturally weather and turn gray. This is a common occurrence and does not necessarily indicate decay or damage. It is purely cosmetic and does not affect the structural integrity of the wood. Many homeowners find the natural gray patina attractive and choose to leave their cedar fences untreated.
If you prefer to maintain the original reddish-brown color of your cedar fence, staining is an ideal solution. Staining not only helps to retain the color but also adds a layer of protection against the damaging effects of sunlight and moisture.
Now that we have a basic understanding of cedar wood and its unique qualities, let’s delve into the benefits of staining a cedar fence in the next section.
Benefits of Staining a Cedar Fence
Staining a cedar fence offers numerous benefits, both in terms of aesthetics and practicality. By taking the time to properly stain your cedar fence, you can enhance its appearance, protect the wood from the elements, and prolong its lifespan. Let’s explore some of the key benefits of staining:
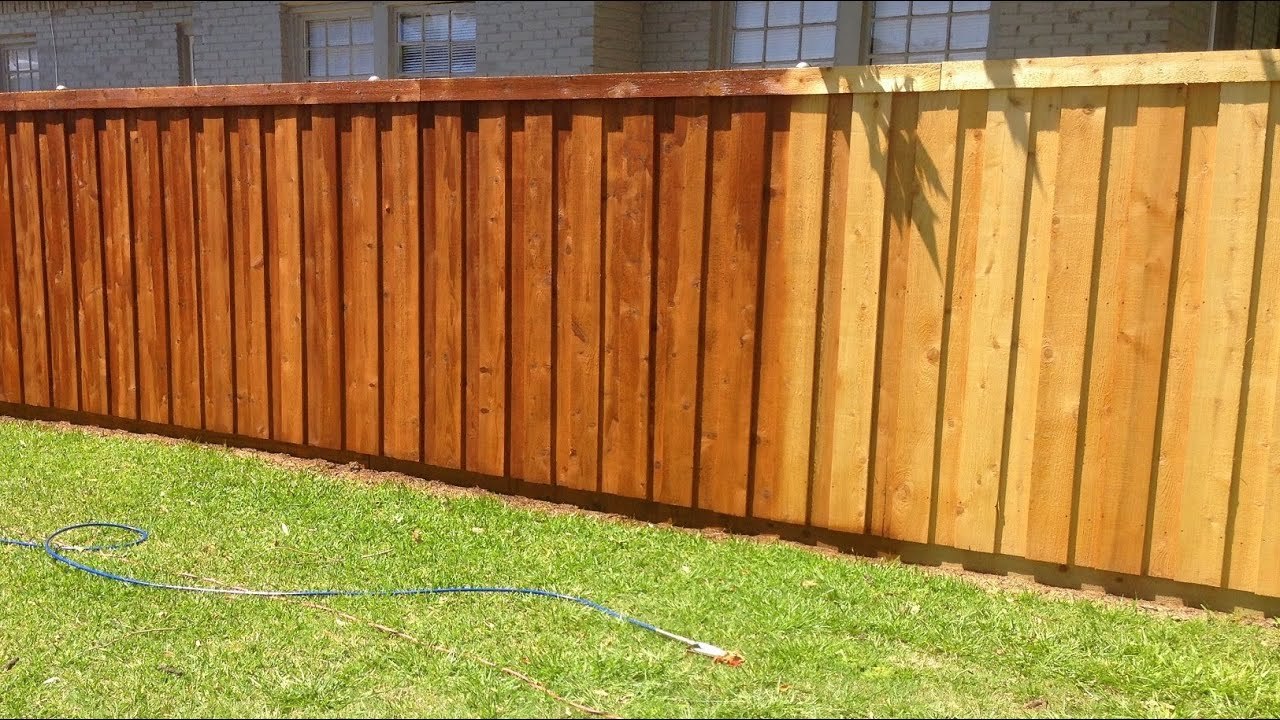
1. Enhances the Natural Beauty: Cedar wood has a beautiful reddish-brown color and unique grain patterns that can be further enhanced with the right stain. Staining allows you to choose a shade that complements your outdoor space and brings out the natural beauty of the wood, adding warmth and richness to your fence.
2. Protects Against Moisture: Cedar wood contains natural oils that make it resistant to moisture. However, over time, prolonged exposure to rain and humidity can still cause the wood to absorb moisture, leading to swelling, warping, and cracking. Applying a stain creates a protective barrier that repels water, preventing damage and extending the lifespan of your fence.
3. Shields from UV Rays: Sunlight can cause the natural color of cedar to fade over time. UV rays can also lead to the breakdown of the wood fibers, causing the fence to become brittle and susceptible to damage. Staining your cedar fence provides a layer of protection against UV rays, minimizing color fading and maintaining the integrity of the wood.
4. Prevents Rot and Decay: While cedar wood is naturally resistant to decay, staining provides an extra layer of defense. The stain penetrates the wood fibers, creating a barrier against moisture and preventing the growth of fungi and rot-causing organisms. This helps to maintain the structural integrity of your fence and prolong its lifespan.
5. Resists Insect Infestation: Cedar wood contains natural oils and compounds that act as a deterrent to insects and pests. However, these protective properties can diminish over time. Applying a stain with insect-repellent properties helps to further safeguard your fence against termites, ants, and other wood-boring insects.
6. Easy Maintenance: Stained cedar fences are generally easier to clean and maintain compared to untreated wood. Stains create a smooth surface that resists dirt, dust, and mildew buildup. Regular maintenance involves simple cleaning with mild soap and water, followed by occasional reapplication of a protective top coat.
7. Customization and Versatility: Stains come in a wide range of colors and opacities, allowing you to customize the look of your cedar fence. Whether you prefer a natural and subtle appearance or a bold and vibrant statement, there is a stain color and finish to suit your personal style and complement your outdoor aesthetic.
By staining your cedar fence, you not only enhance its appearance but also invest in its long-term protection. Now that we understand the benefits of staining, let’s delve into some important factors to consider before staining your new cedar fence.
Factors to Consider before Staining
Before you embark on the process of staining your new cedar fence, there are several factors that you should take into consideration. These factors will help ensure that your staining project yields the best results and that your fence remains beautiful and protected for years to come. Let’s explore some key factors to consider:
1. Age of the Wood: It’s important to allow your new cedar fence to properly acclimate before applying any stain. Freshly installed cedar tends to contain higher moisture levels, and staining too soon can trap moisture within the wood, leading to issues such as uneven penetration or premature degradation. It is generally recommended to wait several weeks to a few months before staining a new cedar fence. This time frame allows the wood to dry and stabilize, preparing it for the staining process.
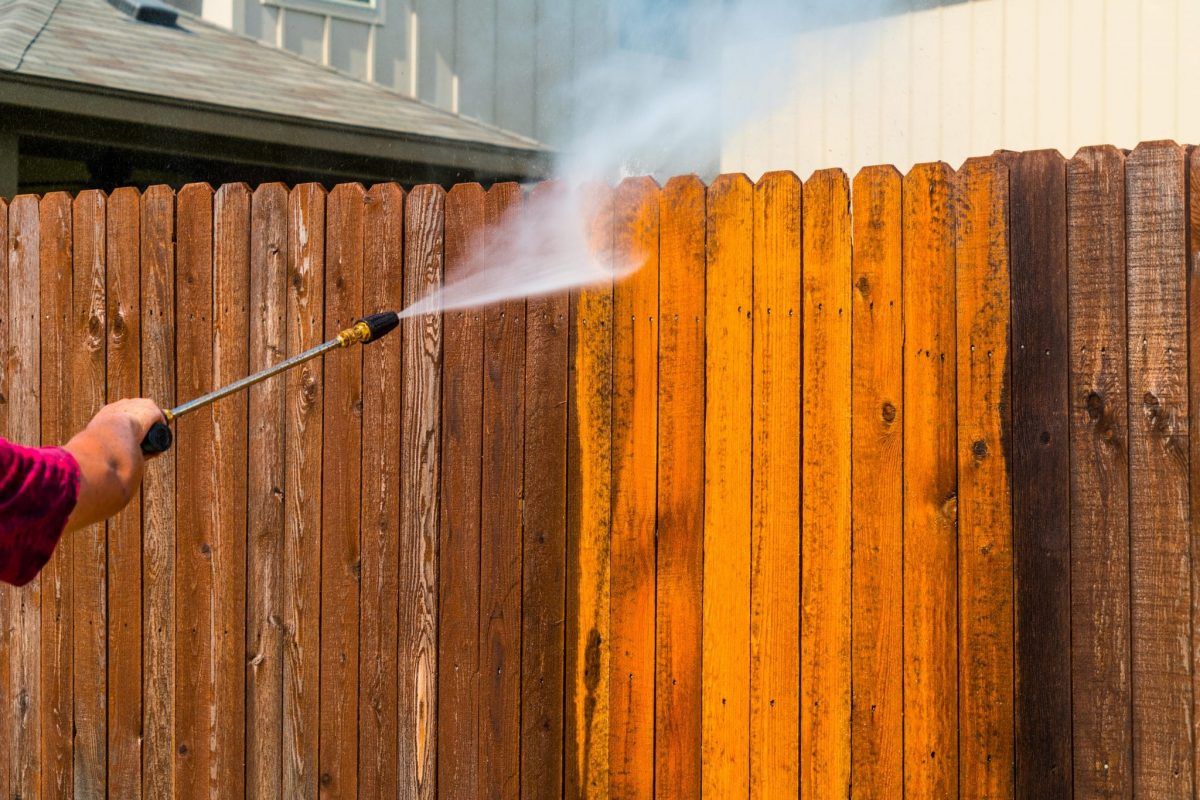
2. Condition of the Wood: Assess the condition of the cedar wood before proceeding with staining. If you notice any signs of discoloration, grayness, or weathering, you may need to take additional steps to prepare the surface. Cleaning the wood with a wood cleaner or using a power washer can remove dirt, debris, and any existing stain or sealant. It’s important to start with a clean and smooth surface to ensure proper adhesion and optimal results.
3. Weather Conditions: Both temperature and humidity play a role in the staining process. It’s important to choose a day with moderate temperatures, typically between 50°F (10°C) and 90°F (32°C). Avoid staining on excessively hot or cold days, as extreme temperatures can affect the stain’s application and curing process. Additionally, humidity levels should be moderate, ideally between 40% and 70%, to prevent the wood from absorbing excessive moisture during the staining process.
4. Stain Compatibility: Determine whether the type of stain you plan to use is compatible with cedar wood. Different stains have different formulations, and some may not adhere well to cedar or may alter the wood’s appearance. It’s always recommended to choose a stain specifically formulated for cedar or one that is suitable for both exterior wood and cedar. This ensures that the stain will properly bond with the wood fibers and provide the desired color and protection.
5. Personal Preferences: Consider your personal preferences when choosing a stain color and opacity. Stains come in a variety of shades, ranging from transparent to solid. Transparent and semi-transparent stains allow the natural grain and beauty of the wood to show through, while semi-solid and solid stains offer more coverage and can provide a different look. Take into account the overall style of your property, the surrounding landscape, and your desired aesthetic when selecting a stain.
6. Safety Precautions: It’s essential to prioritize safety during the staining process. Some stains can contain volatile organic compounds (VOCs) that may emit fumes and require adequate ventilation. It’s recommended to work in a well-ventilated area and wear protective equipment, such as gloves and safety goggles. Follow the manufacturer’s instructions for proper handling and disposal of staining materials.
By considering these factors, you can ensure that you are making informed decisions when it comes to staining your cedar fence. Now that we have discussed the important pre-staining considerations, let’s move on to the next step: testing the wood’s readiness for staining.
Testing the Wood’s Readiness
Before you start applying stain to your new cedar fence, it’s essential to test the wood’s readiness. This step ensures that the wood has adequately dried and is prepared for the staining process. Testing the wood helps prevent issues such as poor stain penetration, uneven coloration, or premature stain failure. Here are some methods to test the wood’s readiness:
1. Moisture Content Test: Excess moisture in the wood can interfere with the stain’s absorption and adhesion. Use a moisture meter to measure the wood’s moisture content. Ideally, the moisture level should be below 15% before applying the stain. If the moisture content is higher, it’s recommended to wait until the wood dries out further.
2. Water Absorption Test: A simple water absorption test can provide insights into the wood’s readiness. Sprinkle a few droplets of water onto the surface of the cedar fence. If the water beads up and remains on the surface, it indicates that the wood might still have excessive moisture. However, if the water is absorbed into the wood, it suggests that the wood is ready to be stained.
3. Wood Color Test: Assess the color of the cedar wood. If the wood still appears wet or has a dark, saturated look, it is an indication that it has not dried completely. The wood should have a lighter, more natural color, indicating that it has dried out sufficiently for staining. Remember, staining wood that is too damp can lead to poor adhesion and potential staining problems.
4. Touch Test: Another method is to touch the wood surface with your bare hand. If the wood feels cool or damp to the touch, it indicates that it may still contain excessive moisture. However, if the wood feels dry and slightly warm, it suggests that the moisture content is low enough for staining.
It’s important to note that the drying time for cedar wood can vary depending on various factors, such as climate, temperature, humidity, and the thickness of the wood. Typically, it is recommended to wait a minimum of two to four weeks after fence installation before starting the staining process. However, it’s always best to rely on actual test results rather than a specific timeframe.
By conducting these tests, you can ensure that the cedar wood is in the optimum condition for staining. Once the wood has passed these tests and is ready for staining, you can move on to the next step: determining the best time to stain your new cedar fence.
Read more: How Long Will Cedar Fence Last
Best Time to Stain a New Cedar Fence
The timing for staining a new cedar fence plays a crucial role in the overall success and longevity of the stain. Choosing the right time to apply the stain ensures proper adhesion, optimal color absorption, and long-lasting protection. Here are some key considerations for determining the best time to stain your new cedar fence:
1. Wait for the Wood to Dry: New cedar fences contain a certain amount of moisture from the manufacturing and installation process. It’s essential to allow the wood to dry and acclimate to its surroundings before staining. Waiting at least two to four weeks, or until the wood’s moisture content is below 15%, is recommended. Staining the wood while it is still damp can lead to poor adhesion, uneven coloration, and the potential for the stain to fail prematurely.
2. Ideal Weather Conditions: Staining should be done when weather conditions are favorable. Choose a day when the temperature range falls between 50°F (10°C) and 90°F (32°C). Extreme temperatures, both high and low, can affect the stain’s application and drying process. It’s also important to consider humidity levels. A moderate humidity range between 40% and 70% is optimal. Staining in high humidity conditions can result in longer drying times and poor adhesion.
3. Avoid Staining in Direct Sunlight: Staining your cedar fence in direct sunlight can accelerate the drying process of the stain, making it difficult to achieve an even application. The heat from the sun can also cause the stain to dry too quickly, leading to brush marks or uneven coloration. It’s advisable to choose a time of day when the fence is shaded or when the sun is at a lower angle.
4. Consider Seasonal Changes: The season in which you choose to stain your new cedar fence can have an impact on the overall results. Staining during the spring or fall, when temperatures are moderate and humidity is not excessively high, is often ideal. Avoid staining in extreme weather conditions, such as freezing temperatures in winter or scorching heat in summer.
5. Plan for Ample Drying Time: After applying the stain, the wood needs sufficient time to dry and cure before it is exposed to moisture, such as rain or sprinklers. Ensure that you have a window of several days of dry weather to allow the stain to fully dry and set. Follow the manufacturer’s instructions for recommended drying and curing times.
6. Schedule Prior to Inclement Weather: It’s wise to plan your staining project before a period of inclement weather, such as heavy rain or snow. Moisture can interfere with the stain’s drying process and potentially lead to blotchy or streaky results. Staining well in advance of anticipated adverse weather conditions allows ample time for the stain to cure and provide adequate protection.
By considering these factors and timing your staining project accordingly, you can ensure that your new cedar fence receives the best treatment and protection. Once you have determined the best time to stain, the next step is to prepare the fence for the staining process.
Stain a new cedar fence after it has weathered for 3-4 weeks to allow the natural oils to dissipate. This will ensure better absorption and longer-lasting results.
Preparing the Fence for Staining
Before applying stain to your new cedar fence, proper preparation is essential to ensure optimal results and long-lasting protection. Preparing the fence involves several steps that help create a clean and smooth surface for the stain to adhere to. Follow these guidelines to prepare your cedar fence for staining:
1. Clean the Surface: Start by removing any dirt, mildew, or debris from the surface of the fence. You can use a stiff-bristle brush, a broom, or a power washer set to a low pressure setting to scrub or rinse away the dirt. Pay special attention to areas that may have accumulated grime, such as the bottom of the fence where it meets the ground, as well as any other areas that appear stained or discolored.
2. Use a Wood Cleaner: If your cedar fence has been exposed to weathering and has a grayish appearance, you may need to use a wood cleaner to restore its natural color. Follow the manufacturer’s instructions on the wood cleaner product for the best results. Apply the cleaner to the fence using a brush or a sprayer, and allow it to sit for the recommended amount of time. Then, rinse the fence thoroughly with water to remove the cleaner along with any dirt, grime, or remaining residue.
3. Repair Damaged Areas: Inspect the fence for any signs of damage, such as loose boards, cracks, or splinters. Repair or replace any damaged areas before applying the stain. Secure loose boards with appropriate fasteners, fill cracks or larger gaps with wood filler, and sand down any rough or splintered areas to ensure a smooth surface.
4. Sand the Surface: Sanding the fence is an important step to create a smooth surface and help the stain adhere evenly. Use sandpaper with a medium grit (between 80 and 120) or a palm sander to sand the entire surface of the fence. Sanding will help remove any splinters, rough spots, or previous stain or sealant residue. Be sure to sand along the wood grain to avoid creating visible scratches.
5. Remove Dust: After sanding, it’s crucial to remove any dust or debris from the surface of the fence. Use a leaf blower, a brush, or a cloth to thoroughly remove all the sanding dust. It’s important to start with a clean and dust-free surface to allow the stain to adhere properly and achieve a smooth and even finish.
6. Protect Surrounding Areas: Take precautions to protect nearby plants, grass, or any other surfaces that you don’t want to come into contact with the stain. Use plastic sheeting, drop cloths, or masking tape to cover and shield these areas. This will prevent accidental staining and make the process cleaner and easier to manage.
Once you have completed these steps and the fence is clean, repaired, and properly sanded, it is ready for staining. In the next section, we will discuss the different types of stain available for cedar wood and how to choose the right one for your new cedar fence.
Types of Stain for Cedar Wood
When it comes to staining a cedar fence, choosing the right type of stain is crucial to achieving the desired appearance and level of protection. Stains are available in a variety of formulations and finishes, each with its own advantages and considerations. Let’s explore the different types of stain suitable for cedar wood:
1. Transparent Stain: Transparent stains are a popular choice for cedar wood because they allow the natural beauty of the grain to shine through. These stains provide minimal pigment, allowing the natural color and texture of the cedar to be visible. Transparent stains provide moderate protection against UV rays and moisture without completely altering the wood’s appearance. They are ideal for adding subtle color enhancement and preserving the wood’s natural rustic charm.
2. Semi-Transparent Stain: Similar to transparent stains, semi-transparent stains allow some of the natural wood grain to show through. However, they offer slightly more pigment, providing a richer, deeper color. Semi-transparent stains provide moderate UV protection and help to even out the color variation in cedar wood. They are a popular choice for those aiming for a more pronounced color while still maintaining the wood’s natural beauty.
3. Semi-Solid Stain: Semi-solid stains offer a balance between transparency and solid color coverage. They provide more opacity than semi-transparent stains, concealing some of the natural wood grain while still allowing the texture to be visible. Semi-solid stains provide increased UV protection and help to even out color inconsistencies in older cedar fences. They are a good choice if you want to add a more substantial color tone and hide minor imperfections in the wood.
4. Solid Stain: Solid stains offer the greatest level of color coverage and opacity. These stains completely cover the wood grain, providing a uniform color and a painted appearance. Solid stains offer the highest level of UV protection and help to hide significant imperfections in the wood. They are most commonly used when you want to drastically change the color of the cedar wood or when the condition of the wood requires extensive coverage.
5. Water-Based vs. Oil-Based Stains: Stains can be formulated using either water-based or oil-based solutions. Water-based stains dry more quickly and have less odor compared to oil-based stains. They are also more environmentally friendly and easier to clean up. However, oil-based stains generally offer greater protection and durability, as well as deeper penetration into the wood. Consider your preferences, as well as the specific characteristics of the stain, when selecting between water-based and oil-based options.
Before proceeding with staining, it’s recommended to test the chosen stain on a small inconspicuous section of the fence. This will help you evaluate the color and coverage, ensuring it aligns with your desired outcome. Always follow the manufacturer’s instructions regarding application techniques, drying times, and any additional protective measures for the stain you choose.
Now that you are familiar with the different types of stain available for cedar wood, we can move on to the next step: applying the stain to your new cedar fence.
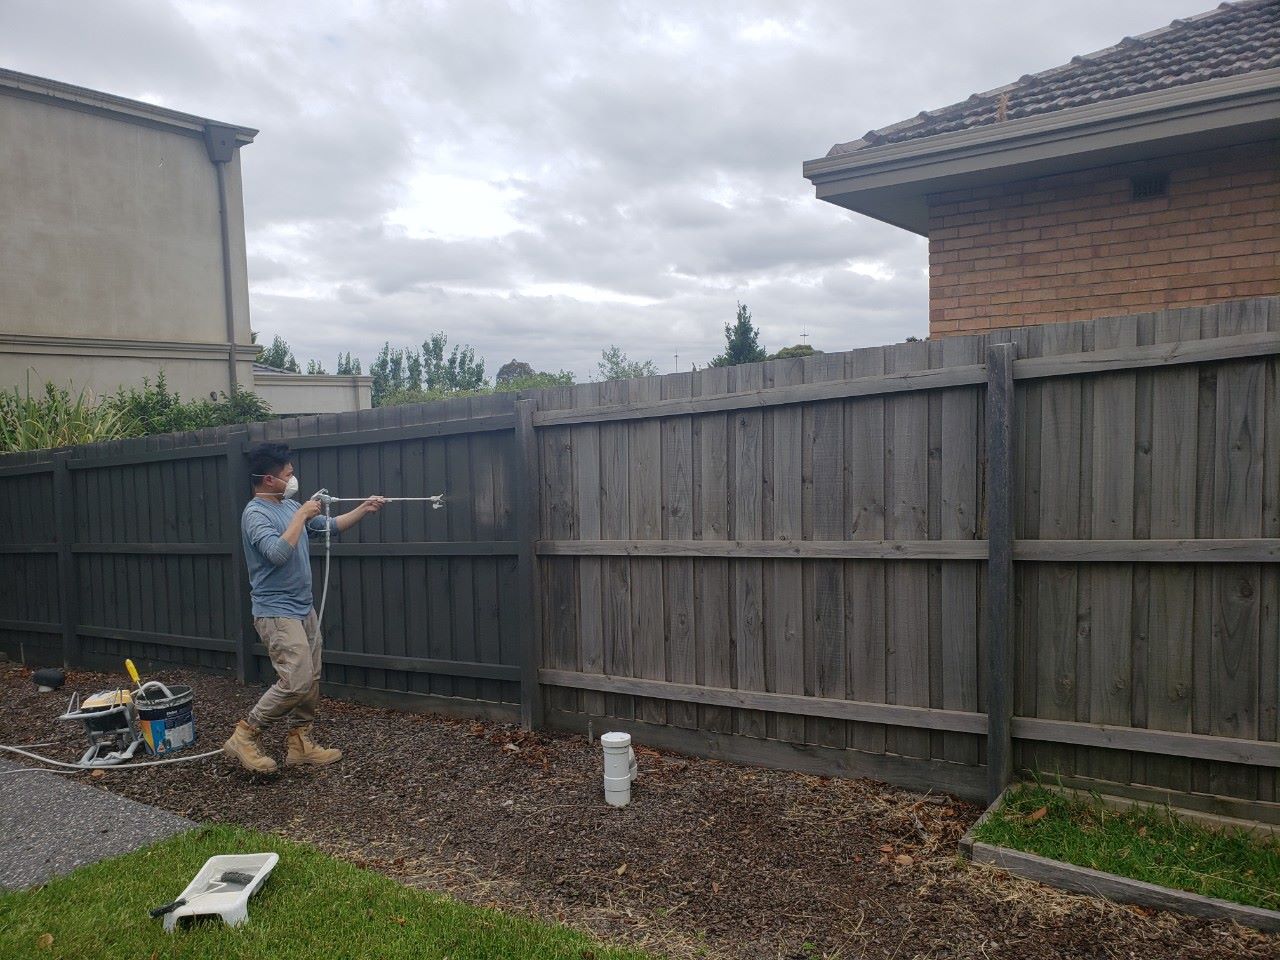
Applying Stain to the Cedar Fence
Once you have chosen the type of stain that best suits your preferences and needs, it’s time to apply the stain to your new cedar fence. Proper application techniques will ensure an even and attractive finish while providing the desired protection. Here are the steps to follow when applying stain to your cedar fence:
1. Prepare the Stain: Before starting the staining process, thoroughly mix the stain according to the manufacturer’s instructions. This helps ensure an even distribution of pigments and additives within the stain. Use a stir stick or paint mixer to stir the stain until it is well blended.
2. Protect Yourself and Surroundings: Put on appropriate protective gear, such as gloves, safety glasses, and a mask, to shield yourself from potential staining agents. Also, protect any adjacent surfaces, such as plants or pavement, with plastic sheeting or drop cloths to prevent unintended staining.
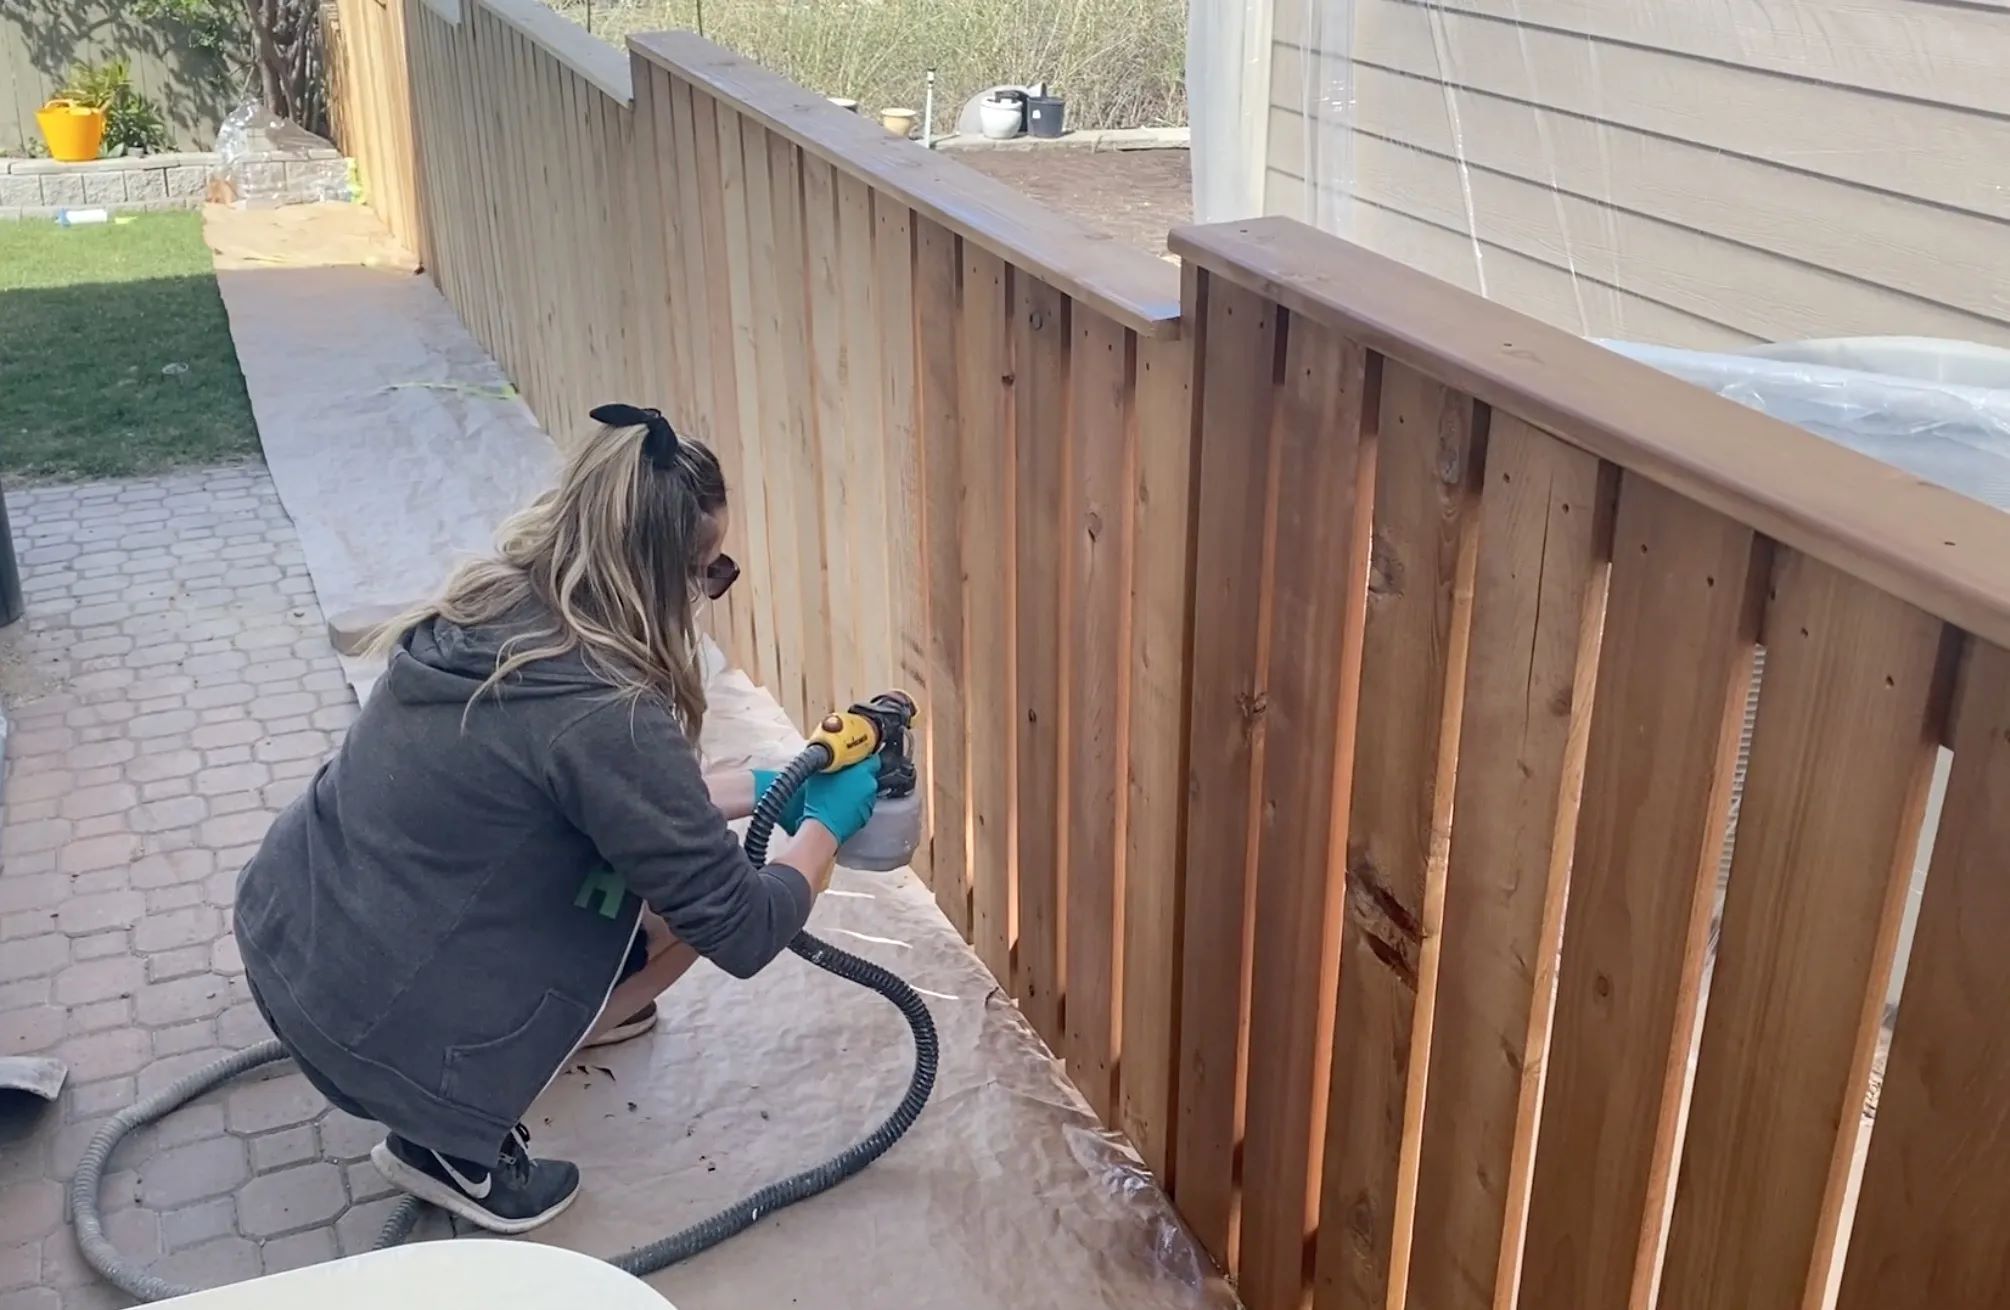
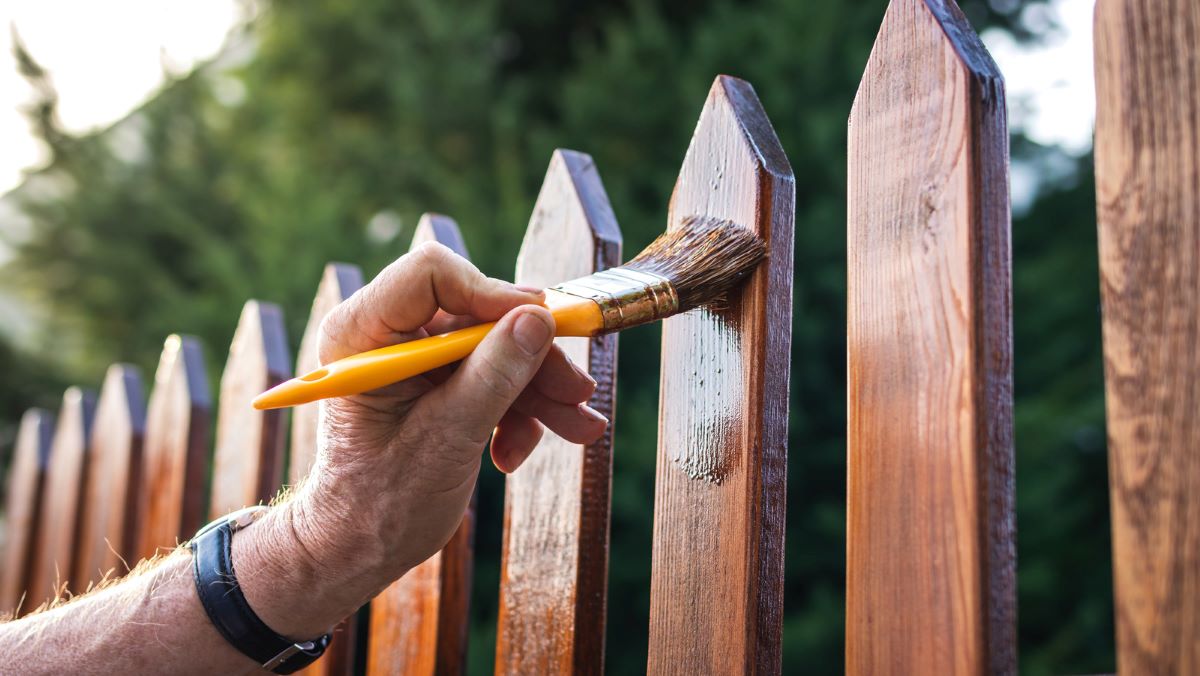
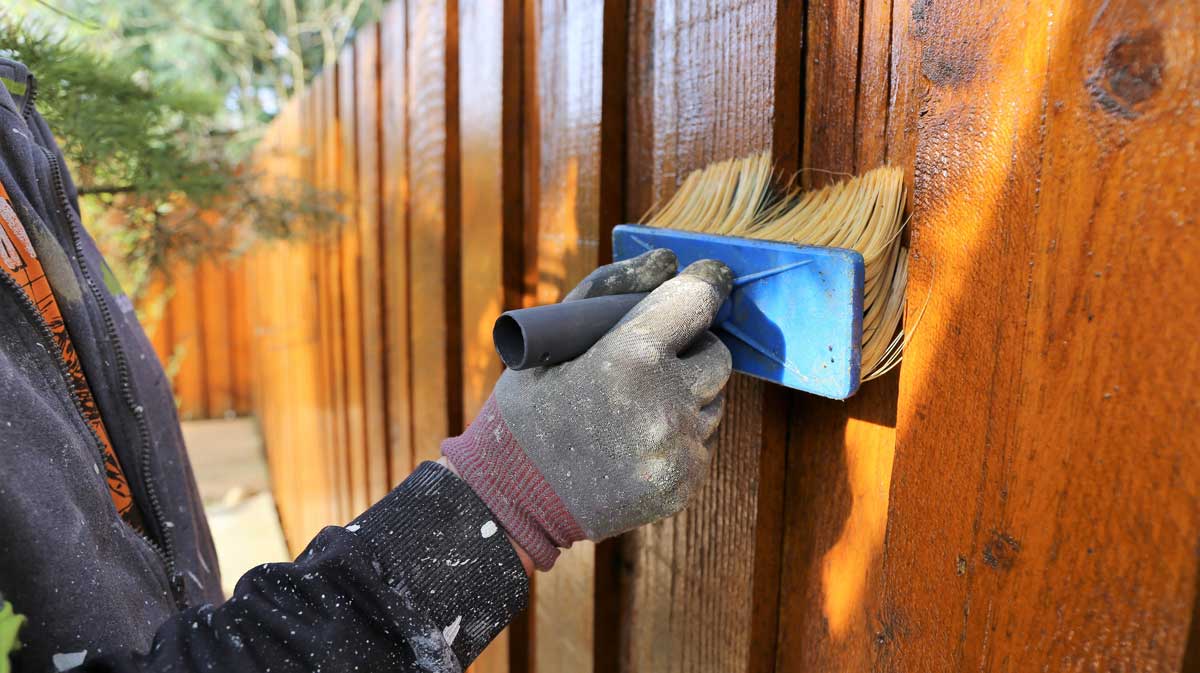
3. Apply the Stain: Begin applying the stain using a brush, roller, or sprayer. If using a brush, use long, even strokes, following the grain of the wood for a consistent and professional look. If using a roller, choose a roller cover specifically designed for staining to ensure proper absorption and coverage. Apply the stain evenly, working in sections or planks to maintain a wet edge and prevent lap marks.
4. Pay Attention to Corners and Edges: Be sure to pay extra attention to corners, edges, and hard-to-reach areas. Use a smaller brush or a stain applicator pad to ensure even coverage in these spots. Taking the time to address these areas will result in a more polished and uniform appearance.
5. Wipe Off Excess Stain: After applying the stain, lightly wipe off any excess with a clean cloth or rag. This helps prevent the formation of sticky or tacky areas and allows the stain to properly penetrate the wood for optimal protection. Wipe in the direction of the wood grain, being careful not to remove too much of the stain.
6. Allow Sufficient Drying Time: After applying the stain, allow the fence to dry according to the manufacturer’s instructions. Keep in mind that drying times can vary depending on the type of stain and weather conditions. Do not rush the drying process, as premature exposure to moisture can compromise the finish and reduce the stain’s effectiveness.
7. Apply additional coats (if needed): Depending on the desired depth of color and level of protection, you may need to apply multiple coats of stain. Follow the recommended drying time between coats and apply additional coats as necessary, ensuring proper drying in between.
8. Clean Up Properly: After completing the staining process, clean up any tools, brushes, or equipment following the manufacturer’s instructions. Dispose of any stain-soaked rags properly, as some stains may be flammable. Clean any spills or drips promptly to prevent staining on unintended surfaces.
By following these steps and taking your time during the staining process, you can achieve a beautiful and durable finish for your new cedar fence. In the next section, we will discuss the maintenance and care required to preserve the stained appearance of your fence.
Read more: What Is The Best Stain For A Fence
Maintenance and Care for Stained Cedar Fences
Proper maintenance and regular care are essential for preserving the beauty, longevity, and protection of your stained cedar fence. While staining provides initial protection, ongoing maintenance is necessary to ensure the stain continues to perform effectively. Here are some important maintenance and care tips for your stained cedar fence:
1. Cleaning: Regularly clean your stained cedar fence to remove dirt, dust, and other debris that can accumulate over time. Use a soft-bristle brush or a cloth along with a mild detergent or a specially formulated wood cleaner. Gently scrub the surface, following the direction of the wood grain, and rinse thoroughly with water. Avoid using abrasive materials or harsh chemicals that can damage the stain or the wood.
2. Inspecting for Damage: Routinely inspect your cedar fence for any signs of damage, such as cracks, splits, or loose boards. Promptly repair or replace any damaged areas to prevent further deterioration. Regular inspections also allow you to identify and address any potential issues, such as mold or mildew growth, before they become more challenging to manage.
3. Reapplying Stain: Over time, the stain on your cedar fence will naturally wear down due to exposure to sunlight, weather, and normal wear and tear. It is recommended to periodically reapply the stain to maintain optimal protection and appearance. The frequency of stain reapplication depends on several factors, such as the type of stain, exposure to the elements, and the overall condition of the fence. Consult the stain manufacturer’s guidelines and monitor the fence’s appearance to determine when it’s time for a fresh coat of stain.
4. Protecting from Moisture: Moisture is one of the biggest threats to cedar fences. Ensure that your fence has adequate drainage to prevent water from pooling or accumulating around the base. Trim any vegetation or shrubbery that is in close contact with the fence, as it can trap moisture and create a breeding ground for mold and mildew. Regularly check for any signs of water damage, such as discoloration or swelling, and address the issue promptly to prevent further deterioration.
5. Avoiding Damage: Take precautions to prevent damage to your stained cedar fence. Avoid placing heavy objects against the fence or using it as a support for climbing plants, as these can cause damage or lead to premature wear. Be mindful of any activities near the fence that may result in scratches or dents, such as moving furniture or equipment. By practicing gentle use and care, you can maintain the integrity and appearance of your fence.
6. Sealing Access Points: Ensure that any gaps or access points, such as joints or cut edges, are properly sealed to prevent moisture infiltration. Applying a high-quality exterior sealant or caulk to these areas helps to create a protective barrier and prevents water from seeping into the wood. This extra layer of protection can prolong the life of your stained cedar fence.
7. Protecting from Direct Sunlight: Continuous exposure to direct sunlight can cause the stain to fade over time. Minimize prolonged sun exposure by strategically placing outdoor furniture or adding shade structures, such as pergolas or trees, near your fence. This will help to reduce the impact of UV rays on the stain and prolong its color and durability.
By following these maintenance and care tips, you can ensure that your stained cedar fence retains its beauty and protection for many years to come. Regular upkeep and attention will help your fence withstand the elements and maintain its appealing appearance.
Conclusion
Staining a new cedar fence is a worthwhile investment that enhances its appearance, extends its lifespan, and provides essential protection against the elements. By understanding the unique qualities of cedar wood and following the recommended guidelines, you can achieve stunning results and enjoy the benefits of a beautifully stained fence for years to come.
Throughout this article, we have discussed the benefits of staining, important factors to consider before staining, testing the wood’s readiness, the best time to stain, preparing the fence, types of stain for cedar wood, applying the stain, and the maintenance required. Each step contributes to the overall success of your staining project and the long-term beauty and durability of your cedar fence.
Whether you opt for a transparent stain to showcase the natural grain of the wood or a solid stain for a more dramatic transformation, the right stain choice can enhance your outdoor space and protect your fence from moisture, UV rays, and insect damage.
Remember to prepare the fence properly by cleaning, sanding, and repairing any damage before applying the stain. Take the time to apply the stain carefully, ensuring even coverage and wiping off any excess. Allow sufficient drying time and consider reapplying the stain periodically to maintain its protective properties.
Regular maintenance, including cleaning, inspections, and addressing any damage, is crucial to preserve the stained appearance and prolong the life of your fence. By following these maintenance and care guidelines, you can ensure that your stained cedar fence remains a beautiful and functional addition to your property.
So, take the necessary steps to stain your new cedar fence. With the right knowledge and proper execution, you can create a visually stunning and long-lasting outdoor asset that will provide privacy, security, and natural elegance for years to come.
Ready to tackle more projects around your house? Our guide on DIY home improvement is perfect for those eager to transform spaces themselves. Learn invaluable skills, save money, and enjoy the satisfaction of completing projects from start to finish. Dive into our comprehensive guide that simplifies complex tasks into manageable steps.
Frequently Asked Questions about When To Stain A New Cedar Fence
Was this page helpful?
At Storables.com, we guarantee accurate and reliable information. Our content, validated by Expert Board Contributors, is crafted following stringent Editorial Policies. We're committed to providing you with well-researched, expert-backed insights for all your informational needs.


0 thoughts on “When To Stain A New Cedar Fence”