Home>Construction & Tools>Building Materials>How To Apply Stucco Around Windows

Building Materials
How To Apply Stucco Around Windows
Published: January 17, 2024
Learn how to apply stucco around windows with our comprehensive guide. Find the best building materials and techniques for a professional finish.
(Many of the links in this article redirect to a specific reviewed product. Your purchase of these products through affiliate links helps to generate commission for Storables.com, at no extra cost. Learn more)
Introduction
Applying stucco around windows is a crucial step in both the construction of new buildings and the renovation of existing structures. Stucco, a durable and versatile building material, not only enhances the aesthetic appeal of windows but also provides essential protection against the elements. Whether you are a seasoned contractor or a DIY enthusiast, mastering the art of applying stucco around windows is a valuable skill that can elevate the overall quality and longevity of your construction projects.
In this comprehensive guide, we will explore the step-by-step process of applying stucco around windows. From preparing the window area to the finishing touches, we will delve into the materials, tools, and techniques necessary to achieve a professional and long-lasting result. Whether you are embarking on a small-scale home improvement project or a large-scale construction endeavor, this guide will equip you with the knowledge and confidence to tackle stucco application with precision and finesse.
Join us as we unravel the art and science of applying stucco around windows, and discover how this timeless building material can elevate the functionality and beauty of any architectural design.
Key Takeaways:
- Properly preparing the window area and using high-quality materials and tools are essential for achieving a durable and visually appealing stucco application around windows. This ensures long-lasting protection and enhances the architectural aesthetics.
- Attention to detail during the finishing touches, such as applying sealant and providing maintenance guidelines, elevates the overall quality and longevity of the stucco. This commitment to excellence ensures enduring protection against the elements and reflects dedication to craftsmanship.
Read more: How To Apply Stucco To Cinder Block Wall
Materials and Tools Needed
Before embarking on the stucco application process, it is essential to gather the necessary materials and tools to ensure a smooth and efficient workflow. Here are the key items you will need:
Materials:
- Stucco mix: Choose a high-quality stucco mix suitable for the specific environmental conditions of your region. Consider factors such as moisture resistance and durability when selecting the stucco mix.
- Wire mesh: This provides structural reinforcement for the stucco and helps prevent cracking over time.
- Primer: A bonding primer designed for masonry surfaces is essential for promoting adhesion between the stucco and the substrate.
- Waterproofing membrane: To protect the window area from water infiltration, a waterproofing membrane is crucial, especially in regions prone to heavy rainfall or humidity.
- Expansion joint material: In areas where movement is expected, such as around window frames, flexible expansion joint material helps accommodate the shifting of building materials without compromising the stucco's integrity.
- Plastic sheeting: Use plastic sheeting to protect adjacent surfaces from stucco splatter and to create a controlled work environment.
Tools:
- Trowel: A quality trowel is indispensable for applying and shaping the stucco with precision.
- Hawk: This tool provides a portable platform for holding and transporting the stucco as you work.
- Staple gun: Use a staple gun to secure the wire mesh to the substrate, ensuring proper adhesion and support.
- Masonry brushes: These brushes are ideal for cleaning the substrate and applying the bonding primer.
- Utility knife: A sharp utility knife is essential for cutting and shaping the waterproofing membrane and expansion joint material.
- Bucket and mixing paddle: These items are necessary for mixing the stucco to the desired consistency.
By ensuring that you have the appropriate materials and tools on hand, you can streamline the stucco application process and achieve professional results that stand the test of time.
Preparing the Window Area
Proper preparation of the window area is crucial to ensure the successful application of stucco. Follow these steps to prepare the window area before applying the stucco:
Read more: How To Apply Tint To Car Windows
1. Surface Inspection:
Before beginning the stucco application, carefully inspect the window area for any signs of damage, such as cracks or water infiltration. Address any underlying issues to ensure a sound substrate for the stucco.
2. Cleaning and Repair:
Thoroughly clean the window area to remove dirt, dust, and debris. Repair any damaged or deteriorated surfaces, and ensure that the substrate is structurally sound and free of loose materials.
3. Application of Bonding Primer:
Apply a bonding primer to the clean and dry window area. The primer promotes adhesion between the stucco and the substrate, creating a strong bond that enhances the longevity of the stucco application.
4. Installation of Waterproofing Membrane:
In regions prone to moisture, it is essential to install a waterproofing membrane around the window area. This membrane acts as a barrier, preventing water from seeping into the building envelope and causing damage over time.
Read more: How To Apply Stickers To Car Windows
5. Integration of Expansion Joint Material:
Around the window frame, integrate flexible expansion joint material to accommodate movement and prevent the development of cracks in the stucco. This step is crucial for ensuring the long-term integrity of the stucco application.
6. Attachment of Wire Mesh:
Secure the wire mesh to the prepared window area using a staple gun. The wire mesh provides structural reinforcement for the stucco, minimizing the risk of cracking and enhancing the overall strength of the application.
By meticulously preparing the window area, you create a solid foundation for the stucco application, setting the stage for a durable and visually appealing finish. Taking the time to execute these preparatory steps will contribute to the overall quality and resilience of the stucco around the windows.
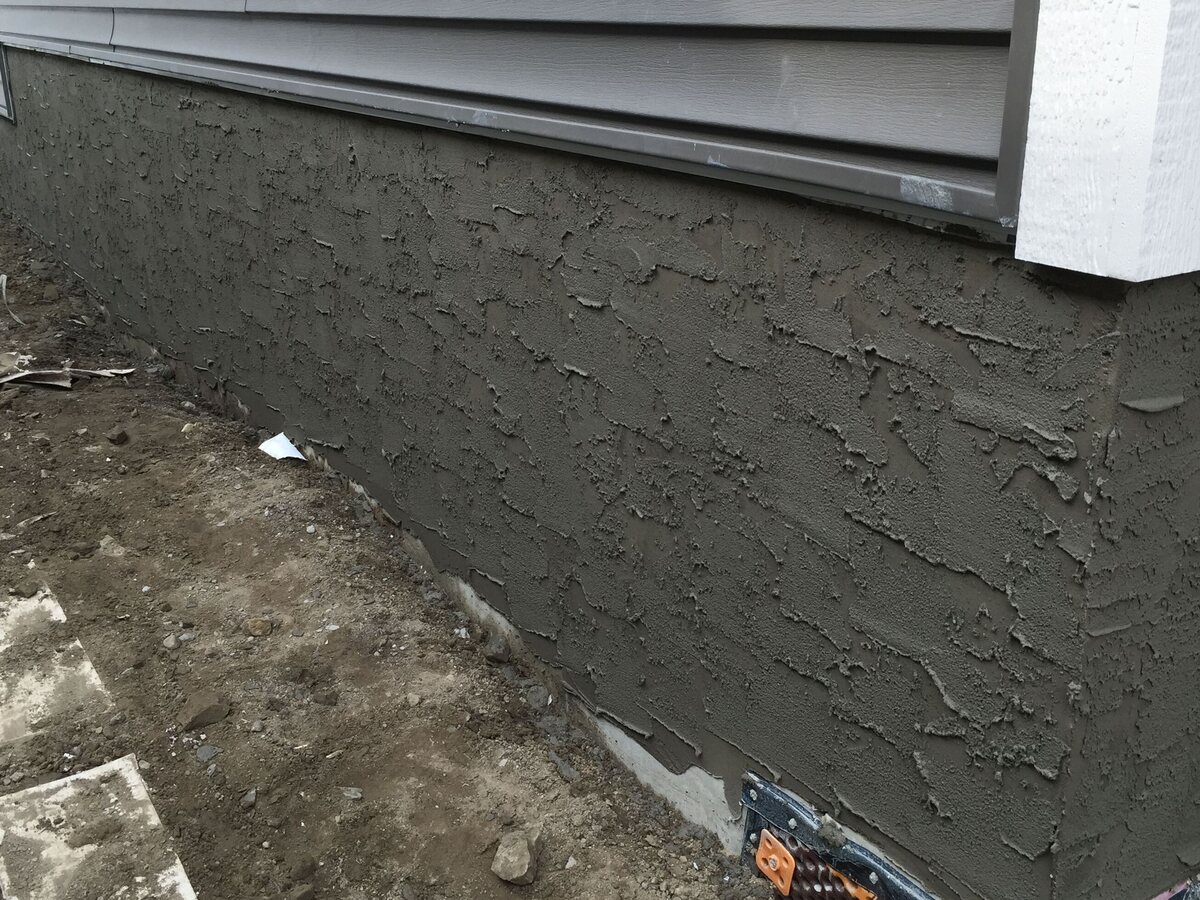
Applying the Stucco
With the window area meticulously prepared, it is time to embark on the stucco application process. Follow these steps to achieve a seamless and professional application:
1. Mixing the Stucco:
In a clean bucket, mix the stucco according to the manufacturer’s instructions. Use a mixing paddle attached to a drill to achieve a smooth and uniform consistency, ensuring that the stucco is free of lumps and clumps.
Read more: How To Replace Windows With Stucco Exterior
2. Loading the Hawk:
Transfer a suitable amount of mixed stucco onto the hawk, ensuring that it is secure and easily accessible as you work around the window area.
3. Applying the Stucco:
Using a trowel, apply the stucco to the prepared window area in a smooth and even manner. Work from the bottom up, overlapping each layer to ensure comprehensive coverage and a consistent thickness.
4. Shaping and Texturing:
Once the stucco is applied, use the trowel to shape and texture the surface to achieve the desired aesthetic effect. Whether you prefer a smooth finish or a textured appearance, this step allows you to customize the stucco to suit your design preferences.
5. Curing and Dampening:
After the initial application, allow the stucco to cure partially before dampening the surface with a fine mist of water. This process promotes proper curing and enhances the strength and durability of the stucco.
Read more: How To Tile Around A Window Recess
6. Additional Coats (if necessary):
Depending on the desired thickness and finish, you may need to apply multiple coats of stucco, allowing each layer to cure before proceeding to the next. This incremental approach ensures a robust and long-lasting stucco application.
7. Clean-Up:
Once the stucco application is complete, carefully clean your tools and work area to prevent dried stucco from interfering with the final finish. Dispose of any excess stucco and maintain a tidy workspace.
By following these steps with precision and attention to detail, you can achieve a flawless stucco application around the windows, enhancing both the visual appeal and structural integrity of the building. Mastering the art of applying stucco requires patience and skill, but the results are well worth the effort.
Finishing Touches
As the stucco application nears completion, attention to detail during the finishing touches is crucial to achieving a polished and professional result. Here are the essential steps to add the finishing touches to the stucco around windows:
1. Curing Time:
Allow the stucco to cure fully according to the manufacturer’s recommendations. Proper curing is essential for the stucco to achieve its maximum strength and durability.
2. Inspection and Repair:
After the stucco has cured, inspect the surface for any imperfections or areas that may require touch-ups. Address any issues promptly to ensure a flawless finish.
3. Application of Sealant:
Apply a high-quality sealant to the cured stucco surface to enhance its resistance to moisture and environmental elements. The sealant provides an additional layer of protection, prolonging the lifespan of the stucco and preserving its appearance.
4. Painting (if desired):
If you intend to paint the stucco, ensure that it is completely dry and free of any contaminants before applying the paint. Choose a paint specifically formulated for stucco surfaces to achieve optimal adhesion and longevity.
5. Clean-Up and Final Inspection:
Thoroughly clean the surrounding areas and remove any debris or remnants of the stucco application process. Conduct a final inspection to ensure that the stucco around the windows meets your quality standards and design expectations.
Read more: What Is The Rubber Around Car Windows Called
6. Maintenance Guidelines:
Provide the property owner with maintenance guidelines for the stucco, including recommendations for routine cleaning, inspection, and any necessary repairs. Educating the owner on proper stucco maintenance can contribute to the long-term preservation of the application.
By meticulously attending to the finishing touches, you elevate the overall quality and longevity of the stucco around the windows, ensuring that it not only enhances the architectural aesthetics but also provides enduring protection against the elements. A well-executed finish reflects your commitment to excellence and sets the stage for the stucco to withstand the test of time.
Conclusion
Mastering the art of applying stucco around windows is a testament to the fusion of craftsmanship and practicality in the realm of construction and design. From the meticulous preparation of the window area to the final finishing touches, each step in the stucco application process contributes to the creation of a durable, visually appealing, and weather-resistant exterior surface.
As you embark on stucco application projects, whether as a professional contractor or a dedicated DIY enthusiast, remember that attention to detail and adherence to best practices are paramount. The careful selection of high-quality materials, the precise execution of each step, and the commitment to thorough finishing touches culminate in a stucco application that stands as a testament to your dedication to excellence.
Furthermore, the enduring allure of stucco lies not only in its functional benefits but also in its ability to enhance the architectural character of any structure. The versatility of stucco allows for a myriad of design possibilities, from traditional textured finishes to modern, sleek appearances, making it an ideal choice for both historical restorations and contemporary construction projects.
As you immerse yourself in the world of stucco application, let your creativity and expertise intertwine, shaping surfaces that not only withstand the rigors of the environment but also captivate the eye with their timeless elegance. Embrace the challenges and rewards of working with stucco, and let each project serve as a testament to your commitment to excellence in the built environment.
With each window adorned with impeccably applied stucco, you contribute to the enduring legacy of this remarkable building material, leaving a lasting impression on the structures you embellish and the individuals who behold them.
As you continue your journey in the realm of construction and design, may the art of applying stucco around windows inspire you to elevate the beauty and resilience of architectural surfaces, one meticulous application at a time.
Frequently Asked Questions about How To Apply Stucco Around Windows
Was this page helpful?
At Storables.com, we guarantee accurate and reliable information. Our content, validated by Expert Board Contributors, is crafted following stringent Editorial Policies. We're committed to providing you with well-researched, expert-backed insights for all your informational needs.


0 thoughts on “How To Apply Stucco Around Windows”