Home>Interior Design>How To Wallpaper Around A Window: An Expert Step By Step
Interior Design
How To Wallpaper Around A Window: An Expert Step By Step
Modified: May 6, 2024
Learn the expert step-by-step process of how to wallpaper around a window in your interior design project. Enhance your home with this effortless technique.
(Many of the links in this article redirect to a specific reviewed product. Your purchase of these products through affiliate links helps to generate commission for Storables.com, at no extra cost. Learn more)
Introduction
Welcome to our expert guide on how to wallpaper around a window. Wallpapering is a fantastic way to transform the look and feel of any room, adding personality and style. However, when it comes to wallpapering around windows, it can be a bit tricky and requires some careful attention to detail.
Wallpapering around a window involves precision cutting, proper preparation, and a keen eye for alignment. With the right tools and techniques, you can achieve a seamless and professional-looking result. In this step-by-step guide, we will walk you through the process, giving you the confidence to take on this DIY project.
Before we get started, it’s important to gather all the necessary tools and materials. Having everything ready will save time and ensure a smoother workflow. Let’s dive in and see what you’ll need.
Key Takeaways:
- Transform the look and feel of any room by wallpapering around a window with precision cutting, proper preparation, and the right tools and techniques.
- Achieve a seamless and professional-looking result by following expert step-by-step guidance, from measuring and cutting wallpaper to smoothing out air bubbles and wrinkles.
Step 1: Gather the necessary tools and materials
Before you begin wallpapering around a window, it’s essential to have all the right tools and materials at hand. Here’s a checklist of what you’ll need:
- Wallpaper of your choice
- Measuring tape
- Scissors or craft knife
- Wallpaper adhesive
- Smoothing brush or wallpaper seam roller
- Sponge or damp cloth
- Bucket of water
- Pencil
- Straight edge or spirit level
- Drop cloth or old sheets
- Masking tape
- Wallpaper brush or soft-bristled brush
Having these tools and materials prepared will ensure a smoother and more efficient workflow, saving you time and frustration during the project.
Once you have everything ready, it’s time to move on to the next step: measuring and cutting the wallpaper.
Step 2: Measure and cut wallpaper
Accurate measurements and precise cutting are crucial when wallpapering around a window. Before you start cutting the wallpaper, measure the height and width of the window area you will be covering. Add a few extra inches to each measurement to ensure you have enough wallpaper to work with.
Once you have your measurements, roll out the wallpaper on a clean, flat surface. Use a straight edge or spirit level to mark the dimensions of the window area on the back of the wallpaper. Double-check your measurements to avoid any errors.
Using scissors or a craft knife, carefully cut along the marked lines. Take your time to ensure clean and straight edges. If your wallpaper has a pattern, make sure to match it correctly when cutting.
Remember to label each piece of cut wallpaper, indicating the direction and section it corresponds to. This will make the hanging process easier later on.
With your wallpaper properly cut and labeled, you’re ready to move on to preparing the area around the window.
Step 3: Preparing the area around the window
Before you start applying the wallpaper, it’s important to prepare the area around the window to ensure the best possible result. Follow these steps to properly prepare the surface:
- Clean the window area: Use a sponge or damp cloth to clean the window frame and surrounding walls. Remove any dust, dirt, or grease that may affect the adhesive’s ability to stick properly.
- Protect the window: Cover the window glass with masking tape or plastic wrap to prevent any glue or adhesive from getting on the glass. This will make cleaning up easier later on.
- Apply primer: If the walls around the window have an uneven or textured surface, consider applying a primer to create a smooth base for the wallpaper. This will help the wallpaper adhere better and ensure a professional finish.
- Mark vertical guidelines: Use a pencil and a straight edge to mark vertical guidelines on the wall surrounding the window. These guidelines will help you align the wallpaper correctly later on.
By taking the time to properly prepare the area around the window, you’ll ensure a smoother application process and a beautiful end result. Now, it’s time to move on to applying the wallpaper adhesive.
Step 4: Apply wallpaper adhesive
Once the area around the window is properly prepared, it’s time to apply the wallpaper adhesive. Follow these steps to ensure a strong bond between the wallpaper and the wall:
- Read the instructions: Different types of wallpaper adhesive have different application methods. So, it’s important to carefully read and follow the manufacturer’s instructions.
- Mix the adhesive: If your adhesive comes in powder form, mix it with water according to the instructions. Stir the mixture thoroughly to ensure a smooth consistency.
- Start from the center: Apply the wallpaper adhesive to the back of the wallpaper, starting from the center and working your way towards the edges. Use a wallpaper brush or a soft-bristled brush to evenly distribute the adhesive over the entire surface of the wallpaper.
- Let the adhesive set: Once the adhesive is applied, let it set according to the manufacturer’s instructions. This will activate the adhesive properties and ensure proper adhesion to the wall.
Remember to work efficiently and avoid letting the adhesive dry before applying the wallpaper. You want the adhesive to be tacky when you hang the wallpaper around the window.
With the wallpaper adhesive applied, it’s time to move on to the exciting part: hanging the wallpaper around the window.
When wallpapering around a window, be sure to measure and cut the wallpaper carefully to fit around the window frame. Use a sharp utility knife and a straight edge to make precise cuts for a professional finish.
Read more: How To Build Steps Around Hot Tub
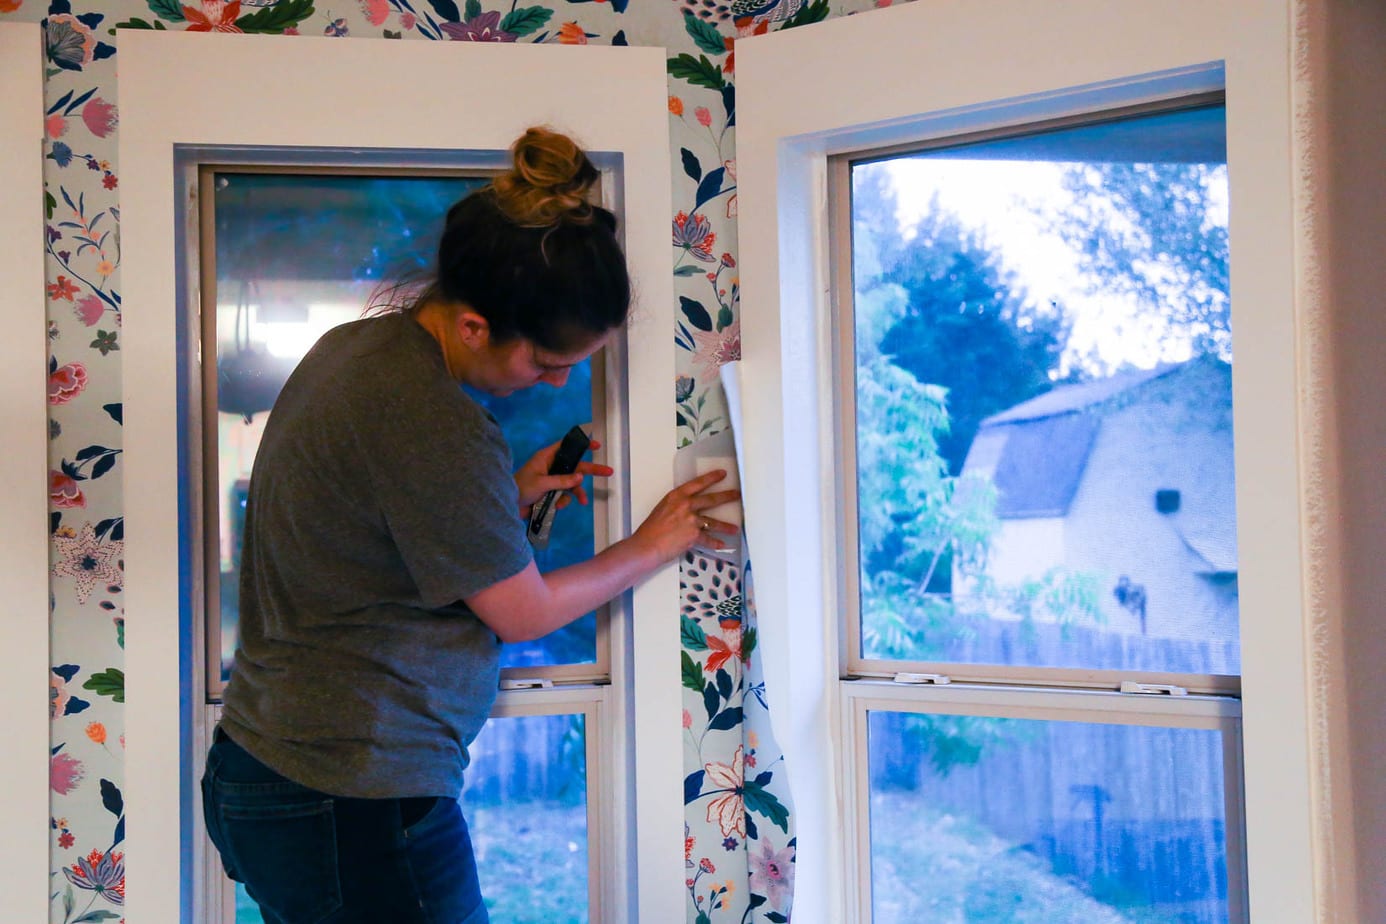
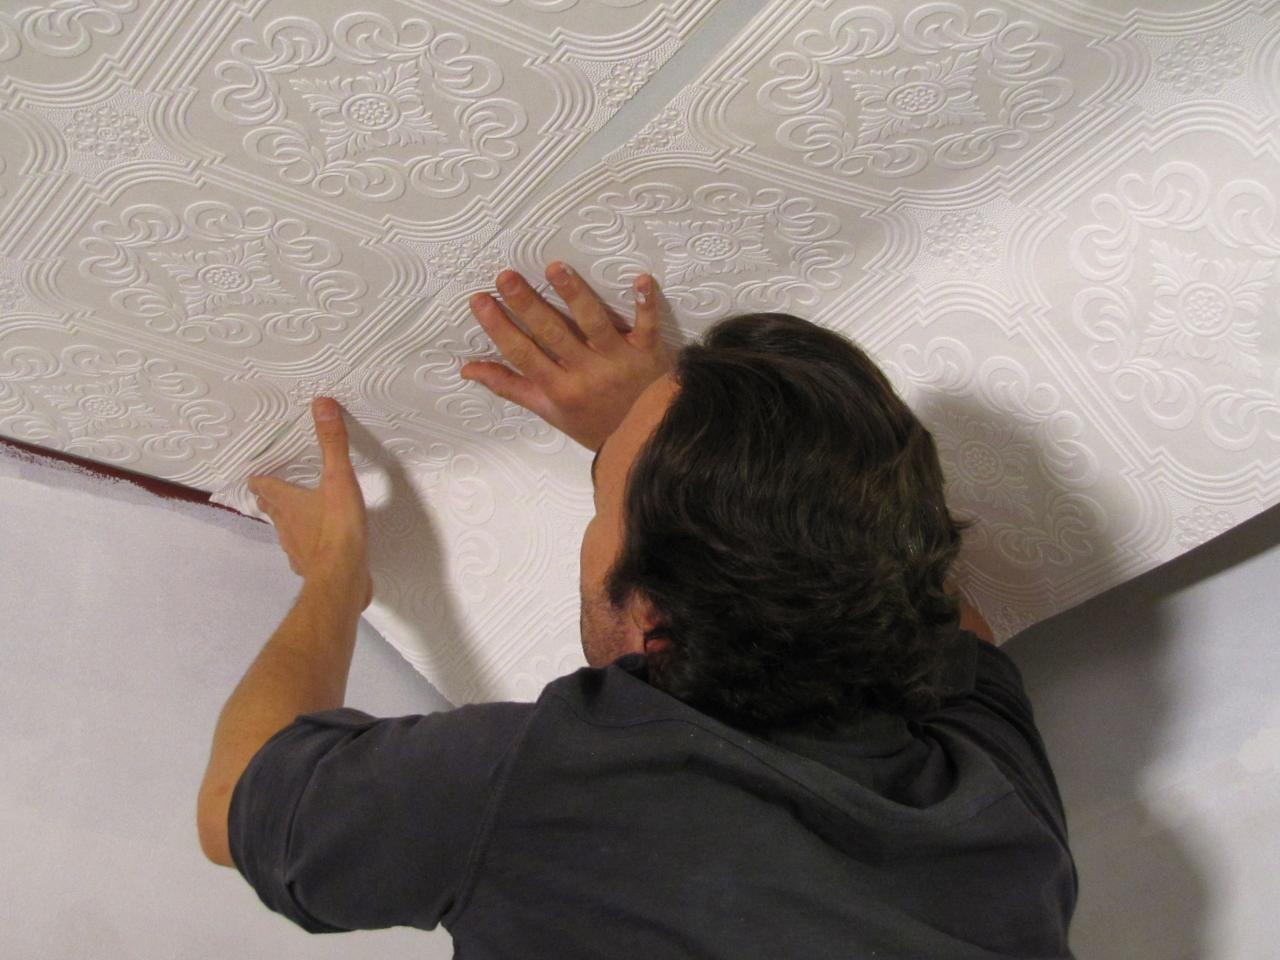
Step 5: Hang wallpaper around the window
Now that the adhesive is ready, it’s time to hang the wallpaper around the window. Follow these steps to ensure a smooth and precise application:
- Align the first piece: Start with the piece of wallpaper that will be closest to the edge of the window frame. Align it with the vertical guidelines you marked earlier, making sure it is straight.
- Smooth out air bubbles: Using a smoothing brush or a wallpaper seam roller, gently press the wallpaper against the wall, starting from the center and working your way out. Smooth out any air bubbles or wrinkles as you go.
- Continue with the next pieces: Move on to the next piece of wallpaper, matching the pattern and edges with the previous one. Again, align it with the vertical guidelines and smooth it out.
- Overlap the edges: If your wallpaper has overlapping edges, carefully trim the excess so that the edges meet seamlessly. Use a sharp scissors or craft knife for clean cuts.
- Repeat the process: Continue hanging the wallpaper around the window, matching patterns and edges as you go. Take your time to ensure a precise and seamless result.
Remember to work methodically and take breaks when needed. Wallpapering can be time-consuming, but the outcome will be well worth it. With the wallpaper securely hung, it’s time to address any air bubbles or wrinkles.
Step 6: Smooth out air bubbles and wrinkles
After hanging the wallpaper around the window, it’s common to encounter air bubbles or wrinkles. Don’t worry – they can be easily fixed. Follow these steps to smooth out any imperfections:
- Start from the center: Locate any air bubbles or wrinkles on the wallpaper and gently press on them from the center, working your way towards the edges. Use a smoothing brush or a wallpaper seam roller for this step.
- Apply slight pressure: Apply slight pressure on the affected area, gradually working outwards, to redistribute the adhesive and smooth out the wallpaper. Be careful not to apply too much pressure, as it may cause damage or distortion.
- Dampen the wallpaper: If there are stubborn wrinkles or bubbles, lightly dampen the wallpaper with a damp sponge or cloth. This will help relax the paper and make it more pliable for smoothing.
- Smooth in a diagonal motion: When smoothing out the dampened wallpaper, work in a diagonal motion rather than straight lines. This will help distribute the moisture evenly and minimize any potential creasing.
Take your time with this step, ensuring all air bubbles and wrinkles are properly smoothed out. By doing so, you’ll achieve a flawless finish that enhances the overall appearance of the room.
Now that the wallpaper is looking smooth and wrinkle-free, it’s time to trim any excess material.
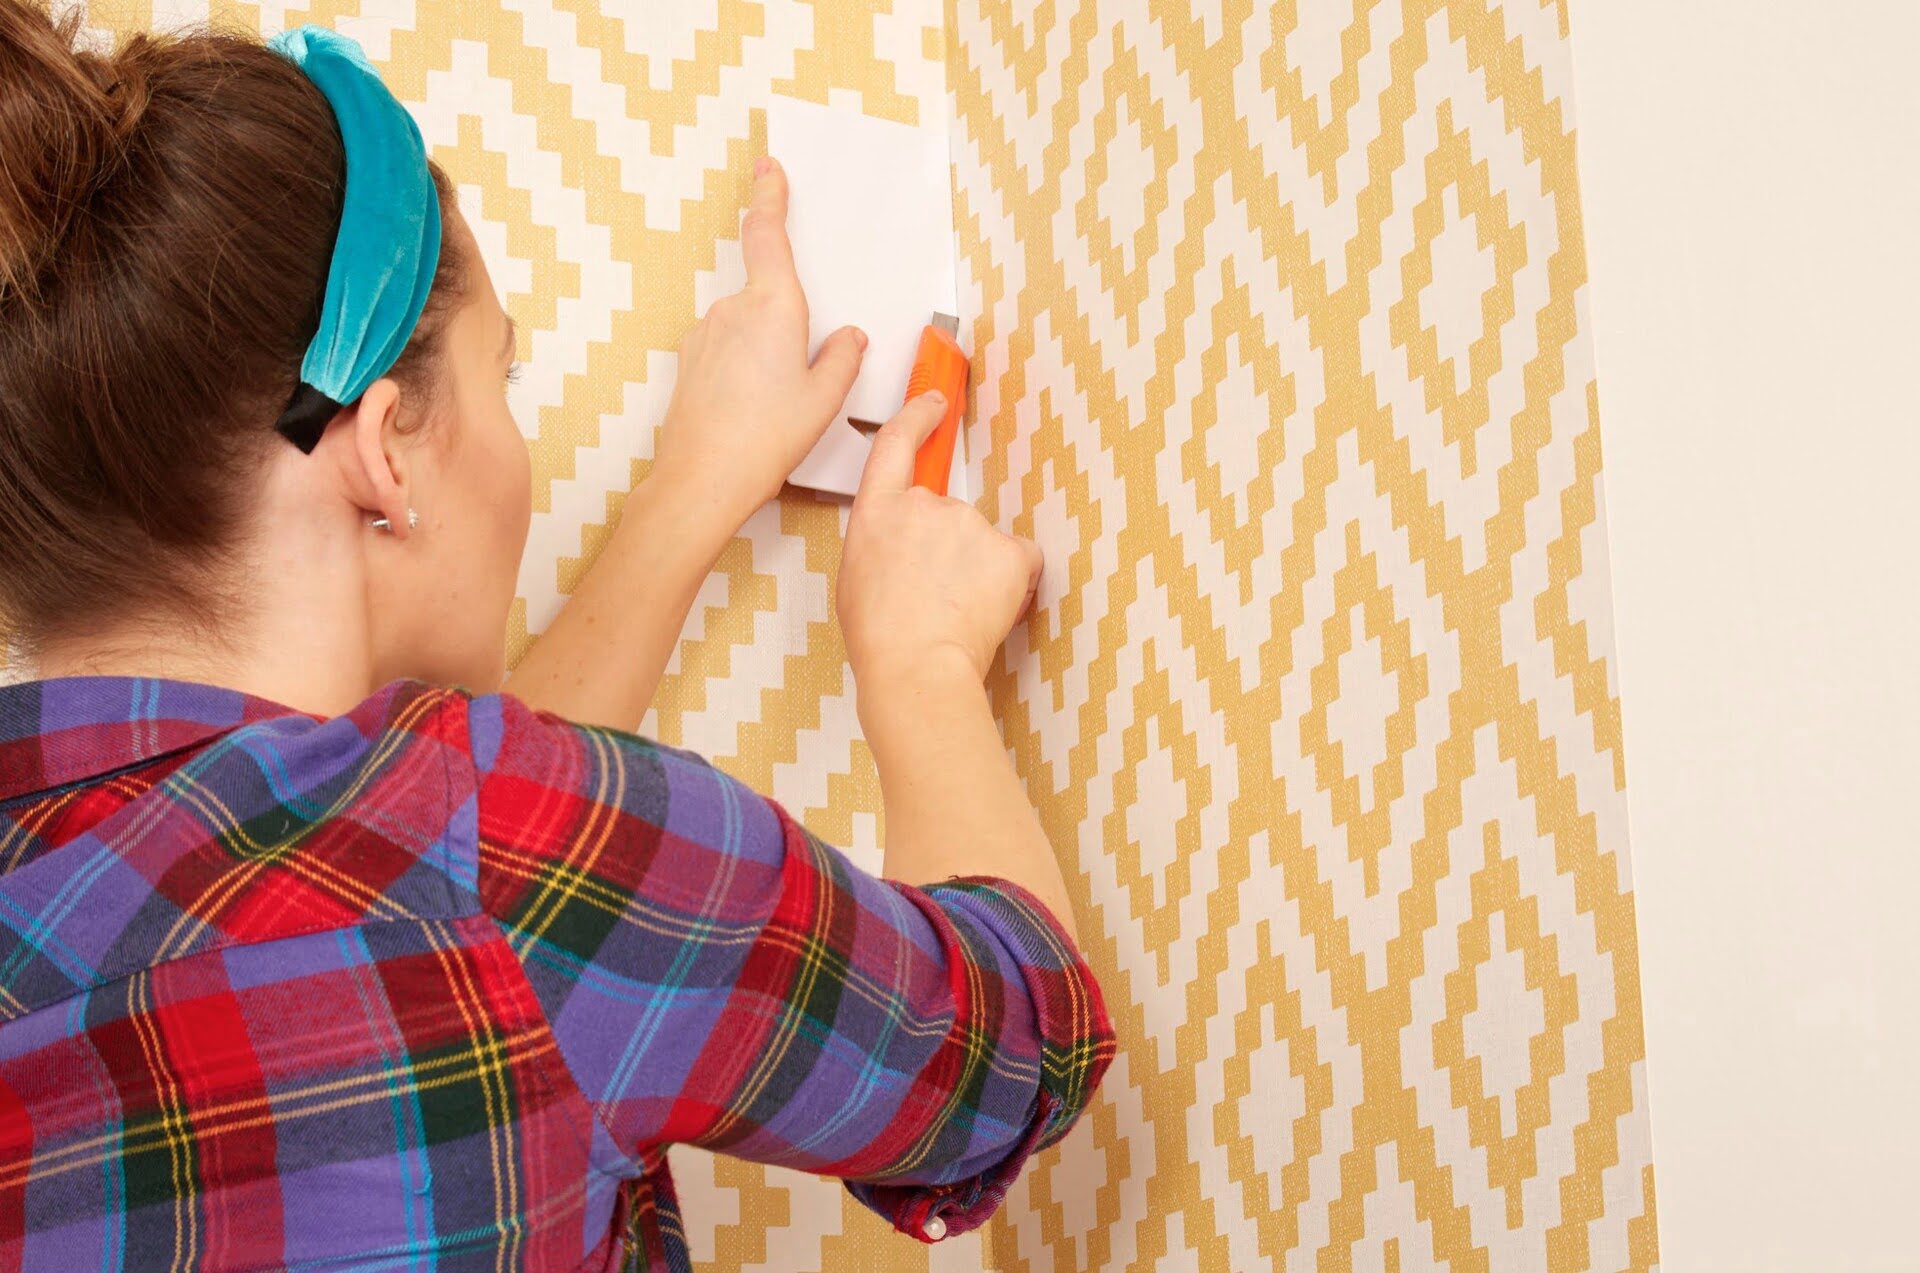
Step 7: Trim excess wallpaper
With the wallpaper smoothly hung around the window, it’s time to trim off any excess material for a clean and finished look. Follow these steps to trim the wallpaper:
- Identify the excess: Carefully examine the edges of the wallpaper around the window frame and determine where the excess material needs to be trimmed.
- Use a straight edge: Place a straight edge, such as a ruler or a wallpaper trim guide, along the edge that needs to be cut. This will ensure a straight and precise cut.
- Trim the excess: With the straight edge as a guide, use a sharp pair of scissors or a craft knife to trim off the excess wallpaper. Take your time and make slow, deliberate cuts for clean and accurate results.
- Clean up any adhesive residue: After trimming, use a damp cloth or sponge to carefully wipe away any excess adhesive that may have seeped out during the trimming process. This will leave a clean and neat finish.
Trimming the excess wallpaper will give your window a polished appearance, making it blend seamlessly with the rest of the wall. With the excess trimmed and any adhesive residue removed, you’re almost done!
Now, it’s time for the finishing touches to complete the wallpapering process around the window.
Step 8: Finishing touches
Once you have trimmed the excess wallpaper, it’s time to add the finishing touches to complete the wallpapering process around the window. Follow these steps for the final touches:
- Inspect for any imperfections: Take a step back and carefully inspect the entire wallpapered area around the window. Look for any remaining air bubbles, wrinkles, or misalignments. If you spot any, gently smooth them out or adjust the wallpaper as needed.
- Remove masking tape or protective coverings: If you used masking tape or protective coverings on the window glass, carefully remove them. Dispose of them properly.
- Clean up any remaining adhesive residue: Inspect the window frame and surrounding walls for any remaining adhesive residue. Use a damp cloth or sponge to clean off any adhesive, ensuring a clean and professional finish.
- Reinstall window treatments: If you had to remove any window treatments, such as blinds or curtains, during the wallpapering process, reinstall them according to their respective instructions. This will complete the look and functionality of the window area.
By paying attention to these finishing touches, you will ensure that the wallpapered area around the window looks flawless and professionally done. Now you can step back and appreciate the beautiful transformation you have achieved.
Congratulations! You have successfully wallpapered around a window. Enjoy the enhanced ambiance and visual appeal that wallpaper brings to your space.
Remember, practice makes perfect. The more you wallpaper, the more comfortable and skilled you will become. So don’t be afraid to take on more wallpapering projects in the future!
Thank you for following our expert step-by-step guide. We hope you found it helpful and inspiring. Happy wallpapering!
Read more: How To Paint Over Wallpaper: An Expert Guide
Conclusion
Wallpapering around a window may initially seem like a daunting task, but with the right tools, techniques, and patience, you can achieve a professional and beautiful result. By following our expert step-by-step guide, you have learned how to successfully wallpaper around a window.
From gathering the necessary tools and materials to trimming excess wallpaper, each step is essential in creating a seamless and visually appealing finish. Take your time and pay attention to detail throughout the process to ensure a high-quality outcome.
Remember to properly measure and cut the wallpaper, prepare the area around the window, and apply the adhesive evenly. Hanging the wallpaper requires precision and care, ensuring that patterns match and edges align seamlessly.
Throughout the process, it’s important to smooth out any air bubbles or wrinkles and trim any excess wallpaper for a polished finish. Don’t forget the finishing touches, such as inspecting for imperfections and cleaning up any adhesive residue.
With each successful wallpapering project, your skills will improve, and you’ll become more confident in your abilities. Embrace the transformation that wallpaper brings to your space, adding personality and style to any room in your home.
Thank you for following our comprehensive guide on how to wallpaper around a window. We hope you found our expert advice helpful and inspiring. Now, gather your tools, choose your favorite wallpaper, and embark on your next interior design adventure.
Happy wallpapering!
Ready to tackle more home projects? Dive into our DIY home improvement guide, packed with practical tips for those ready to get their hands dirty. Or, if you're seeking inspiration to transform your living space, our article on room decor offers stunning ideas to create an ethereal atmosphere. For homeowners contemplating upgrades, our recommendations on home renovation with the best hardwood floors might just be the perfect starting point.
Frequently Asked Questions about How To Wallpaper Around A Window: An Expert Step By Step
Was this page helpful?
At Storables.com, we guarantee accurate and reliable information. Our content, validated by Expert Board Contributors, is crafted following stringent Editorial Policies. We're committed to providing you with well-researched, expert-backed insights for all your informational needs.

0 thoughts on “How To Wallpaper Around A Window: An Expert Step By Step”