Tableware
How To Add A Leaf To A Dining Table
Modified: January 6, 2024
Learn how to easily add a leaf to your dining table with our step-by-step guide. Enhance your tableware collection and accommodate more guests effortlessly!
(Many of the links in this article redirect to a specific reviewed product. Your purchase of these products through affiliate links helps to generate commission for Storables.com, at no extra cost. Learn more)
Introduction
When it comes to hosting gatherings, a dining table with a leaf can be a valuable addition to your home. It offers the flexibility to adjust the table size based on the number of guests or the occasion. Adding a leaf to your dining table is a practical and straightforward process if you follow the right steps.
In this article, we will guide you through the process of adding a leaf to your dining table, ensuring a seamless and secure fit. By the end, you’ll have the knowledge and confidence to expand your table and provide ample seating for all your guests.
Before you begin, make sure to assess your dining table and choose the right type of leaf for it. The process may vary depending on the specific design and construction of your table. Let’s dive into the steps necessary for a successful installation.
Key Takeaways:
- Adding a leaf to a dining table is a practical way to accommodate more guests and create memorable dining experiences. Assess your table, choose the right leaf, and follow the steps for a seamless fit.
- Ensure stability and balance by testing and adjusting the leaf, checking for wobbling, and utilizing table stabilizers. Regular maintenance will help maintain the functionality and longevity of the extended table.
Read more: How To Remove A Dining Table Leaf
Step 1: Assess your dining table
The first step in adding a leaf to your dining table is to carefully assess its design and structure. This will help you determine if your table is suitable for a leaf addition and guide you in choosing the right type of leaf.
Start by examining the table’s construction. Look for any indications that it was designed to accommodate a leaf, such as notches or grooves along the sides or underneath the table. These features are typically found in tables specifically made to extend with a leaf.
Next, measure the dimensions of your dining table. This includes the length and width of the tabletop. Knowing the exact measurements will help you select a leaf that matches the table and fits seamlessly. Take note of any unique or irregular shapes as well, as this might require a custom-made leaf to ensure a proper fit.
Consider the material and finish of your table. A solid wood table is usually more conducive to adding a leaf, while a glass or laminate tabletop may not be stable enough to support the weight of an additional piece. Additionally, look at the style and aesthetic of your table to ensure that the leaf you choose complements the existing design.
If you are unsure about whether your dining table can accommodate a leaf or have any concerns about its structural integrity, it is advisable to consult a professional or the manufacturer of your table for guidance.
Once you have thoroughly assessed your dining table, you are ready to move on to the next step: choosing the right type of leaf.
Step 2: Choose the right type of leaf
Choosing the right type of leaf is crucial to ensure a seamless and secure extension of your dining table. There are a few factors to consider when selecting a leaf that best suits your needs.
Firstly, determine whether you want a self-storing or separate leaf. A self-storing leaf is a convenient option as it remains attached to the table when not in use, eliminating the need for separate storage. This type of leaf is often built into the table, sliding or folding within the tabletop itself. On the other hand, a separate leaf is detachable and requires separate storage when not in use.
Consider the size and shape of the leaf as well. It should match the dimensions of your dining table to maintain a balanced and cohesive look. If your table has unique curves or angles, you may need a custom-made leaf to ensure a perfect fit.
Next, think about the material and finish of the leaf. It should closely match or complement the existing tabletop to create a cohesive appearance. For example, if your dining table is made of oak with a rustic finish, consider selecting a leaf that is also made of oak and features a matching finish.
Additionally, consider the durability and stability of the leaf. It should be made of a high-quality material that can withstand daily use and provide a stable surface for dining. Avoid choosing a leaf that is flimsy or prone to warping, as it can impact the overall stability of your table.
Lastly, think about your budget. The cost of a dining table leaf can vary depending on the material, size, and design. Set a budget that works for you and explore different options within that range.
By carefully considering these factors, you will be able to choose the right type of leaf that seamlessly integrates with your dining table, both functionally and aesthetically. Once you have selected the perfect leaf, it’s time to move on to preparing the dining table for the installation.
Step 3: Prepare the dining table
Before adding the leaf to your dining table, it’s essential to prepare the table to ensure a smooth and secure installation. Here are the steps to follow:
1. Clear the table: Remove any items from the tabletop, such as dishes, decorations, or tablecloths. Clearing the surface will provide you with a clean and unobstructed area to work with.
2. Clean the surface: Take the opportunity to clean the tabletop thoroughly. Use a gentle cleaner that is suitable for the material of your table. Wipe away any dust, dirt, or residue to ensure a clean and smooth surface for the leaf installation.
3. Apply table pads: If you have purchased table pads or protective covers, now is the time to lay them out on the table. These pads provide an extra layer of protection for your table, preventing scratches, spills, and heat damage.
4. Align the table: Ensure that your dining table is properly aligned and level on the floor. Use a spirit level to check if the table is balanced in all directions. If needed, adjust the table legs or use shims to achieve a stable and level surface.
5. Prepare the leaf: If your leaf requires assembly or preparation, follow the manufacturer’s instructions. Some leaves may come with additional support brackets or mechanisms that need to be installed before attaching it to the table.
6. Position the table supports: Examine your table and determine if it has built-in supports or brackets to attach the leaf. If so, position them according to the manufacturer’s instructions. These supports will help secure the leaf in place and maintain stability.
By preparing your dining table properly, you will create an ideal foundation for adding the leaf. With the table cleared, cleaned, and aligned, you are now ready to move on to the next step: positioning the leaf correctly.
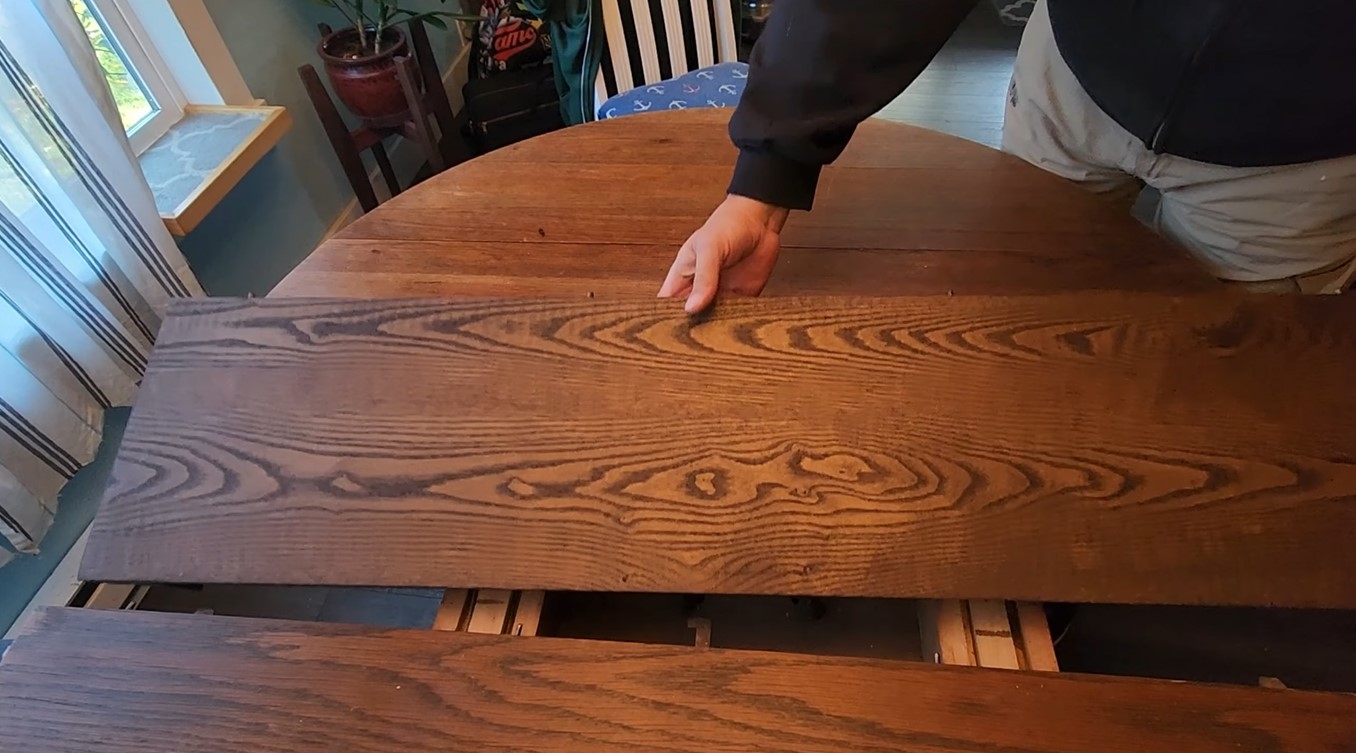
Step 4: Position the leaf correctly
Now that you have prepared the dining table, it’s time to position the leaf correctly. By following these steps, you will ensure a proper fit and alignment:
1. Gather assistance: Adding a leaf to a dining table can be challenging to do alone, especially if the table is heavy. Enlist the help of a family member or friend to assist you in lifting and maneuvering the leaf into place.
2. Identify the alignment: Look for alignment indicators on the table and the leaf. These may include dowel holes, notches, or markings. Line them up to ensure that the leaf aligns perfectly with the table when in place.
3. Lift and slowly lower: Lift the leaf carefully, making sure to keep it level and stable. Slowly lower the leaf onto the table, ensuring that it fits snugly into the designated spot. Take your time to avoid any mishaps or damage to both the leaf and the table.
4. Check for even spacing: Once the leaf is in position, inspect the gaps between the table and the leaf. Ensure that the spacing is even on all sides to maintain a balanced look. If needed, gently adjust the positioning until the gaps are consistent.
5. Test for stability: Give the leaf a gentle press to check if it is secure and stable. It should not wobble or shift when pressure is applied. If you notice any instability, double-check the positioning and alignment, and make any necessary adjustments.
6. Verify the extension: If applicable, test the extension of the table with the leaf in place. Carefully pull apart the two sides of the table to extend it fully. Ensure that the leaf remains securely attached and that the extension is smooth and effortless.
By following these steps, you will position the leaf correctly, ensuring a seamless integration with your dining table. With the leaf in place, it’s time to move on to the next step: securing the leaf to the table.
When adding a leaf to a dining table, make sure to align the locking mechanism properly and evenly distribute the weight to avoid any imbalance. Always follow the manufacturer’s instructions for a secure fit.
Read more: What Is A Dining Table Leaf?
Step 5: Secure the leaf to the table
After positioning the leaf correctly, it’s important to secure it to the table to ensure stability and prevent any accidental movements. Follow these steps to securely attach the leaf:
1. Locate attachment mechanisms: Check if your dining table and leaf have specific mechanisms or hardware designed for securing the leaf. This may include brackets, latches, or locks that help keep the leaf in place. Familiarize yourself with these mechanisms and their proper usage.
2. Align the attachment points: Ensure that the attachment points on both the table and the leaf are properly aligned. These points are typically located along the edges or underside of the table and leaf. Aligning them accurately will facilitate a secure connection.
3. Attach the leaf to the table: Following the manufacturer’s instructions, fasten the attachment mechanisms to connect the leaf to the table. This may involve tightening screws, sliding locking mechanisms, or engaging latches. Use the appropriate tools and ensure a firm, but not overly tight, connection.
4. Test the attachment: Once the leaf is attached, test its stability by applying gentle pressure or lightly shaking the table. The leaf should remain securely in place without any wobbling or movement. If there are any signs of instability, double-check the attachment points and tighten them if necessary.
5. Verify the proper fit: Inspect the table surface and the leaf to ensure a seamless fit. Check for any noticeable gaps or misalignments, and make any minor adjustments if needed. The leaf should blend seamlessly with the rest of the table, creating a cohesive and visually appealing surface.
6. Repeat the process: If your dining table has multiple leaves, repeat these steps to attach each leaf individually. Take your time to ensure a secure and accurate fit for each leaf.
Note: For tables without specific attachment mechanisms, you can use additional support options such as table clamps or brackets. These can be purchased separately and provide an alternative way to secure the leaf to the table.
By successfully securing the leaf to the table, you can enjoy a stable and reliable extension for your dining surface. With the leaf secure, we can move on to the next step: ensuring stability and balance for the extended table.
Step 6: Ensure stability and balance
Once the leaf is securely attached to your dining table, it’s important to ensure that the extended table remains stable and balanced. Follow these steps to achieve stability and balance:
1. Check for wobbling: Test the stability of the extended table by gently applying pressure to different areas. Make sure there is no excessive wobbling or movement. If you notice any instability, adjust the attachment mechanisms, tighten any loose screws, or make any necessary modifications to stabilize the table.
2. Inspect the legs and supports: Examine the legs and supports of the table to ensure they are properly aligned, secure, and in good condition. Tighten any loose screws or bolts and check for signs of wear or damage. Repair or replace any components that may compromise the stability of the table.
3. Test weight distribution: Place weight evenly on different areas of the table to test its balance. It should evenly distribute the weight without sagging or tilting. Adjust the supports or add additional reinforcement if needed to achieve optimal balance.
4. Consider floor protection: To prevent any accidental scratches or damage to your flooring, consider using adhesive felt pads or furniture glides on the bottom of the table legs. These will help to minimize friction and protect your floors from any potential scrapes or scuffs.
5. Utilize table stabilizers: If required, you can consider using table stabilizers or leveling devices to ensure the extended table remains stable on uneven surfaces. These add-ons can provide extra support and stability, especially for older or uneven floors.
6. Regular maintenance: To maintain stability over time, perform regular maintenance on your dining table. This may include tightening screws, inspecting for any loose parts, and addressing any stability concerns promptly.
By ensuring stability and balance, you’ll have a secure and reliable extended dining table that can accommodate your guests comfortably. Now, it’s time to move on to the final step: testing and adjusting the leaf for optimal functionality.
Step 7: Test and adjust the leaf
After securing the leaf and ensuring stability, it’s important to test and adjust the leaf to ensure optimal functionality. Follow these steps to test and make any necessary adjustments:
1. Test the extension and retraction: Extend the table fully by pulling it apart and retract it back to its original size. Test the smoothness of the extension and retraction, ensuring that the leaf slides in and out seamlessly without any obstructions or difficulties. If there are any issues, check for any misalignments, obstructions, or interference that may be causing the problem.
2. Check for gaps or misalignments: Examine the edges where the leaf connects with the main tabletop. Look for any noticeable gaps or misalignments. A perfect fit will have minimal or no visible gaps, and the edges should align seamlessly with the rest of the table. If there are gaps, try adjusting the attachment mechanisms or reconsider the positioning of the leaf.
3. Ensure proper leveling: Place a level on the extended tabletop surface to check for any unevenness. If the surface is not level, adjust the support mechanisms or add shims underneath the table legs to achieve a balanced and level surface for dining.
4. Test for stability during use: Put the extended table to a practical test by placing items on top, applying gentle pressure, and simulating typical dining scenarios. Ensure that the extended table remains stable, without any wobbling, shifting, or unsteadiness. If you notice any instability, reassess the attachment and reinforcement mechanisms, making any necessary adjustments or improvements.
5. Address minor adjustments: If you encounter any minor issues during testing, such as gaps, leveling discrepancies, or stability concerns, make the necessary adjustments. This may involve tightening screws, repositioning the leaf, or adding additional support to ensure a perfect fit and stable surface.
6. Repeat the test periodically: It’s a good practice to periodically test and check the leaf and table stability to detect any wear and tear or potential issues. Regular maintenance and preventative measures will help maintain the functionality and longevity of the table.
By thoroughly testing and adjusting the leaf, you can ensure that your dining table provides a seamless extension and a stable surface for all your dining needs. Now that you have successfully tested and adjusted the leaf, you can sit back, relax, and enjoy your expanded dining table!
With the completion of Step 7, you have successfully added a leaf to your dining table. You can now accommodate a larger number of guests and create memorable dining experiences. Remember, the process may vary depending on the specific design and construction of your dining table, so always refer to the manufacturer’s instructions if available. Enjoy your newfound flexibility and enhanced dining experience!
Conclusion
Adding a leaf to your dining table is a practical and rewarding endeavor that allows you to easily accommodate more guests and create memorable dining experiences. By following the steps outlined in this guide, you can successfully add a leaf to your dining table and ensure a seamless and secure fit.
Remember to assess your dining table to determine its suitability for a leaf and choose the right type of leaf that matches your table’s design and dimensions. Prepare the table by clearing the surface, cleaning it thoroughly, and applying any necessary table pads or protective covers.
Position the leaf correctly by aligning the leaf with the table, lifting it carefully, and lowering it onto the table surface. Secure the leaf to the table using the attachment mechanisms provided, ensuring a firm and stable connection.
Ensure stability by checking for wobbling, inspecting and reinforcing the table legs and supports, and testing weight distribution. Consider using table stabilizers and floor protectors to further enhance stability and prevent damage to your flooring.
Test and adjust the leaf to ensure smooth extension and retraction of the table, eliminating any gaps or misalignments. Verify the levelness of the extended table and address any minor adjustments needed for optimal functionality.
By following these steps and conducting regular maintenance, you can enjoy a dining table that offers versatility, stability, and a seamless extension for any occasion.
Remember, different dining tables may have varying designs and mechanisms for adding a leaf, so always refer to the manufacturer’s instructions when available. Consulting a professional or the manufacturer can provide additional guidance and ensure the best results.
With your newly extended dining table, you’re well-prepared to host gatherings, celebrate special occasions, and create lasting memories with family and friends. Enjoy the versatility and functionality that a leaf adds to your dining space!
Frequently Asked Questions about How To Add A Leaf To A Dining Table
Was this page helpful?
At Storables.com, we guarantee accurate and reliable information. Our content, validated by Expert Board Contributors, is crafted following stringent Editorial Policies. We're committed to providing you with well-researched, expert-backed insights for all your informational needs.


0 thoughts on “How To Add A Leaf To A Dining Table”