Home>Furniture & Design>Bathroom Accessories>How To Make A Bathtub Caddy
Bathroom Accessories
How To Make A Bathtub Caddy
Modified: August 27, 2024
Discover how to create a stylish and functional bathtub caddy for your bathroom with our easy DIY guide. Elevate your bath time experience! Ideal for bathroom accessories enthusiasts.
(Many of the links in this article redirect to a specific reviewed product. Your purchase of these products through affiliate links helps to generate commission for Storables.com, at no extra cost. Learn more)
Introduction
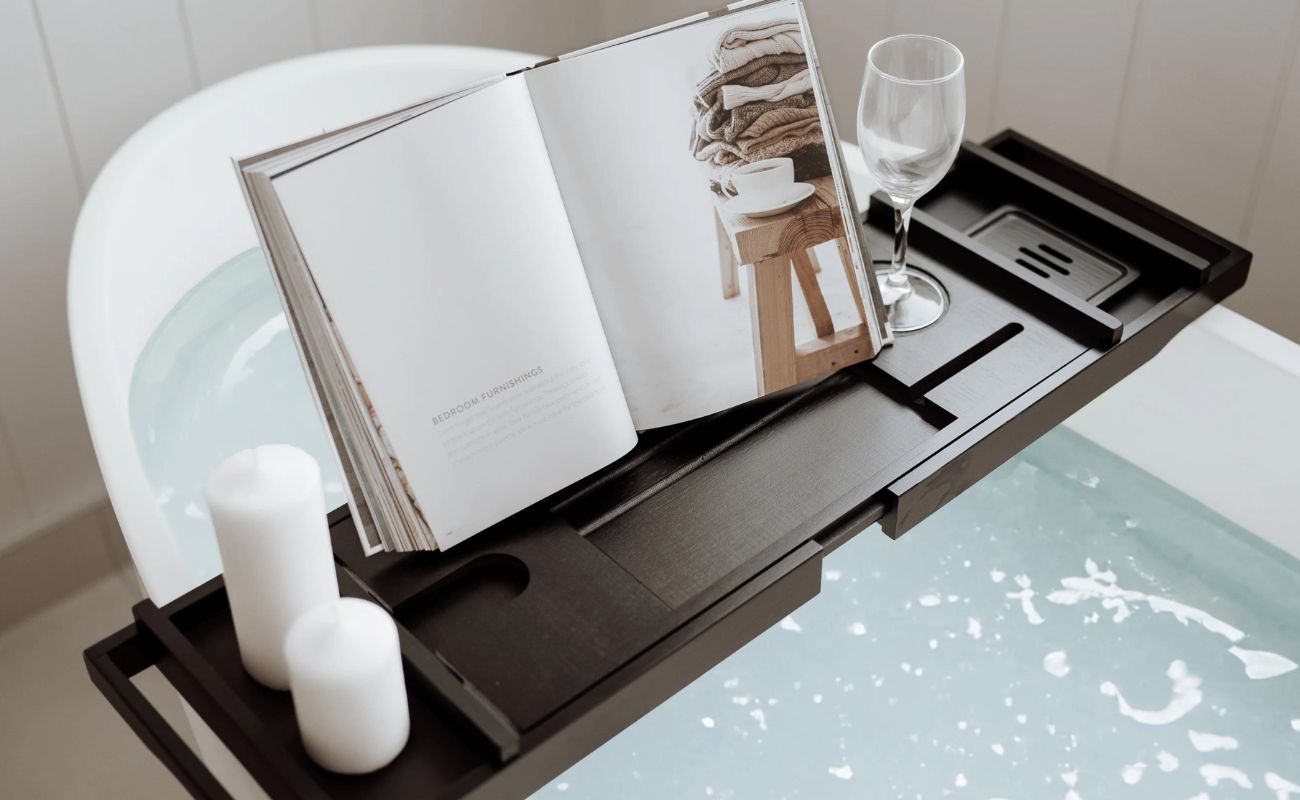
A bathtub caddy, also known as a bath tray or bathtub shelf, is a practical and stylish accessory that can elevate your bathing experience to a whole new level. This versatile piece not only adds a touch of luxury to your bath time but also provides a convenient solution for keeping your essentials within reach while you indulge in a relaxing soak.
Whether you enjoy unwinding with a good book, savoring a glass of wine, or simply pampering yourself with a spa-like ambiance, a well-crafted bathtub caddy can enhance the comfort and enjoyment of your bathing ritual. With a few simple materials and a touch of creativity, you can customize a bathtub caddy to suit your preferences and complement the aesthetics of your bathroom.
In this guide, we will walk you through the step-by-step process of creating your own personalized bathtub caddy. From measuring your bathtub dimensions to adding finishing touches, you will learn how to craft a functional and visually appealing accessory that will become an indispensable part of your bathing routine.
By following the instructions outlined in this tutorial, you will have the opportunity to unleash your DIY skills and unleash your creativity while making a practical addition to your bathroom. Whether you are a seasoned DIY enthusiast or a novice crafter, this project offers a rewarding and enjoyable experience that culminates in a custom-made bathtub caddy that reflects your unique style and enhances your daily self-care rituals.
So, roll up your sleeves, gather your materials, and get ready to embark on a fulfilling journey of creating a personalized bathtub caddy that will become a cherished companion during your moments of relaxation and rejuvenation. Let's dive into the process and bring your vision of the perfect bathtub caddy to life!
Key Takeaways:
- Elevate your bathing experience with a personalized bathtub caddy, crafted to fit your tub perfectly and hold your essentials securely for a luxurious and convenient soak.
- Embrace the creativity and satisfaction of DIY crafting as you transform a wooden plank into a visually captivating and functional bathtub caddy, adding a touch of personalized luxury to your daily self-care rituals.
Read more: How To Make Shower Caddy Stay On Showerhead
Materials Needed
To embark on the exciting journey of creating your own bathtub caddy, you will need a selection of materials that are essential for constructing this functional and aesthetically pleasing accessory. Before diving into the crafting process, it's important to gather the following items to ensure a smooth and efficient DIY experience:
-
Wooden Plank: The foundation of your bathtub caddy will be a sturdy wooden plank that can withstand the humid environment of the bathroom. Opt for a high-quality, durable wood such as teak, cedar, or bamboo, as these materials are known for their resistance to moisture and durability.
-
Measuring Tape: Accurate measurements are crucial for ensuring that your bathtub caddy fits perfectly across the width of your bathtub. A reliable measuring tape will enable you to determine the precise dimensions required for your caddy, allowing for a snug and secure fit.
-
Saw: A saw, such as a handsaw or a power saw, will be necessary for cutting the wooden plank to the desired length. This tool is essential for achieving clean and precise cuts, ensuring that your bathtub caddy is tailored to fit your specific bathtub dimensions.
-
Sandpaper: Smooth out any rough edges and imperfections on the wooden plank by using sandpaper. This will not only enhance the visual appeal of your bathtub caddy but also prevent any splinters or rough surfaces that could detract from the overall comfort and functionality of the accessory.
-
Wood Stain or Paint: Personalize the appearance of your bathtub caddy by selecting a wood stain or paint that complements your bathroom decor. Whether you prefer a natural wood finish, a rich stain, or a pop of color, the choice of wood finish will add a touch of personality to your creation.
-
Handles: Adding handles to your bathtub caddy will not only enhance its portability but also contribute to its aesthetic appeal. Choose handles that are comfortable to grip and complement the overall design of your caddy.
-
Non-Slip Pads: To ensure that your bathtub caddy stays securely in place and protects the surface of your bathtub, non-slip pads are essential. These pads will provide stability and prevent any unwanted shifting or scratching during use.
By gathering these materials, you will be well-equipped to commence the crafting process and bring your vision of a personalized bathtub caddy to fruition. With these essential items at your disposal, you are ready to embark on a fulfilling DIY project that will result in a practical and visually appealing addition to your bathing sanctuary.
Step 1: Measure Your Bathtub
Accurate measurements form the foundation of creating a customized bathtub caddy that seamlessly integrates with the dimensions of your bathtub. Before diving into the crafting process, it is crucial to meticulously measure the width of your bathtub to ensure a snug and secure fit for the caddy.
Begin by retrieving a reliable measuring tape, ensuring that it is extended across the widest part of the bathtub. Take note of the precise width, accounting for any protrusions or curves along the edges. It is essential to measure the interior width of the bathtub, as this will determine the optimal size for your caddy.
To guarantee accuracy, it is advisable to take multiple measurements at different points along the width of the bathtub, especially if the tub features non-uniform contours. By capturing these measurements, you can account for any variations and ensure that your bathtub caddy will rest comfortably and securely on the edges of the tub.
Once you have obtained the measurements, record the exact width to serve as a reference during the subsequent stages of the crafting process. These measurements will guide the cutting and customization of the wooden plank, allowing you to tailor the caddy to the specific dimensions of your bathtub.
By meticulously measuring your bathtub, you lay the groundwork for a personalized bathtub caddy that harmonizes with the unique characteristics of your bathing space. This attention to detail ensures that the caddy will not only fit seamlessly but also enhance the functionality and aesthetic appeal of your bathing sanctuary.
With the precise measurements in hand, you are now prepared to proceed to the next step of crafting your own bathtub caddy, bringing you one step closer to enjoying a luxurious and tailored bathing experience.
Step 2: Cut the Wood
With the precise measurements of your bathtub in hand, you are now ready to embark on the next crucial step of crafting your personalized bathtub caddy: cutting the wood. This step is pivotal in transforming the raw material into a functional and aesthetically pleasing accessory that will enhance your bathing experience.
Begin by selecting a high-quality wooden plank that aligns with your desired aesthetic and functional preferences. Whether you opt for the natural allure of teak, the warmth of cedar, or the eco-friendly appeal of bamboo, ensure that the wood is sturdy and capable of withstanding the humid environment of the bathroom.
Using the measurements obtained in the previous step, mark the appropriate length on the wooden plank, accounting for the width of your bathtub and any additional space required for handles or accessories. With the marked guidelines in place, carefully wield a saw, such as a handsaw or a power saw, to make precise cuts along the designated lines.
It is essential to exercise caution and precision during the cutting process to ensure that the wooden plank is tailored to fit the specific dimensions of your bathtub. Clean and straight cuts will contribute to the overall stability and visual appeal of the bathtub caddy, creating a seamless and secure resting place for your bath essentials.
As you navigate through the cutting process, pay close attention to the accuracy of the cuts, aiming for a smooth and uniform finish along the edges of the wooden plank. This attention to detail will not only enhance the functionality of the caddy but also elevate its aesthetic charm, reflecting the craftsmanship and care invested in its creation.
Once the wood has been cut to the desired length, take a moment to inspect the edges and make any necessary refinements to ensure a flawless and polished appearance. Smooth out any rough surfaces or imperfections using sandpaper, further refining the edges to create a tactile and visually appealing finish.
By meticulously cutting the wood to the precise dimensions of your bathtub, you have taken a significant stride towards bringing your vision of a customized bathtub caddy to life. This pivotal step sets the stage for the subsequent stages of the crafting process, propelling you closer to the gratifying culmination of a personalized and functional accessory that will enrich your bathing rituals.
Step 3: Sand the Wood
After cutting the wooden plank to the precise dimensions of your bathtub, the next critical step in the crafting process involves sanding the wood to achieve a smooth and refined surface. Sanding plays a pivotal role in enhancing the tactile appeal and visual allure of the bathtub caddy, ensuring that it not only complements your bathing space but also provides a comfortable resting place for your essentials.
To commence the sanding process, equip yourself with a sheet of fine-grit sandpaper, ideally with a grit between 120 and 180 for initial sanding. Begin by gently running the sandpaper along the edges and surfaces of the wooden plank, focusing on smoothing out any rough spots, uneven edges, or imperfections resulting from the cutting process. By applying consistent and even pressure, you can gradually refine the texture of the wood, creating a seamless and inviting finish.
As you progress through the sanding process, pay close attention to the corners and edges of the wooden plank, ensuring that they are rounded and softened to prevent any sharp or jagged areas that could compromise the comfort and safety of the bathtub caddy. Additionally, be mindful of any visible blemishes or irregularities on the surface of the wood, addressing them with the sandpaper to achieve a uniform and polished appearance.
Once the initial sanding phase is complete, transition to a finer-grit sandpaper, such as 220 grit or higher, to further refine the surface of the wooden plank. This finer sandpaper will contribute to a velvety-smooth finish, eliminating any remaining roughness and preparing the wood for the application of a wood stain or paint, if desired.
Throughout the sanding process, periodically run your hand across the surface of the wood to assess its smoothness and detect any lingering imperfections. By maintaining a meticulous approach to sanding, you can ensure that the wooden plank attains a luxuriously smooth texture, inviting touch and evoking a sense of craftsmanship and attention to detail.
Upon completing the sanding process, take a moment to admire the transformed wooden plank, now boasting a refined and velvety-smooth surface that is primed for the next phase of customization. The diligent sanding effort has not only elevated the tactile appeal of the wood but also set the stage for the application of a wood stain or paint, allowing you to infuse your personal style into the bathtub caddy.
With the wood now impeccably sanded, you are poised to progress to the subsequent step of the crafting process, bringing you closer to the realization of a personalized and visually captivating bathtub caddy that will enrich your bathing sanctuary.
When making a bathtub caddy, be sure to measure the width of your bathtub before cutting the wood to ensure a perfect fit.
Read more: How To Make An Outdoor Bathtub
Step 4: Stain or Paint the Wood
With the wooden plank meticulously cut and impeccably sanded, the next pivotal step in the crafting process involves infusing the bathtub caddy with a personalized touch through the application of a wood stain or paint. This transformative stage offers an opportunity to imbue the caddy with a distinct aesthetic character that harmonizes with your bathroom decor and reflects your individual style preferences.
If you are drawn to the natural allure of wood, opting for a wood stain can accentuate the inherent beauty of the wooden plank while enriching its texture and grain. Whether you prefer a warm, honey-toned finish or a deep, rich hue, selecting a wood stain allows you to enhance the organic charm of the wood while preserving its tactile appeal. Prior to applying the wood stain, ensure that the surface of the wooden plank is clean and free of any residual dust or debris from the sanding process. Using a brush or cloth, generously apply the wood stain in smooth, even strokes, allowing the wood to absorb the rich pigments and achieve the desired depth of color. After the application, gently wipe away any excess stain to reveal the lustrous and nuanced finish, celebrating the natural elegance of the wood.
Alternatively, if you are inclined towards adding a pop of color or a personalized touch to the bathtub caddy, selecting a paint in a hue that complements your bathroom decor can infuse the accessory with a vibrant and expressive character. Before applying the paint, ensure that the wooden plank is primed with a suitable wood primer to promote adhesion and enhance the longevity of the paint finish. With steady and deliberate brushstrokes, apply the paint evenly across the surface of the wood, allowing each layer to dry thoroughly before adding subsequent coats. Whether you opt for a serene pastel shade, a bold and contemporary color, or a timeless neutral tone, the application of paint empowers you to customize the bathtub caddy to align with your unique design sensibilities.
By embracing the process of staining or painting the wood, you are not only elevating the visual appeal of the bathtub caddy but also infusing it with a personalized essence that resonates with your individual taste and style. This transformative stage marks a significant stride towards the realization of a customized and visually captivating accessory that will enrich your bathing rituals and elevate the ambiance of your bathroom sanctuary.
With the wood now adorned with a lustrous wood stain or a vibrant coat of paint, you are poised to progress to the subsequent steps of the crafting process, bringing you closer to the gratifying culmination of a personalized and visually captivating bathtub caddy that will enrich your bathing sanctuary.
Step 5: Attach the Handles
With the wooden plank now transformed into a visually captivating and personalized centerpiece, the next pivotal step in the crafting process involves the seamless integration of handles, adding both functional utility and aesthetic appeal to the bathtub caddy. The addition of handles not only enhances the portability of the caddy but also contributes to its overall visual allure, creating a sense of refinement and practicality.
Begin by selecting handles that align with your design preferences and ergonomic considerations. Whether you opt for sleek and modern metal handles, rustic and charming rope handles, or classic and timeless wooden handles, ensure that they complement the overall aesthetic of the bathtub caddy while offering a comfortable grip for effortless maneuvering.
Position the handles along the edges of the wooden plank, ensuring symmetrical placement and a balanced visual composition. Mark the precise locations for the handle attachment points, taking into account the spacing and ensuring that they are equidistant from the center of the caddy. This meticulous approach will result in a harmonious and visually appealing arrangement of handles that enhances the overall functionality and aesthetic charm of the caddy.
Using a drill and appropriate screws or fasteners, securely attach the handles to the designated points on the wooden plank. Exercise caution and precision during this process to ensure that the handles are firmly affixed and capable of withstanding the weight of bath essentials without compromising their integrity. The seamless integration of handles not only enhances the practicality of the bathtub caddy but also contributes to its visual cohesiveness, elevating its overall appeal as a refined and functional accessory.
Upon successfully attaching the handles, take a moment to appreciate the transformed bathtub caddy, now boasting a seamless and elegant integration of handles that enhances its portability and visual allure. The addition of handles represents a significant stride towards the realization of a personalized and visually captivating accessory that will enrich your bathing rituals and elevate the ambiance of your bathroom sanctuary.
With the handles now seamlessly integrated, you are poised to progress to the subsequent steps of the crafting process, bringing you closer to the gratifying culmination of a personalized and visually captivating bathtub caddy that will enrich your bathing sanctuary.
Step 6: Add Non-Slip Pads
As you approach the final stages of crafting your personalized bathtub caddy, the addition of non-slip pads represents a crucial step in enhancing the functionality and safety of the accessory. Non-slip pads serve as a protective barrier, ensuring that the bathtub caddy remains securely in place while safeguarding the surface of the bathtub from scratches or unwanted shifting during use. This thoughtful addition not only contributes to the overall stability of the caddy but also reinforces its role as a reliable and indispensable companion during your bathing rituals.
To begin the process of adding non-slip pads, gather a set of high-quality pads designed specifically for use in wet environments. Opt for non-slip pads that are durable, moisture-resistant, and capable of adhering securely to the underside of the bathtub caddy. These pads are engineered to provide reliable traction and stability, preventing the caddy from sliding or moving while in use, thereby enhancing the safety and comfort of your bathing experience.
Carefully position the non-slip pads along the underside of the wooden plank, ensuring even spacing and comprehensive coverage to maximize their effectiveness. The strategic placement of these pads is essential for creating a secure and stable foundation that prevents the caddy from shifting or slipping during use, regardless of the weight of the items placed upon it.
Once the non-slip pads are positioned, firmly press them onto the surface of the wooden plank, ensuring a strong and lasting bond. This meticulous approach guarantees that the pads adhere securely, providing reliable traction and stability without leaving any residue or marks on the surface of the bathtub.
Upon completing the attachment of the non-slip pads, take a moment to appreciate the enhanced functionality and safety they bring to the bathtub caddy. The addition of non-slip pads represents a pivotal step in ensuring that the caddy remains steadfast and secure, offering a dependable platform for your bath essentials while preserving the integrity of the bathtub surface.
With the non-slip pads seamlessly integrated, you are now prepared to proceed to the final step of the crafting process, bringing you one step closer to enjoying a luxurious and tailored bathing experience with your personalized bathtub caddy.
Step 7: Enjoy Your Bathtub Caddy!
With the meticulous crafting process now complete, it's time to revel in the gratifying realization of your personalized bathtub caddy. As you introduce this bespoke accessory into your bathing sanctuary, a world of indulgent relaxation and convenience unfolds before you.
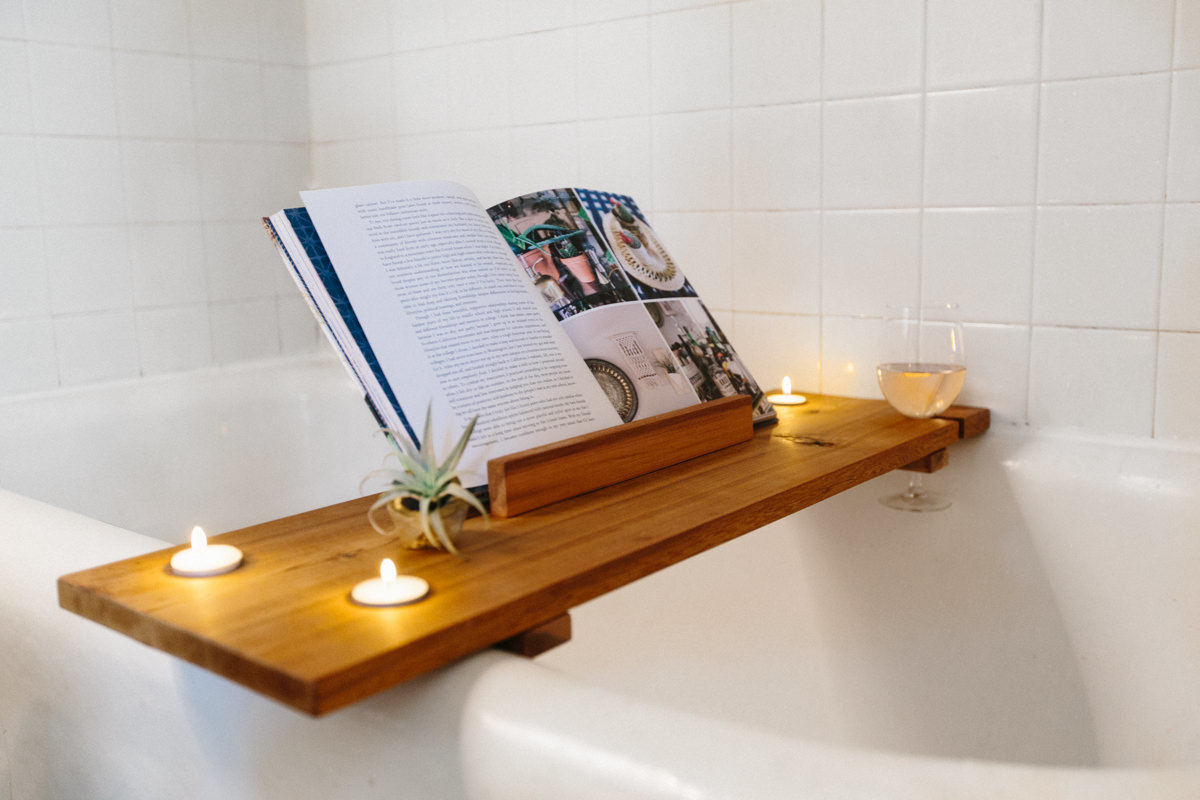
Position your exquisitely crafted bathtub caddy across the width of your bathtub, marveling at its seamless fit and elegant presence. The snug embrace of the caddy along the edges of the tub exudes a sense of bespoke luxury, elevating the ambiance of your bathing space and setting the stage for a truly indulgent experience.
As you settle into the soothing embrace of your bath, the bathtub caddy stands ready to cater to your every need. Whether you reach for a captivating novel, a soothing scented candle, or a sumptuous glass of wine, your essentials find a secure and convenient resting place upon the caddy's smooth and polished surface.
The addition of non-slip pads ensures that the caddy remains steadfast and stable, allowing you to immerse yourself in pure relaxation without the slightest concern of shifting or movement. The secure foundation provided by the non-slip pads reinforces the caddy's reliability, granting you the freedom to fully unwind and luxuriate in your bathing ritual.
With the integrated handles offering effortless portability, you can effortlessly reposition the caddy to accommodate your preferred bathing posture, ensuring that your essentials remain within easy reach at all times. The ergonomic design of the handles not only enhances the practicality of the caddy but also adds a touch of sophistication to its overall allure.
As you bask in the tranquil embrace of your bath, the personalized aesthetic of the bathtub caddy harmonizes with your bathroom decor, infusing the space with a bespoke charm that reflects your individual style and taste. The lustrous wood stain or vibrant paint finish exudes a sense of artistry and refinement, transforming the caddy into a captivating focal point within your bathing sanctuary.
In the presence of your meticulously crafted bathtub caddy, every moment of your bathing ritual becomes an indulgent and personalized experience. The caddy's seamless integration with your bathing space, coupled with its functional versatility and visual allure, elevates your self-care rituals to new heights, allowing you to savor moments of tranquility and rejuvenation with unparalleled ease and elegance.
As you revel in the comfort and convenience offered by your personalized bathtub caddy, you are reminded of the rewarding journey that culminated in the creation of this bespoke accessory. Your dedication to craftsmanship and attention to detail have yielded a masterpiece that not only enhances your bathing rituals but also reflects your unique personality and style.
Embrace the presence of your personalized bathtub caddy as a testament to your creativity and ingenuity, celebrating the seamless fusion of practicality and elegance that enriches your daily self-care rituals. With every indulgent bath, the caddy stands as a symbol of your commitment to crafting a bathing sanctuary that embodies luxury, comfort, and personalized refinement.
In the embrace of your exquisitely crafted bathtub caddy, every bath becomes a cherished and indulgent experience, inviting you to savor moments of tranquility and rejuvenation in a space that reflects your individuality and elevates your well-being.
Frequently Asked Questions about How To Make A Bathtub Caddy
Was this page helpful?
At Storables.com, we guarantee accurate and reliable information. Our content, validated by Expert Board Contributors, is crafted following stringent Editorial Policies. We're committed to providing you with well-researched, expert-backed insights for all your informational needs.


0 thoughts on “How To Make A Bathtub Caddy”