Home>Furniture & Design>Living Room Furniture>How Can I Make A Room Divider
Living Room Furniture
How Can I Make A Room Divider
Modified: March 21, 2024
Discover creative ways to make a room divider with our living room furniture and design tips. Maximize space and style effortlessly.
(Many of the links in this article redirect to a specific reviewed product. Your purchase of these products through affiliate links helps to generate commission for Storables.com, at no extra cost. Learn more)
Introduction
So, you've been pondering over how to maximize the functionality and aesthetic appeal of your living space. Perhaps you're seeking a clever way to carve out a private nook in a studio apartment, or you're yearning to add a touch of elegance to your open floor plan. Look no further than the versatile room divider – a chic and practical solution that effortlessly transforms your space.
Room dividers serve as multifaceted design elements, offering privacy, delineating areas, and adding a decorative flourish to your interiors. Whether you reside in a cozy urban loft or a sprawling suburban abode, the right room divider can elevate your living room, bedroom, or home office with style and functionality.
In this comprehensive guide, we'll delve into the art of selecting and utilizing room dividers to enhance your living space. From assessing your room's layout to exploring various room divider options, including DIY ideas, and finally, installing your chosen divider, we'll cover every aspect to ensure you're well-equipped to make a savvy choice.
So, let's embark on this journey to transform your living space with a touch of creativity and practicality. Whether you're a design enthusiast or a novice decorator, you're sure to find inspiration and valuable insights to elevate your home with a well-chosen room divider.
Key Takeaways:
- Transform your living space with a room divider that adds privacy, style, and functionality. Assess your space, choose the right type, consider DIY options, and install with precision for a seamless transformation.
- Embrace creativity and individuality by crafting a DIY room divider that reflects your style. From repurposed doors to hanging plant screens, infuse your living space with handcrafted charm.
Read more: How Can I Divide A Bedroom Into Two Rooms?
Assessing Your Space
Before diving into the world of room dividers, it’s crucial to assess your living space thoroughly. Understanding the layout, dimensions, and overall ambiance of the room will guide your decision-making process and ensure that the chosen room divider seamlessly integrates with your existing decor.
Start by evaluating the purpose of the room divider. Are you aiming to create a private area within a shared space, such as a home office within the living room or a cozy reading corner in the bedroom? Or perhaps you seek to visually separate distinct functional zones, like a dining area from the living room in an open floor plan? Identifying the primary objective will steer you toward the most suitable room divider style.
Next, take precise measurements of the area where the room divider will be placed. Consider the height, width, and depth available for the divider, ensuring that it complements the proportions of the room without overwhelming or underwhelming the space. Additionally, factor in the surrounding furniture and architectural elements to envision how the room divider will harmonize with the existing layout.
Moreover, take note of the room’s lighting and color scheme. A translucent or open-design room divider can maintain a sense of spaciousness and allow natural light to permeate the room, ideal for maintaining an airy ambiance. Conversely, a solid or opaque divider can create a more intimate atmosphere and serve as a backdrop for accent lighting or decorative elements.
Consider the overall decor style and theme of the room. Whether your space exudes a modern, minimalist vibe or boasts a bohemian, eclectic charm, the room divider should align with the existing aesthetic. Harmonizing the divider’s design with the room’s decor will ensure a cohesive and polished look.
By thoroughly assessing your living space, you’ll gain valuable insights into the specific requirements and opportunities for integrating a room divider. Armed with this understanding, you can confidently move forward to explore the diverse array of room divider options that best suit your unique space and style preferences.
Choosing the Right Type of Room Divider
As you navigate the realm of room dividers, you’ll encounter a myriad of options, each with its own unique features and benefits. Understanding the distinct types of room dividers will empower you to make an informed decision that aligns with your spatial and aesthetic needs.
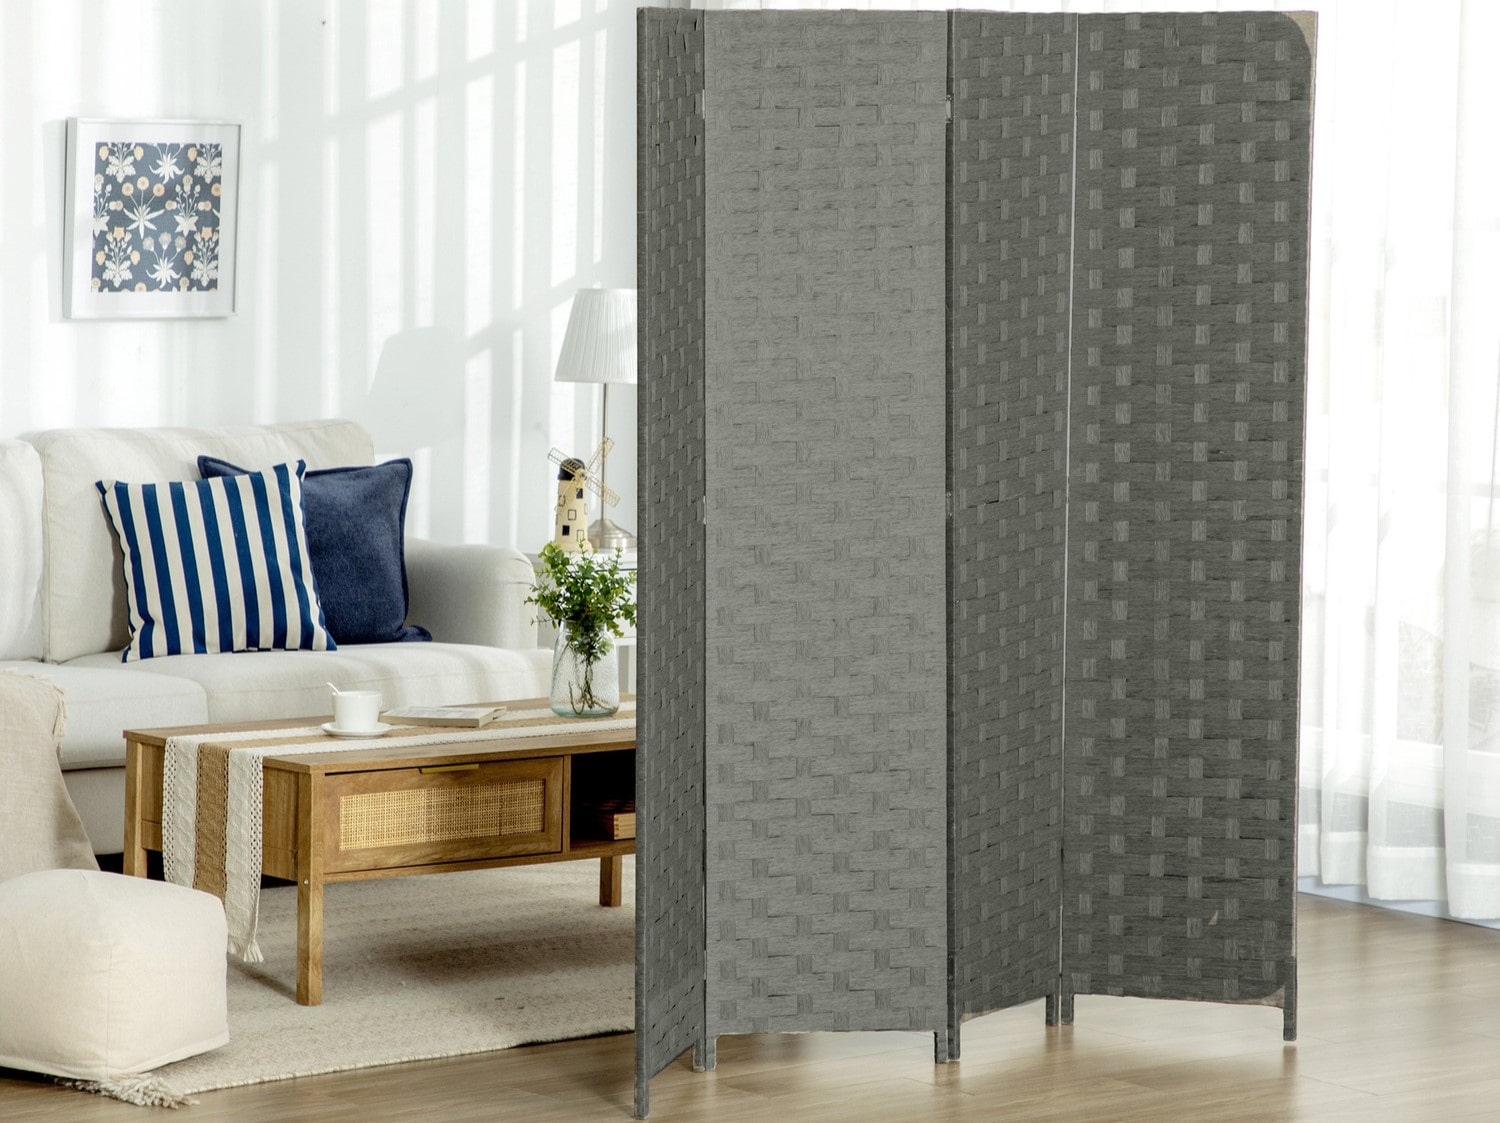
1. Folding Screens: A classic and versatile choice, folding screens are available in various materials, such as wood, metal, or fabric. These dividers can be easily maneuvered to adapt to changing spatial requirements and are an excellent option for creating temporary partitions or adding a decorative accent to a room.
2. Sliding Panels: Ideal for modern and minimalist interiors, sliding panels offer a sleek and streamlined solution for dividing spaces. These panels glide along a track, allowing for effortless customization of room configurations while exuding a contemporary aesthetic.
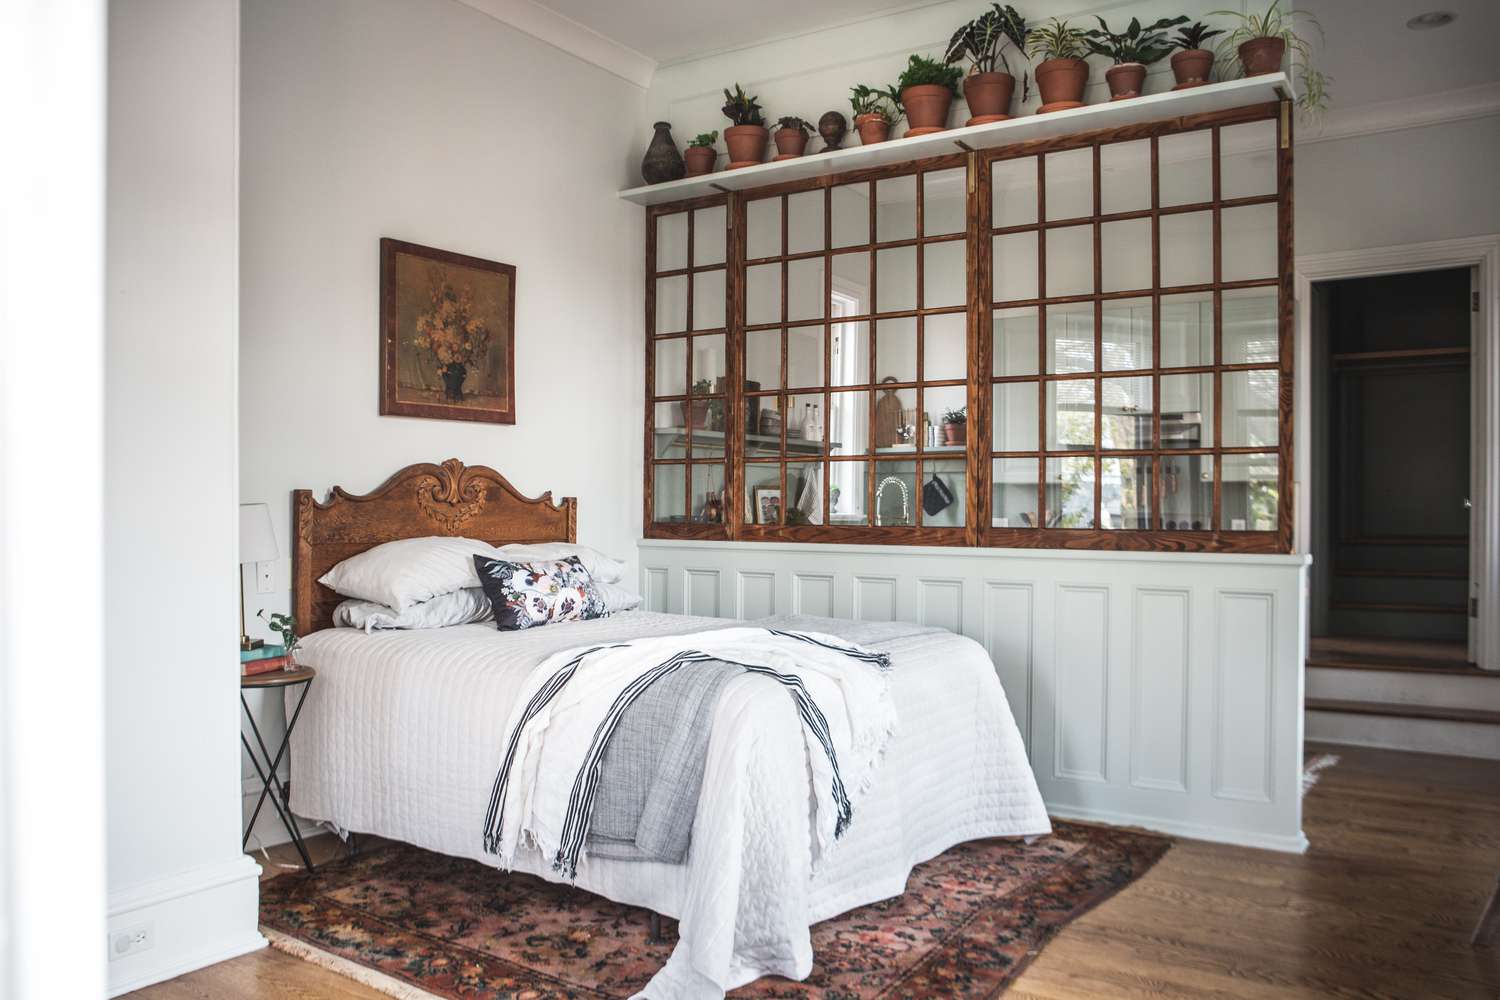
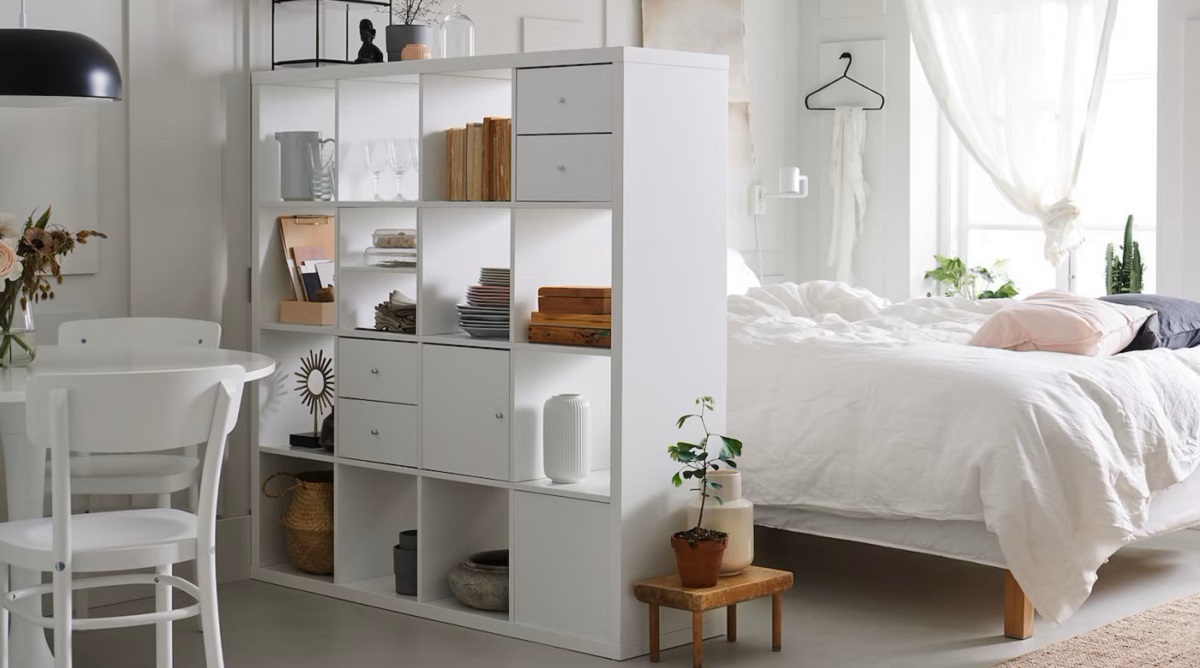
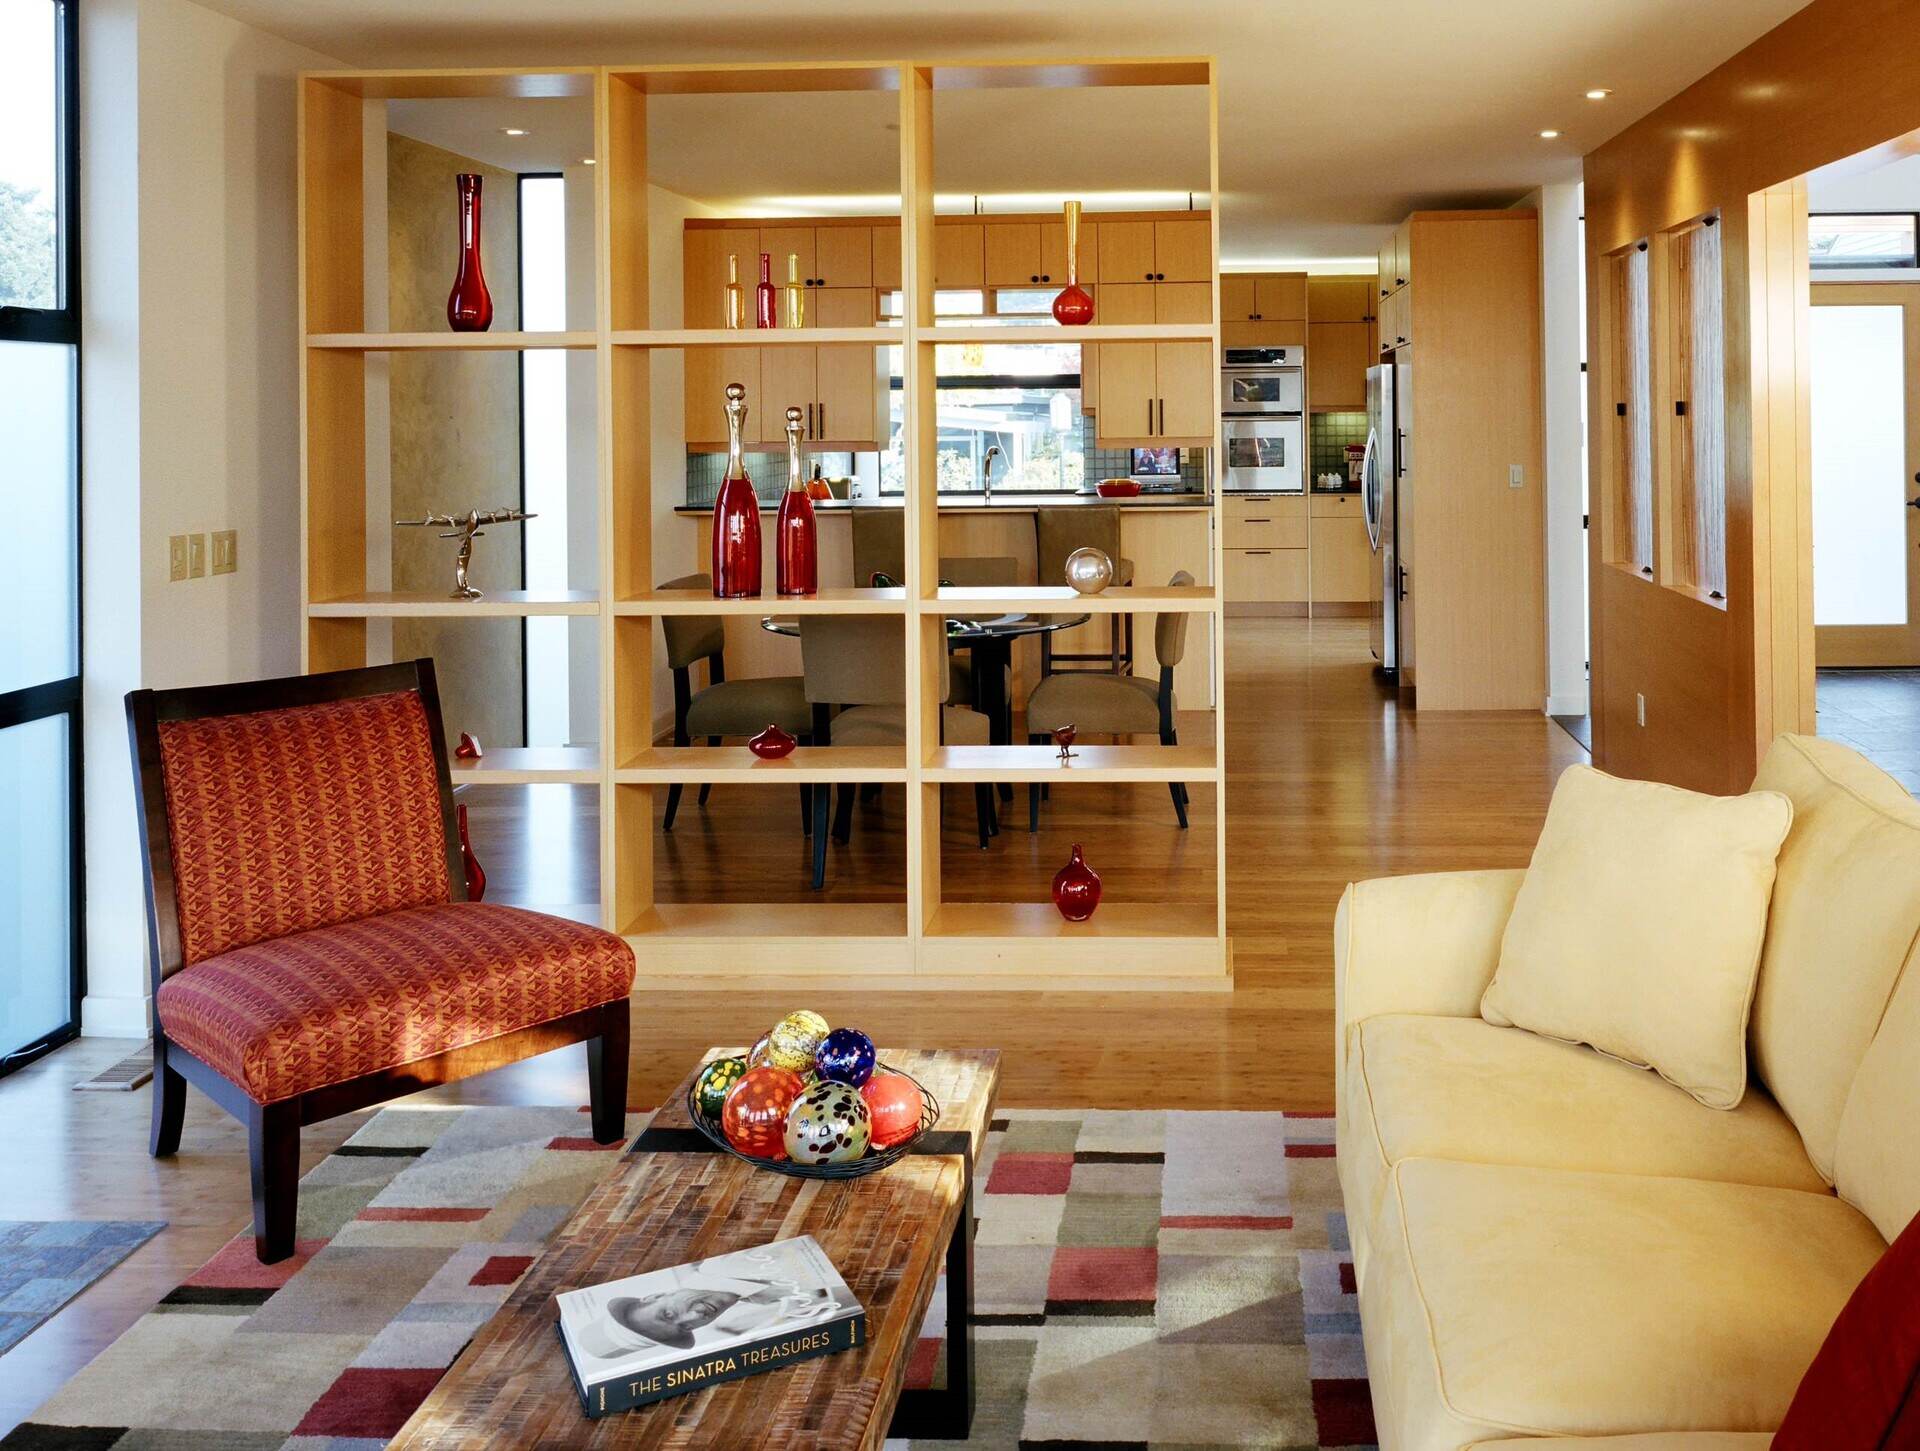
3. Shelving Units: Combining functionality with visual appeal, room dividers integrated with shelving units offer storage space and display areas alongside their partitioning capabilities. This type of divider is particularly advantageous in open floor plans, where it can delineate zones while providing storage solutions.
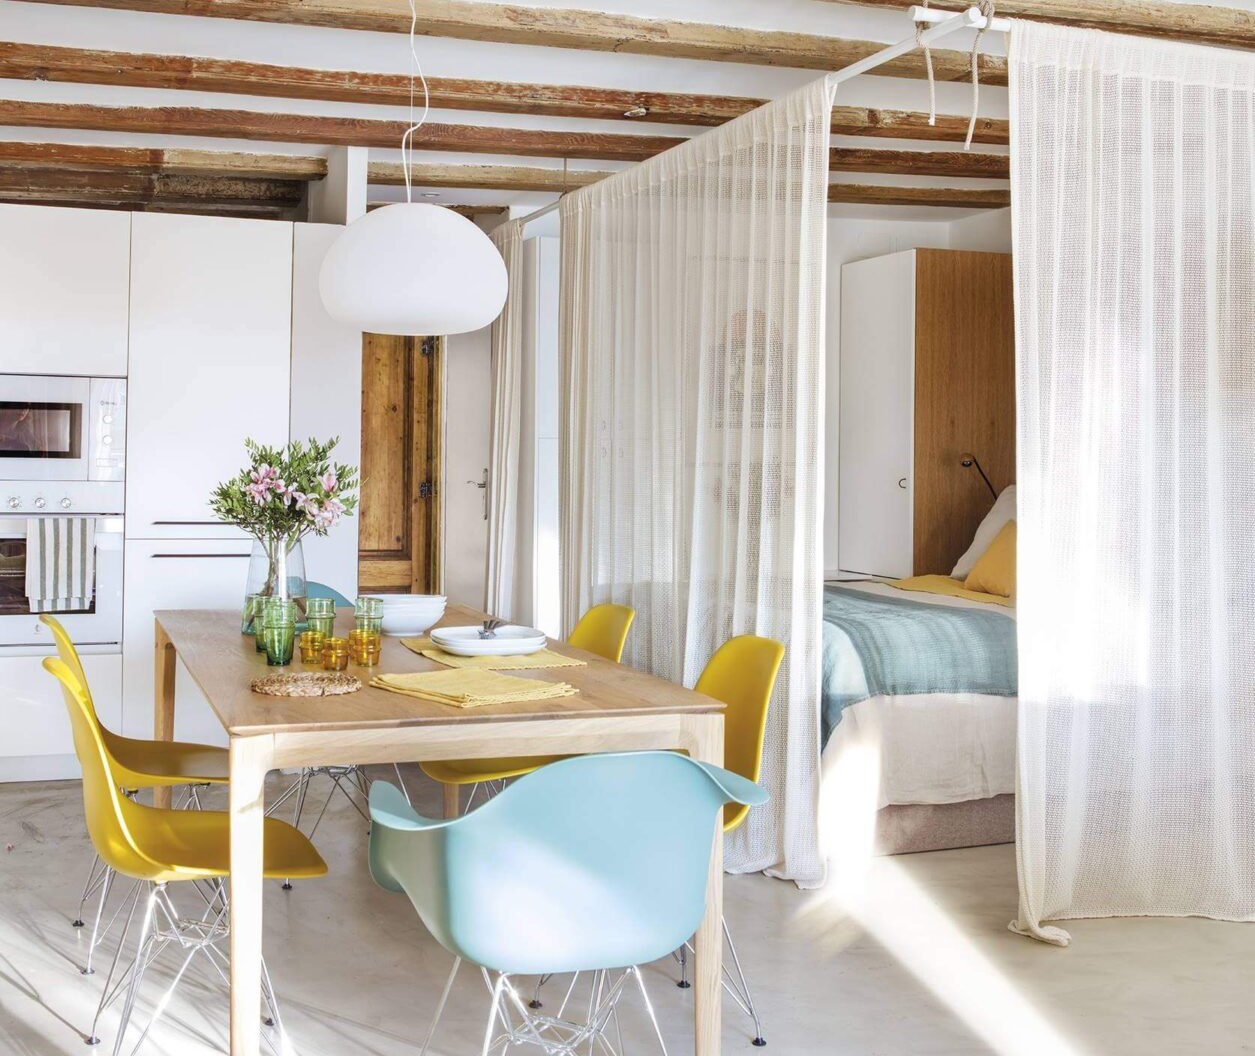
4. Hanging Curtains: A budget-friendly and adaptable option, hanging curtains serve as lightweight and airy room dividers. They lend a soft, ethereal ambiance to the space and are an excellent choice for creating a sense of privacy without sacrificing natural light transmission.
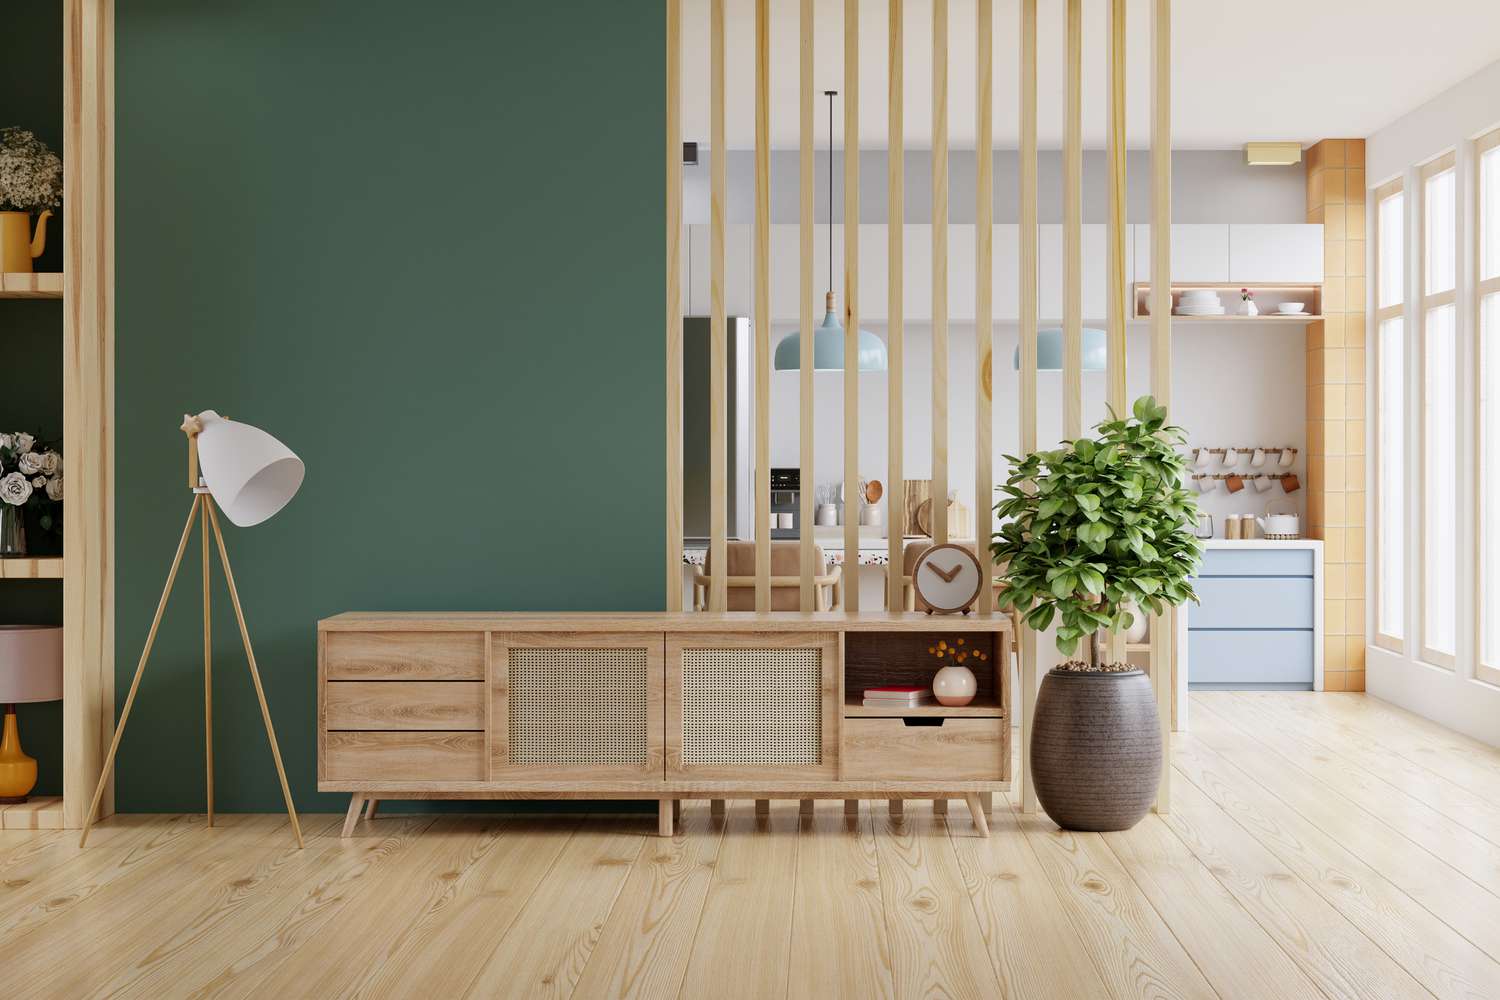
5. Open-Design Dividers: For those seeking a subtle partitioning solution, open-design dividers, such as latticework or laser-cut screens, offer a delicate delineation of space while maintaining a sense of openness. These dividers add a decorative element without creating visual barriers.
When selecting the right type of room divider, consider the specific requirements of your space, including the desired level of privacy, the need for flexibility in spatial arrangements, and the decorative impact you wish to achieve. By carefully evaluating these factors, you’ll be well-equipped to choose a room divider that seamlessly integrates with your living space while enhancing its functionality and visual appeal.
You can make a room divider by using bookshelves, hanging curtains, or creating a folding screen. Be sure to measure the space and consider the design and materials that will best suit your needs.
DIY Room Divider Ideas
Embarking on a do-it-yourself (DIY) room divider project not only allows for personalized customization but also presents an opportunity to infuse your living space with a unique and handcrafted touch. Whether you’re a seasoned DIY enthusiast or a novice crafter, these inventive ideas cater to a range of skill levels and style preferences.
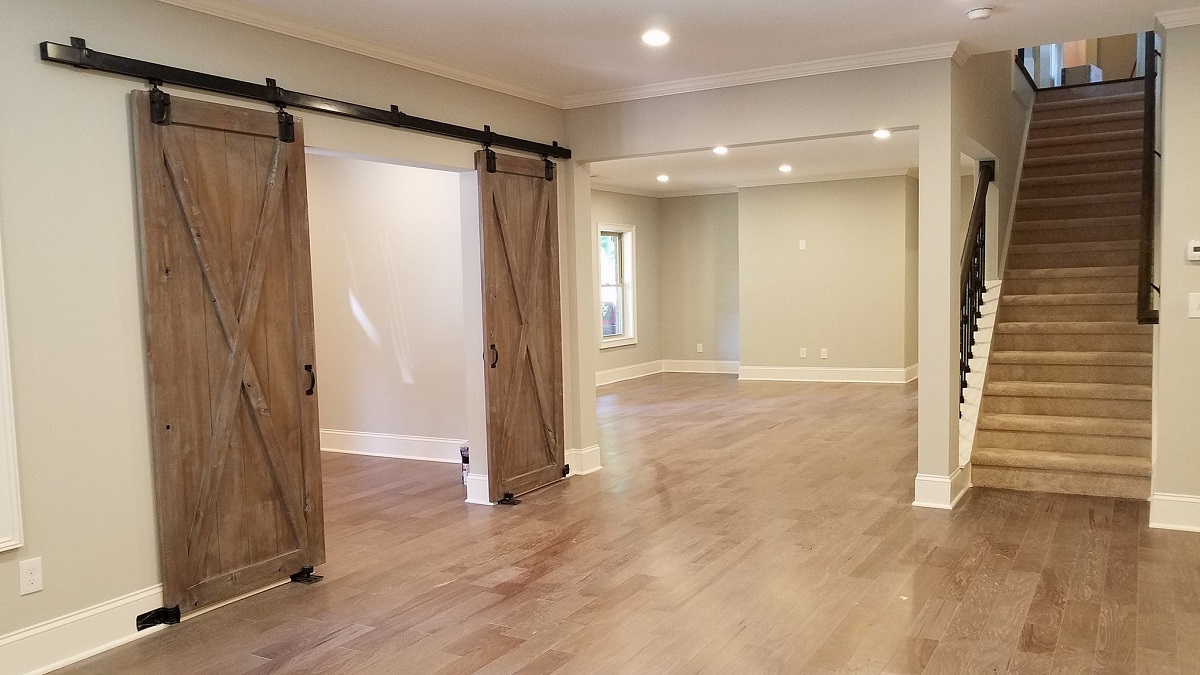
1. Repurposed Bi-Fold Doors: Salvage old bi-fold doors and repurpose them into a charming room divider. Apply a fresh coat of paint or a distressed finish to complement your decor. For added flair, adorn the doors with decorative panels or stenciled designs to infuse personality into the divider.
2. Hanging Macramé Divider: Embrace the bohemian aesthetic by crafting a macramé room divider using cotton rope or macramé cord. With basic knotting techniques, you can create a stunning divider that adds texture and visual interest to your space while allowing light to filter through its intricate patterns.
3. PVC Pipe Partition: Construct a modern and minimalist room divider using PVC pipes and connectors. This DIY project offers a sleek and industrial-inspired partitioning solution. Customize the height and configuration of the pipes to suit your space, and consider painting them in a metallic finish for a contemporary touch.
4. Hanging Plant Screen: Introduce a touch of nature into your living space with a DIY hanging plant screen. Utilize a sturdy wooden frame or repurposed window frames, and suspend potted plants or trailing vines from the structure. This living divider not only delineates space but also purifies the air and infuses the room with greenery.
5. Fabric Panel Divider: Create a personalized fabric panel divider by selecting your favorite textiles and mounting them within a wooden or metal frame. This DIY project allows for endless customization, from vibrant patterns and prints to serene, sheer fabrics that add a soft, ethereal ambiance to the space.
When embarking on a DIY room divider project, consider the overall aesthetic of your space and the level of craftsmanship you’re comfortable with. Whether you opt for a rustic, upcycled divider or a contemporary, plant-adorned screen, infusing your living space with a handcrafted room divider adds a touch of character and individuality to your home.
Installing Your Room Divider
Once you’ve selected the perfect room divider for your space, the next step is to ensure a seamless and secure installation. Whether you’ve chosen a folding screen, sliding panels, or a custom DIY divider, careful consideration and precision are essential to achieve a polished and functional addition to your living area.
1. Assess the Placement: Determine the optimal placement of the room divider, taking into account the room’s layout, traffic flow, and the intended purpose of the partition. Consider factors such as access to natural light, visual symmetry, and the overall balance of the space.
2. Secure Anchoring (For Freestanding Dividers): If you’ve selected a freestanding room divider, ensure it is stable and secure. Depending on the type of divider, you may need to anchor it to the floor or utilize anti-tip mechanisms to prevent accidental tipping, especially in households with children or pets.
3. Mounting (For Hanging or Sliding Dividers): For hanging or sliding room dividers, carefully follow the manufacturer’s instructions for mounting or installing the track system. Use a level to ensure the divider is perfectly aligned, and make any necessary adjustments to achieve a straight and balanced installation.
4. Custom DIY Installation: If you’ve crafted a custom DIY room divider, such as a repurposed door or a handwoven screen, ensure that it is securely anchored or suspended according to its specific design. Take into account the weight of the divider and use appropriate hardware to support its structure.
5. Finishing Touches: Once the room divider is in place, take the time to finesse its surroundings. Consider adding decorative elements, such as potted plants, accent lighting, or artwork, to enhance the visual appeal of the divider and integrate it harmoniously into the room’s decor.
By meticulously attending to the installation process, you’ll ensure that your chosen room divider not only fulfills its practical function but also contributes to the overall ambiance and aesthetics of your living space. Whether you opt for a permanent installation or seek the flexibility of a movable divider, a well-executed installation is key to achieving a cohesive and visually captivating room transformation.
Read more: How To Make A Room Divider With Fabric
Conclusion
As we conclude our exploration of room dividers, it’s evident that these versatile furnishings offer a myriad of benefits, from spatial delineation to decorative enhancement. By embarking on this journey to transform your living space, you’ve gained valuable insights into the art of selecting, crafting, and installing a room divider that perfectly complements your home.
Room dividers not only serve a practical purpose by creating distinct zones within a room, but they also contribute to the visual appeal and ambiance of the space. Whether you’ve chosen a folding screen to add a touch of elegance, a DIY divider to infuse your space with personal flair, or a sliding panel to achieve a modern aesthetic, the carefully curated addition of a room divider can elevate your living area to new heights.
Moreover, the process of assessing your space, choosing the right type of room divider, and considering DIY options has empowered you to make informed decisions that align with your lifestyle and design preferences. By integrating a thoughtfully selected room divider, you’ve not only enhanced the functionality of your living space but also imbued it with a touch of creativity and individuality.
As you bask in the transformed ambiance of your home, take pride in the seamless installation of your chosen room divider. Whether it serves as a striking focal point, a practical partition, or a handcrafted testament to your creativity, the room divider stands as a testament to your discerning taste and attention to detail.
So, as you revel in the newfound allure and functionality of your living space, remember that the journey doesn’t end here. Continuously explore new ways to personalize and optimize your home, and let your room divider stand as a testament to the boundless potential for creativity and innovation within your living space.
With the right room divider, your living space becomes a canvas for endless possibilities, where style meets practicality, and creativity knows no bounds.
Frequently Asked Questions about How Can I Make A Room Divider
Was this page helpful?
At Storables.com, we guarantee accurate and reliable information. Our content, validated by Expert Board Contributors, is crafted following stringent Editorial Policies. We're committed to providing you with well-researched, expert-backed insights for all your informational needs.


0 thoughts on “How Can I Make A Room Divider”