Home>Furniture & Design>Outdoor Furniture>How To Build An Outdoor Kiln
Outdoor Furniture
How To Build An Outdoor Kiln
Modified: August 28, 2024
Learn how to build an outdoor kiln for firing pottery and ceramics with our comprehensive guide. Create beautiful outdoor furniture and designs with your own custom kiln.
(Many of the links in this article redirect to a specific reviewed product. Your purchase of these products through affiliate links helps to generate commission for Storables.com, at no extra cost. Learn more)
Introduction
Welcome to the world of outdoor kiln building! Whether you're a pottery enthusiast, a professional ceramic artist, or someone with a passion for hands-on projects, constructing an outdoor kiln can be a rewarding and exciting endeavor. Building your own kiln allows you to tailor its design to your specific needs and offers a deeper understanding of the firing process. In this guide, we'll explore the step-by-step process of building an outdoor kiln, from choosing the right location to firing and using the kiln for your creative pursuits.
Building an outdoor kiln is a project that requires careful planning, attention to detail, and a willingness to get your hands dirty. Throughout this journey, you'll gain valuable insights into the principles of kiln construction, the selection of suitable materials, and the integration of essential features such as ventilation and heating elements. By the end of this guide, you'll be well-equipped to embark on your outdoor kiln building adventure, ready to unleash your creativity and bring your pottery projects to life.
So, roll up your sleeves, gather your tools, and let's dive into the fascinating world of outdoor kiln construction. Whether you're a seasoned DIY enthusiast or a newcomer to the world of kiln building, this guide will provide you with the knowledge and inspiration to create a functional and efficient outdoor kiln that meets your unique requirements. Let's get started!
Key Takeaways:
- Building an outdoor kiln is a rewarding DIY project that requires careful planning, heat-resistant materials, and essential tools. It empowers pottery enthusiasts to create unique and enduring works of art.
- Firing pottery in an outdoor kiln involves meticulous steps, from preparing pottery pieces to controlling the firing process. It’s a transformative journey that reflects craftsmanship, dedication, and the alchemy of raw materials.
Read more: How To Make A Brick Kiln
Choosing the Right Location
Before embarking on the construction of your outdoor kiln, it’s crucial to carefully select the ideal location for this project. The chosen site should not only accommodate the kiln’s physical dimensions but also consider factors such as safety, accessibility, and environmental impact.
First and foremost, assess the available space in your outdoor area. Ideally, the location should provide ample room for the kiln structure, ensuring that it is positioned a safe distance from any surrounding buildings, trees, or other flammable materials. Additionally, consider the proximity to your workspace or studio, as easy access to the kiln will streamline the firing process and facilitate the transportation of pottery pieces.
Moreover, take into account the environmental implications of the kiln’s placement. Ensure that the chosen site allows for proper ventilation and is not situated near areas susceptible to strong winds or excessive moisture. Adequate ventilation is essential for the safe operation of the kiln and the dispersion of fumes and heat during firing.
Furthermore, evaluate the ground surface where the kiln will be situated. Opt for a level and stable foundation to support the weight of the kiln structure and withstand the heat generated during firing. If necessary, consider preparing the ground by leveling the surface and laying a heat-resistant foundation, such as concrete or fire bricks, to ensure stability and durability.
Lastly, consider the proximity to essential utilities such as electricity and water. Access to power is crucial for operating any ventilation or heating systems integrated into the kiln, while nearby water sources can be beneficial for cooling the kiln and providing a means of extinguishing any unforeseen fires.
By carefully selecting the right location for your outdoor kiln, you’ll establish a solid foundation for the construction process and create a safe and functional environment for firing your pottery creations. With the location secured, you can proceed to the next steps of gathering materials and tools to bring your outdoor kiln to life.
Gathering Materials and Tools
Once you’ve identified the optimal location for your outdoor kiln, it’s time to gather the necessary materials and tools to commence the construction process. Building an outdoor kiln requires a combination of heat-resistant materials, specialized equipment, and essential tools to ensure a safe and efficient build.
First and foremost, consider the primary materials required for constructing the kiln structure. Fire bricks, renowned for their ability to withstand high temperatures, are an essential component of the kiln walls and base. Additionally, refractory mortar, designed to withstand extreme heat, is vital for binding the fire bricks together and creating a durable kiln structure.
Furthermore, you’ll need to procure metal components such as steel rods or bars to reinforce the kiln’s framework and provide structural stability. These metal reinforcements play a crucial role in ensuring the integrity of the kiln, especially during the repeated heating and cooling cycles of the firing process.
In addition to the core materials, consider the ventilation and heating elements essential for the kiln’s functionality. Ventilation systems, including vents and flues, facilitate the regulation of airflow and the release of gases during firing. Heating elements, such as electric or gas-powered burners, are integral for achieving and maintaining the desired temperatures within the kiln chamber.
As for the tools required, a comprehensive set of equipment will streamline the construction process. Essential tools include a masonry trowel for applying mortar, a level for ensuring the evenness of the kiln structure, and a saw for cutting fire bricks to the desired dimensions. Additionally, welding equipment or metal fasteners may be necessary for assembling the metal framework of the kiln.
Lastly, prioritize safety equipment such as heat-resistant gloves, protective eyewear, and a respirator to safeguard against potential hazards during the construction phase. These safety measures are essential for protecting yourself against heat, airborne particles, and fumes associated with working with heat-resistant materials and refractory products.
By gathering the requisite materials and tools, you’ll lay the groundwork for a successful outdoor kiln construction project. With these essentials in hand, you’re ready to move on to the next phase: constructing the foundation of the outdoor kiln.
Constructing the Foundation
The foundation of an outdoor kiln serves as the critical base upon which the entire structure rests, providing stability and support during the firing process. Constructing a durable and heat-resistant foundation is essential for ensuring the longevity and safety of the kiln. Here’s a step-by-step guide to building a solid foundation for your outdoor kiln:
1. Site Preparation:
Begin by preparing the ground surface where the kiln will be situated. Clear any debris, rocks, or uneven terrain to create a level and stable foundation. If necessary, consider laying a heat-resistant material such as fire bricks or refractory concrete to form the base of the foundation.
Read more: How To Build Outdoor Furniture
2. Foundation Design:
Determine the dimensions and layout of the foundation based on the size of your kiln structure. Ensure that the foundation extends beyond the perimeter of the kiln to provide ample support for the entire structure. Consider incorporating additional support columns or footings at strategic points to distribute the weight evenly.
3. Material Selection:
Choose heat-resistant and durable materials for the foundation, such as fire bricks, refractory concrete, or heat-resistant pavers. These materials are capable of withstanding the intense heat generated during firing and will provide a stable base for the kiln.
4. Assembly and Leveling:
Lay the selected materials in accordance with the foundation design, ensuring that each component fits snugly and securely. Use a level to verify the evenness of the foundation, making any necessary adjustments to achieve a perfectly flat and stable surface for the kiln.
5. Reinforcement:
If required, reinforce the foundation with steel rods or mesh to enhance its strength and prevent cracking or shifting during the firing process. Secure the reinforcement within the foundation material to create a robust and resilient base for the kiln.
Read more: How To Build An Outdoor Toilet
6. Curing and Inspection:
Allow the foundation to cure and set according to the manufacturer’s recommendations for the chosen materials. Once cured, inspect the foundation for any signs of instability or structural issues, addressing any concerns before proceeding with the construction of the kiln structure.
By meticulously constructing a sturdy and heat-resistant foundation, you’ll establish a reliable base for your outdoor kiln, setting the stage for the subsequent phases of building the kiln structure and integrating essential features such as ventilation and heating elements.
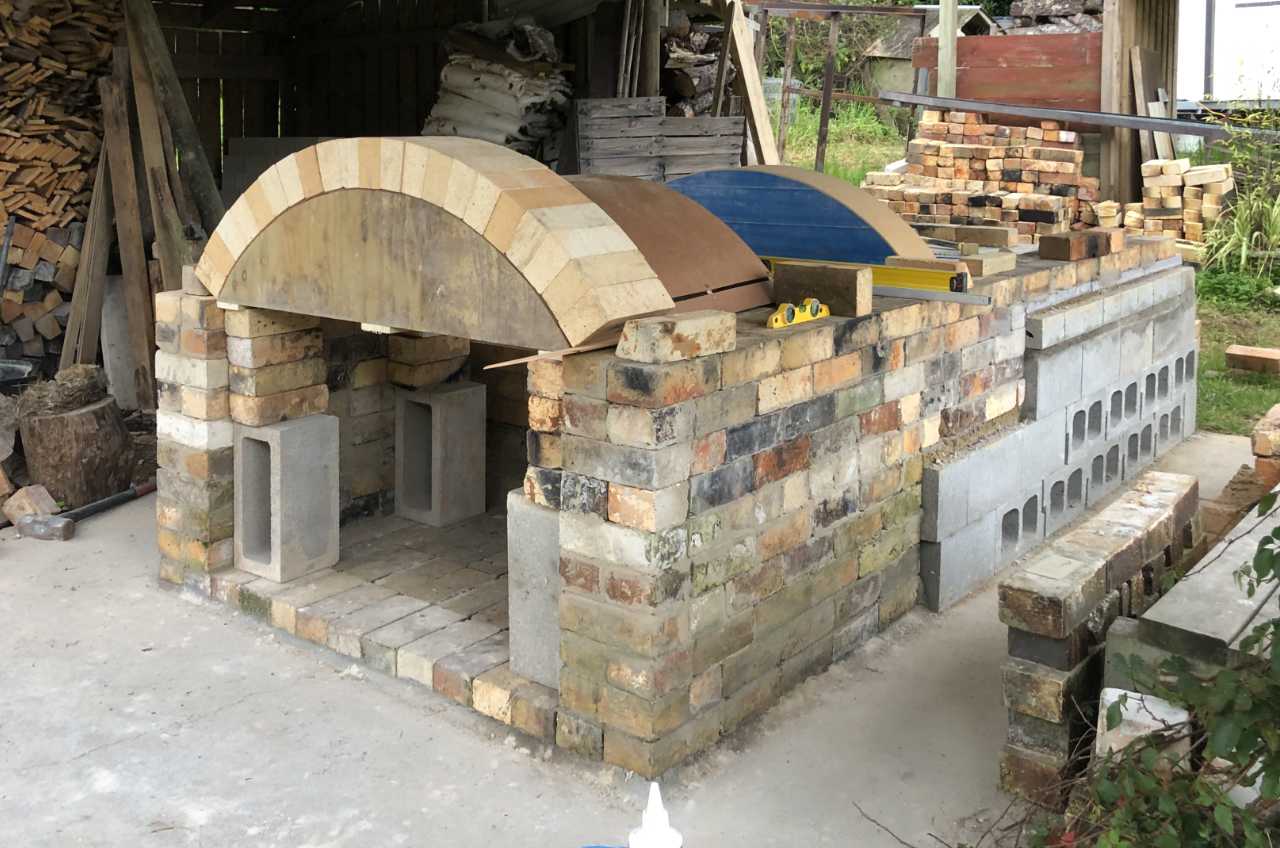
Building the Kiln Structure
Constructing the kiln structure is a pivotal phase in the outdoor kiln building process, where the foundational elements come together to form the framework that will contain and facilitate the firing of pottery and ceramics. Here’s a comprehensive guide to building the kiln structure:
1. Layout and Planning:
Begin by outlining the dimensions and design of the kiln structure based on your specific requirements and available space. Consider factors such as the chamber size, door placement, and the integration of ventilation and heating elements into the structure.
2. Assembly of Fire Bricks:
Using fire bricks and refractory mortar, assemble the walls of the kiln structure, ensuring a tight and secure fit between the bricks. Pay careful attention to creating a smooth and even interior surface to facilitate the loading and unloading of pottery pieces during firing.
Read more: How To Build Outdoor Carpet
3. Metal Framework:
If your design incorporates a metal framework for structural reinforcement, assemble and secure the metal components to support the kiln walls and provide additional stability. Weld or fasten the metal framework according to the predetermined design and layout.
4. Door and Access Points:
Create openings for the kiln door and any additional access points required for loading and unloading pottery pieces. Ensure that these openings are strategically positioned to allow for easy access while minimizing heat loss during firing.
5. Insulation and Sealing:
Apply insulation materials, such as ceramic fiber blanket or refractory bricks, to the exterior of the kiln structure to enhance heat retention and energy efficiency. Seal any gaps or joints with refractory mortar to prevent heat loss and ensure a well-insulated chamber.
6. Ventilation and Flue Installation:
Integrate ventilation systems, including vents and flues, into the kiln structure to regulate airflow and facilitate the release of gases during firing. Position these elements strategically to optimize the circulation of heat and gases within the kiln chamber.
Read more: How To Build An Outdoor Shelter
7. Structural Integrity Check:
Upon completing the construction of the kiln structure, conduct a thorough inspection to verify its structural integrity and stability. Address any areas of concern or potential weaknesses before proceeding to the installation of ventilation and heating elements.
By methodically building the kiln structure, you’ll bring your outdoor kiln one step closer to completion, laying the groundwork for the installation of ventilation and heating elements essential for the firing process. With the kiln structure in place, the next phase involves integrating these crucial components to ensure the functionality and efficiency of the outdoor kiln.
Installing Ventilation and Heating Elements
The installation of ventilation and heating elements is a pivotal phase in the construction of an outdoor kiln, as it directly impacts the functionality and efficiency of the firing process. Proper ventilation and heating systems are essential for regulating airflow, achieving and maintaining desired temperatures, and ensuring the safe operation of the kiln. Here’s a detailed guide to installing ventilation and heating elements in your outdoor kiln:
1. Ventilation System Integration:
Position vents and flues within the kiln structure to facilitate the regulation of airflow during firing. Strategically place intake and exhaust vents to optimize the circulation of gases and heat within the kiln chamber, promoting uniform temperature distribution and efficient firing.
2. Ventilation Control Mechanisms:
Implement control mechanisms such as dampers or adjustable vents to regulate the airflow and maintain the desired atmosphere within the kiln. These mechanisms enable precise adjustments to the ventilation system, allowing for the optimization of firing conditions and the management of gas release during the process.
Read more: How To Build An Outdoor Shed
3. Heating Element Installation:
Integrate the selected heating elements, whether electric or gas-powered, into the kiln structure to facilitate the generation and maintenance of the required firing temperatures. Position the heating elements evenly throughout the kiln chamber to ensure uniform heat distribution and consistent firing results.
4. Temperature Control Systems:
Incorporate temperature control systems, such as thermocouples and controllers, to monitor and regulate the kiln’s internal temperature during firing. These systems provide real-time temperature feedback and enable precise adjustments to achieve the desired firing profiles for different types of pottery and ceramics.
5. Insulation Enhancement:
Reinforce the insulation surrounding the heating elements to minimize heat loss and maximize energy efficiency during firing. Apply additional insulation materials, such as ceramic fiber blankets or refractory bricks, to create a well-insulated and heat-retentive environment within the kiln chamber.
6. Safety Measures and Precautions:
Prioritize safety measures such as installing thermal barriers, heat shields, and emergency shut-off systems to mitigate potential hazards associated with the high temperatures generated during firing. These precautions are essential for safeguarding against overheating and ensuring the secure operation of the kiln.
By meticulously installing ventilation and heating elements, you’ll equip your outdoor kiln with the essential components necessary for precise temperature control, efficient firing, and the safe operation of the kiln. With these critical elements in place, your outdoor kiln is poised to fulfill its purpose of transforming raw clay into beautifully fired pottery and ceramics.
Read more: How To Build An Outdoor Bathroom
Firing and Using the Outdoor Kiln
As the culmination of your outdoor kiln construction journey, the firing and utilization of the kiln mark the realization of your creative vision and the transformation of raw materials into exquisite pottery and ceramics. Firing in an outdoor kiln involves a meticulous process that requires attention to detail, precise temperature control, and an understanding of the behavior of different types of clay and glazes. Here’s a comprehensive guide to firing and using your outdoor kiln:
1. Preparing Pottery Pieces:
Prior to firing, prepare your pottery pieces by ensuring they are thoroughly dried and free of any moisture. Properly bisque-fired pieces are essential for achieving successful results during the glaze firing process, ensuring that the clay has been sufficiently hardened and any residual moisture has been eliminated.
2. Loading the Kiln:
Carefully arrange the pottery pieces within the kiln chamber, ensuring adequate spacing between items to allow for even heat distribution and optimal exposure to the glaze. Consider the placement of different types of pottery and ceramics to maximize the kiln’s capacity while maintaining a balanced and efficient firing environment.
3. Firing Process Initiation:
Commence the firing process by gradually increasing the kiln temperature, following a predetermined firing schedule tailored to the specific requirements of the clay and glazes being used. Monitor the kiln’s internal temperature using the integrated control systems, making any necessary adjustments to achieve the desired firing profile.
Read more: How To Build An Outdoor Shower
4. Temperature Ramp and Soak:
Implement temperature ramping and soaking periods as part of the firing schedule, allowing the kiln to reach and maintain specific temperatures for predetermined durations. These controlled heating and cooling phases are essential for achieving the desired effects on the pottery and ceramics, including the development of vibrant glaze colors and the consolidation of clay bodies.
5. Cooling and Unloading:
Upon completion of the firing process, initiate the cooling phase to gradually lower the kiln temperature, preventing thermal shock to the pottery pieces. Once the kiln has reached a safe temperature, carefully unload the fired pottery, taking precautions to handle the pieces with care and avoid any potential breakage or damage.
6. Post-Firing Inspection and Finishing:
Inspect the fired pottery pieces to assess the results of the firing process, examining the glaze surfaces, color development, and overall quality of the finished pieces. If necessary, perform additional finishing processes such as sanding, polishing, or applying additional decorative elements to enhance the final appearance of the pottery and ceramics.
By following these steps and embracing the art and science of kiln firing, you’ll unlock the full potential of your outdoor kiln, transforming raw clay into beautifully fired pottery and ceramics. The firing process is a testament to your craftsmanship and dedication, culminating in the creation of unique and enduring works of art that reflect your creative vision and expertise.
Conclusion
Congratulations on embarking on the fulfilling journey of building your very own outdoor kiln! Throughout this guide, we’ve delved into the intricacies of outdoor kiln construction, from selecting the ideal location to the meticulous process of firing pottery and ceramics. As you conclude this transformative endeavor, it’s essential to reflect on the knowledge and skills you’ve acquired and the boundless creative possibilities that lie ahead.
Building an outdoor kiln is a testament to craftsmanship, patience, and a deep appreciation for the art of pottery. The careful selection of materials, the precise assembly of the kiln structure, and the integration of ventilation and heating elements all culminate in the creation of a functional and efficient kiln that empowers you to bring your creative visions to life.
By constructing your outdoor kiln, you’ve gained a profound understanding of the firing process, the behavior of different types of clay and glazes, and the nuances of temperature control and kiln management. This knowledge not only enhances your capabilities as a potter or ceramic artist but also deepens your connection to the timeless tradition of kiln firing.
As you fire your pottery and ceramics in the outdoor kiln, you’ll witness the transformative power of heat and the alchemy of raw materials evolving into enduring works of art. Each firing becomes a testament to your dedication, skill, and creative expression, yielding unique pieces that bear the mark of your craftsmanship and ingenuity.
Moreover, the outdoor kiln serves as a focal point for artistic exploration and community engagement, offering a platform for sharing your passion with fellow enthusiasts, students, and aspiring artists. Its presence in your creative space becomes a source of inspiration and a testament to the enduring tradition of kiln firing that transcends generations.
As you continue to hone your craft and explore new horizons in pottery and ceramics, the outdoor kiln stands as a steadfast companion, ready to bring your artistic visions to fruition. Its enduring presence and unwavering functionality embody the timeless artistry and the enduring legacy of kiln firing, fostering a deep appreciation for the beauty and resilience of fired pottery and ceramics.
With your outdoor kiln as a beacon of creativity and craftsmanship, the possibilities for artistic expression and exploration are boundless. Embrace the art of kiln firing, cherish the process of creation, and let your outdoor kiln be a testament to the enduring tradition of pottery and ceramics.
Frequently Asked Questions about How To Build An Outdoor Kiln
Was this page helpful?
At Storables.com, we guarantee accurate and reliable information. Our content, validated by Expert Board Contributors, is crafted following stringent Editorial Policies. We're committed to providing you with well-researched, expert-backed insights for all your informational needs.


0 thoughts on “How To Build An Outdoor Kiln”