Home>Furniture & Design>Outdoor Furniture>How To Build An Outdoor Shed
Outdoor Furniture
How To Build An Outdoor Shed
Modified: October 18, 2024
Learn how to build an outdoor shed to store your outdoor furniture and design. Get expert tips and advice for creating the perfect outdoor storage solution.
(Many of the links in this article redirect to a specific reviewed product. Your purchase of these products through affiliate links helps to generate commission for Storables.com, at no extra cost. Learn more)
Introduction
Welcome to the exciting world of outdoor shed construction! Whether you're a seasoned DIY enthusiast or a novice looking to delve into the realm of outdoor furniture and design, building your own outdoor shed can be a rewarding and fulfilling endeavor. Not only does it provide practical storage space for your gardening tools, outdoor equipment, and seasonal items, but it also offers a canvas for expressing your creativity and design preferences.
In this comprehensive guide, we'll walk you through the step-by-step process of constructing an outdoor shed that seamlessly blends functionality with aesthetic appeal. From selecting the perfect location to adding the finishing touches, each stage of the construction journey will be demystified, empowering you to embark on this project with confidence.
Whether you envision a quaint garden shed nestled amidst lush foliage or a robust storage unit that complements your outdoor living space, this guide will equip you with the knowledge and insights needed to bring your vision to life. So, roll up your sleeves, gather your tools, and let's embark on this fulfilling and transformative journey of building an outdoor shed that reflects your personal style and meets your practical needs.
Key Takeaways:
- Planning and preparation are crucial for building an outdoor shed. Consider its purpose, local regulations, budget, design, materials, and tools to ensure a successful and enjoyable construction experience.
- Building an outdoor shed involves choosing the right location, gathering materials and tools, constructing the foundation and frame, adding walls and roof, installing doors and windows, and adding finishing touches. Each step contributes to creating a functional and visually appealing shed.
Read more: How Build A Shed
Planning and Preparation
Before diving into the construction process, meticulous planning and thorough preparation are essential to ensure a smooth and successful build. Here are the key steps to kickstart your outdoor shed project:
- Define Your Shed’s Purpose: Consider how you intend to use the shed. Will it primarily serve as a storage space for gardening tools, outdoor furniture, or seasonal items? Or do you envision a multifunctional space that can also accommodate a workshop or hobby area?
- Assess Local Regulations: Check with your local building authorities to understand any zoning restrictions, building codes, or permit requirements for constructing an outdoor shed. Compliance with these regulations is crucial to avoid potential legal issues down the road.
- Set a Realistic Budget: Determine the budget for your shed project, factoring in expenses for materials, tools, and any professional assistance you may require. Creating a comprehensive budget will help you manage costs effectively throughout the construction process.
- Sketch Your Shed Design: Take the time to sketch a rough design of your shed, considering its size, layout, and architectural style. This initial visualization will serve as a valuable reference point as you progress through the construction stages.
- Compile a Materials List: Based on your shed design, create a detailed list of required materials, such as lumber, roofing materials, hardware, and insulation. Accurately estimating the quantities and types of materials will streamline the procurement process.
- Organize Essential Tools: Ensure you have the necessary tools for the construction, including a hammer, tape measure, circular saw, level, drill, and safety gear. Having these tools readily available will facilitate a smooth workflow during the building phase.
By meticulously planning and preparing for your outdoor shed project, you lay a solid foundation for a successful and enjoyable construction experience. With these essential steps completed, you’re ready to move on to the next phase: choosing the right location for your shed.
Choosing the Right Location
When selecting the location for your outdoor shed, thoughtful consideration of various factors will ensure that your shed not only enhances the functionality of your outdoor space but also integrates harmoniously with its surroundings. Here’s what you need to keep in mind:
- Accessibility: Choose a location that provides convenient access to your shed. Whether you’re storing gardening tools, lawnmowers, or outdoor furniture, easy accessibility will streamline the process of retrieving and storing items.
- Proximity to Utilities: If you plan to incorporate electricity, lighting, or water supply into your shed, proximity to existing utility connections should be a key consideration. This will minimize the effort and cost of extending essential services to the shed.
- Exposure to Natural Light: Positioning your shed to receive ample natural light can create a more inviting and functional space. Consider the sun’s path throughout the day and orient the shed to optimize natural lighting, especially if you intend to use the interior for hobbies or workspace activities.
- Landscaping and Aesthetics: Integrate the shed seamlessly into your outdoor landscape by considering its visual impact. Whether nestled among trees, positioned against a fence, or integrated into a garden nook, the shed should complement the overall aesthetics of your outdoor environment.
- Foundation and Drainage: Assess the ground conditions to ensure proper drainage and a stable foundation for the shed. Avoid low-lying areas prone to water accumulation and aim for a level surface to facilitate the construction and long-term durability of the shed.
- Regulatory Compliance: Adhere to any local regulations or restrictions regarding shed placement, setbacks from property lines, and proximity to neighboring structures. Ensuring compliance will prevent potential conflicts and legal issues in the future.
By carefully evaluating these factors, you can pinpoint the optimal location for your outdoor shed, setting the stage for a seamless and functional integration within your outdoor space. With the location selected, you’re ready to embark on the next phase: gathering the materials and tools required for the construction process.
Gathering Materials and Tools
As you venture into the exciting phase of gathering materials and tools for your outdoor shed project, meticulous planning and attention to detail are paramount. By ensuring that you have the necessary components and equipment, you lay the groundwork for a smooth and efficient construction process. Here’s a comprehensive guide to help you assemble the essential materials and tools:
Materials
When compiling the materials for your outdoor shed, consider the following key components:
- Lumber and Structural Components: Select high-quality lumber for framing, flooring, and trusses. The specific dimensions and quantities will depend on the size and design of your shed.
- Roofing Materials: Choose durable and weather-resistant roofing materials, such as shingles or metal panels, to ensure long-term protection from the elements.
- Hardware and Fasteners: Stock up on nails, screws, anchors, and other fastening components required for assembling the shed’s structural elements and securing various fixtures.
- Doors and Windows: If your shed design includes doors and windows, ensure that you have these components on hand, along with any necessary hardware for installation.
- Insulation and Weatherproofing: Depending on your climate, consider insulation materials and weatherproofing elements to enhance the shed’s comfort and protection against temperature fluctuations and moisture.
- Exterior Finishes: Whether you opt for paint, stain, or other exterior finishes, procure the necessary materials to protect and enhance the aesthetic appeal of your shed.
Read more: How To Build A Shed
Tools
Equipping yourself with the right tools is essential for a successful construction endeavor. Here are the fundamental tools you’ll need:
- Measuring and Marking Tools: Ensure you have a tape measure, carpenter’s square, and marking tools to maintain precision throughout the construction process.
- Cutting and Shaping Tools: A circular saw, jigsaw, and hand saw will be indispensable for cutting lumber and other materials to the required dimensions.
- Fastening Tools: Stock up on a quality hammer, cordless drill, screwdriver set, and nail gun to facilitate efficient assembly and fastening of components.
- Leveling and Alignment Tools: A reliable level and plumb bob are essential for ensuring that your shed’s components are aligned and installed with precision.
- Safety Gear: Prioritize safety by obtaining protective gear, including goggles, work gloves, and a dust mask, to safeguard yourself during the construction process.
By methodically gathering the required materials and tools, you set the stage for a well-prepared and organized construction phase. With these essential components at your disposal, you’re ready to embark on the exciting journey of building the foundation for your outdoor shed.
Building the Foundation
The foundation serves as the cornerstone of your outdoor shed, providing stability and structural integrity. By laying a solid foundation, you ensure that your shed withstands the test of time and environmental elements. Here’s a comprehensive overview of the steps involved in constructing a sturdy shed foundation:
Evaluating Ground Conditions
Prior to commencing the foundation construction, assess the ground conditions to identify any irregularities or drainage issues. Ensure that the chosen location offers a level surface, free from excessive moisture or water accumulation. Addressing these factors at the outset will contribute to a stable and durable foundation.
Foundation Types
Depending on your shed design and local building codes, you may opt for a skid, concrete slab, or pier foundation. Each type offers distinct advantages and suitability based on the shed’s size, intended use, and environmental factors. Select the foundation type that aligns with your specific requirements and complements the shed’s structural design.
Read more: How To Build A Bar Shed
Construction Process
Once you’ve determined the foundation type, follow these general steps for construction:
- Site Preparation: Clear the designated area of any debris, rocks, or vegetation. Mark the perimeter of the foundation using stakes and string, ensuring precise dimensions based on your shed design.
- Excavation and Grading: If opting for a concrete slab foundation, excavate the area to the required depth, ensuring uniform grading and proper compaction of the soil. For skid or pier foundations, level the ground and prepare the support points accordingly.
- Formwork and Reinforcement: If pouring a concrete slab, construct formwork to contain the concrete. Install reinforcement, such as rebar or wire mesh, to enhance the slab’s strength and durability.
- Concrete Pouring and Finishing: Pour the concrete into the formwork, ensuring even distribution and smooth leveling. Finish the surface with a trowel to achieve a uniform and level foundation.
- Skid or Pier Installation: For skid or pier foundations, position and secure the support elements according to the shed’s layout, ensuring proper alignment and anchoring.
- Curing and Setting: Allow the concrete to cure and set as per the manufacturer’s recommendations, ensuring optimal strength and stability before proceeding to the next construction phase.
By meticulously executing the foundation construction process, you establish a robust base for your outdoor shed, setting the stage for the subsequent stages of frame construction and enclosure. With the foundation in place, you’re ready to elevate your shed project to the next level: constructing the frame.
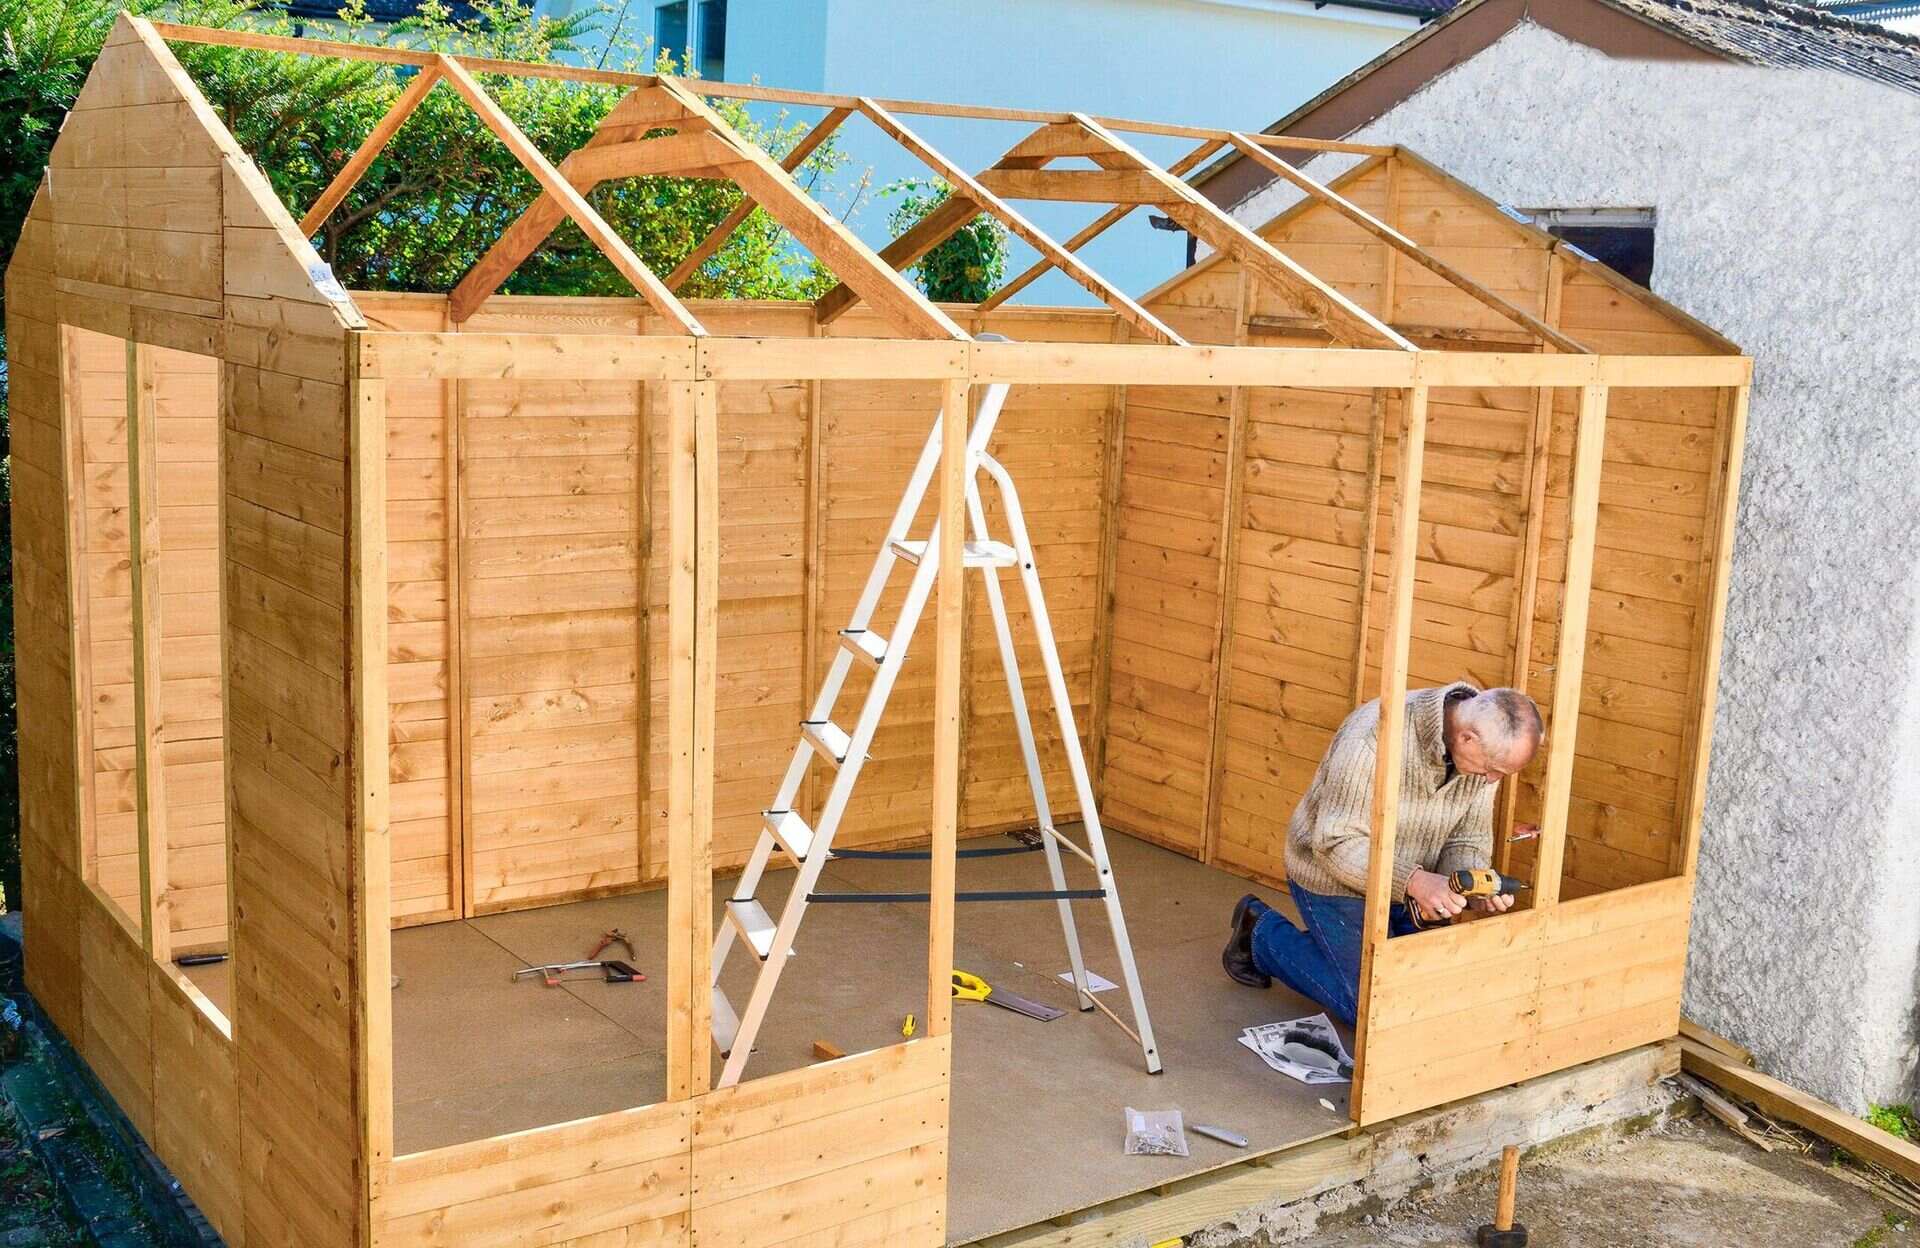
Constructing the Frame
The frame serves as the skeletal structure of your outdoor shed, providing support, strength, and the framework for the enclosure. As you embark on this pivotal phase of construction, precision and attention to detail are paramount to ensure a stable and durable frame. Here’s a comprehensive guide to constructing the frame for your outdoor shed:
Materials and Preparation
Prior to assembling the frame, gather the necessary lumber, fasteners, and tools. Ensure that the lumber is of high quality and suitable dimensions based on your shed design and structural requirements. With the materials at hand, prepare the work area by organizing the lumber and ensuring a clear, spacious layout for assembly.
Frame Assembly Process
Follow these fundamental steps to construct the frame:
- Measure and Cut Lumber: Accurately measure and mark the lumber based on your shed design’s specifications. Use a circular saw or appropriate cutting tools to achieve precise dimensions for the frame components.
- Assemble Wall Frames: Construct individual wall frames by aligning and securing the vertical studs, top and bottom plates, and any necessary bracing. Ensure that each wall frame is square and structurally sound before proceeding.
- Erect Wall Frames: With the individual wall frames completed, erect them in their designated positions, ensuring proper alignment and spacing. Secure the frames to the foundation and to each other, creating a unified structure.
- Add Roof Supports: Install the necessary roof supports, such as rafters or trusses, to provide the framework for the shed’s roof. Ensure that these components are securely attached to the wall frames and aligned according to the intended roof pitch.
- Bracing and Reinforcement: Incorporate diagonal bracing and reinforcement elements to enhance the frame’s stability and resistance to structural forces, such as wind loads and seismic activity, depending on your region’s requirements.
Read more: How To Build A Tuff Shed
Quality Assurance and Alignment
Throughout the frame construction process, prioritize quality assurance and alignment to ensure that the frame components are structurally sound and aligned with the shed’s design specifications. Use a level, plumb bob, and measuring tools to verify that the frame is true to the intended dimensions and angles.
By methodically constructing the frame with precision and attention to detail, you establish a robust and reliable framework for your outdoor shed. With the frame in place, you’re poised to advance to the next phase of enclosure and roofing, bringing your shed project one step closer to completion.
Adding Walls and Roof
As your outdoor shed takes shape, the addition of walls and the installation of the roof mark significant milestones in the construction process. These elements not only enclose the shed’s interior space but also provide protection from the elements and contribute to its structural integrity. Here’s a comprehensive overview of the steps involved in adding walls and installing the roof for your outdoor shed:
Wall Installation
With the frame in place, proceed to add walls to enclose the shed’s interior. Follow these essential steps for wall installation:
- Sheathing: Apply sheathing material, such as plywood or oriented strand board (OSB), to the exterior side of the wall frames. Secure the sheathing with appropriate fasteners, ensuring a solid and uniform attachment to the frame.
- Window and Door Openings: If your shed design includes windows and doors, carefully cut out the openings in the sheathing, following precise measurements and layout guidelines. Install appropriate headers and framing elements to accommodate the windows and doors.
- Vapor Barrier and Insulation: Depending on your climate and intended use of the shed, consider adding a vapor barrier and insulation within the wall cavities to enhance thermal efficiency and moisture control.
- Exterior Finishes: Apply exterior finishes, such as siding or cladding, to protect the walls from weather exposure and enhance the shed’s aesthetic appeal. Choose materials that complement your outdoor setting and provide long-term durability.
Roofing Installation
Once the walls are in place, shift your focus to installing the shed’s roof, a critical element for weather protection and structural stability. Follow these key steps for roofing installation:
- Roof Decking: Apply plywood or OSB as roof decking material, securing it to the roof supports, such as rafters or trusses. Ensure a solid and even attachment to provide a stable base for the roofing material.
- Weatherproofing: Install an appropriate weatherproofing underlayment, such as roofing felt or synthetic membrane, to protect the roof decking from moisture infiltration and enhance the shed’s resilience against the elements.
- Roofing Material: Select and install the roofing material of your choice, whether asphalt shingles, metal panels, or other roofing options. Follow manufacturer guidelines and best practices for proper installation and weatherproofing.
- Soffits and Fascia: Complete the roofing assembly by adding soffits and fascia to provide a finished look, protect the roof edges, and promote proper ventilation in the shed’s attic space.
By methodically adding walls and installing the roof, you transform the frame into a fully enclosed and weather-resistant structure, bringing your outdoor shed one step closer to serving its intended purpose. With the walls and roof in place, you’re poised to proceed to the next phase: installing doors and windows to further enhance the shed’s functionality and visual appeal.
Read more: How To Build Rafters For A Shed
Installing Doors and Windows
As you near the completion of your outdoor shed construction, the installation of doors and windows adds functionality, aesthetics, and ventilation to the enclosed space. These elements not only contribute to the shed’s visual appeal but also enhance its usability and comfort. Here’s a comprehensive guide to installing doors and windows for your outdoor shed:
Door Installation
The installation of doors is a pivotal step in providing convenient access to the shed’s interior and securing its contents. Follow these essential steps for door installation:
- Door Selection: Choose a door that suits your shed’s design and functional requirements. Whether opting for a pre-hung exterior door or constructing a custom door, ensure that it aligns with the shed’s dimensions and architectural style.
- Frame Preparation: Prepare the door frame by ensuring it is plumb, level, and securely anchored to the surrounding wall structure. Use shims and fasteners to achieve a stable and precise fit for the door.
- Hardware Installation: Mount the door onto the frame, ensuring smooth operation and a secure seal. Install appropriate hinges, handles, locks, and any additional hardware as per the door manufacturer’s guidelines.
- Weathertight Sealing: Apply weather-stripping and door seals to create a weathertight barrier, preventing drafts, moisture infiltration, and ensuring energy efficiency within the shed.
Window Installation
Windows not only introduce natural light and ventilation into the shed but also contribute to its visual appeal. Follow these key steps for window installation:
- Window Selection: Choose windows that complement the shed’s design and provide the desired level of natural light and ventilation. Consider factors such as size, style, and energy efficiency when selecting windows.
- Rough Opening Preparation: Prepare the rough openings in the wall sheathing to accommodate the windows, ensuring precise dimensions and proper support for the window frames.
- Window Mounting and Sealing: Install the windows within the rough openings, ensuring they are securely anchored and aligned. Apply caulking and weatherproofing seals around the window frames to prevent water infiltration and enhance the shed’s weather resistance.
- Operational Features: Verify that the windows operate smoothly, providing easy opening and closing mechanisms, as well as secure locking features for added safety and security.
By meticulously installing doors and windows, you elevate the functionality, comfort, and visual appeal of your outdoor shed, creating a welcoming and versatile space within your outdoor environment. With these key elements in place, your shed project is on the brink of completion, ready for the final phase: adding finishing touches to perfect the shed’s appearance and functionality.
Finishing Touches
As you approach the final stages of your outdoor shed construction, the addition of finishing touches serves to elevate the shed’s functionality, aesthetics, and overall appeal. These details not only contribute to the shed’s visual charm but also enhance its usability and durability. Here’s a comprehensive guide to adding finishing touches to perfect your outdoor shed:
Read more: How To Build A Roof For A Shed
Interior and Exterior Finishes
Applying interior and exterior finishes not only protects the shed from the elements but also adds character and visual appeal. Consider the following aspects when adding finishes:
- Exterior Protection: Apply a weather-resistant paint, stain, or protective finish to the exterior surfaces, safeguarding the shed against moisture, UV exposure, and environmental wear. Choose a finish that complements your outdoor setting and enhances the shed’s longevity.
- Interior Enhancements: Finish the interior surfaces with paint, sealant, or other appropriate materials to create a clean, bright, and inviting space. Consider adding shelving, storage solutions, or workbenches to optimize the shed’s functionality based on your specific needs.
- Trim and Molding: Install trim and molding elements to provide a polished look and conceal seams and joints. Well-executed trim work enhances the shed’s visual appeal and creates a cohesive and finished appearance.
Utility and Accessibility Features
Enhancing the shed’s utility and accessibility further contributes to its practicality and user-friendly design. Consider incorporating the following features:
- Electrical and Lighting: If desired, install electrical wiring, outlets, and lighting fixtures to illuminate the shed’s interior and provide power for tools, appliances, or other equipment.
- Ventilation Solutions: Ensure adequate ventilation by adding vents or louvers to regulate airflow and prevent moisture buildup within the shed. Proper ventilation contributes to a comfortable and healthy indoor environment.
- Ramps and Access Points: If the shed will store heavy equipment or tools, consider adding a ramp or optimizing access points to facilitate smooth entry and exit, ensuring convenience and safety.
Landscaping Integration
Integrate the shed seamlessly into its surroundings by considering the following landscaping aspects:
- Pathways and Paving: Create pathways or paving around the shed to facilitate access and enhance its visual integration with the outdoor space. Use materials that complement the shed’s design and blend harmoniously with the landscape.
- Plantings and Greenery: Soften the shed’s appearance by incorporating plantings, shrubs, or climbing vines near its exterior. Thoughtful landscaping adds natural charm and blends the shed into the surrounding environment.
By meticulously attending to these finishing touches, you bring your outdoor shed project to its culmination, creating a functional, visually appealing, and seamlessly integrated structure within your outdoor space. With the finishing touches complete, your outdoor shed stands ready to serve its intended purpose, enriching your outdoor living experience and reflecting your personal style and practical needs.
Conclusion
Congratulations on successfully completing the construction of your outdoor shed! The journey from planning and preparation to the final finishing touches has been a testament to your dedication, creativity, and craftsmanship. As you stand back and admire the fruits of your labor, it’s evident that your outdoor shed is not merely a functional storage space but a reflection of your vision and passion for outdoor living and design.
Throughout this transformative process, you’ve navigated a myriad of tasks, from selecting the perfect location and gathering materials to constructing the frame, adding walls and the roof, and installing doors and windows. Each step has contributed to the realization of a versatile and inviting space that seamlessly integrates into your outdoor environment.
As you bask in the satisfaction of your completed shed, it’s essential to recognize the multifaceted benefits it brings to your lifestyle. Beyond providing storage for tools and equipment, your shed offers a sanctuary for pursuing hobbies, tending to gardening endeavors, or simply retreating to a tranquil haven within your outdoor oasis.
Furthermore, the skills and knowledge you’ve gained from this project are invaluable, empowering you to undertake future endeavors with confidence and proficiency. Whether it’s embarking on additional outdoor construction projects, honing your woodworking skills, or exploring new design ventures, the experience gained from building your outdoor shed serves as a solid foundation for future creative pursuits.
Lastly, your outdoor shed stands as a testament to the power of personal expression and the fulfillment that comes from bringing a vision to life. As it weathers the seasons and becomes an integral part of your outdoor landscape, it will continue to embody the dedication and artistry invested in its creation, enriching your outdoor living space for years to come.
With your outdoor shed now ready to enhance your outdoor lifestyle, take a moment to revel in the sense of accomplishment and the boundless possibilities that this new space offers. Whether it’s organizing your gardening supplies, pursuing DIY projects, or simply savoring moments of tranquility within its walls, your outdoor shed is a testament to your creativity and a cherished addition to your outdoor haven.
Frequently Asked Questions about How To Build An Outdoor Shed
Was this page helpful?
At Storables.com, we guarantee accurate and reliable information. Our content, validated by Expert Board Contributors, is crafted following stringent Editorial Policies. We're committed to providing you with well-researched, expert-backed insights for all your informational needs.


0 thoughts on “How To Build An Outdoor Shed”