Home>Dining>Table Decor>How To Build Your Own C-Style End Table
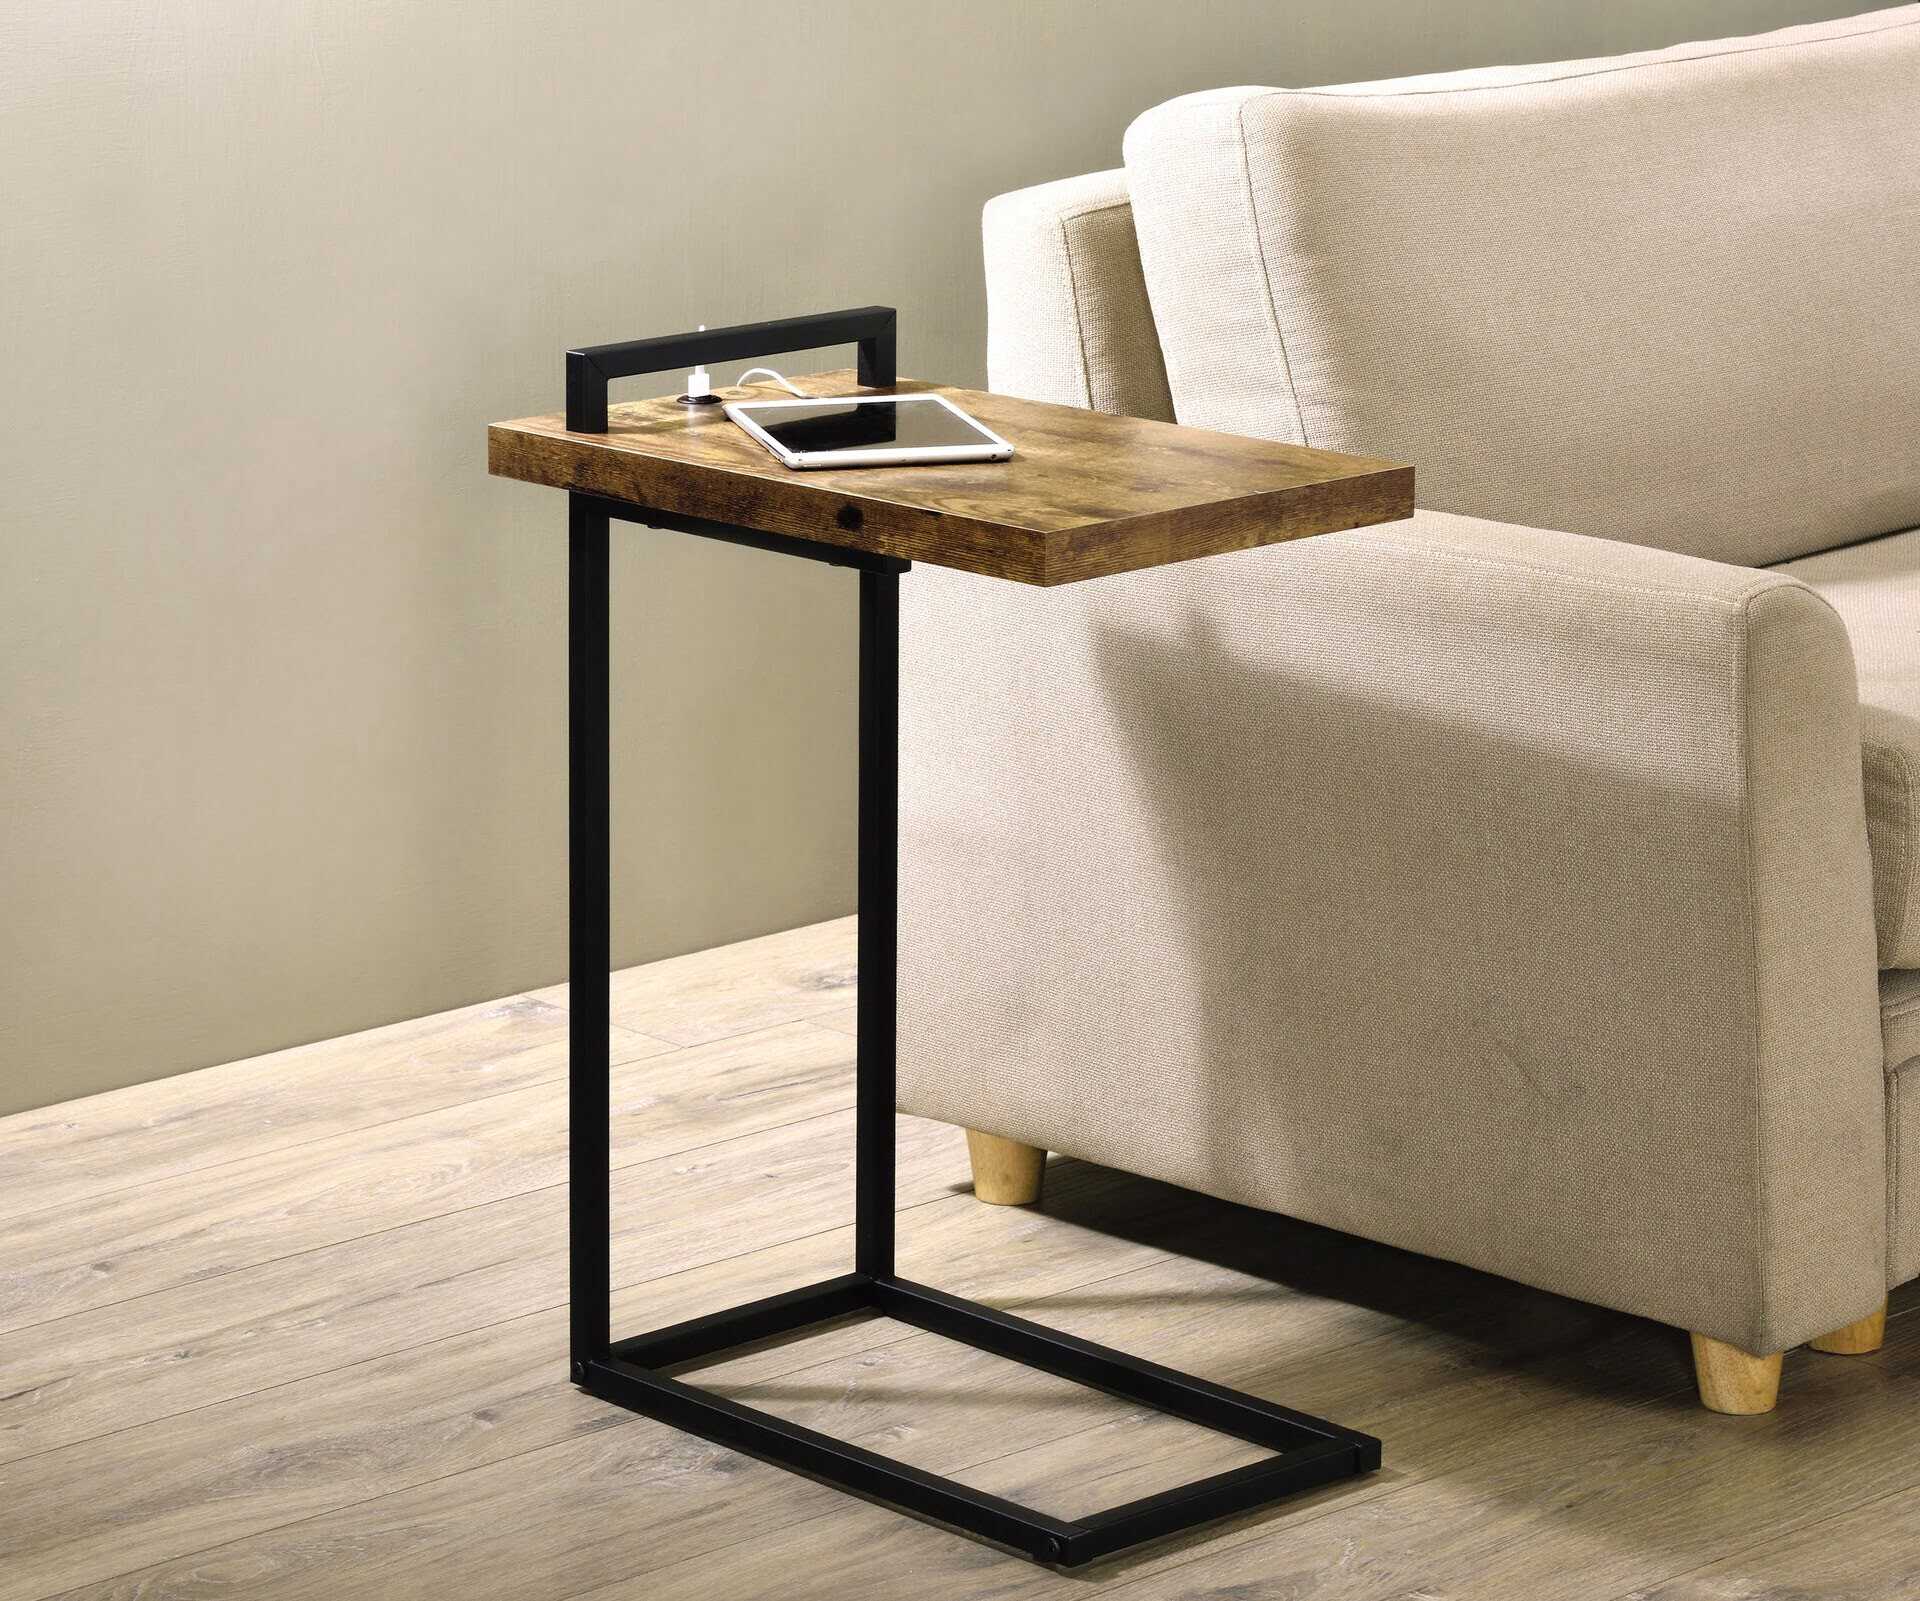
Table Decor
How To Build Your Own C-Style End Table
Modified: October 31, 2024
Learn how to create your own C-Style end table with step-by-step instructions and enhance your home decor with this stylish table. Discover unique table-decor ideas and unleash your creativity today!
(Many of the links in this article redirect to a specific reviewed product. Your purchase of these products through affiliate links helps to generate commission for Storables.com, at no extra cost. Learn more)
Introduction
Welcome to the world of DIY table decor! Building your own furniture can be a rewarding and fulfilling experience, and one piece that adds both functionality and style to any room is an end table. In this guide, we will walk you through the step-by-step process of creating your own C-style end table.
The C-style end table is a versatile and trendy design that adds a modern touch to any space. Its unique shape allows it to slide effortlessly under sofas or chairs, making it a convenient surface for drinks, books, or decorative items. Plus, by building your own C-style end table, you have the freedom to customize it to your preferred size, color, and finish.
Before we dive into the construction process, let’s go over the materials and tools you will need to complete this project:
Key Takeaways:
- Building a C-style end table allows for customization of size, color, and finish, providing a versatile and trendy addition to any space while saving money and adding a personal touch to your decor.
- By following the step-by-step process, you can learn woodworking skills, unleash your creativity, and enjoy the satisfaction of creating a functional and stylish piece of furniture that reflects your unique taste and personality.
Read more: How To Style A Two-Tiered End Table
Materials Needed
- 2 pieces of wooden boards (dimensions depend on desired table size)
- Wood screws
- Wood glue
- Sandpaper (various grits)
- Wood stain or paint
- Clear protective finish (such as polyurethane)
Tools Needed
- Measuring tape
- Saw (circular saw or miter saw)
- Drill
- Screwdriver
- Sandpaper block or electric sander
- Paintbrush or foam brush
Now that you have gathered all the necessary materials and tools, let’s get started on building your own C-style end table.
Key Takeaways:
- Building a C-style end table allows for customization of size, color, and finish, providing a versatile and trendy addition to any space while saving money and adding a personal touch to your decor.
- By following the step-by-step process, you can learn woodworking skills, unleash your creativity, and enjoy the satisfaction of creating a functional and stylish piece of furniture that reflects your unique taste and personality.
Read more: How To Style A Two-Tiered End Table
Materials Needed
Before you begin building your C-style end table, make sure you have all the necessary materials to complete the project. Here’s a list of what you’ll need:
- Wooden boards: You’ll need two pieces of wooden boards for the top and bottom of the table. The dimensions of the boards will depend on the desired size of your end table. Opt for high-quality and sturdy wood, such as oak or pine, for durability.
- Wood screws: These will be used to attach the different components of the table together. Make sure to choose screws that are appropriate for the thickness of the wood you are working with.
- Wood glue: This adhesive is essential for providing extra strength and stability to the joints of the table. Look for a strong wood glue that dries clear and bonds well with the type of wood you are using.
- Sandpaper: To achieve a smooth and polished finish, you’ll need sandpaper of various grits. Start with a coarse grit to remove any rough edges or imperfections, and gradually move to finer grits for a smoother surface.
- Wood stain or paint: Enhance the appearance of your end table with your choice of wood stain or paint. Stain will highlight the natural beauty of the wood grain, while paint allows you to add a pop of color to match your existing decor.
- Clear protective finish: A clear protective finish, such as polyurethane, will provide a layer of protection to your end table. It helps to prevent scratches, stains, and moisture damage, ensuring the longevity of your creation.
These are the basic materials you’ll need to build your C-style end table. However, feel free to personalize your project by adding additional elements such as decorative hardware, glass inserts, or even a drawer for extra storage.
Now that you have gathered all the necessary materials, it’s time to gather the tools you’ll need to bring your vision to life.
Tools Needed
Before you embark on building your C-style end table, it’s important to gather all the necessary tools to make the construction process smooth and efficient. Here are the tools you’ll need:
- Measuring tape: Accurate measurements are crucial for achieving the desired dimensions of your end table. A measuring tape will help ensure precision throughout the project.
- Saw: A saw is an essential tool for cutting the wooden boards to the desired size. Depending on your preference and availability, you can use a circular saw or a miter saw for straight, clean cuts.
- Drill: A drill will be used to create pilot holes for the screws, as well as for making any necessary adjustments during assembly. Opt for a cordless drill for easier maneuverability.
- Screwdriver: You’ll need a screwdriver to tighten the wood screws and secure the different components of your end table. Consider using a power screwdriver or a set of screwdriver bits for convenience.
- Sandpaper block or electric sander: To achieve a smooth finish, you’ll need sandpaper. A sanding block can be used for smaller areas, while an electric sander will expedite the sanding process for larger surfaces.
- Paintbrush or foam brush: If you choose to paint your end table, a paintbrush or foam brush will be necessary for applying the paint evenly and smoothly. Consider using brushes with different sizes for precision and coverage.
These are the essential tools you’ll need to construct your C-style end table. However, it’s always helpful to have some additional tools on hand, such as clamps for securing pieces together, a level for ensuring straight lines, and a carpenter’s square for precise measurements and angles.
Now that you have gathered all the necessary tools, you are ready to move on to the step-by-step construction process. Let’s get building!
Step 1: Measure and Cut the Wood
The first step in building your C-style end table is to measure and cut the wooden boards to the desired size. Follow these steps to ensure precise cuts:
- Start by measuring the width, height, and length of the table you want to build. Ensure that the measurements are accurate and align with your intended design.
- Using a measuring tape, mark the dimensions on the wooden boards. Double-check the measurements to avoid any mistakes.
- Once you have marked the dimensions, use a saw (such as a circular saw or a miter saw) to cut the boards accordingly. Take your time and make steady, controlled cuts to achieve clean edges.
- After cutting the top and bottom boards, verify that they are the correct size and fit together properly. Make any necessary adjustments at this stage before proceeding.
It is important to be precise with your measurements and cuts to ensure that the table components fit together seamlessly. Take your time during this step to achieve accurate results. Remember, you can always trim off a little more if needed, but it’s challenging to add material once it’s been cut.
Once you have measured and cut the wood to the appropriate dimensions, you are ready to move on to the next step: assembling the frame of your C-style end table.
When building a C-style end table, make sure to measure and cut your wood accurately to ensure a snug fit for the C-shaped design. Use a level to ensure the table is balanced and stable.
Step 2: Assemble the Frame
Now that you have the pieces of wood cut to the correct dimensions, it’s time to assemble the frame of your C-style end table. Follow these steps:
- Place the top and bottom boards parallel to each other, ensuring that they are aligned correctly.
- Apply a small amount of wood glue on the ends of the boards to create a strong bond. Spread the glue evenly using a brush or your finger.
- Secure the boards together using wood screws. Drill pilot holes first to prevent the wood from splitting, then carefully drive the screws into place.
- Double-check that the frame is level and square before tightening the screws completely. Use a carpenter’s square and a level to ensure accuracy.
With the frame assembled, you have the basic structure of your C-style end table. The wood glue and screws provide stability and strength to hold the table together. This step sets the foundation for the remaining components that will be added to complete the table.
Once you have successfully assembled the frame, you are ready to proceed to the next step: attaching the top and bottom boards to complete the structure of your C-style end table.
Step 3: Attach the Top and Bottom
Now that the frame of your C-style end table is securely assembled, it’s time to attach the top and bottom boards to complete the structure. Follow these steps:
- Apply a thin layer of wood glue along the top edges of the frame where the top board will be placed. This will ensure a strong bond between the frame and the top.
- Position the top board on the glued edges, making sure it is aligned correctly and centered on the frame.
- Secure the top board to the frame by driving wood screws through the frame and into the top board. Drill pilot holes to prevent any splitting or cracking of the wood.
- Repeat the same process to attach the bottom board to the frame, ensuring it is aligned properly and centered.
By attaching the top and bottom boards to the frame, you are completing the overall structure of the C-style end table. The wood glue and screws provide additional stability and strength, ensuring that the boards remain securely in place.
Before moving on to the next step, take a moment to double-check that both the top and bottom boards are attached securely and that the table is level. Making any necessary adjustments at this stage will save you time and effort later on.
Now that the top and bottom boards are attached, your C-style end table is starting to take shape. It’s time to move on to the next step: sanding and finishing the table to create a smooth and polished surface.
Step 4: Sand and Finish
With the structure of your C-style end table complete, it’s time to sand and finish the wood to achieve a smooth and polished surface. Follow these steps to bring out the natural beauty of the wood:
- Start by using coarse-grit sandpaper to remove any rough edges or imperfections on the surface of the table. Sand in the direction of the wood grain to achieve a consistent and even result.
- Gradually move to finer grit sandpaper to smooth out the surface further. This will help to create a silky and touchable finish.
- After sanding, wipe down the entire table with a clean, damp cloth to remove any dust or debris. This step is crucial to ensure a clean working surface for the finishing stage.
- Now it’s time to apply the finish. If you prefer a natural look, you can use wood stain to enhance the color and grain of the wood. Apply the stain evenly using a brush or cloth and let it dry according to the manufacturer’s instructions. For a painted finish, apply your chosen paint color, allowing each coat to dry completely before applying the next.
- Once the stain or paint is dry, apply a clear protective finish, such as polyurethane, to seal and protect the wood. Follow the manufacturer’s instructions for the best application method. This finish adds durability and enhances the overall appearance of the table.
After completing the sanding and finishing process, take a moment to inspect the table for any touch-ups or areas that need additional attention. Sanding and finishing provide a professional touch and protect the wood from wear and tear, ensuring your C-style end table will last for years to come.
Now that you have beautifully sanded and finished your end table, it’s time for the final step: adding optional design details to personalize your creation.
Read more: Who Owns C And C Home Improvements
Step 5: Optional Design Details
Congratulations! You have successfully built and finished your own C-style end table. Now it’s time to add optional design details to personalize and enhance the overall look of your creation. Here are a few ideas to consider:
- Hardware: Consider adding decorative hardware, such as drawer pulls or knobs, to the table. This can add a touch of elegance or a rustic charm, depending on your style preference.
- Glass Inserts: If you want to add a unique element to your end table, consider incorporating glass inserts into the top or sides of the table. This can create an interesting visual effect and add a touch of sophistication.
- Painted Accents: Get creative by adding painted accents to your end table. You can paint designs, patterns, or even a monogram to make it truly one-of-a-kind.
- Storage Options: If you’re looking to maximize functionality, consider adding a small drawer or a shelf beneath the table. This provides additional storage space for small items like magazines, remote controls, or coasters.
- Decorative Legs: Instead of traditional straight legs, you can experiment with different styles of legs to give your end table a unique look. Consider tapered, turned, or hairpin legs for added visual interest.
Remember, these design details are optional and completely customizable based on your personal style and preferences. Feel free to think outside the box and let your creativity shine!
Once you have added any desired design details, take a step back and admire your stunning C-style end table. You have successfully built a functional and stylish piece of furniture that will be a focal point in any room.
Now that you’ve completed all the steps, it’s time to share your creation with others! Whether you showcase it in your living room, office, or any other space, your DIY C-style end table is sure to impress.
Remember, building furniture takes time and practice, so don’t be afraid to experiment with different techniques and designs. Enjoy the process, and let your creativity guide you. Happy building!
Conclusion
Congratulations on completing your own C-style end table! By following the step-by-step process outlined in this guide, you have successfully built a functional and stylish piece of furniture that adds both functionality and personality to your space. Not only did you save money by building it yourself, but you also have the satisfaction of creating something unique and tailored to your taste.
Throughout this journey, you learned how to measure and cut the wood, assemble the frame, attach the top and bottom boards, sand and finish the table, and even add optional design details to personalize your creation. These skills can be applied to future woodworking projects, allowing you to continue building and expanding your DIY repertoire.
Remember, when it comes to woodworking, practice makes perfect. Don’t be discouraged if your first attempt isn’t flawless—each project presents an opportunity to learn and improve. Take pride in your accomplishments and continue honing your skills.
Lastly, don’t forget to enjoy the process! Building your own furniture is not only a practical endeavor but also a creative outlet. Let your imagination run wild and explore different design possibilities. Whether you stick with a classic and timeless look or opt for a more eclectic and unique style, the choice is yours.
Now that you have completed your C-style end table, it’s time to show it off and enjoy its functionality and beauty. Place it in your living room, bedroom, or any other area where it can serve as a conversation piece and a functional addition to your home.
Thank you for embarking on this DIY journey with us. We hope that this guide has empowered and inspired you to continue exploring the world of furniture building and unleash your creative potential. Happy crafting!
Frequently Asked Questions about How To Build Your Own C-Style End Table
Was this page helpful?
At Storables.com, we guarantee accurate and reliable information. Our content, validated by Expert Board Contributors, is crafted following stringent Editorial Policies. We're committed to providing you with well-researched, expert-backed insights for all your informational needs.


0 thoughts on “How To Build Your Own C-Style End Table”