Home>Furniture & Design>Outdoor Furniture>How To Frame Outdoor Kitchen With Metal Studs
Outdoor Furniture
How To Frame Outdoor Kitchen With Metal Studs
Modified: August 27, 2024
Learn how to frame an outdoor kitchen with metal studs for durable and stylish outdoor furniture and design. Discover expert tips and techniques for a sturdy and long-lasting outdoor living space.
(Many of the links in this article redirect to a specific reviewed product. Your purchase of these products through affiliate links helps to generate commission for Storables.com, at no extra cost. Learn more)
**
Introduction
**
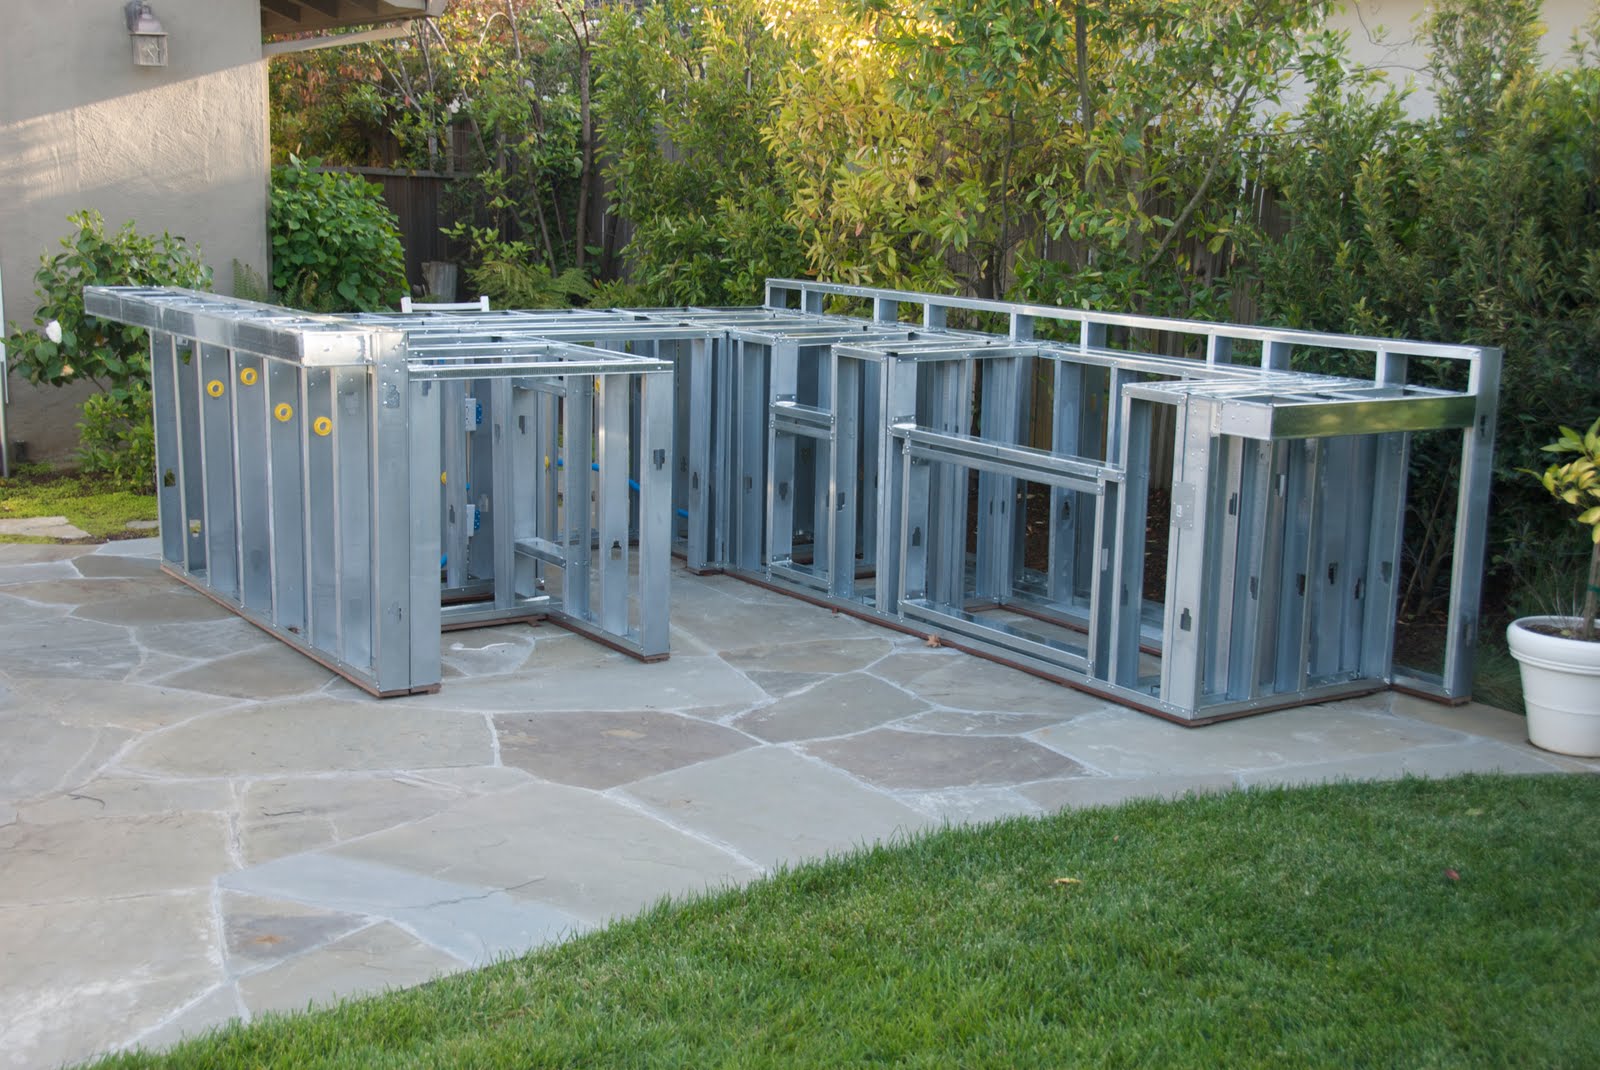
When it comes to creating an outdoor kitchen, using metal studs to frame the structure offers numerous benefits. Not only are metal studs durable and resistant to pests and rot, but they also provide a strong and stable framework for your outdoor culinary space. This comprehensive guide will walk you through the process of framing an outdoor kitchen with metal studs, from the initial planning stages to the final installation of the sheathing. By following these steps, you can ensure that your outdoor kitchen is not only visually stunning but also built to last.
Throughout this article, we will explore the materials and tools needed for the project, delve into the crucial aspects of planning and design, and provide detailed instructions for building the frame and installing the sheathing. Whether you are a seasoned DIY enthusiast or embarking on your first outdoor construction project, this guide will equip you with the knowledge and confidence to create a functional and stylish outdoor kitchen using metal studs. Let's dive into the exciting world of outdoor design and construction, where creativity meets practicality in the form of a stunning outdoor kitchen.
**
Key Takeaways:
- Building an outdoor kitchen with metal studs provides durability, resistance to pests, and a strong framework. Meticulous planning, precise frame assembly, and sheathing installation are crucial for a successful project.
- Attention to detail, creativity, and a touch of craftsmanship are essential for framing an outdoor kitchen with metal studs. The process opens the door to diverse outdoor design possibilities tailored to individual preferences and lifestyle needs.
Materials and Tools Needed
**
Before embarking on the journey of framing an outdoor kitchen with metal studs, it’s essential to gather the necessary materials and tools. Here’s a comprehensive list to ensure you have everything required for a successful project:
Materials:
- Metal studs: These will form the backbone of your outdoor kitchen’s frame. Opt for galvanized steel studs, as they offer superior resistance to rust and corrosion.
- Track and stud fasteners: These will be used to secure the metal studs in place, providing stability and support for the frame.
- Sheathing material: Choose a suitable sheathing material, such as cement board or weather-resistant plywood, to enclose the frame and provide a surface for finishing materials.
- Insulation (optional): Depending on your climate, you may opt to include insulation to regulate the temperature within the outdoor kitchen.
- Weatherproofing materials: Sealant and flashing will help protect the frame from the elements, ensuring longevity and durability.
- Screws and nails: These will be used to secure the sheathing material to the frame, as well as for various other fastening needs throughout the project.
- Concrete mix: If your outdoor kitchen includes a concrete countertop, you’ll need concrete mix to create a sturdy and durable surface.
- Finishing materials: Depending on your design preferences, you may require materials such as stucco, stone veneer, or tile for the exterior of the outdoor kitchen.
Tools:
- Power drill and screwdriver bits
- Stud finder
- Level
- Tape measure
- Hammer
- Circular saw or tin snips for cutting metal studs
- Utility knife
- Safety goggles and work gloves
- Workbench or sawhorses for cutting and assembling materials
- Paintbrushes and rollers for applying sealant and finishing materials
- Extension cords and lighting for working in dimly lit areas
- Personal protective equipment, including a dust mask and ear protection
By ensuring that you have all the necessary materials and tools at your disposal, you can streamline the construction process and minimize potential delays. With these essentials in hand, you’re ready to move on to the planning and design phase of framing your outdoor kitchen with metal studs.
**
Planning and Design
**
Before diving into the physical construction of your outdoor kitchen frame, meticulous planning and thoughtful design are crucial to the success of the project. Here are the key considerations to take into account during the planning and design phase:
Layout and Functionality: Begin by envisioning how you intend to use your outdoor kitchen. Consider the layout, cooking appliances, storage space, and any additional features you wish to incorporate, such as a sink or bar area. This will guide the dimensions and overall design of the frame.
Location and Accessibility: Select a suitable location for your outdoor kitchen, keeping in mind factors such as proximity to the indoor kitchen, prevailing wind direction, and access to utilities such as water and electricity. Ensure that the layout promotes seamless movement and interaction within the outdoor cooking space.
Building Codes and Permits: Familiarize yourself with local building codes and regulations pertaining to outdoor structures. Determine whether a building permit is required for your project and ensure compliance with relevant guidelines to avoid any legal issues down the line.
Material Selection: Choose the appropriate metal stud dimensions and sheathing material based on the intended design and environmental factors. Consider the visual aesthetics, durability, and maintenance requirements of the materials to align with your long-term vision for the outdoor kitchen.
Integration with Surroundings: Harmonize the design of the outdoor kitchen frame with the existing landscape and architectural features of your property. Whether you prefer a seamless blend or a striking contrast, the design should complement the overall aesthetic appeal of your outdoor living space.
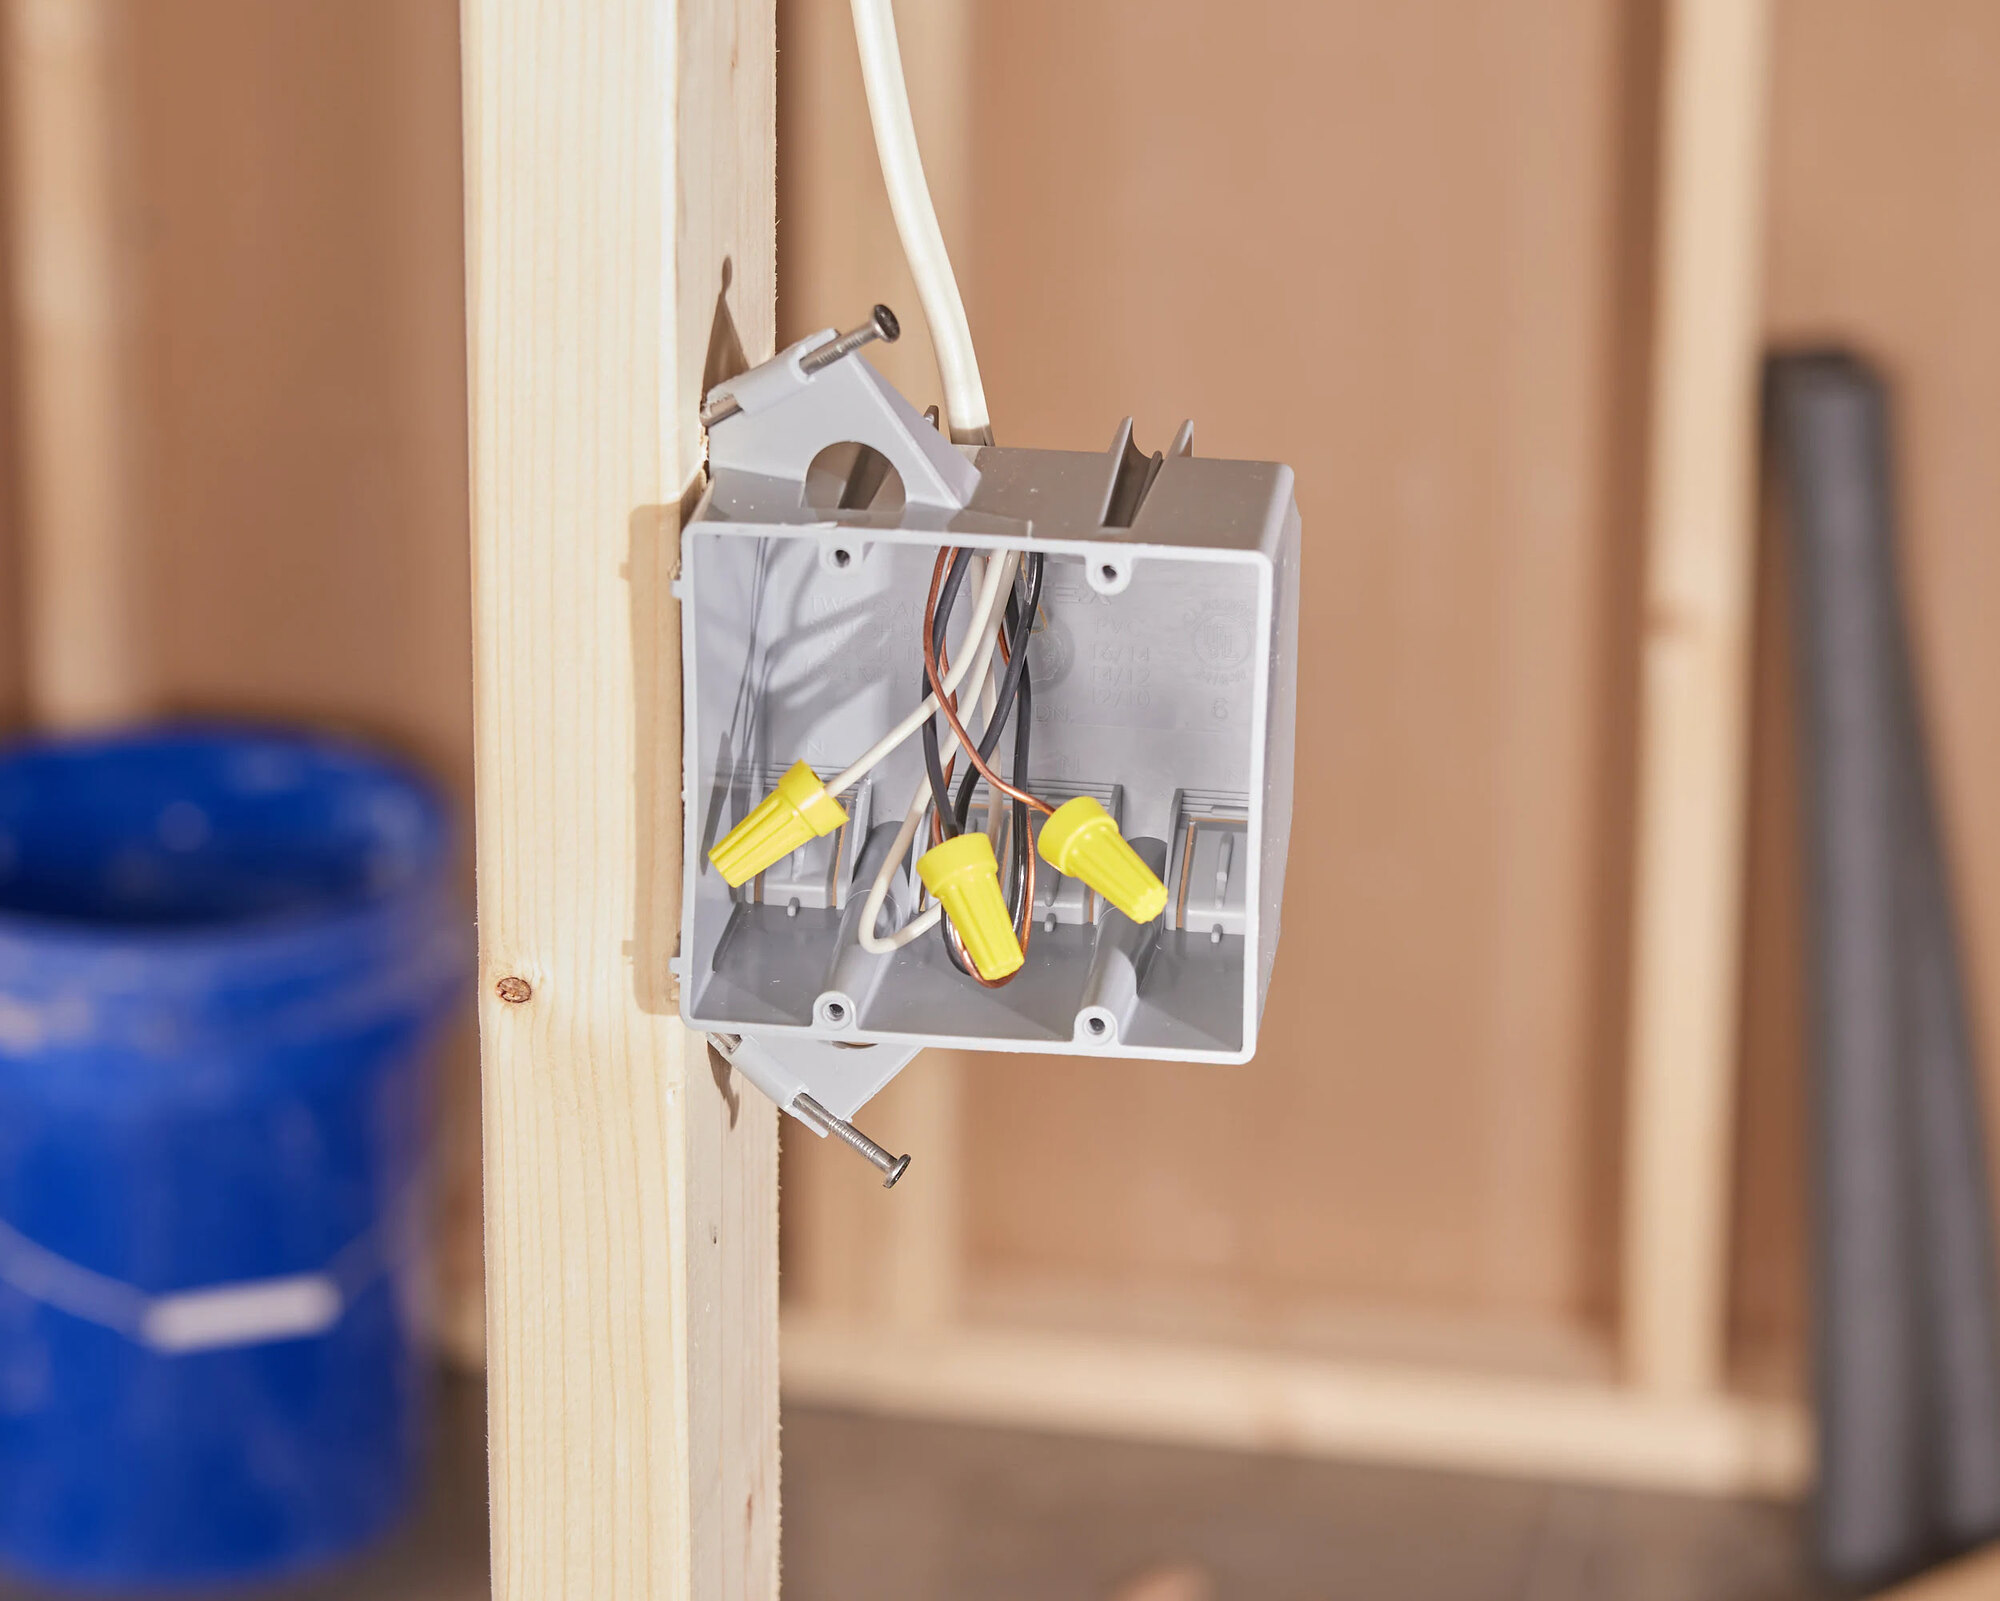
Utility Connections: If your outdoor kitchen will include utilities such as a gas line, water supply, or electrical outlets, plan for their integration into the frame design. Consult with professionals if necessary to ensure safe and code-compliant installations.
Future Expansion and Upgrades: Anticipate potential future upgrades or expansions of your outdoor kitchen. Incorporate flexibility into the design to accommodate new features or modifications, allowing the space to evolve along with your culinary preferences and lifestyle.
By meticulously addressing these aspects during the planning and design phase, you can lay a solid foundation for the construction of your outdoor kitchen frame with metal studs. This thoughtful approach will not only streamline the building process but also result in a functional, visually appealing, and harmoniously integrated outdoor culinary haven.
**
When framing an outdoor kitchen with metal studs, use pressure-treated lumber for the base plates to prevent moisture damage. This will ensure the durability and longevity of your outdoor kitchen structure.
Building the Frame
**
With the planning and design phase complete, it’s time to embark on the exciting process of building the frame for your outdoor kitchen using metal studs. Follow these step-by-step guidelines to ensure a sturdy and well-constructed frame:
1. Marking the Layout: Begin by marking the layout of the outdoor kitchen on the ground, using stakes and string to outline the perimeter. This visual guide will help you accurately position the metal studs and track during the assembly process.
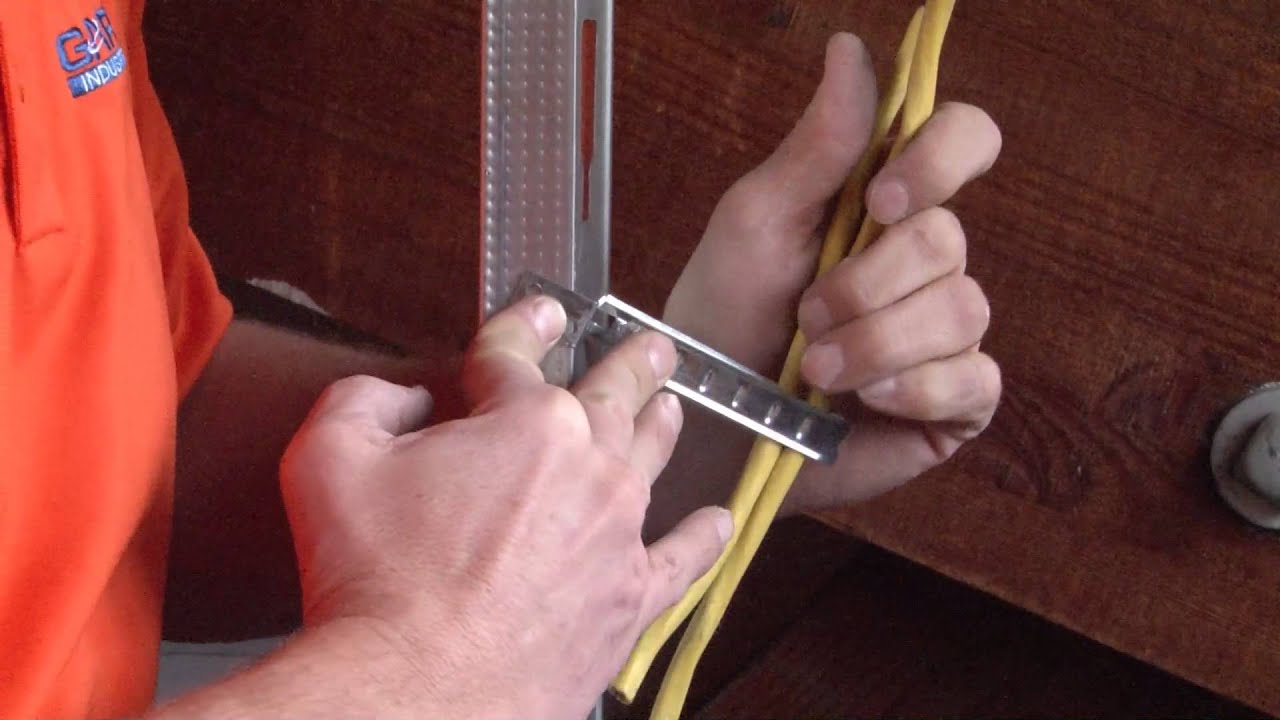
2. Cutting and Assembling the Metal Studs: Using a circular saw or tin snips, cut the metal studs to the appropriate lengths based on your design and layout. Assemble the cut studs and tracks according to the marked layout, ensuring that they are plumb and level as you secure them in place.
3. Securing the Frame: Utilize track and stud fasteners to secure the metal studs in place, maintaining the structural integrity of the frame. Double-check the alignment and stability of the frame components as you progress, making any necessary adjustments to ensure a solid foundation for the outdoor kitchen.
4. Reinforcing Corners and Intersections: Pay special attention to reinforcing the corners and intersections of the frame, as these areas are crucial for maintaining the overall stability of the structure. Additional fasteners and bracing may be required to fortify these critical points.
5. Integrating Support for Appliances and Countertops: If your outdoor kitchen will accommodate heavy appliances or countertops, incorporate additional supports within the frame to bear the weight effectively. Consult the specifications provided by appliance manufacturers to ensure proper support and clearance.
6. Verifying Alignment and Plumbness: Throughout the assembly process, consistently verify the alignment and plumbness of the frame using a level and measuring tools. This meticulous attention to detail will result in a well-balanced and visually appealing structure.
7. Inspecting for Structural Integrity: Once the frame is fully assembled, conduct a comprehensive inspection to ensure its structural integrity. Look for any signs of misalignment, instability, or inadequate fastening, addressing any issues promptly to guarantee a secure and reliable frame.
By meticulously following these steps and maintaining a keen eye for precision and stability, you can construct a robust and well-engineered frame for your outdoor kitchen using metal studs. With the frame in place, you’re ready to proceed to the next crucial phase: installing the sheathing to enclose the structure and prepare it for finishing materials.
**
Installing the Sheathing
**
With the frame of your outdoor kitchen securely in place, the next vital step is to install the sheathing, which will enclose the structure and provide a stable surface for finishing materials. Follow these essential guidelines to ensure a successful sheathing installation:
1. Selecting the Sheathing Material: Choose a suitable sheathing material, such as cement board or weather-resistant plywood, based on your design preferences and the environmental conditions of your location. Ensure that the sheathing material is compatible with the intended finishing materials and provides adequate protection for the frame.
2. Measuring and Cutting: Measure the dimensions of the areas that require sheathing and carefully cut the material to fit accurately. Use a circular saw or appropriate cutting tools to achieve clean and precise cuts, ensuring a snug and seamless fit against the frame.
3. Attaching the Sheathing: Secure the sheathing material to the frame using screws or nails, ensuring that it is firmly attached and flush with the edges of the frame. Follow the recommended spacing and fastening guidelines provided by the sheathing manufacturer to maintain structural integrity and weather resistance.
4. Sealing and Weatherproofing: Apply a suitable sealant to the seams and edges of the sheathing to prevent moisture infiltration and enhance the overall weatherproofing of the structure. Pay particular attention to areas where different sheathing panels meet, creating a continuous barrier against the elements.
5. Reinforcing Load-Bearing Areas: If your outdoor kitchen design includes heavy appliances or countertops, reinforce the load-bearing areas of the sheathing to provide additional support. This may involve integrating additional framing or bracing behind the sheathing to ensure stability and longevity.
6. Preparing for Finishing Materials: Once the sheathing is securely installed and weatherproofed, the structure is primed for the application of finishing materials such as stucco, stone veneer, or tile. Ensure that the sheathing surface is clean, level, and ready to receive the chosen finishing treatments for a polished and visually striking exterior.
7. Final Inspection and Touch-Ups: Conduct a thorough inspection of the sheathing installation, checking for any protruding fasteners, uneven seams, or imperfections that require attention. Make any necessary touch-ups or adjustments to achieve a flawless and uniform sheathing surface.
By meticulously following these steps and paying attention to detail during the sheathing installation, you can ensure that the frame of your outdoor kitchen is effectively enclosed and prepared for the application of finishing materials. With the sheathing in place, you’re one step closer to realizing your vision of a functional and aesthetically pleasing outdoor culinary space.
**
Read more: How To Attach Insulation To Metal Studs
Conclusion
**
Embarking on the journey of framing an outdoor kitchen with metal studs is an endeavor that blends creativity, practicality, and craftsmanship. By following the comprehensive guidelines outlined in this guide, you have gained valuable insights into the essential steps involved in this rewarding construction process. From meticulous planning and precise frame assembly to the installation of sheathing, each phase contributes to the creation of a durable, visually appealing, and functional outdoor culinary haven.
As you reflect on the journey thus far, it’s important to celebrate the progress made and the knowledge acquired. Framing an outdoor kitchen with metal studs not only expands your skill set as a DIY enthusiast but also opens the door to endless possibilities for outdoor design and construction projects. The fusion of metal studs’ durability and the flexibility of design allows for the realization of diverse outdoor kitchen visions, tailored to suit individual preferences and lifestyle needs.
Looking ahead, the completion of the frame and sheathing installation sets the stage for the exciting phase of applying finishing materials, such as stucco, stone veneer, or tile, to bring your outdoor kitchen to life. This transformative process will infuse the structure with character, charm, and a distinct personality, elevating it from a functional space to a captivating outdoor focal point.
As you continue your journey, remember that attention to detail, precision, and a touch of creativity will guide you towards the realization of your outdoor kitchen dreams. Whether you envision a sleek modern design, a rustic culinary retreat, or a vibrant outdoor entertainment space, the versatility of metal studs provides a sturdy canvas for bringing your vision to fruition.
With this guide as your companion, you are well-equipped to navigate the remaining phases of the project with confidence and enthusiasm. Embrace the opportunity to craft a space where culinary delights, gatherings with loved ones, and cherished memories converge under the open skies.
As the finishing touches adorn the frame, the heart of your outdoor kitchen will beat with the promise of shared meals, laughter, and the joy of outdoor living. So, as you venture forth, may your outdoor kitchen with metal studs become a testament to your creativity, craftsmanship, and the art of blending the indoors with the great outdoors.
Frequently Asked Questions about How To Frame Outdoor Kitchen With Metal Studs
Was this page helpful?
At Storables.com, we guarantee accurate and reliable information. Our content, validated by Expert Board Contributors, is crafted following stringent Editorial Policies. We're committed to providing you with well-researched, expert-backed insights for all your informational needs.


0 thoughts on “How To Frame Outdoor Kitchen With Metal Studs”