Articles
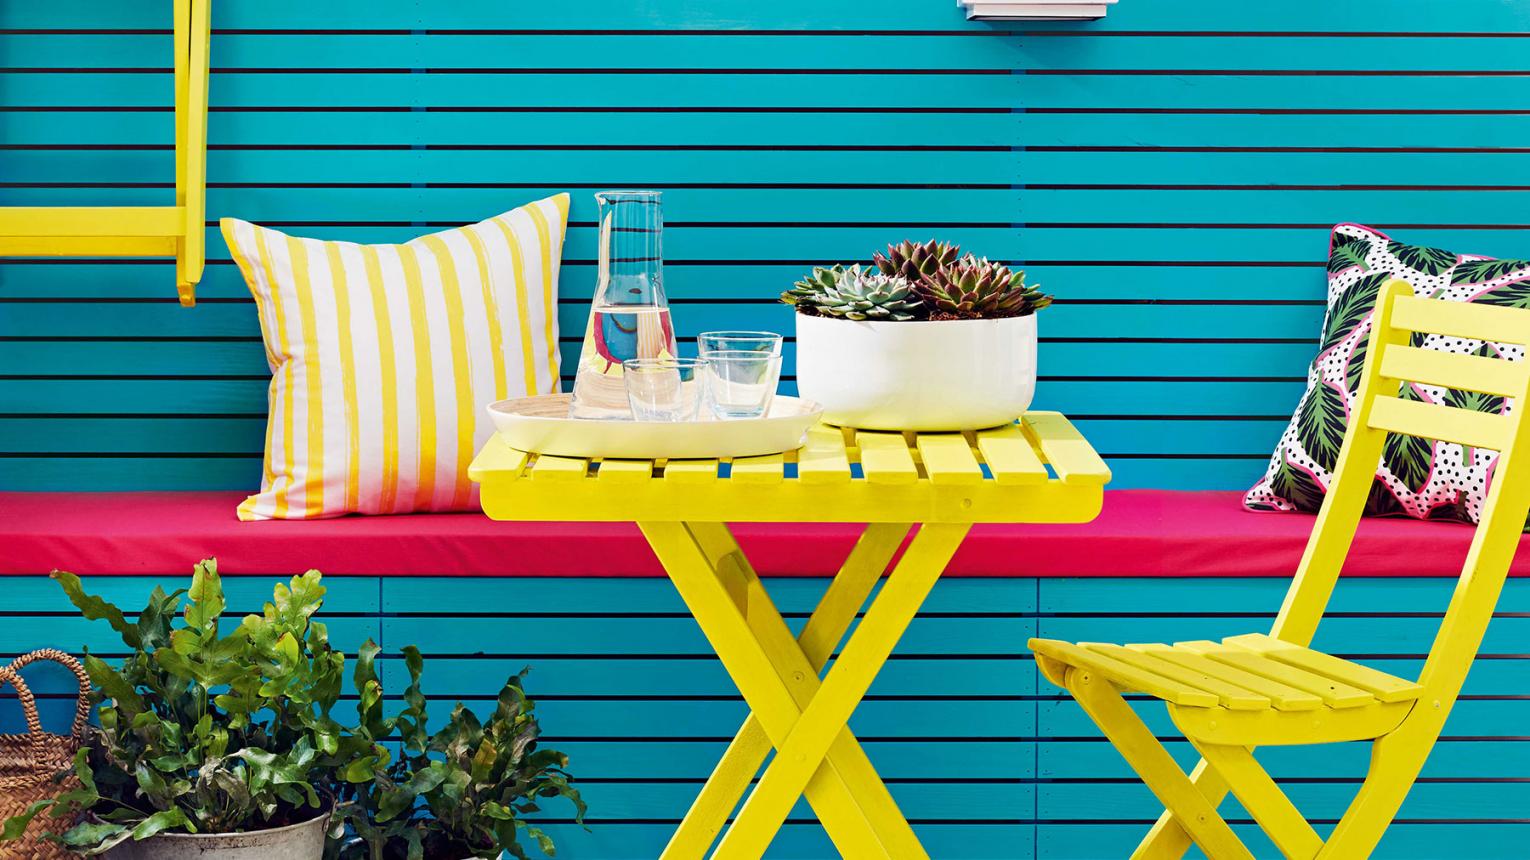
How To Paint Outdoor Metal Furniture
Modified: September 2, 2024
Learn how to paint your outdoor metal furniture with our step-by-step guide. Transform your worn-out pieces into stunning masterpieces with our expert tips and techniques. Perfect for reviving your #furniture!
(Many of the links in this article redirect to a specific reviewed product. Your purchase of these products through affiliate links helps to generate commission for Storables.com, at no extra cost. Learn more)
Introduction
Furniture is an essential component of any living space, and outdoor furniture adds a touch of elegance and comfort to your outdoor areas. Among the various types of outdoor furniture, metal furniture stands out for its durability, versatility, and aesthetic appeal. However, over time, outdoor metal furniture may start to show signs of wear and tear due to constant exposure to the elements.
One effective way to refresh and revive the appearance of your outdoor metal furniture is by giving it a fresh coat of paint. Painting outdoor metal furniture not only enhances its visual appeal but also provides a protective layer against rust and corrosion.
In this article, we will guide you on how to paint outdoor metal furniture to ensure a beautiful and long-lasting result. From preparation to finishing touches, we will cover all the steps necessary to transform your tired-looking metal furniture into a stunning focal point in your outdoor space.
Before we dive into the step-by-step process, it’s important to note that different types of metal furniture may require slightly different approaches when it comes to preparation and painting. Additionally, the specific condition of your outdoor metal furniture will also influence the steps required. Therefore, it’s essential to assess the condition of your furniture and choose the appropriate techniques accordingly.
Are you ready to give your outdoor metal furniture a fresh lease on life? Let’s get started!
Key Takeaways:
- Revive and transform your outdoor space by painting outdoor metal furniture. Follow proper techniques for preparation, painting, and finishing touches to achieve a professional-looking and durable result.
- Maintain the beauty and longevity of your painted outdoor metal furniture with regular cleaning, protection from harsh weather, and timely touch-ups. Enjoy the process and create a stunning outdoor haven.
Preparation
Proper preparation is crucial to achieve a long-lasting and professional-looking finish when painting outdoor metal furniture. Before you start painting, gather all the necessary tools and materials:
- Protective clothing, including gloves, goggles, and a face mask
- Drop cloths or plastic sheets to protect the surrounding area
- High-quality paint brushes and/or paint sprayer
- Sandpaper or a sanding sponge
- Paint primer specific to metal surfaces
- Outdoor metal paint in your desired color
- A bucket of soapy water and a sponge or soft cloth for cleaning
- Rust remover and a wire brush for rusted areas (if necessary)
Once you have gathered all your supplies, it’s time to prepare the metal surface for painting. Here are the steps to follow:
- Clean the metal surface
- Remove rust and flaking paint (if applicable)
- Sand the surface
- Apply a primer
Continue reading to learn more about each step in detail.
Cleaning the Metal Surface
Before you can start painting, it’s essential to clean the metal surface to remove any dirt, debris, or grease. Use a bucket of soapy water and a sponge or soft cloth to gently scrub the entire surface. Pay close attention to corners, crevices, and textured areas where dirt may accumulate. Rinse thoroughly with clean water and allow it to dry completely.
Removing Rust and Flaking Paint
If your outdoor metal furniture has any rust spots or areas with flaking paint, it’s important to address them before painting. Use a rust remover and a wire brush to remove any existing rust. Apply the rust remover according to the manufacturer’s instructions and scrub the affected areas with the wire brush until the rust is completely removed. For flaking paint, gently scrape off the loose paint using a putty knife or scraper.
Sanding the Surface
After cleaning and removing any rust or flaking paint, it’s time to sand the metal surface. Sanding helps create a smooth and even surface, ensuring better adhesion of the paint. Use medium-grit sandpaper or a sanding sponge to gently sand the entire surface of the furniture. Pay attention to any rough areas or imperfections and sand them until smooth. Remember to wipe away any dust or debris before moving on to the next step.
Applying a Primer
Priming the metal surface is crucial to enhance the bond between the metal and the paint, ensuring better durability and longevity of the finish. Choose a high-quality primer specifically designed for metal surfaces. Apply the primer using a brush or a paint sprayer, following the manufacturer’s instructions. Apply a thin and even coat, covering the entire surface of the furniture. Allow the primer to dry completely before moving on to the next step. The drying time may vary depending on the primer used, so refer to the product instructions for guidance.
Once you have completed the preparation steps, your outdoor metal furniture is now ready for painting. In the next section, we will discuss different painting techniques to achieve a professional-looking finish.
Cleaning the Metal Surface
Before embarking on the process of painting your outdoor metal furniture, it is essential to ensure that the surface is thoroughly cleaned. Over time, outdoor furniture can accumulate dirt, grime, and other contaminants, making it imperative to clean the metal surface before applying any paint. Follow these steps to effectively clean your outdoor metal furniture:
- Gather your cleaning supplies.
- Protect yourself by wearing gloves, goggles, and a face mask.
- Prepare a bucket of warm water and add a mild dish soap or laundry detergent. Stir the mixture to create a soapy solution.
- Remove any cushions, fabrics, or removable parts from the furniture.
- Place a drop cloth or plastic sheet underneath the furniture to protect the surrounding area from splashes and spills.
- Dip a sponge or soft cloth into the soapy water and wring it out to remove excess moisture.
- Gently scrub the entire metal surface using the sponge or cloth, paying particular attention to areas with visible dirt or stains. Make sure to clean all sides of the furniture, including the back and underneath if applicable.
- For stubborn stains or grime, you may need to use a soft-bristle brush to scrub more vigorously. Be cautious not to use an abrasive brush that can damage the metal surface.
- Rinse the metal surface thoroughly with clean water to remove any soap residue.
- Use a soft cloth or sponge to dry the furniture. This step is crucial to prevent moisture from trapping between the paint layers and causing potential damage in the future.
- Allow the furniture to air dry completely before proceeding to the next steps.
Cleaning the metal surface ensures that the paint will properly adhere to the furniture and result in a smooth and even finish. It removes any dirt, grime, or old layers of paint that may affect the adhesion and longevity of the new paint.
By following these cleaning steps, you can create a clean canvas for your painting project. With a pristine metal surface, you are now ready to move on to the next steps, which involve removing rust and flaking paint (if applicable), sanding the surface, and applying a primer. These steps will be covered in detail in the subsequent sections.
Removing Rust and Flaking Paint
Before painting your outdoor metal furniture, it is crucial to address any rust spots or areas with flaking paint. Removing rust and loose paint ensures a smooth and even surface for the new paint to adhere to. Follow these steps to effectively remove rust and flaking paint from your metal furniture:
- Inspect the furniture for any visible signs of rust or flaking paint. Focus your attention on areas that are prone to rust, such as joints, corners, and areas exposed to moisture.
- To remove rust, start by using a rust remover. Apply the rust remover to the affected areas following the manufacturer’s instructions. Most rust removers require you to apply the solution and leave it on for a specific amount of time to penetrate the rust.
- Once the rust remover has had time to work, use a wire brush or a stiff-bristle brush to scrub the rusted areas. Apply gentle pressure and scrub in a circular motion to remove the rust. Repeat this process until all visible rust is gone. If the rust is extensive, you may need to use a power tool with a wire brush attachment.
- After removing the rust, rinse the area thoroughly with clean water to remove any residual rust remover. Dry the area completely using a clean cloth or allow it to air dry.
- If your furniture has flaking paint, use a putty knife or a scraper to gently scrape away the loose paint. Be careful not to damage the metal surface during this process. Once all loose paint has been removed, use sandpaper or a sanding sponge to smooth any rough edges or remaining paint patches. This step helps create a uniform surface for the new paint.
- After removing rust and flaking paint, inspect the furniture once again to ensure that all the affected areas have been properly addressed. Make any necessary touch-ups or repeat the steps if needed.
By effectively removing rust and flaking paint, you ensure that the new paint will have a clean and solid surface to adhere to. This step is crucial for achieving a smooth and durable finish.
Once you have completed the process of removing rust and flaking paint, it is important to move on to the next step, which is sanding the surface. Sanding helps create an even and smooth surface for the new paint. We will cover this step in detail in the following section.
Sanding the Surface
Sanding the surface of your outdoor metal furniture is a crucial step in preparing it for painting. Sanding helps to smooth out any imperfections, rough areas, or remaining paint patches, creating a uniform and even surface for the new paint to adhere to. Follow these steps to effectively sand the surface of your metal furniture:
- Gather the necessary materials for sanding, including medium-grit sandpaper or a sanding sponge.
- Ensure that the furniture is clean and free from any dust or debris.
- Begin sanding by focusing on areas with rough textures, remaining paint patches, or imperfections. Use the sandpaper or sanding sponge to gently sand these areas in a back-and-forth or circular motion. Apply even pressure to create a smooth and consistent surface.
- Continue sanding the entire surface of the furniture, paying attention to corners, edges, and intricate details. Be thorough but be careful not to sand too aggressively, as it can damage the metal surface.
- Periodically check the furniture to ensure that the rough areas are becoming smoother and the remaining paint patches are being blended into the surface.
- As you sand, wipe away any dust or debris with a clean cloth or brush to maintain a clean working surface. Removing the accumulated dust will also help you assess the progress of sanding.
- Switch to a finer-grit sandpaper or sponge to further smoothen the surface once the majority of imperfections are removed. This finer sanding ensures a seamless transition between the old and new paint layers.
- Once you have completed sanding, use a clean cloth or brush to remove any leftover dust or debris from the furniture. Ensure that the surface is clean and smooth to the touch.
Sanding the surface of your outdoor metal furniture provides several benefits. It creates a uniform and even base for the new paint, helps the paint adhere better, and improves the overall appearance of the finished result. Additionally, sanding allows you to address any remaining imperfections and ensure a smooth and professional-looking finish.
After sanding, you are ready to proceed to the next step, which is applying a primer to the metal surface. We will discuss this crucial step in detail in the upcoming section.
Read more: How To Paint Metal Patio Furniture
Priming the Metal
Priming the metal surface of your outdoor furniture is a crucial step before applying the final coat of paint. The primer acts as a bonding agent between the metal and the paint, ensuring better adhesion and durability of the finish. Here are the steps to effectively prime the metal surface:
- Gather the necessary materials, including a high-quality primer specifically designed for metal surfaces, a paintbrush or paint sprayer, and any protective gear required.
- Ensure that the metal surface is clean, dry, and free from any dust or debris. If needed, use a clean cloth or brush to remove any leftover sanding dust.
- If using a paint sprayer, ensure that it is properly set up according to the manufacturer’s instructions. If using a paintbrush, choose a high-quality brush suitable for the type of primer being used.
- If necessary, cover any surrounding areas or objects to protect them from overspray or drips.
- Start priming the metal surface by applying a thin and even coat of the primer. If using a paintbrush, use smooth and even strokes in the same direction as the grain of the metal.
- If using a paint sprayer, hold it approximately 6-8 inches away from the surface and apply the primer in a back-and-forth motion, overlapping each pass slightly for even coverage.
- Ensure that all areas of the furniture are covered with the primer. Pay close attention to any detailed or hard-to-reach areas.
- Allow the primer to dry completely before applying additional coats or moving on to the next step. The drying time may vary depending on the type of primer used. Refer to the manufacturer’s instructions for specific drying times.
- If necessary, lightly sand the primed surface with fine-grit sandpaper or a sanding sponge to ensure a smooth and even finish. Remember to remove any sanding dust before applying the final coat of paint.
Priming the metal surface provides several benefits. It helps to create a stronger bond between the metal and the final paint, improves the paint’s resistance to chipping and flaking, and enhances the overall durability and longevity of the finish. Additionally, the primer can help to even out the appearance of the metal surface and provide a solid base for the color of the paint to come through more vibrantly.
Once the primer is dry and you have prepared the metal surface, you are now ready to proceed to the next step: applying the paint. We will cover different painting techniques and tips in the upcoming sections to ensure a professional-looking and long-lasting finish.
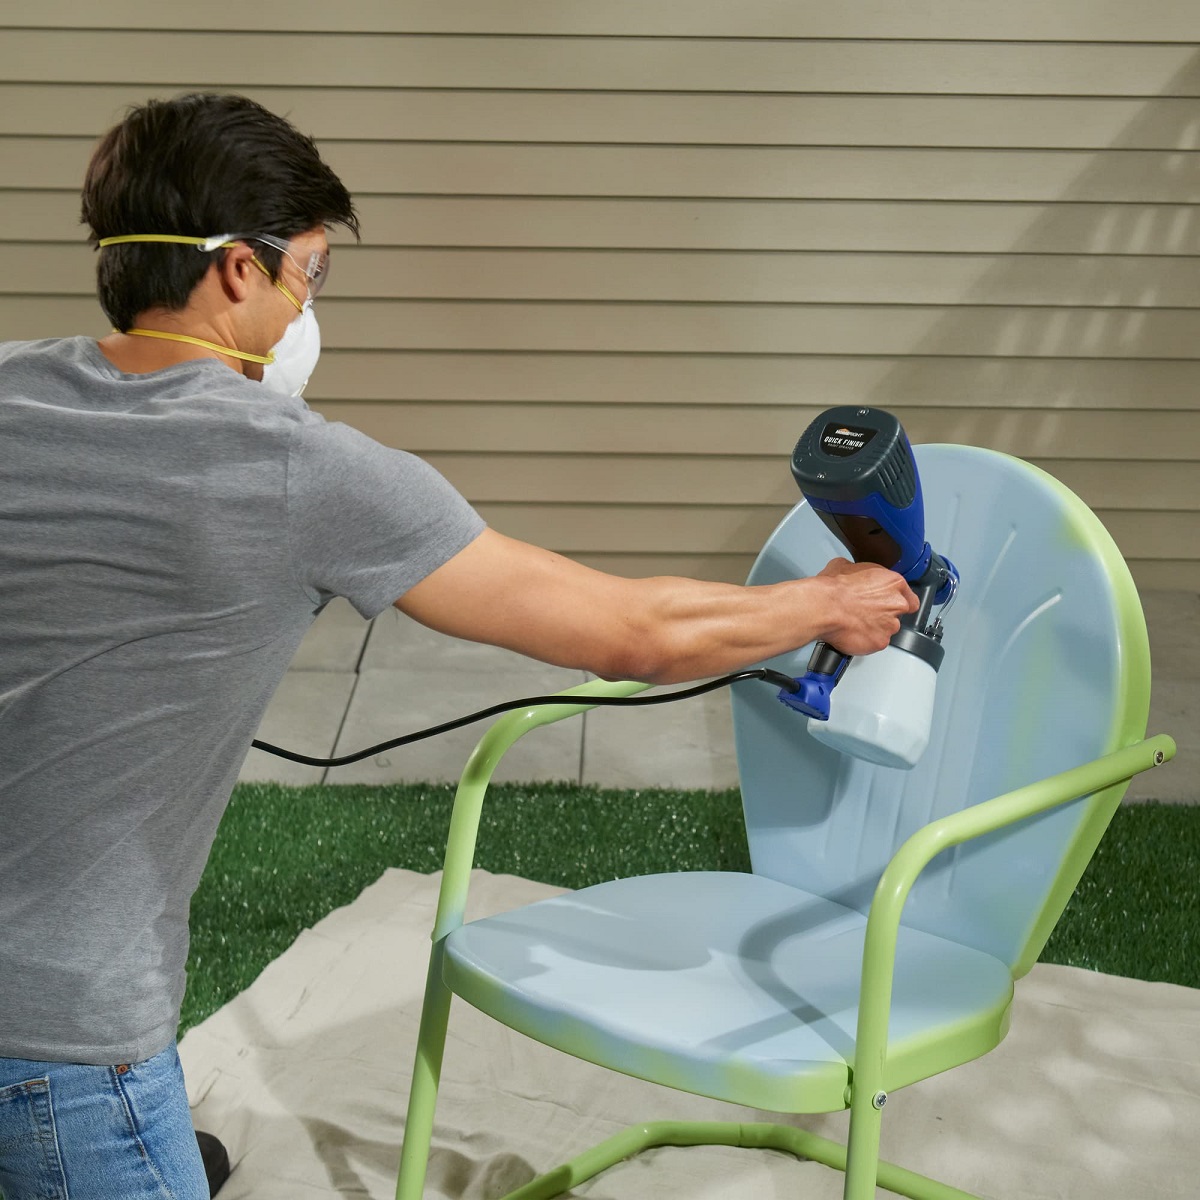
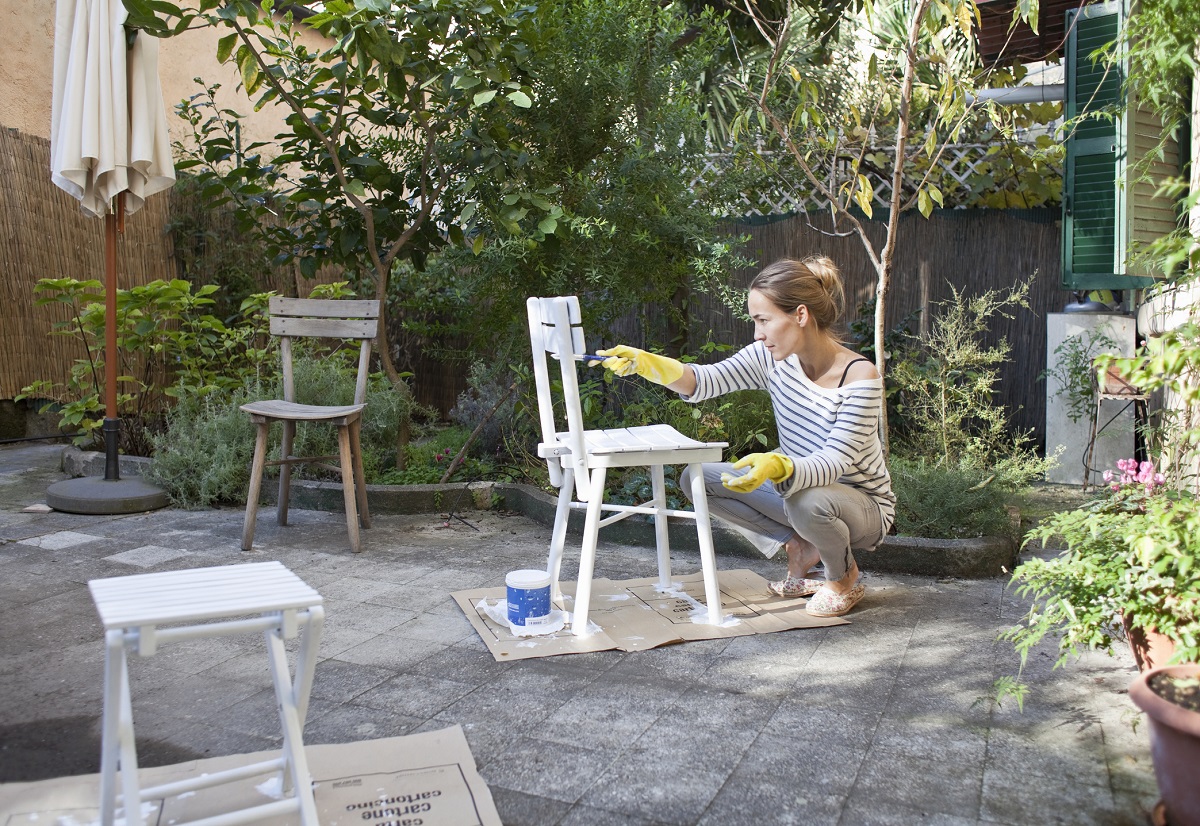
Painting Techniques
When it comes to painting your outdoor metal furniture, choosing the right techniques can make a significant difference in the final result. By using proper painting techniques, you can achieve a professional-looking finish that is both beautiful and durable. Here are some essential techniques to keep in mind:
Applying the Base Coat
Before you can start applying the color of your choice, it’s important to apply a base coat. The base coat provides a solid foundation for the color and helps enhance the overall appearance of the finished result. Here’s how to apply the base coat:
- Choose a high-quality outdoor metal paint in a color that complements your outdoor space.
- Stir the paint thoroughly before applying to ensure an even consistency.
- If using a paintbrush, start by applying the base coat using smooth and even strokes, following the grain of the metal. Make sure to cover all surfaces, including any intricate details.
- If using a paint sprayer, hold it at a distance of 6-8 inches from the surface and apply the base coat in a sweeping motion, overlapping each pass slightly for even coverage.
- Allow the base coat to dry according to the manufacturer’s instructions. This drying time may vary depending on the type of paint chosen. Ensure that the base coat is thoroughly dry before proceeding to the next step.
Adding Layers and Texture
For a more dynamic and interesting finish, you can consider adding additional layers or textures to your outdoor metal furniture. Here are a few techniques you can try:
- Layering: Apply multiple coats of paint, allowing each layer to dry before applying the next. This technique can create depth and dimension, especially if you choose complementing or contrasting colors.
- Distressing: If you want to achieve a vintage or worn look, consider distressing your furniture. After applying the base coat, you can lightly sand certain areas or use a sanding block to create a distressed effect, particularly on corners or areas that would naturally wear over time.
- Stencil Design: Add a unique touch to your furniture by using stencils. Choose a stencil design and place it on the desired area. Use a different color of paint to fill in the stencil, creating a beautiful pattern or motif.
Read more: How To Clean Metal Outdoor Furniture
Finishing Touches
After you have applied all the necessary coats of paint and achieved your desired look, it’s time to add the finishing touches to ensure the longevity of the finish. Consider these additional steps:
- Allow the final coat of paint to dry completely before using or exposing the furniture to the elements. This step ensures that the paint cures properly, making it more resistant to scratches and wear.
- If desired, apply a clear topcoat specifically designed for outdoor furniture. The topcoat adds an extra layer of protection and enhances the durability of the paint finish.
By applying these painting techniques and adding your personal touch, you can transform your outdoor metal furniture into a stunning focal point in your outdoor space. Remember to follow the manufacturer’s instructions for the paint and any additional products you use to ensure the best results.
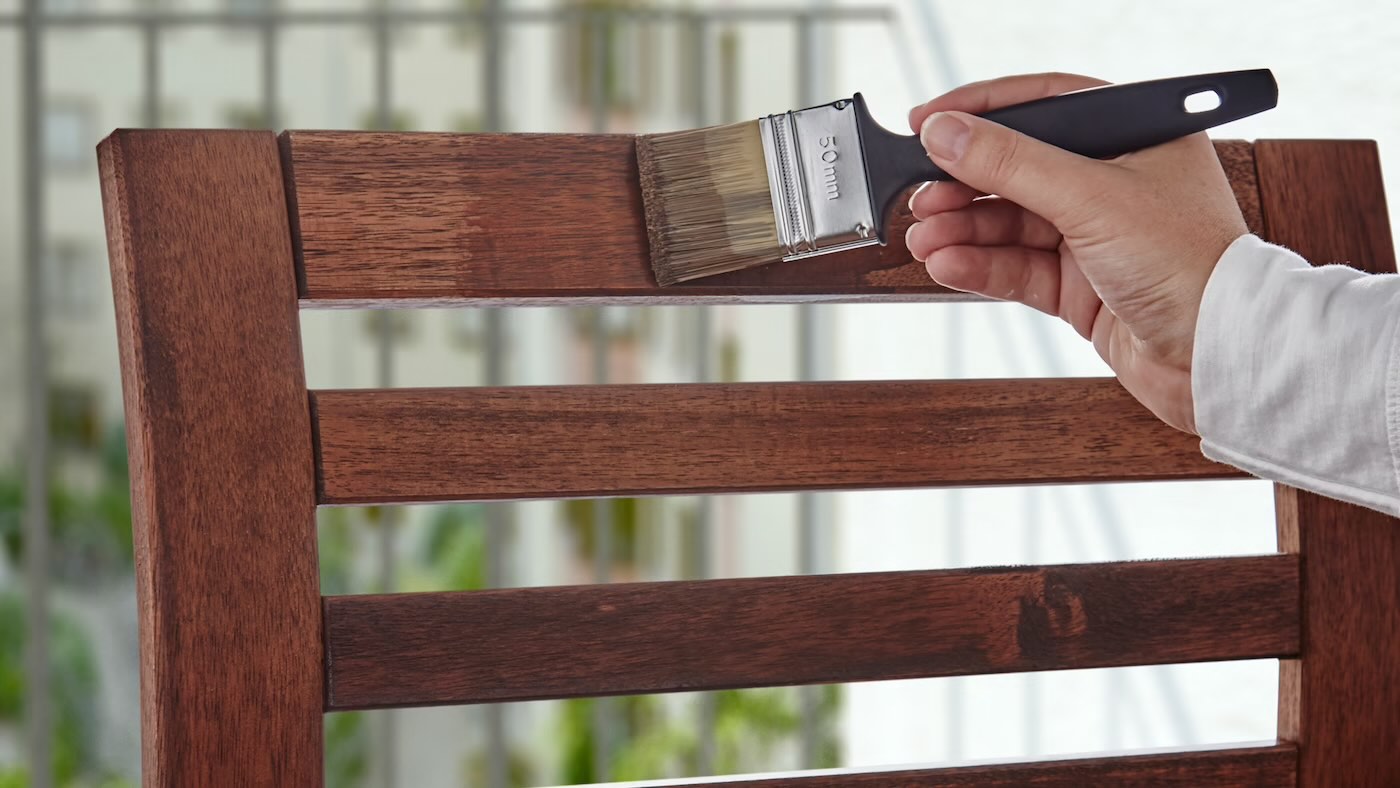
Applying the Base Coat
Applying a base coat is a crucial step in painting your outdoor metal furniture. The base coat not only provides a foundation for the color but also enhances the overall appearance and durability of the finished result. By following the proper technique, you can achieve a professional-looking finish that will withstand the elements. Here’s how to apply the base coat:
- Choose a high-quality outdoor metal paint that is specifically formulated for use on metal surfaces. Select a color that complements your outdoor space and desired aesthetic.
- Before starting, thoroughly stir the paint to ensure an even consistency. This will help distribute the pigments and produce a uniform color throughout the application process.
- If using a paintbrush, dip the brush into the paint and remove any excess by tapping it gently on the side of the paint can. Start by applying the base coat using even strokes, following the direction of the metal’s grain. Work from one end of the furniture to the other, applying a thin and even layer of paint. Ensure that all surfaces, including any intricate details, are adequately covered.
- If you prefer to use a paint sprayer, make sure it is properly set up according to the manufacturer’s instructions. Fill the paint container with the desired color and test the spray pattern on a scrap piece of cardboard or a spare metal surface. Hold the sprayer approximately 6-8 inches away from the furniture and apply the base coat in a smooth and consistent motion, overlapping each pass slightly to ensure even coverage.
- Once the first coat is applied, allow it to dry according to the manufacturer’s instructions. The drying time can vary based on the type of paint used, the humidity, and the temperature. It’s important to ensure that the base coat is completely dry before applying additional coats.
- Inspect the furniture after the base coat has dried. If necessary, lightly sand any imperfections or brush strokes using fine-grit sandpaper or a sanding sponge. This step will create a smooth and even surface for subsequent coats.
- Apply additional coats of the base paint, repeating the process of even application and drying time between each coat. The number of coats required will depend on the color intensity desired and the coverage achieved. Allow each coat to dry completely before applying the next.
By following these steps, you can achieve a well-prepared and professionally applied base coat on your outdoor metal furniture. This foundation will ensure better paint adhesion and a more durable finish. Remember to follow the specific instructions provided by the paint manufacturer to achieve the best results.
After applying the base coat, you can move on to adding layers and texture, or proceed to the final step of applying the topcoat. These additional steps will enhance the visual appeal and protect the paint finish, ensuring that your outdoor metal furniture remains beautiful and long-lasting.
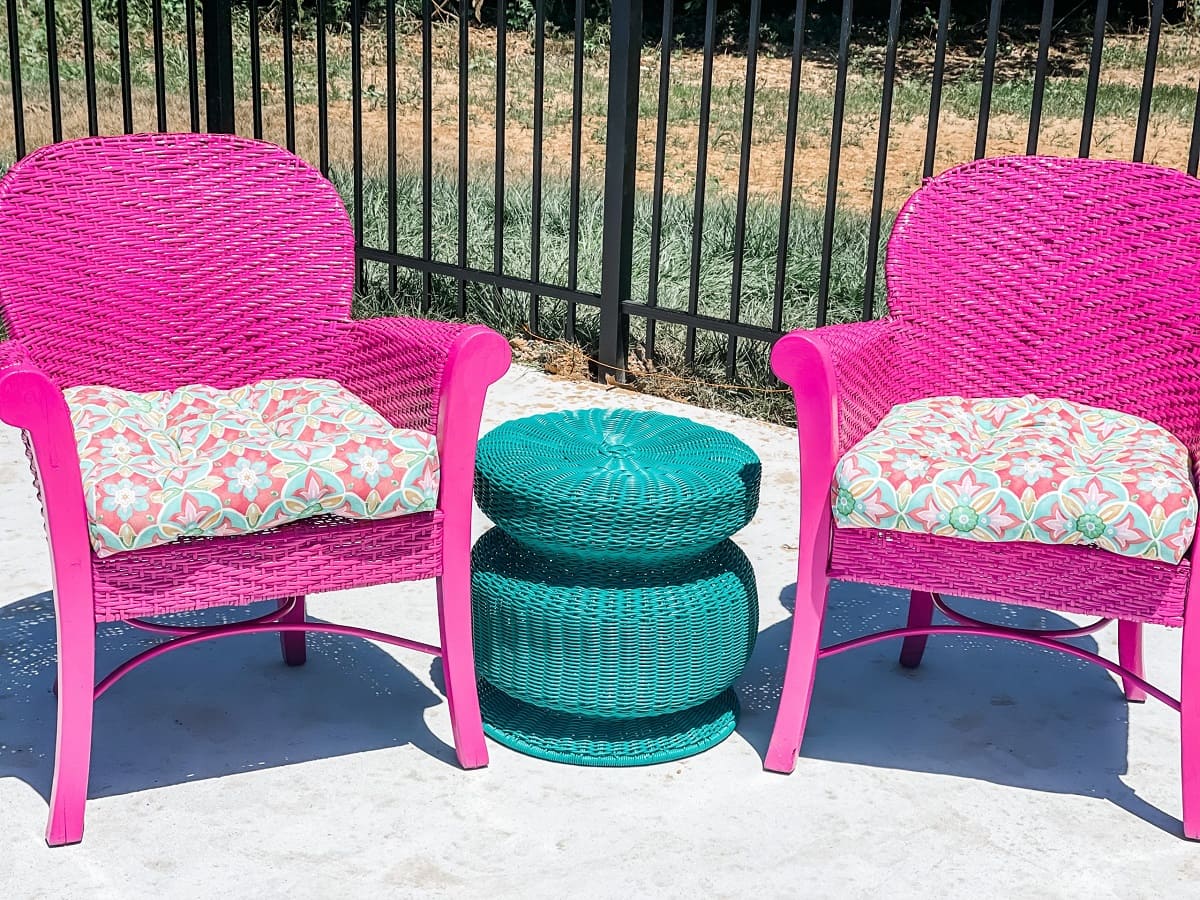
Adding Layers and Texture
Adding layers and texture to your outdoor metal furniture can take your paint job to the next level, creating depth, visual interest, and a unique look. By incorporating these techniques, you can customize your furniture and make it stand out in your outdoor space. Here are a few methods to consider:
- Layering: Layering involves applying multiple coats of paint to create depth and dimension. Start by applying a base coat and allowing it to dry completely. Then, apply subsequent coats of a different color or shade, allowing each layer to dry before adding the next. This technique works particularly well when using complementing or contrasting colors.
- Distressing: Distressing can give your furniture a charming, vintage look. After applying the base coat and allowing it to dry, use sandpaper or a sanding block to gently sand specific areas of the furniture. Focus on edges, corners, and areas that are prone to wear naturally. By removing some of the paint, you expose the base coat or the metal underneath, creating a distressed effect.
- Stenciling: Stenciling allows you to add intricate patterns or designs to your furniture. Choose a stencil design that complements your outdoor theme and secure it firmly onto the surface. Use a brush or sponge to apply a different color of paint over the stencil, creating a crisp and eye-catching pattern. Make sure to hold the stencil securely and apply the paint evenly to achieve the desired effect.
- Faux Finishes: Faux finishes can mimic the appearance of different materials, such as wood grain or stone. These techniques involve using specialized tools or techniques to create realistic textures on the metal surface. For example, you can use a wood-graining tool to create the look of wood or a sponge to create a stone-like texture.
Experiment with these techniques or combine them to create your own unique look. It’s important to plan your desired outcome and test the techniques on scrap materials or inconspicuous areas before applying them to your furniture. This way, you can ensure that you achieve the desired effect without any surprises.
Remember that layering and adding texture can be time-consuming processes, especially if you’re incorporating multiple techniques. Take your time, be patient, and allow each layer or texture to dry completely before moving on to the next step. By doing so, you can achieve a beautiful, custom finish on your outdoor metal furniture.
Once you’ve added the desired layers and textures, it’s time to consider the finishing touches. Applying a clear topcoat or sealant can protect the paint and enhance the durability of your beautifully transformed metal furniture.
Finishing Touches
When it comes to painting your outdoor metal furniture, adding the finishing touches is just as important as the painting process itself. These final steps will not only protect the paint and enhance its longevity but also ensure a polished and professional-looking result. Here are some essential finishing touches to consider:
- Allow Sufficient Drying Time: Before using or exposing your painted furniture to the elements, make sure the paint has fully cured. This ensures that the paint adheres properly and achieves its maximum durability. Check the manufacturer’s instructions for the recommended drying time, as it can vary depending on the type of paint and the environmental conditions.
- Apply a Top Coat or Sealant: Applying a clear top coat or sealant is an excellent way to protect the paint from scratches, fading, and other types of damage. Choose a top coat specifically designed for outdoor use and follow the manufacturer’s instructions for application. Brush or spray a thin and even layer of the top coat over the painted surface, ensuring complete coverage.
- Consider Weatherproofing: Depending on your climate and the level of exposure your furniture will endure, you may want to consider additional weatherproofing measures. There are various products available, such as weatherproofing sprays or outdoor fabric covers, that can provide an extra layer of protection against the sun, rain, and other outdoor elements.
- Inspect for Touch-Ups: After the furniture has dried and the top coat has been applied, carefully inspect the furniture for any areas that may require touch-ups. Look for any missed spots, imperfections, or chipped areas and apply additional paint or touch-up paint as needed. This ensures that the furniture has a flawless and cohesive appearance.
- Maintain and Clean Regularly: To keep your painted metal furniture looking its best, it’s important to maintain and clean it regularly. Avoid using harsh chemicals or abrasive tools that can damage the paint. Instead, use a gentle cleanser and a soft cloth to remove dirt and debris. Regular cleaning will help preserve the paint and extend the life of your furniture.
By incorporating these finishing touches into your painting process, you can ensure that your outdoor metal furniture remains beautiful and protected for years to come. Remember to follow the specific instructions provided by the paint and top coat manufacturers to achieve the best results.
With the final touches complete, step back and admire your transformed outdoor metal furniture. Enjoy the beauty and durability of your newly painted piece as it enhances your outdoor space and creates a welcoming and stylish atmosphere.
When painting outdoor metal furniture, make sure to clean the surface thoroughly before applying any paint. Use a metal primer to ensure better adhesion and durability of the paint.
Read more: How To Paint Metal Railings Outdoors
Maintenance Tips
Proper maintenance is key to ensuring the longevity and continued beauty of your outdoor metal furniture. By following these maintenance tips, you can keep your furniture looking its best and protect it from the elements:
- Clean Regularly: Regular cleaning is essential to remove dirt, dust, and other debris that can accumulate on the furniture surface. Use a mild soap or detergent mixed with water and a soft cloth or sponge to gently clean the metal. Avoid abrasive cleaners or tools that can scratch or damage the paint. Rinse well with clean water and allow the furniture to dry thoroughly.
- Protect from Harsh Weather: Extreme heat, rain, snow, and prolonged exposure to direct sunlight can damage the paint finish. Use protective covers or move the furniture to a covered area during harsh weather conditions. This will shield the metal from excessive moisture, UV rays, and other elements that can cause fading or deterioration.
- Avoid Chemicals and Abrasives: When cleaning or maintaining your outdoor metal furniture, avoid using harsh chemicals, solvents, or abrasive tools. These can damage the paint, strip away protective coatings, and compromise the integrity of the furniture. Stick to gentle cleaning agents and soft materials to preserve the finish.
- Inspect for Damage: Regularly inspect your furniture for signs of damage, such as chipped paint, rust spots, or structural issues. Address any problems promptly by repairing or repainting the affected areas. This will prevent further damage and maintain the overall appearance of the furniture.
- Reapply Protective Coating: Over time, the protective coating on outdoor metal furniture can wear off. To maintain its resistance to the elements, periodically reapply a clear top coat or sealant. Follow the manufacturer’s instructions on the timing and application of the protective coating.
- Store During Winter: If you live in an area with harsh winters, consider storing your outdoor metal furniture indoors during the colder months. This will provide additional protection from freezing temperatures, moisture, and snow. Clean and dry the furniture before storing, and keep it in a dry and well-ventilated area.
- Touch Up as Needed: Regularly inspect your furniture for any scratches, chips, or areas where the paint has worn off. Touch up these areas promptly by applying matching paint or touch-up paint. Make sure to prepare the surface properly before applying the new paint to ensure proper adhesion.
By following these maintenance tips, you can extend the life of your outdoor metal furniture and keep it looking its best throughout the years. Regular cleaning, protection from harsh weather, and addressing any issues promptly will help preserve the paint finish, prevent rust, and maintain the overall quality of the furniture.
Remember, each piece of outdoor metal furniture may require specific care, so consult the manufacturer’s guidelines for any specific maintenance recommendations. With proper care and maintenance, your outdoor metal furniture will continue to provide beauty, comfort, and enjoyment for years to come.
Conclusion
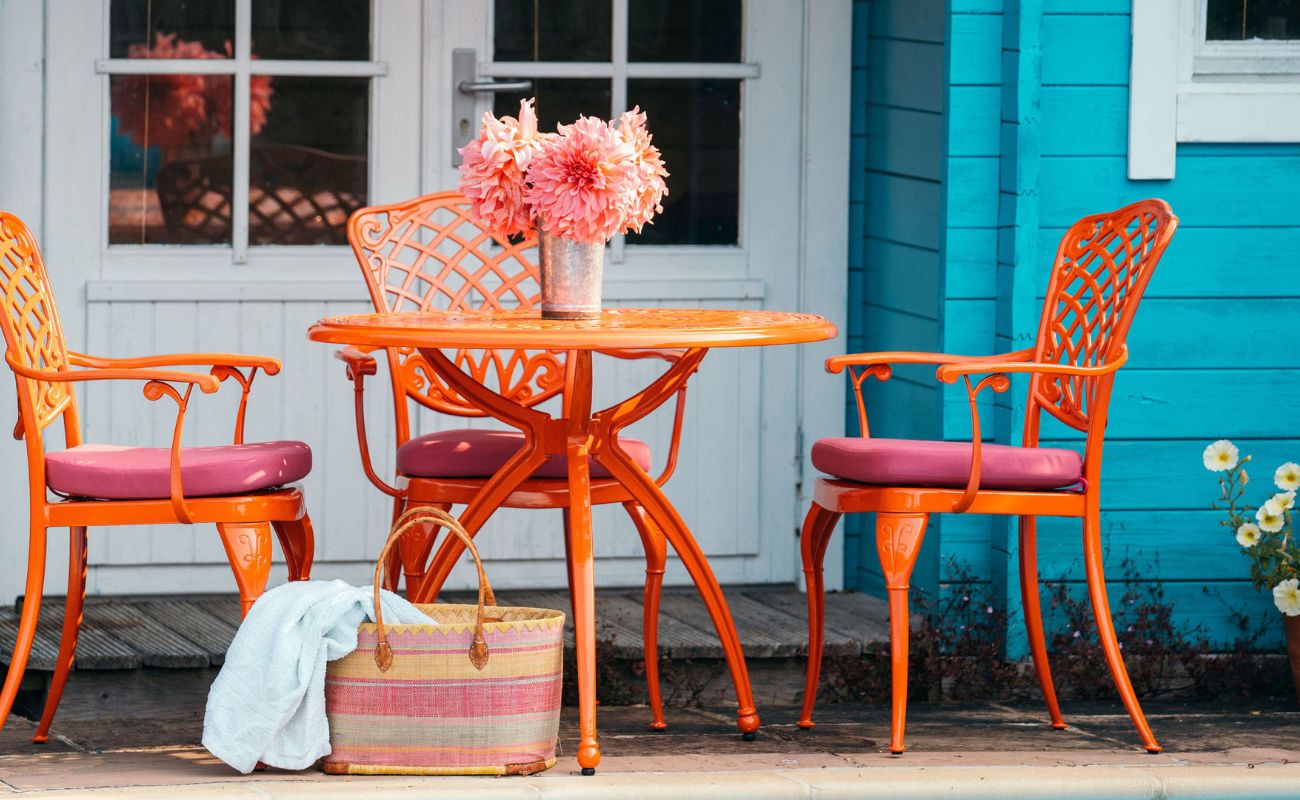
Painting outdoor metal furniture is an effective way to revive and transform the appearance of your outdoor space. By following the proper techniques and guidelines, you can achieve a professional-looking finish that enhances the durability and visual appeal of your furniture.
In this comprehensive guide, we discussed the importance of preparation when painting outdoor metal furniture. We learned how to clean the metal surface, remove rust and flaking paint, and properly sand the surface to ensure a smooth and even finish.
We also explored the crucial step of applying a primer, which helps the paint adhere better and improves the overall durability of the finish. Additionally, we explored various painting techniques, such as layering, distressing, stenciling, and faux finishes, which allow you to personalize your furniture and create unique textures and patterns.
We emphasized the significance of adding finishing touches, such as allowing sufficient drying time, applying a top coat or sealant, and considering weatherproofing measures. These final steps ensure the protection and longevity of your newly painted furniture.
To maintain the beauty and integrity of your outdoor metal furniture, we shared essential maintenance tips, including regular cleaning, protecting from harsh weather, avoiding chemicals and abrasives, inspecting for damage, and reapplying protective coating when necessary.
By following these guidelines and incorporating your creative touch, you can transform your outdoor metal furniture into stunning focal points that enhance the aesthetic appeal of your outdoor space. Remember that each piece may require specific care, so consult the manufacturer’s guidelines and instructions for any additional recommendations.
Now, armed with the knowledge and techniques shared in this article, it’s time to roll up your sleeves, gather your supplies, and embark on the journey of painting your outdoor metal furniture. Enjoy the process, unleash your creativity, and create a beautiful outdoor haven that reflects your style and personality.
Happy painting!
Frequently Asked Questions about How To Paint Outdoor Metal Furniture
Was this page helpful?
At Storables.com, we guarantee accurate and reliable information. Our content, validated by Expert Board Contributors, is crafted following stringent Editorial Policies. We're committed to providing you with well-researched, expert-backed insights for all your informational needs.

0 thoughts on “How To Paint Outdoor Metal Furniture”