Home>Furniture & Design>Outdoor Furniture>How To Remove An Outdoor Drain Cover
Outdoor Furniture
How To Remove An Outdoor Drain Cover
Modified: January 19, 2024
Learn how to safely and efficiently remove an outdoor drain cover with our expert tips and step-by-step guide. Keep your outdoor furniture and design in top condition with this essential maintenance task.
(Many of the links in this article redirect to a specific reviewed product. Your purchase of these products through affiliate links helps to generate commission for Storables.com, at no extra cost. Learn more)
Introduction
Welcome to our guide on how to remove an outdoor drain cover. Whether you're looking to clean the drain, inspect the pipes, or simply give your outdoor space a little TLC, knowing how to remove the drain cover is a valuable skill for any homeowner or outdoor furniture enthusiast. Outdoor drain covers are essential for preventing debris and dirt from clogging up the drainage system, but over time, they can become caked with grime and require cleaning or replacement.
In this comprehensive guide, we'll walk you through the step-by-step process of safely and efficiently removing an outdoor drain cover. We'll also share tips on cleaning and maintaining the drain cover and the surrounding area. So, grab your tools and let's get started on this DIY outdoor furniture maintenance adventure!
Key Takeaways:
- Removing an outdoor drain cover requires basic tools like a screwdriver and adjustable wrench. Clearing debris, inspecting, and cleaning the area are crucial steps for successful maintenance.
- After cleaning the drain cover and surrounding area, reposition and secure the cover carefully. Regular maintenance ensures optimal drainage and a clean, inviting outdoor space.
Read more: How To Clean An Outdoor Drain
Step 1: Gather the necessary tools
Before you begin the process of removing an outdoor drain cover, it’s essential to gather the appropriate tools to ensure a smooth and efficient operation. Here’s a list of the tools you’ll need:
- Screwdriver: Depending on the type of screws or bolts securing the drain cover, you may need a flathead or Phillips-head screwdriver. Make sure the screwdriver matches the screw type to avoid damaging the screws.
- Adjustable wrench: If the drain cover is secured with bolts, an adjustable wrench will be necessary for loosening and removing them.
- Gloves: It’s always a good idea to protect your hands with a pair of durable gloves, especially if the drain cover or the surrounding area is dirty or sharp.
- Cleaning brush or wire brush: To clean the drain cover and remove any accumulated debris or grime, a brush with stiff bristles or a wire brush can be very useful.
- Bucket or container: Have a bucket or container on hand to collect any debris or water that may come out when removing the drain cover.
- Cleaning solution: Depending on the condition of the drain cover, you may need a mild cleaning solution or detergent to thoroughly clean it before reinstallation.
By ensuring you have these tools ready, you’ll be well-prepared to tackle the task of removing the outdoor drain cover with confidence and ease.
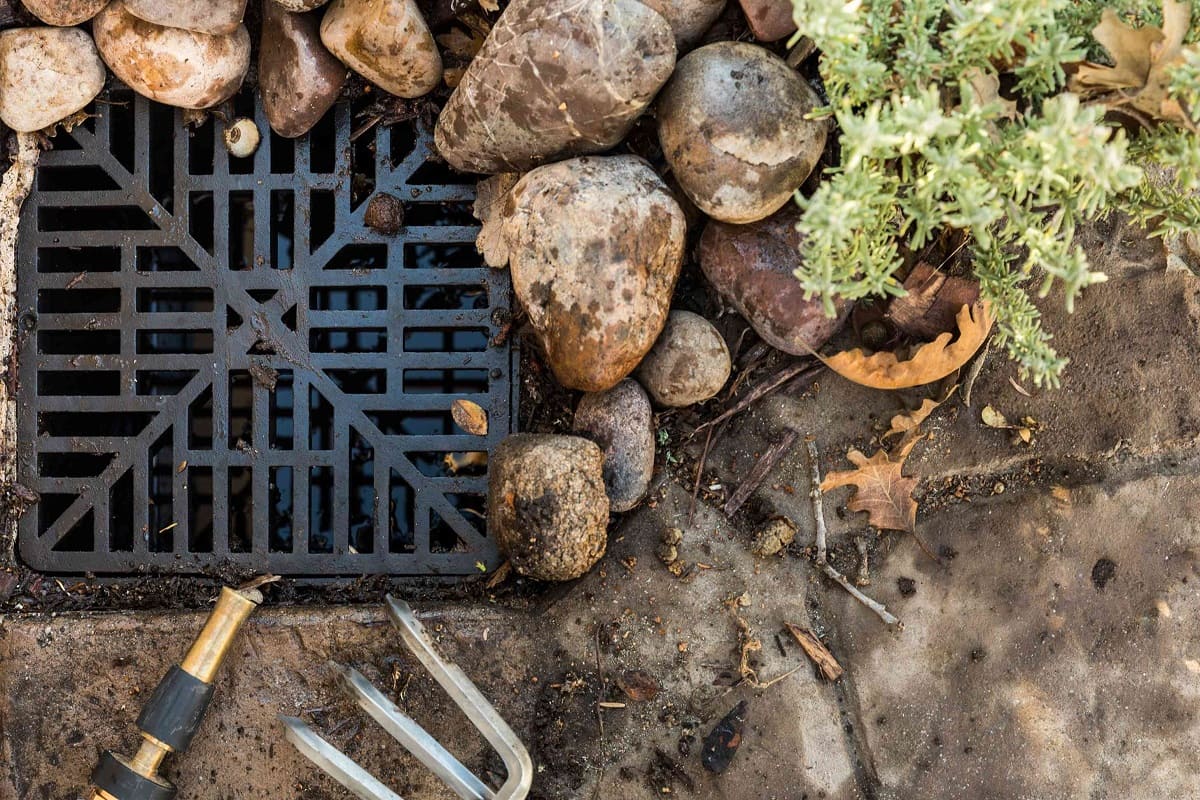
Step 2: Remove any debris or dirt around the drain cover
Before you begin the process of removing the drain cover, it’s important to clear the area around the drain to ensure easy access and prevent any debris from falling into the drain during the removal process. Here’s how to do it:
- Clear the surrounding area: Remove any outdoor furniture, potted plants, or other obstructions near the drain to create a clear workspace. This will give you ample room to maneuver and work comfortably.
- Sweep or brush away debris: Use a broom or brush to clear away any loose dirt, leaves, or debris that may have accumulated around the edges of the drain cover. This will prevent these items from falling into the drain or hindering the removal process.
- Inspect the area: Take a moment to inspect the area around the drain for any signs of damage, corrosion, or blockages. This is also a good opportunity to assess the condition of the drain cover and determine if it needs cleaning or replacement.
By taking the time to clear and inspect the area around the drain cover, you’ll set the stage for a smooth and hassle-free removal process. This simple step can help you avoid potential complications and ensure that the drain cover is ready to be safely removed.
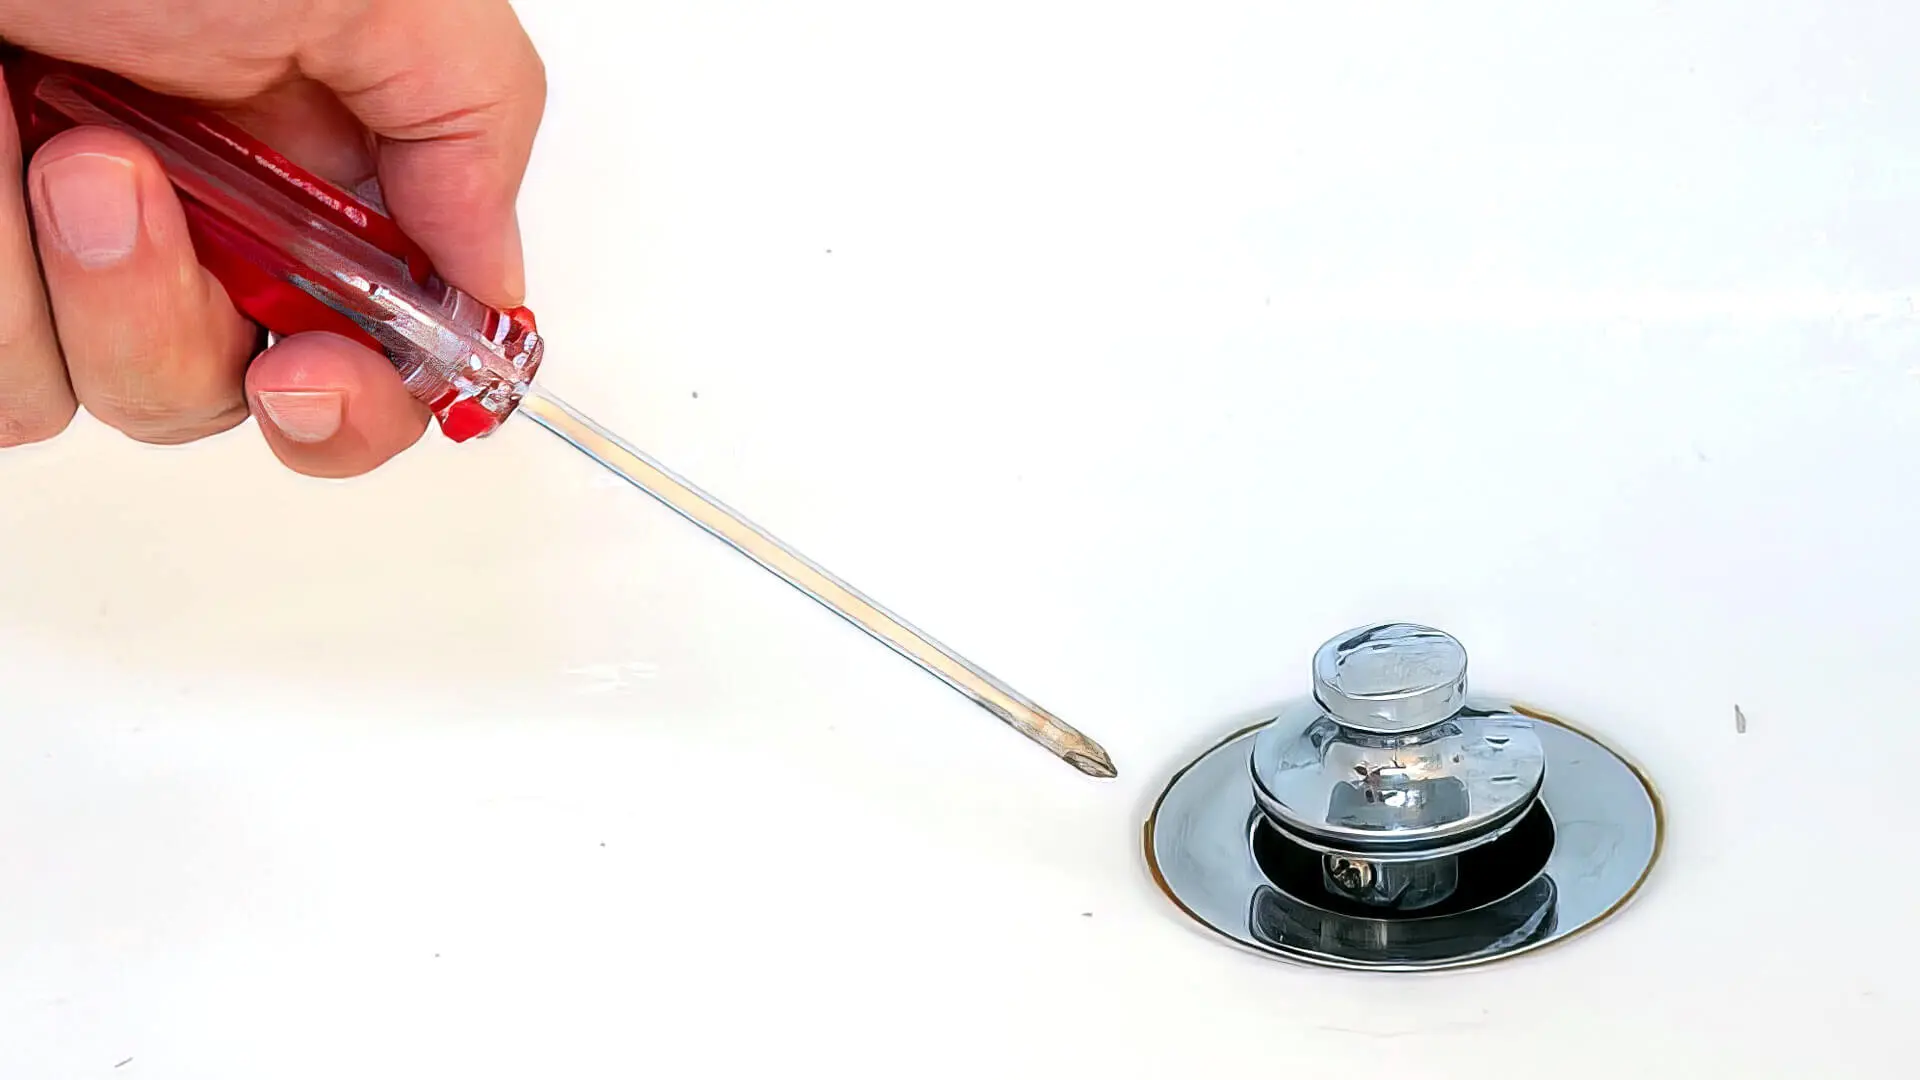
Step 3: Loosen the screws or bolts holding the drain cover in place
Once the area around the drain cover is clear, it’s time to focus on loosening the screws or bolts that secure the cover in place. Here’s a step-by-step guide to help you through this process:
- Identify the type of fasteners: Inspect the drain cover to determine whether it is secured with screws or bolts. This will help you choose the appropriate tool for the next steps.
- Use the screwdriver or wrench: If the drain cover is held in place by screws, use the appropriate screwdriver to carefully loosen and remove the screws. For covers secured with bolts, use an adjustable wrench to loosen and remove the bolts.
- Apply gentle pressure: In some cases, the screws or bolts may be stuck due to rust or corrosion. Apply gentle pressure and, if necessary, a penetrating oil to help loosen them without causing damage.
- Keep the fasteners in a safe place: As you remove the screws or bolts, be sure to keep them in a secure location, such as a small container or your pocket, to prevent them from getting lost.
By following these steps, you’ll be able to safely and effectively loosen the fasteners holding the drain cover in place, setting the stage for its removal in the next step. Remember to work patiently and carefully to avoid damaging the screws, bolts, or the surrounding area.
Use a screwdriver to remove the screws holding the drain cover in place. If it’s stuck, try using a lubricant or tapping it with a hammer to loosen it. Be careful not to damage the surrounding area.
Step 4: Lift and remove the drain cover
With the fasteners loosened, it’s time to carefully lift and remove the drain cover from its position. Follow these steps to ensure a smooth and safe removal process:
- Position yourself: Stand in a stable and comfortable position near the drain cover, ensuring that you have a good grip and clear visibility of the cover.
- Lift the cover: Using both hands, carefully lift the drain cover straight upward. If the cover is heavy or difficult to lift, consider using a pry bar or a similar tool to help loosen it from its position.
- Set the cover aside: Once the drain cover is removed, place it in a safe and secure location, away from the work area. This will prevent any accidents and allow you to inspect and clean the cover more effectively.
- Inspect the drain: With the cover removed, take a moment to inspect the drain for any signs of blockages, damage, or corrosion. This is also an excellent opportunity to clean out any debris or dirt that may have accumulated inside the drain.
By following these steps, you’ll be able to safely and effectively remove the drain cover, giving you access to the drain for cleaning, maintenance, or further inspection. Remember to work carefully and be mindful of any sharp edges or protrusions on the cover and the surrounding area.
Read more: How To Drain An Outdoor Faucet
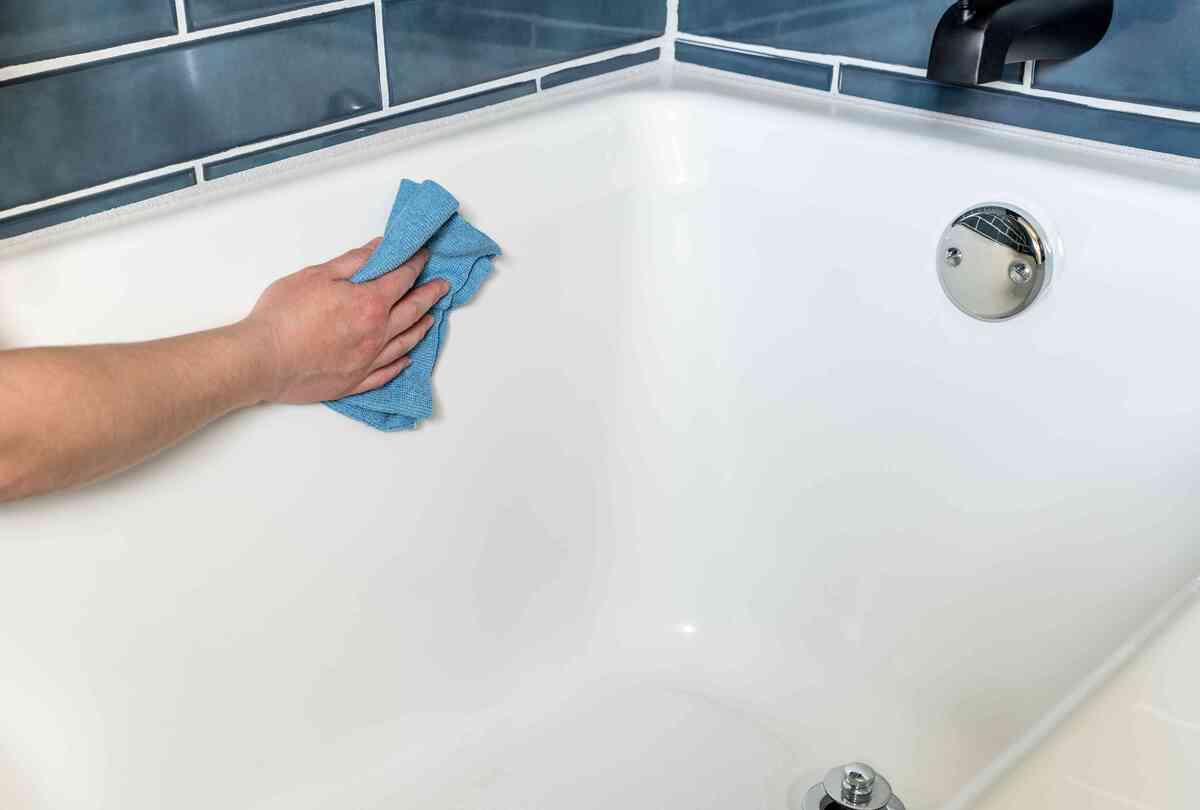
Step 5: Clean the drain cover and the surrounding area
After removing the drain cover, it’s essential to clean both the cover and the surrounding area to ensure optimal drainage and prevent any future issues. Follow these steps to thoroughly clean the drain cover and its immediate surroundings:
- Inspect the drain cover: Take a close look at the drain cover to assess its condition. Remove any visible debris, dirt, or grime by hand or using a brush. If the cover is heavily soiled, consider using a mild cleaning solution and a brush to scrub away stubborn stains and buildup.
- Clean the surrounding area: Use a brush or a hose to clean the area around the drain, removing any remaining debris, dirt, or standing water. This will help maintain a clear and functional drainage system.
- Rinse the drain cover: Once the cover is free of debris and grime, rinse it thoroughly with water to remove any cleaning solution or loosened dirt. This will ensure that the cover is clean and ready for reinstallation.
- Dry the drain cover: After rinsing, allow the drain cover to air dry completely or use a cloth to dry it thoroughly. This will prevent water spots and ensure that the cover is clean and ready for reinstallation.
By following these steps, you’ll be able to clean the drain cover and the surrounding area effectively, promoting optimal drainage and preventing potential blockages. A clean and well-maintained drain cover will contribute to the overall aesthetics and functionality of your outdoor space.
Step 6: Replace the drain cover
After cleaning the drain cover and the surrounding area, it’s time to reposition and secure the drain cover to restore the functionality and visual appeal of your outdoor space. Follow these steps to ensure a successful reinstallation:
- Position the drain cover: Carefully place the clean drain cover back over the drain opening, ensuring that it sits flush and level with the surrounding surface. Take care to align the cover properly to prevent any gaps or misalignment.
- Secure the cover: If the drain cover is held in place with screws, use the appropriate screwdriver to reinsert and tighten the screws. For covers secured with bolts, use an adjustable wrench to reinsert and tighten the bolts securely.
- Apply even pressure: When securing the cover, apply even pressure to ensure that it sits securely and does not wobble or shift. Avoid over-tightening the screws or bolts, as this may cause damage to the cover or the surrounding surface.
- Inspect the reinstalled cover: Once the cover is securely in place, take a moment to inspect it and ensure that it sits level, flush, and free of any visible debris. This will help maintain the functionality and aesthetics of the drain cover.
By following these steps, you’ll be able to reposition and secure the drain cover effectively, restoring the functionality and visual appeal of your outdoor space. A properly installed and well-maintained drain cover will contribute to the overall cleanliness and functionality of your outdoor furniture and design elements.
Conclusion
Congratulations! You’ve successfully learned how to remove an outdoor drain cover and carry out essential maintenance to keep your outdoor space clean and functional. By following the steps outlined in this guide, you’ve gained valuable insights into the process of safely removing, cleaning, and reinstalling a drain cover, contributing to the overall maintenance of your outdoor furniture and design elements.
Remember, regular maintenance of your outdoor drainage system, including the drain cover and the surrounding area, is crucial for preventing blockages, maintaining optimal drainage, and preserving the aesthetics of your outdoor space. By incorporating these maintenance tasks into your routine, you can enjoy a clean, well-maintained outdoor environment that enhances the comfort and appeal of your outdoor furniture and design features.
As you continue to care for your outdoor space, consider exploring additional maintenance and improvement projects to further enhance its beauty and functionality. Whether it’s updating your outdoor furniture, adding new design elements, or implementing landscaping enhancements, your dedication to outdoor maintenance will ensure that your outdoor space remains a welcoming and enjoyable retreat for years to come.
Thank you for joining us on this maintenance journey, and we hope you find success and satisfaction in keeping your outdoor space in top condition!
Frequently Asked Questions about How To Remove An Outdoor Drain Cover
Was this page helpful?
At Storables.com, we guarantee accurate and reliable information. Our content, validated by Expert Board Contributors, is crafted following stringent Editorial Policies. We're committed to providing you with well-researched, expert-backed insights for all your informational needs.


0 thoughts on “How To Remove An Outdoor Drain Cover”