Home>Furniture>Living Room Furniture>How To Make A Bean Bag Lap Tray
Living Room Furniture
How To Make A Bean Bag Lap Tray
Modified: March 16, 2024
Discover how to make a bean bag lap tray, the perfect addition to your living room furniture. Enjoy a comfortable and convenient surface for working or snacking.
(Many of the links in this article redirect to a specific reviewed product. Your purchase of these products through affiliate links helps to generate commission for Storables.com, at no extra cost. Learn more)
Introduction
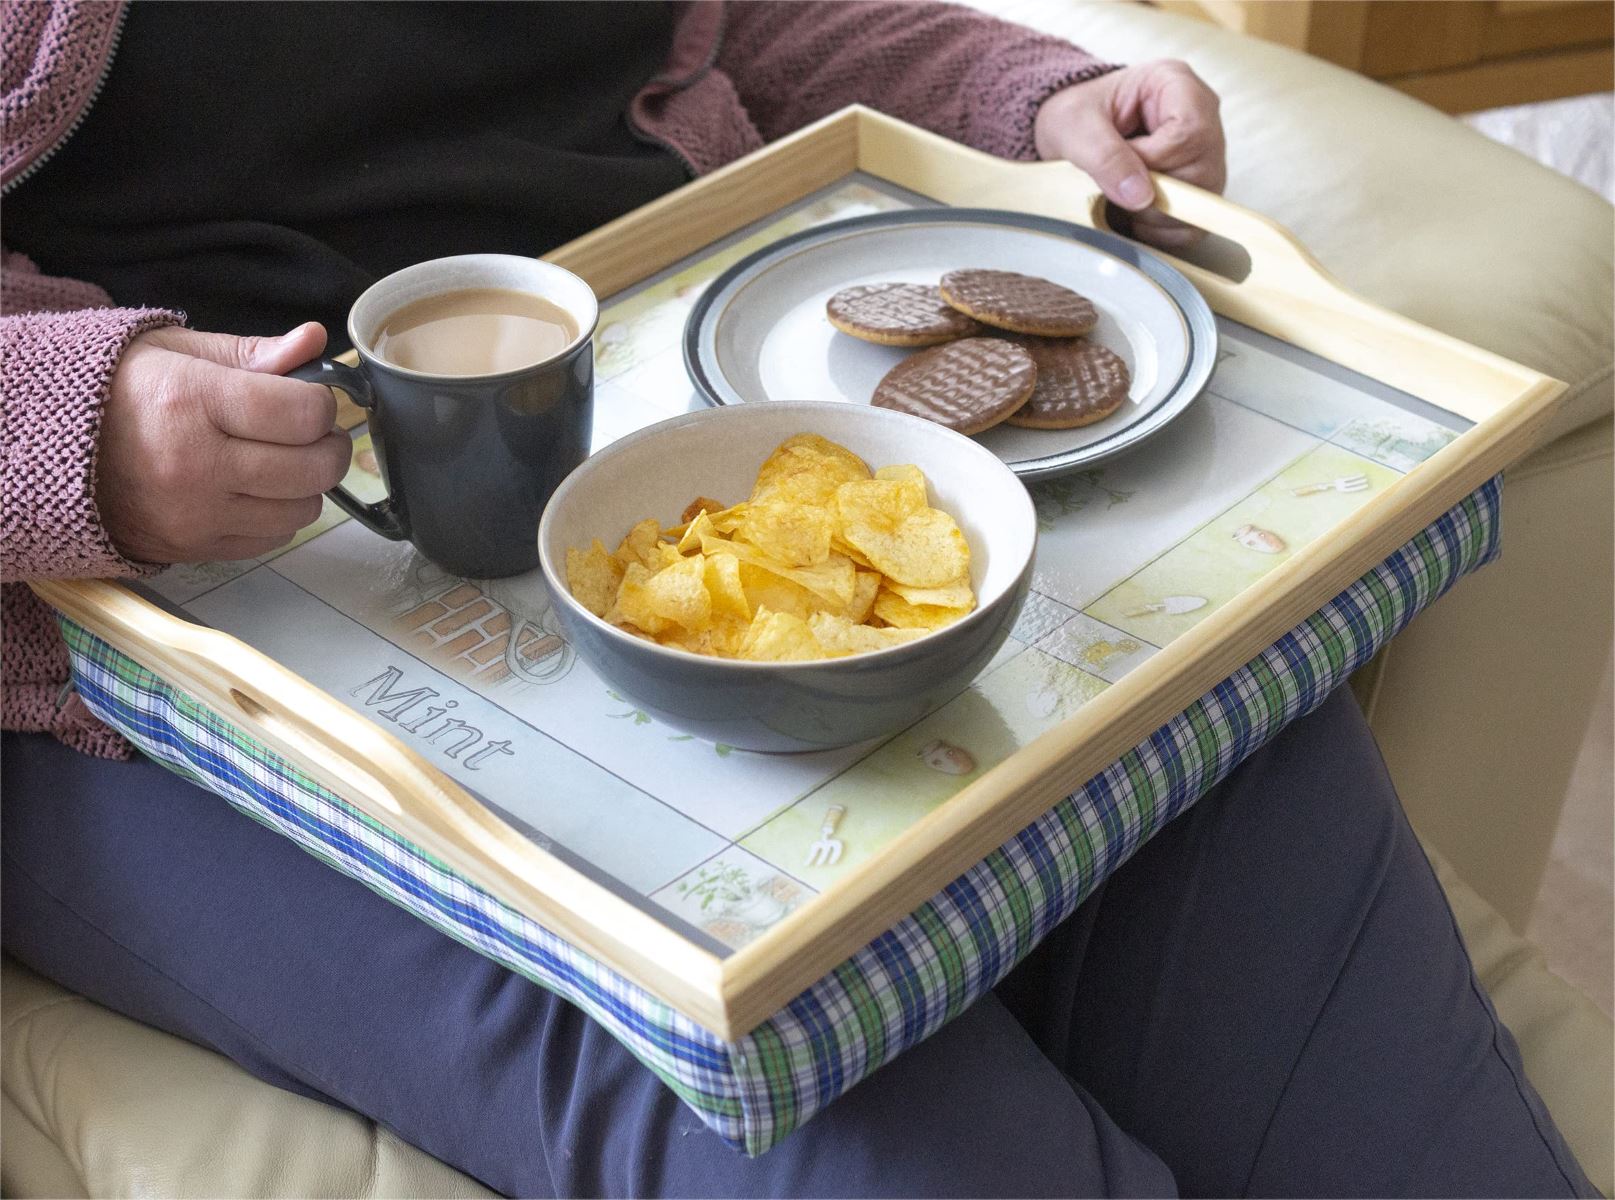
Welcome to our step-by-step guide on how to make a bean bag lap tray! A bean bag lap tray is a versatile and practical accessory that can enhance your comfort and convenience while you relax and enjoy various activities such as reading, browsing the internet, or having a meal in the comfort of your living room. Whether you’re a DIY enthusiast or simply looking for a cost-effective solution for a lap tray, this article will guide you through the process of creating your own bean bag lap tray from scratch.
With just a few materials and some basic sewing skills, you’ll be able to customize and design a lap tray that suits your personal style and preferences. Not only will this project provide you with a sense of accomplishment, but it will also create a functional and stylish addition to your living room furniture.
In this guide, we will walk you through each step of the process, from measuring and cutting the fabric to sewing the sides together, creating the bean bag filling, attaching it to the tray, and finally adding some finishing touches. So, let’s dive in and get started on this exciting DIY project!
Before we begin, let’s go over the materials you will need:
- Fabric of your choice
- Scissors
- Measuring tape or ruler
- Thread and needle or sewing machine
- Bean bag filling or alternative filling material
- Velcro strips or buttons for closure (optional)
- Decorative elements such as ribbon or trim (optional)
Now that you have your materials ready, let’s move on to the first step: measuring and cutting the fabric.
Key Takeaways:
- Create a personalized bean bag lap tray for your living room using fabric, sewing skills, and bean bag filling. Enjoy comfort and convenience for activities like reading and using a laptop.
- Add decorative elements and non-slip backing to make your lap tray unique and functional. Express your creativity and enjoy the satisfaction of a handmade project.
Read more: How To Make A Bean Bag
Materials Needed
Before you get started on making your bean bag lap tray, it’s important to gather all the necessary materials. Here’s a list of what you will need:
- Fabric of your choice: You can choose any fabric that suits your personal style and matches your living room decor. Consider using a durable and easy-to-clean material such as cotton, canvas, or polyester.
- Scissors: Make sure you have a sharp pair of fabric scissors to ensure clean and precise cuts.
- Measuring tape or ruler: Accurate measurements are crucial to ensure a properly fitting lap tray. Use a measuring tape or ruler to measure the dimensions of the tray.
- Thread and needle or sewing machine: You’ll need thread that matches the color of your fabric and a needle if you plan to sew the tray by hand. Alternatively, if you have access to a sewing machine, it can speed up the process.
- Bean bag filling or alternative filling material: The filling is what gives the tray its plush and comfortable feel. While bean bag filling is commonly used, you can also opt for alternatives such as foam beads, pillow stuffing, or even rice if you prefer a firmer surface.
- Velcro strips or buttons for closure (optional): If you want to secure the bean bag filling inside the tray, you can use Velcro strips or buttons to create a closure. This will prevent the filling from shifting or falling out.
- Decorative elements such as ribbon or trim (optional): If you’d like to add a personal touch and enhance the aesthetic appeal of your lap tray, consider incorporating decorative elements such as ribbon or trim. This can give your lap tray a unique and stylish look.
Once you have gathered all the necessary materials, you’re ready to begin creating your bean bag lap tray. The next section will guide you through the first step of the process: measuring and cutting the fabric.
Step 1: Measuring and Cutting the Fabric
The first step in creating your bean bag lap tray is to measure and cut the fabric. This will ensure that your tray is the perfect size and shape for your needs.
Start by determining the dimensions of your lap tray. Consider how much space you want for activities such as placing a laptop, notebook, or plate. Generally, a lap tray measuring around 18-20 inches in width and 14-16 inches in length works well for most purposes.
Once you have decided on the dimensions, lay your fabric flat on a clean and spacious surface. Use a measuring tape or ruler to mark the measurements of your lap tray on the fabric. Take into account that you will need to leave a seam allowance of about 1/2 an inch on each side for sewing.
After marking the measurements, carefully cut out the fabric following the marked lines using a sharp pair of fabric scissors. Take your time to ensure clean and accurate cuts. If you’re using a patterned fabric, make sure the pattern is aligned correctly before cutting.
If your lap tray design includes a curved or rounded edge, use a round object like a plate or a compass to create a smooth and even curve. Simply trace around the object onto the fabric and cut along the traced line.
Once you have completed the cutting process, you should have two identical fabric pieces, one for the top of the tray and one for the bottom. Make sure they are the same size and shape.
Now that you have your fabric pieces ready, you can proceed to the next step: sewing the sides of the tray together.
Step 2: Sewing the Sides Together
Now that you have your fabric pieces cut to size, it’s time to sew the sides of the tray together to create the main structure of your bean bag lap tray.
Start by placing the two fabric pieces on top of each other with the right sides facing inward. This means that the patterned or colored side of the fabric should be facing inwards, while the plain or underside of the fabric should be facing outwards. Pin the edges of the fabric together to keep them aligned during sewing.
Using a sewing machine or a needle and thread, stitch along the edges of the fabric, leaving one of the shorter ends open. Sew along the three sides of the fabric, making sure to backstitch at the beginning and end of each seam for added durability.
For those sewing by hand, use a backstitch or a running stitch to secure the fabric together. Make sure to sew as close to the edge as possible to create a neat and sturdy seam.
Once the sides are stitched together, turn the fabric right side out through the open end. You should now have a fabric pouch that resembles the shape of a tray, with one side left open for inserting the filling.
Before moving on to the next step, take a moment to check the seams and ensure they are secure. If necessary, reinforce any loose or weak areas by sewing over them again.
Now that the sides of the tray are sewn together, it’s time to move on to creating the filling for your lap tray. In the next step, we will guide you through the process of creating the bean bag filling.
When making a bean bag lap tray, make sure to use a durable and washable fabric for the tray surface, and fill the bean bag with lightweight and moldable materials like rice or plastic pellets for easy handling and comfort.
Step 3: Creating the Bean Bag Filling
In this step, we will guide you through the process of creating the bean bag filling for your lap tray. The filling is what gives the tray its soft and cushioned surface, allowing for comfortable use.
There are a variety of options for filling your lap tray, and one popular choice is using bean bag filling. Bean bag filling is easily accessible and provides a plush and supportive feel to the tray. You can find bean bag filling at craft stores or online.
To create the bean bag filling, start by preparing a clean and spacious area to work in. Open the bag of bean bag filling and carefully pour it into a large container or bowl. This will make it easier to handle and distribute the filling evenly into your lap tray.
When filling your tray, it’s important to not overfill it. This can make the tray too bulky and uncomfortable to use. Start by adding a small amount of filling and test the firmness by pressing down on the surface. Continue adding small amounts of filling until you reach the desired level of firmness.
For those who prefer a firmer surface or do not have access to bean bag filling, there are alternative options available. Foam beads, pillow stuffing, or even rice can be used as filling materials. Simply adjust the quantity to achieve the desired level of comfort.
Once you have filled your tray to your satisfaction, it’s time to move on to the next step: attaching the bean bag filling to the tray.
Before we proceed, it’s important to note that if you plan on washing your lap tray in the future, it is advisable to create a removable filling compartment. This can be achieved by sewing a fabric lining inside the tray, similar to a pillowcase, that can be easily removed and washed separately.
Now that your bean bag filling is ready, let’s continue to the next step of attaching it to the tray.
Read more: How To Make A Giant Bean Bag Chair
Step 4: Attaching the Bean Bag Filling to the Tray
In this step, we will guide you through the process of attaching the bean bag filling to your lap tray, creating a secure and comfortable surface to use.
Start by positioning your tray with the open end facing up. This is where you will insert the bean bag filling. To make the process more manageable, use a funnel or a rolled-up piece of paper to guide the filling into the tray.
Slowly pour the bean bag filling into the tray, distributing it evenly across the surface. You may want to gently shake the tray as you fill it to ensure the filling settles evenly and doesn’t clump up in one area.
Continue adding the filling until the tray reaches your desired level of comfort. Remember not to overfill the tray, as this may make it difficult to close and may cause discomfort during use.
Once you have filled the tray to your satisfaction, it’s time to close the open end. There are a few options for securing the filling inside the tray:
- Velcro strips: Cut two pieces of Velcro strips and attach them to the edges of the open end. Make sure that they align correctly so that the tray closes securely.
- Buttons: Sew buttons onto one side of the open end, leaving corresponding buttonholes on the other side. This will allow you to close the tray by fastening the buttons into the buttonholes.
- Stitching: If you prefer a permanent closure, simply sew the open end shut using a needle and thread or a sewing machine. Make sure to secure the stitches to prevent the filling from escaping.
Choose the closure method that suits your preferences and sewing skills. Whichever method you choose, ensure that it provides a secure closure so that the filling doesn’t spill out during use.
Now that your lap tray is filled and closed, you’re almost finished! In the next step, we will add some finishing touches to complete your bean bag lap tray.
Step 5: Finishing Touches
In this final step, we will add some finishing touches to your bean bag lap tray, making it even more personalized and aesthetically pleasing.
One option for adding a decorative touch is to incorporate ribbon or trim around the edges of the tray. Choose a ribbon or trim that complements the fabric and the overall style of your living room. Simply sew the ribbon or trim along the edges of the tray using a needle and thread or a sewing machine.
Another option is to embellish the tray with embroidery or applique. You can personalize it with your initials, a favorite pattern, or even a unique design that reflects your interests. Use embroidery floss or fabric scraps to add these decorative elements and make your lap tray truly one-of-a-kind.
If you want to make your lap tray more versatile, consider adding pockets or compartments. These can be sewn onto the fabric, providing storage space for small items such as pens, notepads, or a remote control. You can customize the size and number of pockets to suit your needs.
Lastly, consider adding a non-slip backing to the bottom of your tray to prevent it from sliding off your lap. You can use a non-slip fabric or attach a rubberized surface like shelf liner or adhesive grip tape. This will ensure stability and a secure fit while using the lap tray.
Remember, the finishing touches are meant to enhance the functionality and appearance of your lap tray, so feel free to get creative and add any elements that suit your style and preferences.
Once you have completed the finishing touches, take a moment to inspect your lap tray and make any necessary adjustments or fixes. Double-check that all seams are secure and that everything is in place before putting your lap tray to use.
Congratulations! You have successfully created your own bean bag lap tray from start to finish. Not only is it a practical accessory for your living room, but it’s also a reflection of your creativity and personal style.
Now it’s time to sit back, relax, and enjoy the comfort and convenience of your homemade bean bag lap tray. Whether you’re indulging in a meal, working on your laptop, or simply unwinding with a book, your lap tray will provide you with a cozy and functional surface right at your fingertips.
We hope you found this guide helpful and inspiring. Happy crafting!
Conclusion
Congratulations on completing your bean bag lap tray! By following this step-by-step guide, you have successfully created a functional and personalized accessory for your living room. Not only does it provide a convenient surface for various activities, but it also adds a touch of style to your living room decor.
Throughout the DIY process, you measured and cut the fabric, sewed the sides together, created the bean bag filling, attached it to the tray, and added finishing touches. These steps have allowed you to showcase your sewing skills and creativity, resulting in a lap tray that is tailored to your individual needs and preferences.
Remember, you have the flexibility to customize your lap tray further by choosing different fabrics, adding decorative elements, or incorporating additional features like pockets or non-slip backing. Feel free to experiment and make it truly unique to you.
Whether you use your lap tray for enjoying meals, working on your laptop, reading, or even doing crafts, it will undoubtedly enhance your comfort and convenience. Sit back, relax, and enjoy the practicality and versatility of your homemade lap tray.
We hope that this guide has been helpful and inspiring in your DIY journey. Creating your own bean bag lap tray not only saves you money but also allows you to express your creativity and add a personal touch to your living room.
So, grab your favorite fabric, sewing supplies, and get started on crafting your very own bean bag lap tray. Enjoy the process and the satisfaction of completing a handmade project that you can enjoy for years to come!
Frequently Asked Questions about How To Make A Bean Bag Lap Tray
Was this page helpful?
At Storables.com, we guarantee accurate and reliable information. Our content, validated by Expert Board Contributors, is crafted following stringent Editorial Policies. We're committed to providing you with well-researched, expert-backed insights for all your informational needs.

0 thoughts on “How To Make A Bean Bag Lap Tray”