Home>Garden Essentials>How To Germinate Scarlett Runner
Garden Essentials
How To Germinate Scarlett Runner
Modified: October 20, 2024
Learn how to successfully germinate Scarlett Runner beans in your garden with our step-by-step guide. Grow your own vibrant and nutritious beans for a bountiful harvest.
(Many of the links in this article redirect to a specific reviewed product. Your purchase of these products through affiliate links helps to generate commission for Storables.com, at no extra cost. Learn more)
Introduction
Welcome to the world of gardening, where the joy of nurturing plants and reaping the rewards of your hard work can be truly fulfilling. If you’re a fan of beans, then growing the Scarlett Runner variety is sure to pique your interest. These vibrant, red-flowered beans not only add a pop of color to your garden but are also delicious and nutritious.
In this article, we will guide you through the process of germinating Scarlett Runner beans. From choosing the right seeds to providing optimal growing conditions, we will cover all the essential steps to ensure successful cultivation. So, let’s jump right in and embark on this exciting gardening journey together.
Key Takeaways:
- Choose high-quality Scarlett Runner bean seeds from trusted suppliers and prepare the soil with optimal conditions for successful germination and healthy plant growth.
- Provide your Scarlett Runner beans with consistent watering, balanced fertilization, proper support, and vigilant pest and disease management to ensure a bountiful and flavorful harvest.
Choosing the Right Seeds
When it comes to growing Scarlett Runner beans, selecting high-quality seeds is crucial. Here are a few tips to help you choose the right ones:
- Start with a reputable seed supplier: Look for trusted seed suppliers who provide certified organic or non-GMO seeds. This ensures that you start with seeds of the highest quality.
- Consider the growing region: Take into account the climate and growing conditions of your region when choosing Scarlett Runner bean seeds. Opt for seeds that are specifically suited to your area, as they will have a better chance of thriving.
- Inspect the seed packet: Read the information on the seed packet carefully. Look for details such as the variety, estimated maturation time, and specific growing requirements. This will help you make an informed decision based on your gardening goals and available resources.
- Check for seed viability: While most seeds have a good germination rate, it’s always recommended to perform a simple viability test. Take a few seeds and place them between damp paper towels. Keep them in a warm area and check for germination after a few days. If a majority of the seeds sprout, you can be confident in their viability.
By considering these factors, you can ensure that you choose the best Scarlett Runner bean seeds for your garden. Once you have your seeds, it’s time to prepare the soil for planting.
Preparing the Soil
Preparing the soil properly is essential for the healthy growth of Scarlett Runner beans. Follow these steps to create an ideal environment for your seeds:
- Choose a sunny location: Scarlett Runner beans thrive in full sunlight, so select a spot in your garden that receives at least 6-8 hours of direct sunlight each day. This will encourage robust plant development and a bountiful harvest.
- Clear the area: Before preparing the soil, remove any weeds or vegetation from the planting area. Weeds can compete with your beans for nutrients and water, so it’s important to establish a weed-free environment.
- Loosen the soil: Use a garden fork or tiller to loosen the soil to a depth of around 8-10 inches. This will improve the soil’s texture and allow the roots of your beans to penetrate deep into the ground.
- Amend the soil: Scarlett Runner beans prefer well-draining soil with a slightly acidic to neutral pH level of 6.0-7.0. If your soil is heavy clay or sandy, you can improve its structure by incorporating organic matter like compost or well-rotted manure. This will increase the soil’s fertility and moisture-retaining capacity.
- Level the soil: After amending the soil, smooth it out and level the surface. This will provide an even base for sowing the seeds and ensure uniform growth of your bean plants.
By adequately preparing the soil, you create an optimal foundation for your Scarlett Runner beans to thrive. Now that the soil is ready, let’s move on to the next step: sowing the seeds.
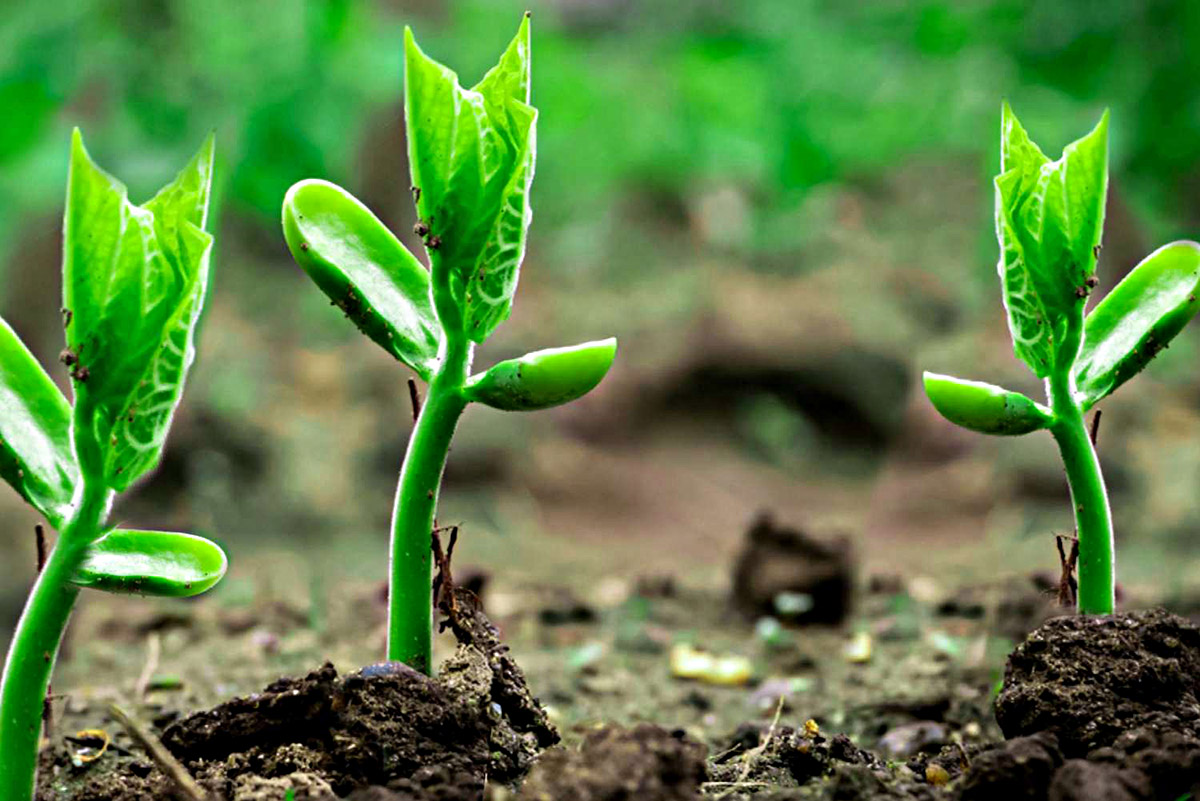
Sowing the Seeds
Now that you’ve selected the perfect seeds and prepared the soil, it’s time to sow your Scarlett Runner beans. Follow these steps to ensure successful germination:
- Create furrows: Using a garden hoe or your finger, create furrows in the soil. Space the furrows about 12-18 inches apart to allow enough room for the bean plants to spread.
- Sow the seeds: Place the seeds in the furrows, spacing them about 4-6 inches apart. Cover the seeds with about 1 inch of soil, gently pressing it down to ensure good contact between the seed and the soil.
- Water the seeds: After sowing, water the area thoroughly to provide moisture for the germination process. Be careful not to wash away the seeds and soil. Maintain consistent moisture throughout the germination period.
- Label the rows: To keep track of your planting, label each row with the name of the variety and the planting date. This will help you monitor the progress of your beans and make any necessary adjustments.
Scarlett Runner beans typically germinate within 7-10 days. Once the seeds have sprouted, it’s important to provide them with the optimal growing conditions to ensure healthy growth and a bountiful harvest.
Providing Optimal Growing Conditions
To ensure that your Scarlett Runner beans grow vigorously and produce abundant harvests, it’s important to provide them with optimal growing conditions. Here are some key factors to consider:
- Sunlight: Scarlett Runner beans thrive in full sunlight. Make sure they receive at least 6-8 hours of direct sunlight every day. This will stimulate healthy growth and maximize the production of flowers and beans.
- Temperature: These beans prefer moderate temperatures between 60-80°F (15-27°C). They can tolerate slight variations, but extreme heat or frost can negatively impact their growth and yield.
- Spacing: Adequate spacing between plants is essential to allow air circulation and prevent the spread of diseases. Ensure that the plants are spaced 4-6 inches apart within the row and maintain a gap of 12-18 inches between rows.
- Soil Moisture: Scarlett Runner beans require consistently moist soil, but they don’t thrive in waterlogged conditions. Water the plants regularly, providing enough moisture to keep the soil evenly moist but not saturated.
- Weed Control: Regular weeding is necessary to prevent weeds from competing with your beans for nutrients and water. Remove any weeds by hand or carefully use a hoe to avoid damaging the shallow roots of the bean plants.
- Mulching: Applying a layer of organic mulch around the base of your bean plants can help retain soil moisture, suppress weed growth, and maintain more consistent soil temperatures.
- Pruning: While Scarlett Runner beans generally do not require pruning, you can remove any yellow or withered leaves to improve air circulation and reduce the risk of diseases.
By providing these optimal growing conditions, you are setting the stage for healthy bean plants that can withstand pests, diseases, and adverse environmental conditions. Regular monitoring and maintenance will ensure their continued growth and productivity.
Soak Scarlett Runner seeds in water for 24 hours before planting to help speed up the germination process. This will soften the seed coat and encourage quicker sprouting.
Read more: How To Install Runner On Stairs
Watering and Fertilizing
Proper watering and fertilizing are essential for the healthy growth and productivity of your Scarlett Runner beans. Let’s explore how to give them the right nutrients and hydration:
Watering:
- Consistent Moisture: Keep the soil consistently moist for optimal bean growth. Water deeply, providing enough moisture to penetrate the root zone. Avoid overwatering, as it can lead to root rot and other fungal diseases.
- Watering Schedule: Depending on weather conditions, you may need to water your beans every 2-3 days. Monitor the soil moisture level regularly by inserting your finger into the soil. If it feels dry up to the first knuckle, it’s time to water.
- Morning watering: Water in the morning to allow excess moisture to evaporate during the day. Avoid watering in the evening, as damp foliage overnight can promote fungal diseases.
- Drip Irrigation or Soaker Hoses: Consider using drip irrigation or soaker hoses to provide a slow, steady supply of water directly to the root zone. This minimizes water waste and reduces the risk of foliage diseases.
Fertilizing:
- Balance of Nutrients: Scarlett Runner beans have moderate fertility requirements. Prioritize balanced fertilizers, such as a 10-10-10 or 14-14-14 NPK (nitrogen, phosphorus, potassium) blend, to ensure they receive essential nutrients.
- Timing: Apply a granular fertilizer when planting the seeds or shortly after germination. Alternatively, you can use a liquid fertilizer every 2-3 weeks throughout the growing season.
- Avoid Excessive Nitrogen: Excessive nitrogen can lead to lush foliage growth at the expense of bean production. Follow package instructions and avoid over-fertilizing with nitrogen-rich fertilizers.
- Organic Options: If you prefer organic gardening, consider using compost or well-rotted manure as a natural, slow-release fertilizer. These organic amendments improve soil fertility and promote overall plant health.
By providing consistent watering and balanced fertilization, you’ll ensure that your Scarlett Runner beans have the nutrients and hydration they need to grow vigorously and produce an abundant harvest.
Support and Trellising
Scarlett Runner beans are vigorous climbers that require support and trellising to grow vertically. Providing proper support not only helps them reach their full potential but also facilitates easier maintenance and harvesting. Here’s how to effectively support your bean plants:
- Selecting a Support Structure: Choose a sturdy support structure that can withstand the weight of mature bean plants. Options include trellises, stakes, or A-frame structures. Ensure that the structure is at least 6-8 feet tall to accommodate the vigorous growth of Scarlett Runner beans.
- Installing the Support: Place the support structure firmly in the ground, ensuring it is stable and secure. Consider positioning it on the north side of the bean plants to avoid shading neighboring plants.
- Training the Vines: As the bean plants grow, gently guide the vines towards the support structure. Use garden twine or soft ties to secure the stems to the trellis or stakes. This helps the plants climb vertically and prevents them from flopping over.
- Regular Maintenance: Regularly check the vines and adjust their positioning as needed. Encourage the vines to weave through the support structure for maximum coverage and airflow. Trim any side shoots or tendrils that may hinder the upward growth.
Proper support and trellising not only promote vertical growth but also help improve air circulation around the plants, reducing the risk of diseases. It also makes harvesting easier, as the bean pods will be more accessible and less likely to come into contact with the soil.
Remember to regularly inspect and maintain the support structure throughout the growing season, ensuring it remains sturdy and intact. By providing the necessary support, you’ll ensure that your Scarlett Runner beans grow upward and thrive in your garden.
Managing Pests and Diseases
Like any garden plants, Scarlett Runner beans are susceptible to certain pests and diseases. However, with the right preventive measures and diligent monitoring, you can effectively manage and minimize the impact of these issues. Here’s how to keep common pests and diseases at bay:
Pest Management:
- Aphids: These small, soft-bodied insects can cluster on the undersides of leaves, causing damage by sucking sap from the plants. Control aphid populations by spraying a strong stream of water to dislodge them or using insecticidal soap as a natural remedy.
- Bean Beetles: Bean beetles feed on the leaves and bean pods, causing significant damage. Handpick the beetles or use row covers to prevent them from accessing the plants. Alternatively, introduce beneficial insects like ladybugs, which feed on bean beetles and other pests.
- Slugs and Snails: These slimy creatures can damage the tender foliage of young bean plants. Create barriers, such as crushed eggshells or diatomaceous earth, around the plants to deter them. Regularly check for slugs and snails and remove them by hand.
Disease Control:
- Powdery Mildew: This fungal disease appears as a white, powdery coating on leaves and stems. To prevent powdery mildew, ensure proper air circulation around the plants and avoid overhead watering. If necessary, apply a fungicidal spray specifically formulated for powdery mildew control.
- Anthracnose: Anthracnose causes dark, sunken lesions on leaves, stems, and bean pods. To manage anthracnose, remove and destroy infected plant debris, practice crop rotation, and provide adequate spacing between plants to improve airflow.
- Bacterial Blight: Bacterial blight causes brown spots on leaves and can lead to plant wilting. Unfortunately, there are no effective chemical controls for this disease. To minimize the risk, practice good sanitation, avoid overhead watering, and remove and destroy infected plants to prevent the spread of bacteria.
Regular monitoring of your bean plants is crucial for early pest or disease detection. By promptly taking action and implementing appropriate control methods, you can effectively manage pest and disease issues in your garden, ensuring the health and productivity of your Scarlett Runner beans.
Harvesting Scarlett Runner Beans
Harvesting Scarlett Runner beans is an exciting culmination of your gardening journey. These flavorful and vibrant beans are best enjoyed freshly picked. Here’s how to know when and how to harvest them:
Timing:
Scarlett Runner beans usually reach maturity around 60-70 days after planting, although this can vary slightly depending on growing conditions. It’s important to monitor the plants regularly and look for a few key indicators that signal readiness for harvest:
- Bean Size: The beans should be plump and well-filled. They should have reached their mature size, usually about 6-8 inches long.
- Bean Color: Scarlett Runner beans turn a distinct deep red color when fully mature. The vibrant red shade is a visual cue that they are ready to be harvested.
- Texture: Gently squeeze a few beans to check their texture. They should feel firm and crisp, indicating their readiness for harvest.
Harvesting Technique:
To harvest Scarlett Runner beans, follow these steps:
- Use sharp garden shears or a knife to carefully cut the bean pods from the plants. Hold the pod gently to avoid damaging the plant.
- Harvest regularly, as leaving mature beans on the plant can slow down further production. Aim to harvest beans every 2-3 days as they reach maturity.
- It’s important to harvest the beans before they become overly mature. Overripe beans can be tough and stringy, so pick them while they are still tender and flavorful.
Post-Harvest Care:
Once harvested, sort through the beans and discard any damaged or discolored ones. Rinse the beans under cool water to remove any dirt or debris. Then, enjoy the fruits of your labor! Scarlett Runner beans can be cooked and enjoyed in various ways – steamed, sautéed, stir-fried, or added to salads and stews.
Remember, harvested beans can also be preserved for future use. To do this, blanch the beans by placing them in boiling water for a couple of minutes, then transfer them to an ice bath to stop the cooking process. Drain and pack the blanched beans into freezer-safe bags or containers for long-term storage.
Celebrate your successful harvest and savor the delicious taste of Scarlett Runner beans that you nurtured from seed to harvest.
Read more: What Is A Carpet Runner
Conclusion
Growing Scarlett Runner beans is a rewarding experience that allows you to enjoy the beauty and bounty of these vibrant red-flowered beans. By following the steps outlined in this article, you can successfully germinate, care for, and harvest these nutritious legumes.
Start by selecting high-quality seeds from reputable suppliers, ensuring they are suitable for your growing region. Properly preparing the soil before sowing the seeds sets the stage for healthy plant growth. Remember to provide optimal growing conditions, including adequate sunlight, spacing, moisture, and proper support and trellising.
Regular watering and fertilization, combined with diligent pest and disease management, will help your Scarlett Runner beans flourish. By monitoring for pests and diseases, you can take preemptive action to prevent damage and keep your plants healthy.
Finally, the joy of harvesting Scarlett Runner beans is the culmination of your efforts. Harvest the beans when they are plump, red, and tender for the best flavor. Enjoy them fresh or preserve them for future use.
So, grab your gardening tools and embark on the journey of growing Scarlett Runner beans. With patience, care, and attention to detail, you will be rewarded with a bountiful harvest of these delicious and nutritious beans. Happy gardening!
Frequently Asked Questions about How To Germinate Scarlett Runner
Was this page helpful?
At Storables.com, we guarantee accurate and reliable information. Our content, validated by Expert Board Contributors, is crafted following stringent Editorial Policies. We're committed to providing you with well-researched, expert-backed insights for all your informational needs.


0 thoughts on “How To Germinate Scarlett Runner”