Home>Garden Essentials>How To Grow Cornflowers From Seed
Garden Essentials
How To Grow Cornflowers From Seed
Modified: August 27, 2024
Learn how to grow vibrant cornflowers from seed in your garden with our step-by-step guide. Enhance your garden's beauty with these easy-to-grow flowers.
(Many of the links in this article redirect to a specific reviewed product. Your purchase of these products through affiliate links helps to generate commission for Storables.com, at no extra cost. Learn more)
Introduction
Welcome to the wonderful world of growing cornflowers! These beautiful and vibrant flowers can add a splash of color to any garden, making it a haven for bees, butterflies, and other pollinators. Whether you’re a seasoned gardener or just starting out, growing cornflowers from seed is a rewarding and relatively easy process. In this article, we will guide you through the step-by-step process of growing cornflowers, from choosing the right seeds to harvesting and saving seeds for future planting.
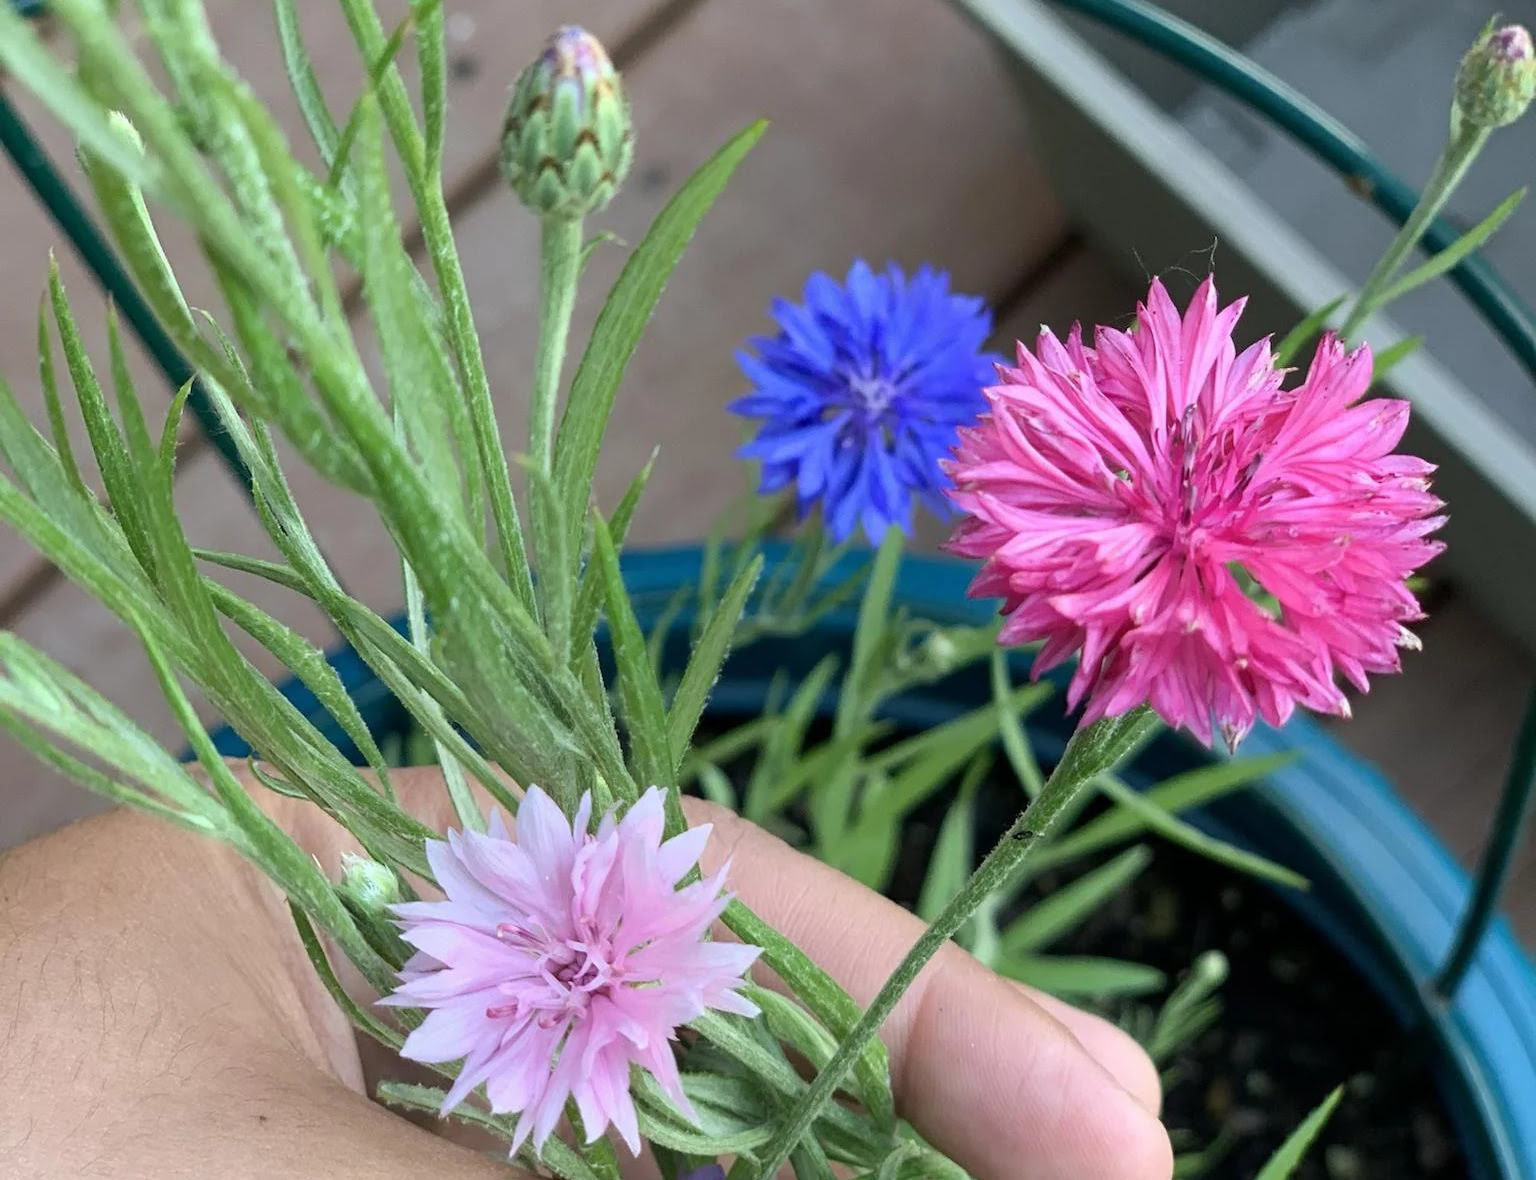
Cornflowers, also known as Centaurea cyanus, are native to Europe but have become popular garden flowers worldwide due to their striking blue, pink, and white blooms. They are hardy annuals that can thrive in various climates, making them an excellent choice for gardeners of all experience levels.
These charming flowers are not only aesthetically pleasing but also have several practical uses. Cornflower petals can be used to make natural dyes for fabrics and food coloring. Additionally, their nectar-rich flowers attract bees and other beneficial insects, making them an important part of any pollinator-friendly garden.
Before you start planting, it’s essential to understand the different types of cornflower seeds available. There are several varieties, including single flowers, double flowers, and dwarf varieties, each with its unique characteristics. Consider your garden’s size, soil conditions, and aesthetic preferences when selecting the best seeds for your space.
Now, let’s dive into the exciting journey of growing cornflowers from seed. By the end of this article, you’ll have all the knowledge you need to successfully cultivate these stunning flowers and enjoy their beauty throughout the growing season.
Key Takeaways:
- Growing cornflowers from seed is a fun and rewarding process, suitable for both new and experienced gardeners. From choosing the right seeds to harvesting, this guide provides all the steps for success.
- By following the steps in this article, you can enjoy the vibrant beauty of cornflowers in your garden. From providing optimal conditions to harvesting and saving seeds, this guide covers it all.
Read more: How To Grow Okra From Seed
Choosing the Right Seeds
When it comes to growing cornflowers, selecting the right seeds is the first step towards a successful garden. There are a few factors to consider when choosing your cornflower seeds:
- Variety: Cornflowers come in a range of varieties, each with its own unique characteristics. Single flowers, double flowers, and dwarf varieties are some of the options available. Consider the height, flower form, and color preferences when selecting the variety for your garden.
- Soil and Climate: Cornflowers prefer well-draining soil and can tolerate a wide range of climates. However, they thrive in full sun or partial shade, so choose a variety that is suitable for your specific growing conditions.
- Source: Purchase seeds from reputable nurseries or seed suppliers to ensure quality and germination rates. Look for organic or heirloom varieties if you prefer to avoid genetically modified seeds.
- Sowing Instructions: Read the packaging or product description to understand the sowing instructions for the particular variety you’ve chosen. It will provide valuable information on the optimal time for sowing, planting depth, and spacing between plants.
Once you’ve considered these factors, it’s time to acquire your cornflower seeds. You can find them at local garden centers, online seed retailers, or even through seed exchanges with fellow gardeners. Remember to check the seed packets for the specific information mentioned above, as it will guide you in the successful cultivation of your cornflowers.
Now that you’ve chosen your cornflower seeds let’s move on to preparing the soil for optimal growth.
Preparing the Soil
Preparing the soil is a crucial step in ensuring the healthy growth of cornflowers. These flowers prefer well-draining soil with a slightly acidic to neutral pH. Here are the steps to prepare your soil for planting:
- Clear the Area: Start by clearing the designated area of any weeds, rocks, or debris. Cornflowers perform best in weed-free environments, so take the time to remove any unwanted vegetation.
- Loosen the Soil: Use a garden fork or tiller to loosen the soil to a depth of about 8 to 12 inches. This will help improve drainage and allow the roots to penetrate easily.
- Amend the Soil: If your soil is heavy clay or lacks organic matter, consider adding compost or well-rotted manure to improve its texture and fertility. These organic amendments will help retain moisture and provide essential nutrients for the cornflowers.
- Test the pH: It’s a good idea to test the soil’s pH level using a soil testing kit. Cornflowers prefer a pH range of 6.0 to 7.0. If the pH is too low (acidic), you can add lime to raise it. If it’s too high (alkaline), sulfur or peat moss can be added to lower the pH.
- Rake the Soil: After adding amendments or adjusting the pH, rake the soil to level the surface and create a fine, crumbly texture. This will provide an ideal seedbed for sowing the cornflower seeds.
By following these steps, you will create an optimal environment for the cornflowers to grow and thrive. The improved soil structure, fertility, and pH will support healthy root development and overall plant vigor.
Now that your soil is ready, it’s time to move on to the exciting part – sowing the cornflower seeds!
Sowing the Seeds
Sowing the cornflower seeds is an exciting step that brings you closer to seeing these beautiful flowers bloom in your garden. Here’s how you can sow the seeds:
- Timing: The best time to sow cornflower seeds is in early spring, after the last frost has passed. However, if you live in a region with mild winters, you can also sow the seeds in the fall for early spring blooms.
- Prepare the Rows or Beds: Decide whether you want to sow the seeds in rows or scattered beds. If using rows, make shallow furrows using a garden hoe or your finger. Space the rows or beds according to the recommended seed packet instructions to provide enough room for the mature plants.
- Sow the Seeds: Gently sprinkle or sow the cornflower seeds along the furrows or scatter them in the prepared beds. Aim for a spacing of about 6 to 8 inches between seeds or plants to allow for proper airflow and growth.
- Cover and Water: After sowing the seeds, lightly cover them with a thin layer of soil, approximately ¼ inch deep. Then, gently water the area to moisten the soil. Avoid overwatering, as it can lead to seed rot or fungal diseases.
- Label and Mulch: It’s helpful to label the sown area or rows to keep track of the different varieties. Additionally, applying a layer of organic mulch, such as straw or wood chips, can help conserve moisture, suppress weeds, and regulate soil temperature.
Keep the soil consistently moist but not waterlogged during the germination period, which usually takes around 10 to 14 days. As the seedlings emerge, thin them out if necessary, ensuring that there is enough space for each plant to grow and access sunlight.
Now that you’ve sown your cornflower seeds, it’s time to provide the right conditions for their growth and development. Stay tuned for the next section!
Providing the Right Conditions
Creating the optimal growing conditions for your cornflowers will greatly contribute to their overall health and performance. Here are some important factors to consider:
- Sunlight: Cornflowers thrive in full sun to partial shade. Ensure they receive at least 6 to 8 hours of direct sunlight each day. In hotter climates, providing some afternoon shade can help protect the plants from extreme heat.
- Temperature: Cornflowers are adaptable and can tolerate a wide range of temperatures. However, they prefer moderately cool temperatures between 60°F and 75°F (15°C and 24°C). Avoid extreme heat or prolonged frost exposure.
- Air Circulation: Good air circulation is essential for preventing fungal diseases and promoting healthy plant growth. Avoid overcrowding the plants and provide sufficient spacing between them.
- Watering: While cornflowers are relatively drought-tolerant, they still require consistent moisture, especially during periods of prolonged dryness. Water the plants thoroughly when the top inch of soil feels dry, providing a deep soaking rather than light watering.
- Mulching: Applying a layer of organic mulch around the base of the plants can help regulate soil moisture levels, suppress weeds, and protect the roots from temperature fluctuations.
- Note on Container Growing: If you’re growing cornflowers in containers, ensure they have drainage holes to prevent waterlogged soil. Place the containers in a location that receives adequate sunlight and remember to water them appropriately.
By providing these optimal conditions, your cornflowers will be able to flourish and produce vibrant blooms throughout the growing season. Pay attention to any signs of stress or disease and make adjustments as needed to ensure their continued success.
Next, let’s explore how to properly water and fertilize your cornflowers to promote healthy growth and abundant flowering.
Read more: How To Grow A Tree From A Seed
Watering and Fertilizing
Proper watering and fertilizing techniques are vital for the healthy growth and blooming of your cornflowers. Here’s what you need to know:
Watering:
Cornflowers are relatively drought-tolerant once established, but they still require regular watering, especially during dry spells. Here are some guidelines to follow:
- Deep Watering: Water the plants deeply, providing enough moisture to reach the root zone. This encourages the roots to grow deeper, making the plants more resilient to drought.
- Frequency: Water your cornflowers when the top 1-2 inches of soil feel dry. Avoid overwatering, as this can lead to root rot and other water-related diseases.
- Time of Day: Water in the early morning or late afternoon to minimize moisture loss through evaporation. Avoid watering during the hottest part of the day to prevent leaf scorch.
- Avoid Foliar Watering: Water the soil directly at the base of the plants to prevent wet foliage, which can contribute to fungal diseases.
Fertilizing:
Cornflowers are relatively low-maintenance when it comes to fertilization. Here are some tips to keep in mind:
- Organic Matter: Prior to planting, incorporate well-rotted compost or organic matter into the soil to provide essential nutrients and improve soil fertility.
- Slow-Release Fertilizer: If your soil is lacking in nutrients, you can apply a balanced slow-release granular fertilizer when planting. This will provide a steady supply of nutrients without the risk of overfeeding.
- Side-Dressing: As the plants grow, you can supplement with a side-dressing of compost or organic fertilizer around the base of the plants. This can be done once or twice during the growing season to provide additional nutrients.
- Be Mindful of Nitrogen: Avoid excessive nitrogen fertilization, as it can lead to excessive foliage growth at the expense of flower production.
Regular observation of your cornflowers will help you gauge their nutrient requirements. Adjust the watering and fertilization accordingly to ensure they remain healthy and vibrant throughout the growing season.
Now that you’re taking good care of your cornflowers, let’s explore how to protect them from pests and diseases.
Protecting from Pests and Diseases
While cornflowers are generally resistant to pests and diseases, it’s essential to remain vigilant and take proactive measures to protect your plants. Here are some common pests and diseases to watch out for and how to manage them:
Read more: How To Grow Zinnias From Seed
Pests:
- Aphids: These small, sap-sucking insects can be controlled through methods such as spraying a mixture of mild soap and water or using insecticidal soap.
- Slugs and Snails: These slimy creatures can damage the foliage and blooms. Use organic slug and snail control methods like traps or diatomaceous earth around the plants.
- Caterpillars: Some caterpillars, like the corn borer, can target cornflowers. Inspect the plants regularly and handpick any caterpillars you find. You can also use bacillus thuringiensis (BT) as a biological control.
Diseases:
- Powdery Mildew: This fungal disease appears as a white, powdery coating on the leaves. Provide good air circulation and avoid overhead watering to prevent powdery mildew. If needed, treat with a fungicide labeled for powdery mildew control.
- Gray Mold (Botrytis): Gray mold can occur in cool, damp conditions and causes a fuzzy grayish-brown mold on the flowers and foliage. Remove and dispose of any infected plant material to prevent the spread of the disease.
- Root Rot: Overwatering or poorly drained soil can lead to root rot. Ensure proper drainage and avoid overwatering to prevent this fungal disease.
Regularly inspecting your cornflowers for signs of pests and diseases will allow you to catch any problems early and take appropriate measures to minimize damage. Removing infected or infested plant material and maintaining a clean and tidy garden will help prevent the spread of pests and diseases.
Now that you’re armed with knowledge on protecting your cornflowers, let’s move on to the exciting part – harvesting and saving seeds!
Harvesting and Saving Seeds
Harvesting and saving seeds from your cornflowers allows you to preserve your favorite varieties and grow them again in future seasons. Here’s how you can do it:
Harvesting:
- Timing: Allow the flowers to mature and dry on the plants. The petals will fade and the centers will turn brown as the seeds develop.
- Seed Head Preparation: Cut the seed heads from the plants when they are fully dry. Place a paper bag or a cloth underneath to catch any seeds that may fall during the process.
- Threshing: Gently rub or shake the seed heads to release the seeds. You can do this by hand or by using a sieve or strainer to separate the seeds from the chaff.
- Cleaning the Seeds: Remove any remaining chaff or debris by gently blowing on the seeds or using a fine mesh sieve. This will help ensure that you have clean and viable seeds.
Read more: How To Grow Begonia From Seed
Saving Seeds:
- Drying: Once you’ve cleaned the seeds, spread them out in a single layer on a paper towel or a mesh screen. Place them in a well-ventilated area away from direct sunlight to allow them to dry completely. This process usually takes about a week or two.
- Storage: Once dry, store the seeds in an airtight container, such as a glass jar or a seed packet. Be sure to label the container with the variety and the date of harvest. Store the container in a cool, dark, and dry place, such as a pantry or a refrigerator.
- Viability and Germination: Cornflower seeds can remain viable for several years if stored properly. However, germination rates may decrease over time. To test the viability of stored seeds, you can perform a simple germination test by planting a few seeds in a pot or tray to see if they sprout.
By harvesting and saving seeds from your cornflowers, you can continue to enjoy these beautiful flowers in your garden for years to come. It also allows you to share seeds with other gardeners, contributing to the preservation of these lovely plants.
Congratulations! You’ve now learned the entire process of growing cornflowers from seed, from choosing the right seeds to harvesting and saving seeds. We hope this guide has inspired you to embark on this gardening adventure and enjoy the vibrant beauty of cornflowers in your own garden.
Happy gardening!
Plant cornflower seeds in well-drained soil in a sunny spot. Water regularly, but avoid overwatering. Deadhead flowers to encourage more blooms.
Conclusion
Growing cornflowers from seed is a delightful journey that allows you to experience the beauty and charm of these vibrant flowers firsthand. Whether you’re a novice gardener or an experienced green thumb, the process of cultivating cornflowers is both rewarding and relatively easy. By following the steps outlined in this article, you’ll be well-equipped to successfully grow your own cornflowers and enjoy their stunning blooms.
From choosing the right seeds to preparing the soil, sowing the seeds, and providing the optimal conditions, every step plays a vital role in the successful growth of cornflowers. Remember to consider factors such as variety, soil and climate conditions, and proper care techniques to ensure your plants thrive.
Watering and fertilizing your cornflowers appropriately, while guarding against pests and diseases, will help maintain the health and vigor of your plants. Regular observation and timely interventions will address any issues that may arise.
Lastly, don’t forget the joy of harvesting and saving seeds from your cornflowers. Preserving your favorite varieties allows you to continue growing these beautiful flowers year after year and share them with fellow gardening enthusiasts. Just remember to dry and store the seeds properly for maximum viability.
The process of growing cornflowers from seed is not only a source of visual pleasure but also benefits the environment. Cornflowers, with their nectar-rich flowers, attract important pollinators and contribute to biodiversity in your garden.
So, why not add the beauty and ecological benefits of cornflowers to your garden? Whether you have a small balcony or a spacious backyard, these lovely flowers will bring color, life, and enchantment to any space.
Now, armed with the knowledge and steps provided in this article, it’s time to get your hands dirty and start your cornflower-growing adventure. Enjoy the process, take pride in your green thumb, and revel in the wonder of watching your cornflowers flourish and bloom in your very own garden.
Happy gardening!
Frequently Asked Questions about How To Grow Cornflowers From Seed
Was this page helpful?
At Storables.com, we guarantee accurate and reliable information. Our content, validated by Expert Board Contributors, is crafted following stringent Editorial Policies. We're committed to providing you with well-researched, expert-backed insights for all your informational needs.


0 thoughts on “How To Grow Cornflowers From Seed”