Home>Garden Essentials>How To Make A Putting Green In My Yard With Fake Grass
Garden Essentials
How To Make A Putting Green In My Yard With Fake Grass
Modified: October 20, 2024
Learn how to create a stunning putting green in your yard with synthetic grass. Enhance your garden with our easy-to-follow tips and transform your outdoor space.
(Many of the links in this article redirect to a specific reviewed product. Your purchase of these products through affiliate links helps to generate commission for Storables.com, at no extra cost. Learn more)
Introduction
Welcome to the world of backyard putting greens! If you’re an avid golfer or simply enjoy the game, having your very own putting green in your yard can be a dream come true. And with the advancements in technology, you don’t have to rely on natural grass anymore. With the use of fake grass, you can create a stunning and low-maintenance putting green right in your own backyard.
Having a putting green in your yard not only allows you to practice your putting skills whenever you want, but it also adds a beautiful and functional focal point to your outdoor space. Whether you’re entertaining guests, spending quality time with family, or just enjoying the tranquility of your garden, a fake grass putting green can provide endless hours of enjoyment.
Choosing the right materials and taking the necessary steps to install and maintain your putting green are crucial to ensuring its longevity and playability. In this article, we will guide you through the process of creating your very own putting green using fake grass.
From choosing the perfect fake grass to preparing your yard, installing the turf, and adding special features, we’ll cover all the essential steps. With a little planning and effort, you can have a professional-quality putting green right in your backyard.
So, get ready to channel your inner golfer, roll up your sleeves, and let’s dive into the world of creating a putting green in your yard with fake grass!
Key Takeaways:
- Creating a backyard putting green with fake grass is a fun way to practice golf at home. Choosing the right turf and preparing the yard properly are crucial for a realistic and enjoyable playing experience.
- Maintaining your fake grass putting green is essential for its longevity and optimal performance. Regular brushing, cleaning, and preventive measures will keep the turf looking great and ensure endless hours of golfing fun.
Read more: How To Make My Brown Grass Green Fast
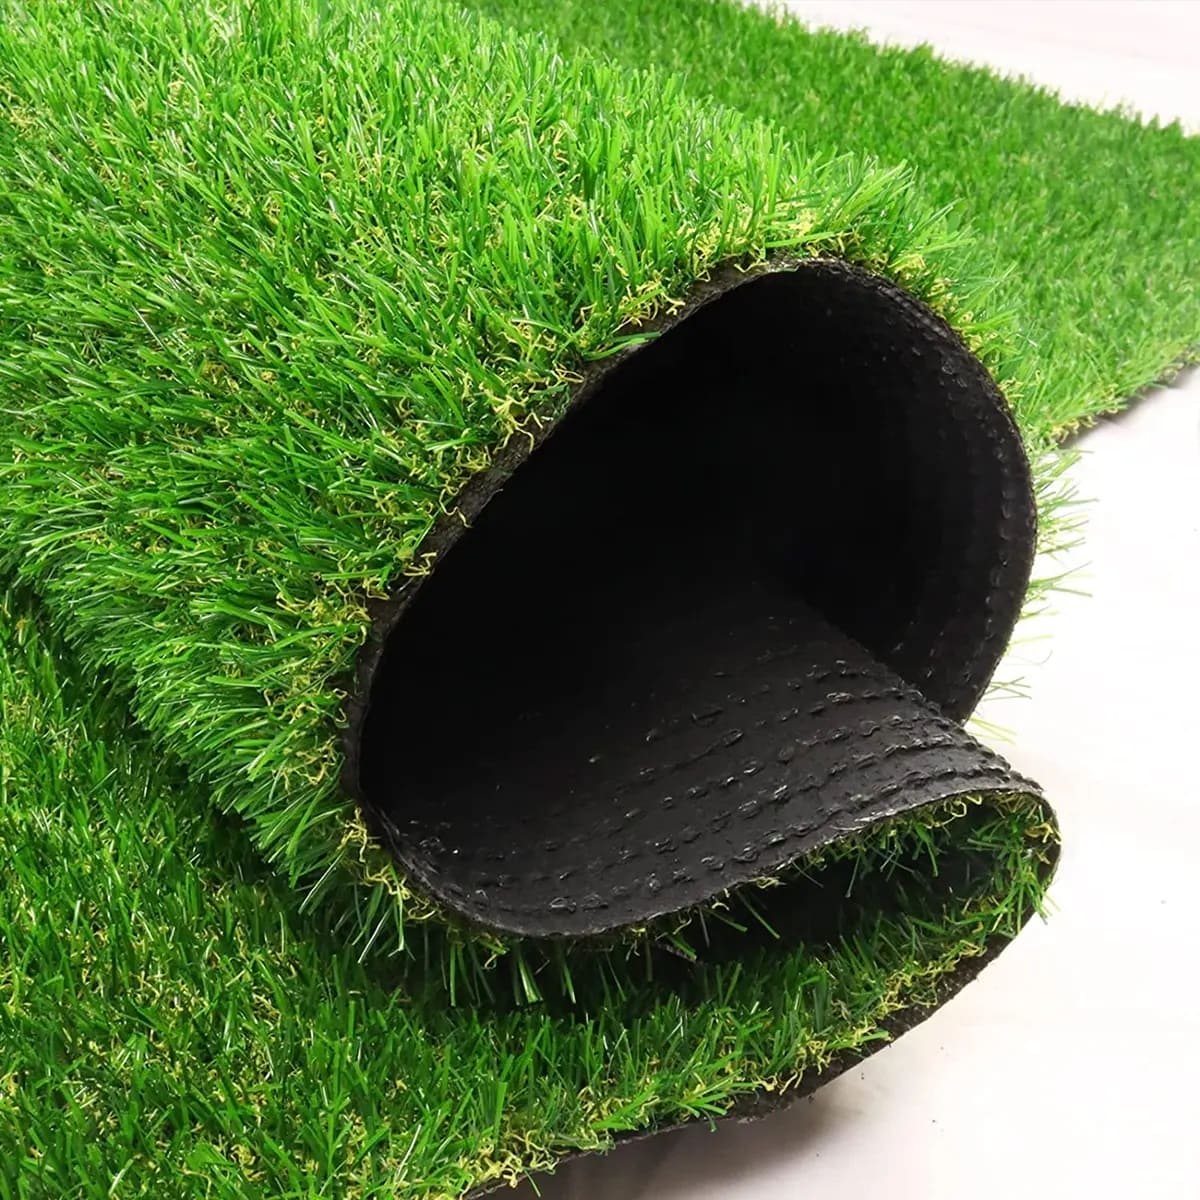
Choosing the Right Fake Grass
When it comes to creating a putting green with fake grass, selecting the right turf is crucial for a realistic and enjoyable playing experience. Here are a few factors to consider when choosing the perfect fake grass for your yard:
- Pile Height: The pile height refers to the length of the synthetic grass blades. For a putting green, you’ll want a shorter pile height to mimic the smooth and tightly mowed surface of a real golf course. Aim for a pile height of around 10-15 millimeters.
- Density and Weight: Opt for a fake grass that is dense and has a higher weight per square meter. This will ensure that the turf stays in place and provides a consistent roll for your putts.
- Infill: Infill is an essential component of fake grass, as it helps to keep the blades upright and provides stability. For putting greens, a sand infill or a mix of sand and rubber infill is commonly used. This creates a firm and level surface for your golf ball to roll smoothly.
- Backing Material: The backing material of the fake grass plays a role in its durability and drainage. Look for a turf with a high-quality, permeable backing that allows water to pass through easily and prevents puddles from forming on the surface.
- Color and Texture: Choose a fake grass that closely resembles the appearance of natural grass. Look for shades of green that match the surrounding landscape and a texture that feels realistic when stepped on.
When shopping for fake grass, it’s a good idea to request samples from different suppliers. This will allow you to compare the look, feel, and performance of the turf before making your final decision.
Additionally, consider seeking advice from experts or consulting with professionals who specialize in artificial turf installation. They can provide insights tailored to your specific needs and help you choose the best fake grass for your putting green.
Remember, investing in high-quality fake grass will ensure that your putting green looks great and withstands the test of time, even with frequent use and varying weather conditions. So, take your time in choosing the perfect turf that will make your backyard putting green a golfer’s paradise.
Preparing the Yard for the Putting Green
Before you can start installing the fake grass for your putting green, it’s important to properly prepare your yard. Follow these steps to ensure a smooth and level surface:
- Clear the Area: Begin by removing any existing vegetation, rocks, or debris from the area where you plan to install the putting green. This will provide a clean and uniform base for your turf.
- Grade the Surface: Use a leveling rake or a garden roller to even out the ground and create a smooth surface. Fill in any low spots with topsoil and compact it down with a tamper to ensure stability.
- Create Borders: Define the boundaries of the putting green by installing edging or borders. This will help keep the turf in place and prevent it from spreading out into surrounding areas. You can use materials such as wood, plastic, or metal for the borders.
- Add Drainage: To prevent water from pooling on the surface, it’s important to ensure proper drainage. If your yard does not naturally slope away from the putting green, you can create a slight slope by adding a thin layer of gravel or using a leveling tool to adjust the grade.
- Compact the Soil: To ensure a stable base for your fake grass, use a plate compactor to compact the soil. This will make the surface more solid and help prevent any unevenness or shifting of the turf.
Remember to take your time during the preparation phase, as it is crucial for the overall quality and longevity of your putting green. The effort you put into properly preparing the yard will pay off when you have a smooth and consistent playing surface for your golfing pleasure.
Installing the Fake Grass
Once you have prepared your yard, it’s time to move on to the exciting part – installing the fake grass for your putting green. Follow these steps for a successful installation:
- Measure and Cut: Begin by measuring the area of your putting green and order enough fake grass to cover the space. Make sure the turf arrives in rolls or pieces that are easy to handle. Unroll the turf and allow it to acclimate to the temperature and conditions for a few hours.
- Trim Excess Material: Using a utility knife, carefully trim any excess edges or overlapping sections of the fake grass. Make sure the cuts are clean and straight to create a seamless appearance.
- Position the Turf: Start at one end of the putting green and roll out the fake grass, ensuring that it covers the entire area and fits snugly against the borders or edging. Adjust the position as needed to achieve a proper fit.
- Secure the Turf: Use landscape stakes or galvanized nails to secure the fake grass to the ground. Place the stakes or nails around the edges and in the middle of the turf, making sure they are evenly spaced. Be careful not to damage the turf in the process.
- Join Multiple Pieces (If Required): If your putting green requires multiple pieces of fake grass, carefully align the seams and use specialized adhesive or seam tape to join them together. Apply the adhesive or tape according to the manufacturer’s instructions.
- Infill the Turf: Once the fake grass is securely installed, it’s time to add infill material. Spread the recommended infill (usually a sand or sand-and-rubber mixture) evenly over the surface using a drop spreader or a power brush. This will help to weigh down the turf, provide stability, and maintain its shape.
Throughout the installation process, regularly inspect the turf for any imperfections or inconsistencies. Smooth out any wrinkles or folds in the fake grass, and adjust the positioning as needed to ensure a smooth and level playing surface.
Remember, installing fake grass for your putting green requires attention to detail and precision. Take your time during the installation to ensure a professional-looking result that will enhance your golfing experience.
When installing fake grass for a putting green, make sure to properly prepare the ground by removing any existing grass and debris. Use a compacted base of crushed rock and sand to ensure a smooth and level surface for the fake grass to be installed on.
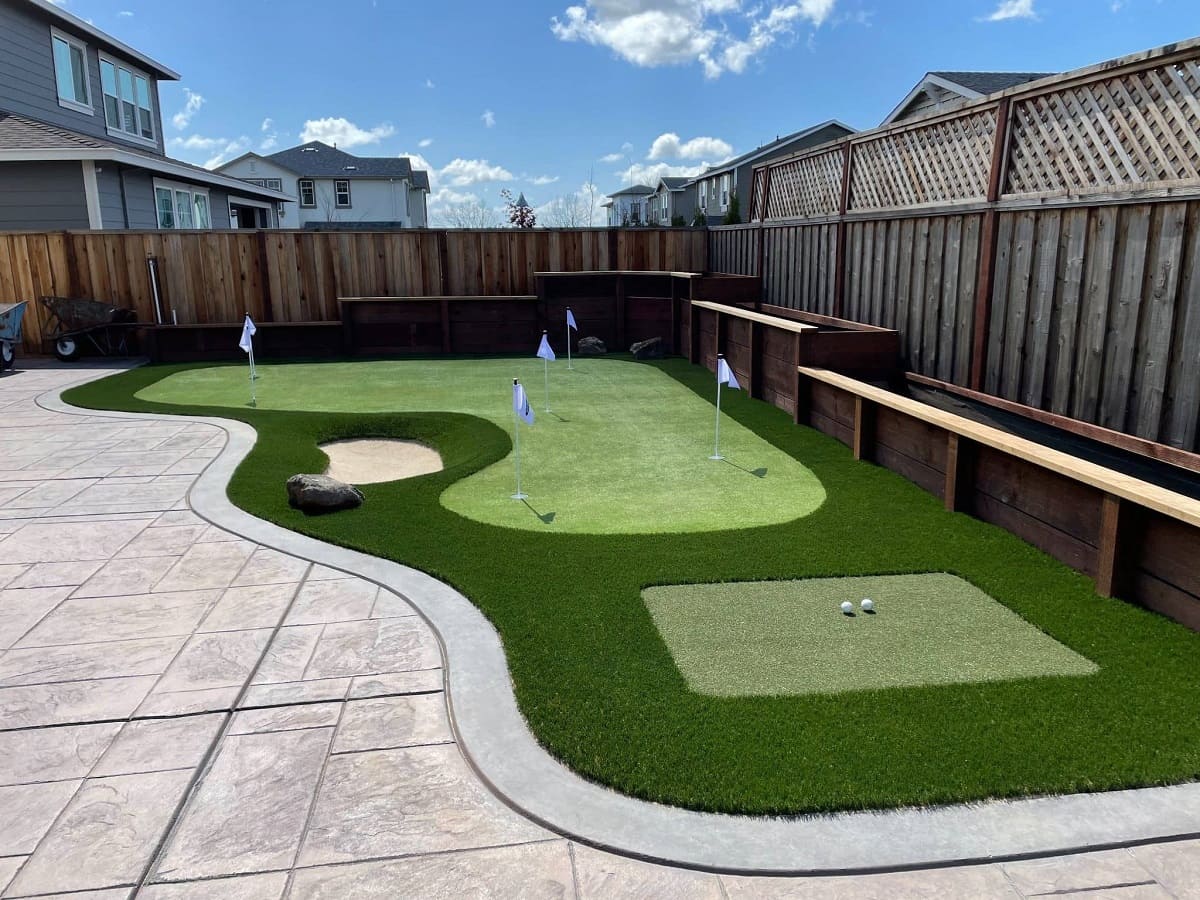
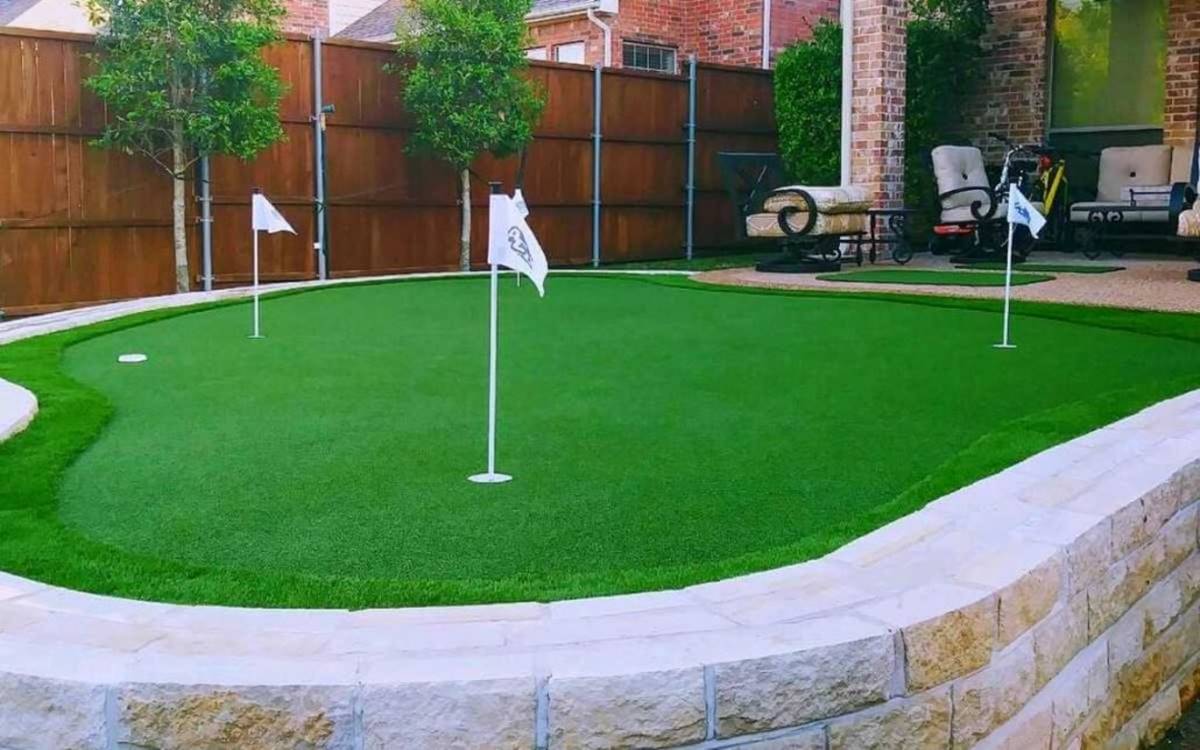
Adding the Putting Green Features
Now that the fake grass is installed, it’s time to add the finishing touches to your putting green. These additional features will enhance the aesthetics and functionality of your backyard golfing oasis:
- Cup Holes: Create cup holes on your putting green to mimic the actual holes on a golf course. You can purchase pre-made cup holes or create your own by cutting holes in the fake grass and installing the cups. Make sure the cups are installed securely and level with the surface of the turf.
- Flagsticks: Attach flagsticks to the cup holes to complete the authentic look of a putting green. You can find flagsticks and flags specifically designed for backyard putting greens. Choose flag colors that add a pop of color and make it easier to spot the holes.
- Bunkers: If you want to add some additional challenge to your putting green, consider installing synthetic turf bunkers. These small sand-filled areas mimic the hazards found on a golf course and allow you to practice your sand shots. Use special bunker mats or designate an area of the fake grass for the bunkers.
- Chipping Areas: If you have enough space in your yard, you can designate a separate area for chipping practice. Create a chip and pitch area near the putting green, with different turf or artificial turf mats to simulate different lies. This will allow you to practice a variety of short game shots within the comfort of your own yard.
- Lighting: To extend your playtime, consider installing outdoor lighting around your putting green. This will allow you to practice your putting skills even after the sun goes down. Choose energy-efficient LED lights that provide sufficient illumination without being too harsh or distracting.
- Seating and Shade: To make your backyard putting green more inviting and comfortable, consider adding seating and shade options. Install benches or chairs where you can take a break between shots or enjoy watching others play. You can also incorporate umbrellas or a pergola to provide shade during hot sunny days.
Adding these features to your putting green will not only enhance the overall experience but also make it a more enjoyable and realistic practice area. Take the time to carefully plan and install these features, ensuring they blend seamlessly with the fake grass and create a true golfer’s haven in your yard.
Maintaining the Fake Grass Putting Green
To ensure the longevity and optimal performance of your fake grass putting green, regular maintenance is essential. Here are some key steps to keep your turf looking and playing its best:
- Brushing: Regularly brush the fake grass with a stiff-bristle brush or a power broom to keep the blades upright and prevent matting. This will also distribute the infill material evenly, improving the playability of the putting green.
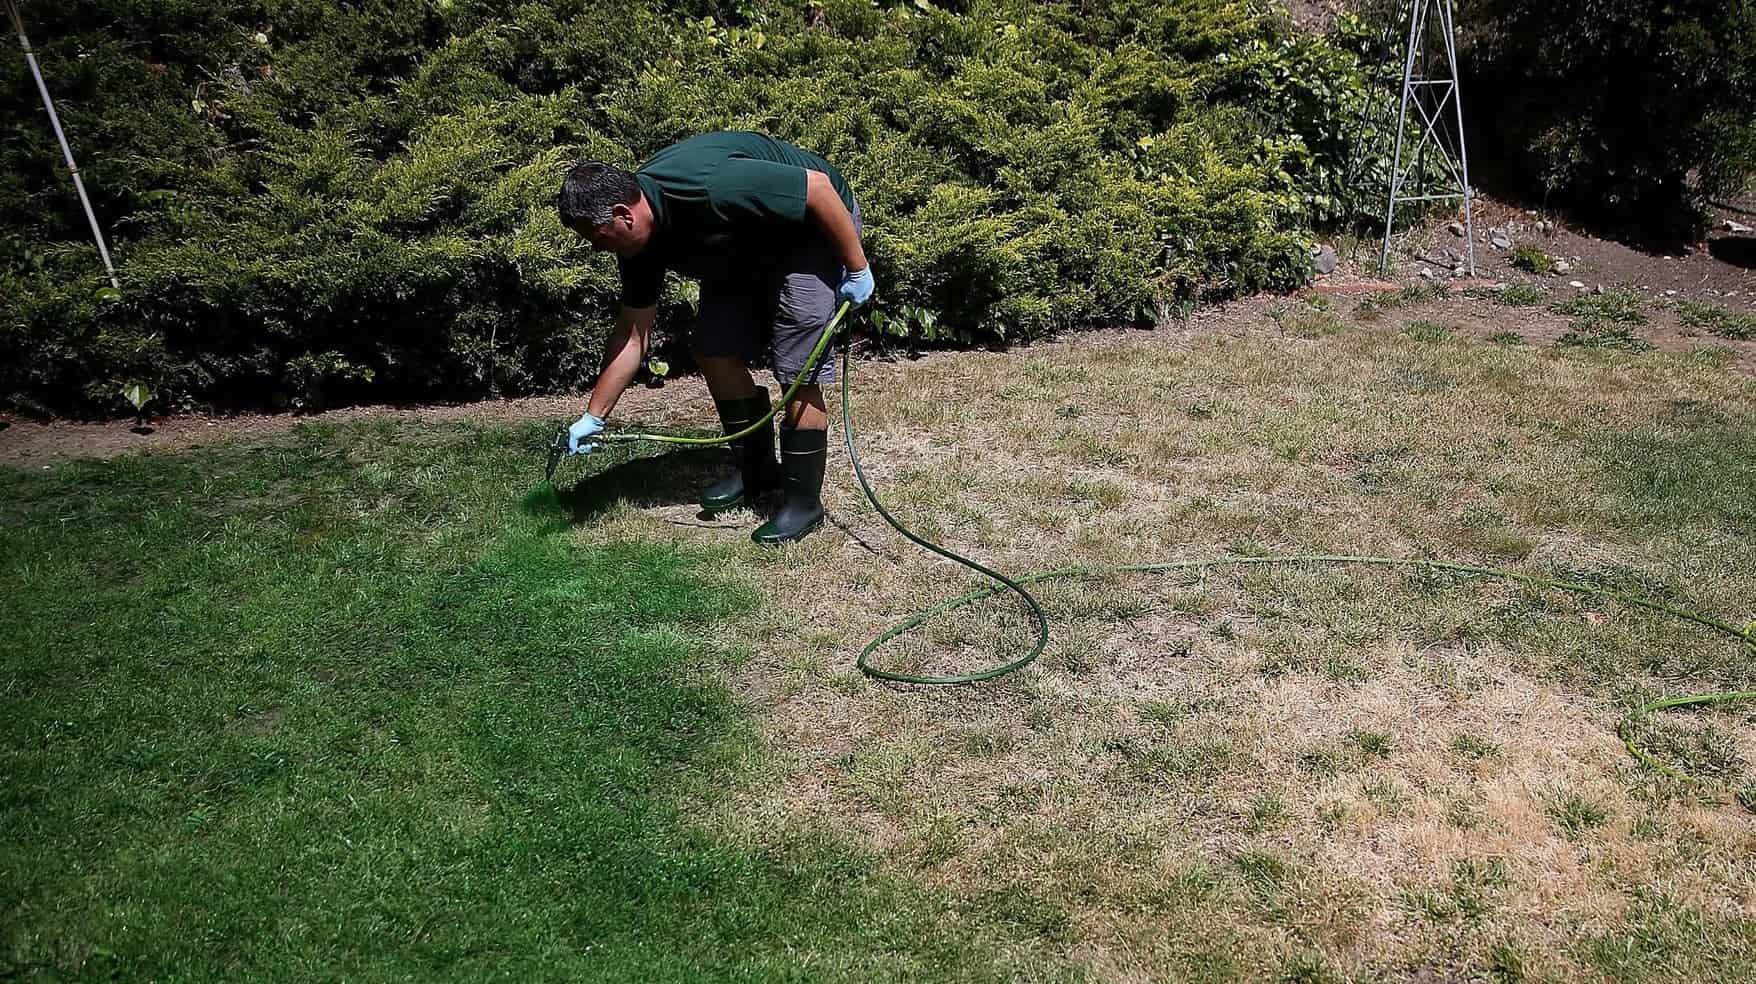
- Cleaning: Remove debris such as leaves, twigs, and dirt from the fake grass regularly. Use a leaf blower or a gentle rake to clear the surface. If there are any stains or spills, gently clean the area with water and a mild detergent. Avoid using harsh chemicals that can damage the turf.
- Infill Maintenance: Over time, the infill material may settle or compact. Periodically check the infill levels and add more if necessary to maintain the desired firmness and ball roll consistency. A professional-grade power brush or a drop spreader can be used for infill redistribution.
- Watering: Unlike natural grass, fake grass does not require regular watering. However, occasional light watering can help to refresh the turf and minimize static electricity. If you live in a dry climate, you may need to spray the turf with water to cool it down on hot days.
- Preventing Damage: Avoid placing heavy objects or furniture on the fake grass for extended periods, as this can cause flattening or indentation of the fibers. Use furniture pads or avoid placing items directly on the turf. Additionally, prevent sharp objects or high heels from coming into direct contact with the turf to avoid punctures or tears.
- Snow and Ice: If you live in an area with freezing temperatures, fake grass can still be used during winter. However, it’s important to remove any snow or ice buildup to prevent damage. Gently brush away the snow, and avoid using harsh ice-melting products that may affect the integrity of the fake grass.
- Regular Inspections: Take the time to inspect your fake grass putting green regularly for any damage, wear, or signs of deterioration. Address any issues promptly to prevent further damage and ensure the longevity of your investment.
By following these maintenance practices, you can keep your fake grass putting green in excellent condition for years to come. Enjoy endless hours of practice, refine your skills, and create lasting golfing memories, all within the comfort of your own backyard.
Conclusion
Creating a putting green in your yard using fake grass is a fantastic way to indulge your passion for golf and enhance your outdoor living space. With the right materials, proper preparation, and attention to detail during installation, you can have a stunning and functional putting green that provides endless hours of enjoyment.
Choosing the right fake grass is crucial for achieving a realistic and playable surface. Consider factors like pile height, density, infill, backing material, and color to ensure that the turf closely resembles the appearance and feel of natural grass.
Preparing your yard is a vital step in the process. Clearing the area, grading the surface, creating borders, and ensuring proper drainage will lay the foundation for a smooth and level putting green. Take the time to complete these steps thoroughly to ensure optimal long-term results.
Installing the fake grass requires precision and attention to detail. Measure and cut the turf carefully, secure it in place, and join multiple pieces seamlessly. Adding essential features such as cup holes, flagsticks, and bunkers will enhance the authenticity and challenge of your putting green.
To maintain your fake grass putting green, regular upkeep is necessary. Brushing, cleaning, infill maintenance, and preventive measures will keep the turf looking pristine and performing its best. Be diligent in inspections and addressing any issues promptly to preserve the longevity of your investment.
In conclusion, with the right steps and ongoing maintenance, a putting green with fake grass can transform your yard into a golfer’s paradise. Enjoy endless hours of practice, invite friends and family for friendly competitions, and bask in the joy of having your own mini golf course just steps away from your doorstep.
So, embrace your love for golf, unleash your putting skills, and create memories that will last a lifetime with your very own fake grass putting green. Get ready to tee off and watch as your yard transforms into a haven for golf enthusiasts!
Frequently Asked Questions about How To Make A Putting Green In My Yard With Fake Grass
Was this page helpful?
At Storables.com, we guarantee accurate and reliable information. Our content, validated by Expert Board Contributors, is crafted following stringent Editorial Policies. We're committed to providing you with well-researched, expert-backed insights for all your informational needs.

0 thoughts on “How To Make A Putting Green In My Yard With Fake Grass”