Home>Garden Essentials>How To Make A Wall Water Fountain
Garden Essentials
How To Make A Wall Water Fountain
Modified: October 20, 2024
Learn how to make a stunning garden wall water fountain with step-by-step instructions. Enhance your outdoor space with this simple DIY project.
(Many of the links in this article redirect to a specific reviewed product. Your purchase of these products through affiliate links helps to generate commission for Storables.com, at no extra cost. Learn more)
Introduction
Welcome to our comprehensive guide on how to make a wall water fountain. A wall water fountain can add a touch of elegance and serenity to any outdoor or indoor space. The soothing sound of trickling water can create a tranquil atmosphere and enhance the overall ambiance.
Creating your own wall water fountain may sound like a daunting task, but with the right materials and step-by-step instructions, it can be a rewarding DIY project. Whether you are a seasoned gardener looking to add a unique feature to your landscape or a beginner searching for a new and exciting hobby, this guide will provide you with all the information you need to successfully build your own wall water fountain.
Before we dive into the step-by-step process, let’s take a look at the materials you will need for this project.
Key Takeaways:
- Creating a wall water fountain is a fun DIY project that can bring elegance and tranquility to any space, whether indoors or outdoors. With the right materials and steps, you can build your own serene oasis.
- Choosing the right location, preparing the wall, and testing the water flow are essential steps in creating a beautiful wall water fountain. Adding personal touches and enjoying the soothing ambiance completes the rewarding process.
Read more: How To Make A Musical Water Fountain
Materials Needed
Before you begin constructing your wall water fountain, gather the following materials:
- A wall water fountain kit or the necessary components:
- Water basin or reservoir
- Water pump
- Water spout or spigot
- Tubing
- Decorative stones or pebbles
- Mounting brackets or hooks
- A wall-mounted frame or surface to attach the fountain
- A drill with masonry bits
- An electrical outlet or extension cord (if electricity is needed for the water pump)
- A level
- Waterproof sealant or caulk
- A measuring tape
- A spirit level
- Screws and anchors for mounting
- A hose or faucet for water supply (if connecting to a water source)
- Optional: Lighting fixtures or LED lights for added ambiance
Now that you have gathered all the necessary materials, let’s proceed to the first step: Choosing the right location for your wall water fountain.
Step 1: Choosing the Right Location
Choosing the right location for your wall water fountain is crucial to ensure optimal functionality and aesthetic appeal. Here are some factors to consider when selecting the spot:
- Space: Assess the available space in your garden or indoors where you plan to install the wall water fountain. Consider the dimensions and ensure that it will fit comfortably.
- Visibility: Choose a location where the wall water fountain will be easily visible and admired. It could be a focal point of your garden or a striking addition to your living room wall.
- Structural Integrity: Ensure that the wall or surface where you plan to mount the fountain is structurally sound and capable of supporting its weight. If in doubt, consult a professional.
- Electricity and Water Access: If your wall water fountain requires electricity for the water pump or a water supply, make sure there is an accessible electrical outlet and a nearby water source.
- Aesthetic Considerations: Consider the overall design and style of your space. Choose a location that complements the existing elements and enhances the overall aesthetic appeal.
Once you have considered these factors, take measurements of the chosen location to ensure that it aligns with the size of your wall water fountain kit. This will help you determine if any modifications or adjustments are needed.
Now that you are confident in your chosen location, let’s move on to the next step: preparing the wall for installation.
Step 2: Preparing the Wall
Before you can install your wall water fountain, you need to prepare the wall or surface where it will be mounted. Follow these steps to ensure a sturdy and secure installation:
- Clean the Surface: Remove any dirt, debris, or loose paint from the wall using a brush or a pressure washer. This will provide a clean and smooth surface for mounting the fountain.
- Locate Studs: Use a stud finder to locate the wall studs behind the surface. Mark the stud locations as they will provide additional support for mounting the fountain.
- Drill Pilot Holes: Use a drill with a masonry bit to drill pilot holes into the wall at the marked stud locations. Make sure the holes are slightly smaller than the screws or anchors you will use to secure the fountain.
- Mounting Brackets or Hooks: Attach the mounting brackets or hooks to the wall using the screws and anchors. Ensure that they are level and securely fastened to provide a stable base for the fountain.
- Apply Waterproof Sealant: If your wall water fountain kit does not include a waterproof sealant or caulk, apply it around the perimeter of the mounting brackets or hooks. This will help prevent water from seeping into the wall and causing damage.
By following these preparation steps, you will have a solid and secure foundation for your wall water fountain. In the next step, we will guide you through the installation of the water pump. Keep reading!
Step 3: Installing the Water Pump
Now that you have prepared the wall, it’s time to install the water pump in your wall water fountain. The water pump is responsible for circulating and recirculating the water, creating a continuous flow. Follow these steps to properly install the water pump:
- Position the Water Pump: Place the water pump in the water basin or reservoir, ensuring that it is positioned securely and upright.
- Attach the Tubing: Connect one end of the tubing to the water pump outlet, also known as the discharge port. Check the instructions provided with your fountain kit for the specific attachment method.
- Thread the Tubing through the Fountain Components: If your wall water fountain kit includes additional components such as water spouts or spigots, thread the tubing through them to create a pathway for the water flow.
- Secure the Tubing: Use zip ties or clips to secure the tubing in place and prevent it from slipping or becoming loose. This will ensure a consistent water flow throughout the fountain.
- Connect the Power: If your water pump requires electricity, plug it into a nearby electrical outlet or extension cord. Ensure that the cord is safely tucked away and protected from water exposure.
Once you have successfully installed the water pump, you are now ready to proceed with attaching the water feature components. This will transform your wall water fountain into an enchanting display of cascading water. Stay tuned for the next step!
Choose a waterproof and durable material for the base of your wall water fountain, such as stone or concrete, to ensure it lasts a long time and withstands the elements.
Read more: How To Make A Solar Water Fountain
Step 4: Attaching the Water Feature Components
Now that the water pump is installed and ready to go, it’s time to attach the water feature components to your wall water fountain. These components, such as water spouts or spigots, create the visually appealing element of flowing water. Follow these steps to attach the water feature components:
- Position the Water Feature Components: Determine the desired placement of the water spouts or spigots on your fountain. This can be based on personal preference or the design of your fountain kit.
- Mark the Position: Use a pencil or marker to mark the exact positions where the water spouts or spigots will be installed. Ensure the marks are level and symmetrical for an aesthetically pleasing look.
- Drill Holes: Use a drill with a masonry bit to carefully drill holes at the marked positions. Make sure the size of the holes matches the specifications provided by your fountain kit.
- Insert the Water Spouts or Spigots: Insert the water spouts or spigots into the drilled holes. Apply gentle pressure to ensure a snug fit.
- Secure the Components: Depending on the design of your fountain kit, you may need to use screws, nuts, or other fasteners to secure the water feature components in place. Make sure they are tight and secure.
- Test for Proper Flow: Turn on the water pump and check if water is flowing smoothly and consistently from the attached water spouts or spigots. Adjust the position or angle if necessary to achieve the desired flow.
Once you have successfully attached the water feature components, your wall water fountain will begin to take shape. In the next step, we will guide you through connecting the water supply for a continuous water flow. Keep reading!
Step 5: Connecting the Water Supply
Connecting the water supply is an essential step in ensuring a continuous flow of water in your wall water fountain. Depending on your setup, you may need to connect the fountain to a hose or faucet for a consistent water supply. Follow these steps to properly connect the water supply:
- Locate the Water Inlet: Identify the water inlet component on your fountain. This is where the water will enter the fountain to maintain the water level.
- Position the Water Inlet: Based on the design of your fountain kit, position the water inlet near the container or reservoir that holds the water. It should be at an appropriate height to ensure proper water flow.
- Attach the Tubing: Connect one end of the tubing to the water inlet on your fountain. Make sure it is securely attached to prevent any leaks.
- Connect the Hose or Faucet: If connecting to a hose, attach the other end of the tubing to the hose nozzle. If connecting to a faucet, use a hose adapter and connect the tubing to the adapter.
- Test for Water Flow: Turn on the water supply and check if water is flowing smoothly into the fountain’s container or reservoir. Ensure that there are no leaks and adjust the water flow if necessary.
- Monitor Water Level: Regularly check the water level in the fountain and refill as needed to maintain the desired water flow and prevent the pump from running dry.
By properly connecting the water supply, you ensure a constant flow of water in your wall water fountain, adding to its beauty and tranquility. In the next step, we will guide you through testing and adjusting the water flow. Stay tuned!
Step 6: Testing and Adjusting the Water Flow
After connecting the water supply to your wall water fountain, it is important to test and adjust the water flow to achieve the desired effect. Follow these steps to properly test and adjust the water flow:
- Turn on the Water Pump: Start by turning on the water pump and observe the water flow from the water feature components. Check if the flow is steady and even.
- Evaluate the Water Flow: Assess the water flow and determine if it aligns with your vision for the fountain. Is it too strong or too weak? Does it create the desired sound and visual effect?
- Adjust the Water Pump Settings: If the water flow is too strong, you can adjust the water pump settings to lower the flow rate. Refer to the instructions provided with your fountain kit for the specific steps on adjusting the pump settings.
- Modify the Water Feature Components: If the water flow is not evenly distributed among the water spouts or spigots, you may need to adjust their position or angle. This can be done by gently moving or repositioning the components until the desired flow is achieved.
- Observe the Water Sound and Visual Effect: As you make adjustments, pay attention to the sound of the flowing water and the visual effect it creates. Fine-tune the water flow until you are satisfied with the overall ambiance.
- Monitor and Make Further Adjustments: After testing and making initial adjustments, continue to monitor the water flow over time. It may take some trial and error to achieve the perfect balance. Don’t hesitate to make further adjustments as needed.
By testing and adjusting the water flow, you can ensure that your wall water fountain creates a soothing and visually pleasing atmosphere. In the final step, we will guide you through securing the fountain and adding final touches. Keep reading!
Step 7: Securing the Fountain and Final Touches
After installing and testing your wall water fountain, it’s time to secure the fountain and add the final touches to complete the project. Follow these steps to ensure a secure and visually appealing fountain:
- Secure the Fountain: Use screws or fasteners to secure the fountain to the mounting brackets or hooks on the wall. This will prevent any accidental shifting or movement of the fountain.
- Check Stability: After securing the fountain, gently shake or nudge it to check its stability. Ensure that it is firmly attached to the wall and does not wobble or sway.
- Apply a Waterproof Sealant: If necessary, apply a waterproof sealant or caulk around the edges of the fountain and any openings. This will help seal any gaps and prevent water leakage.
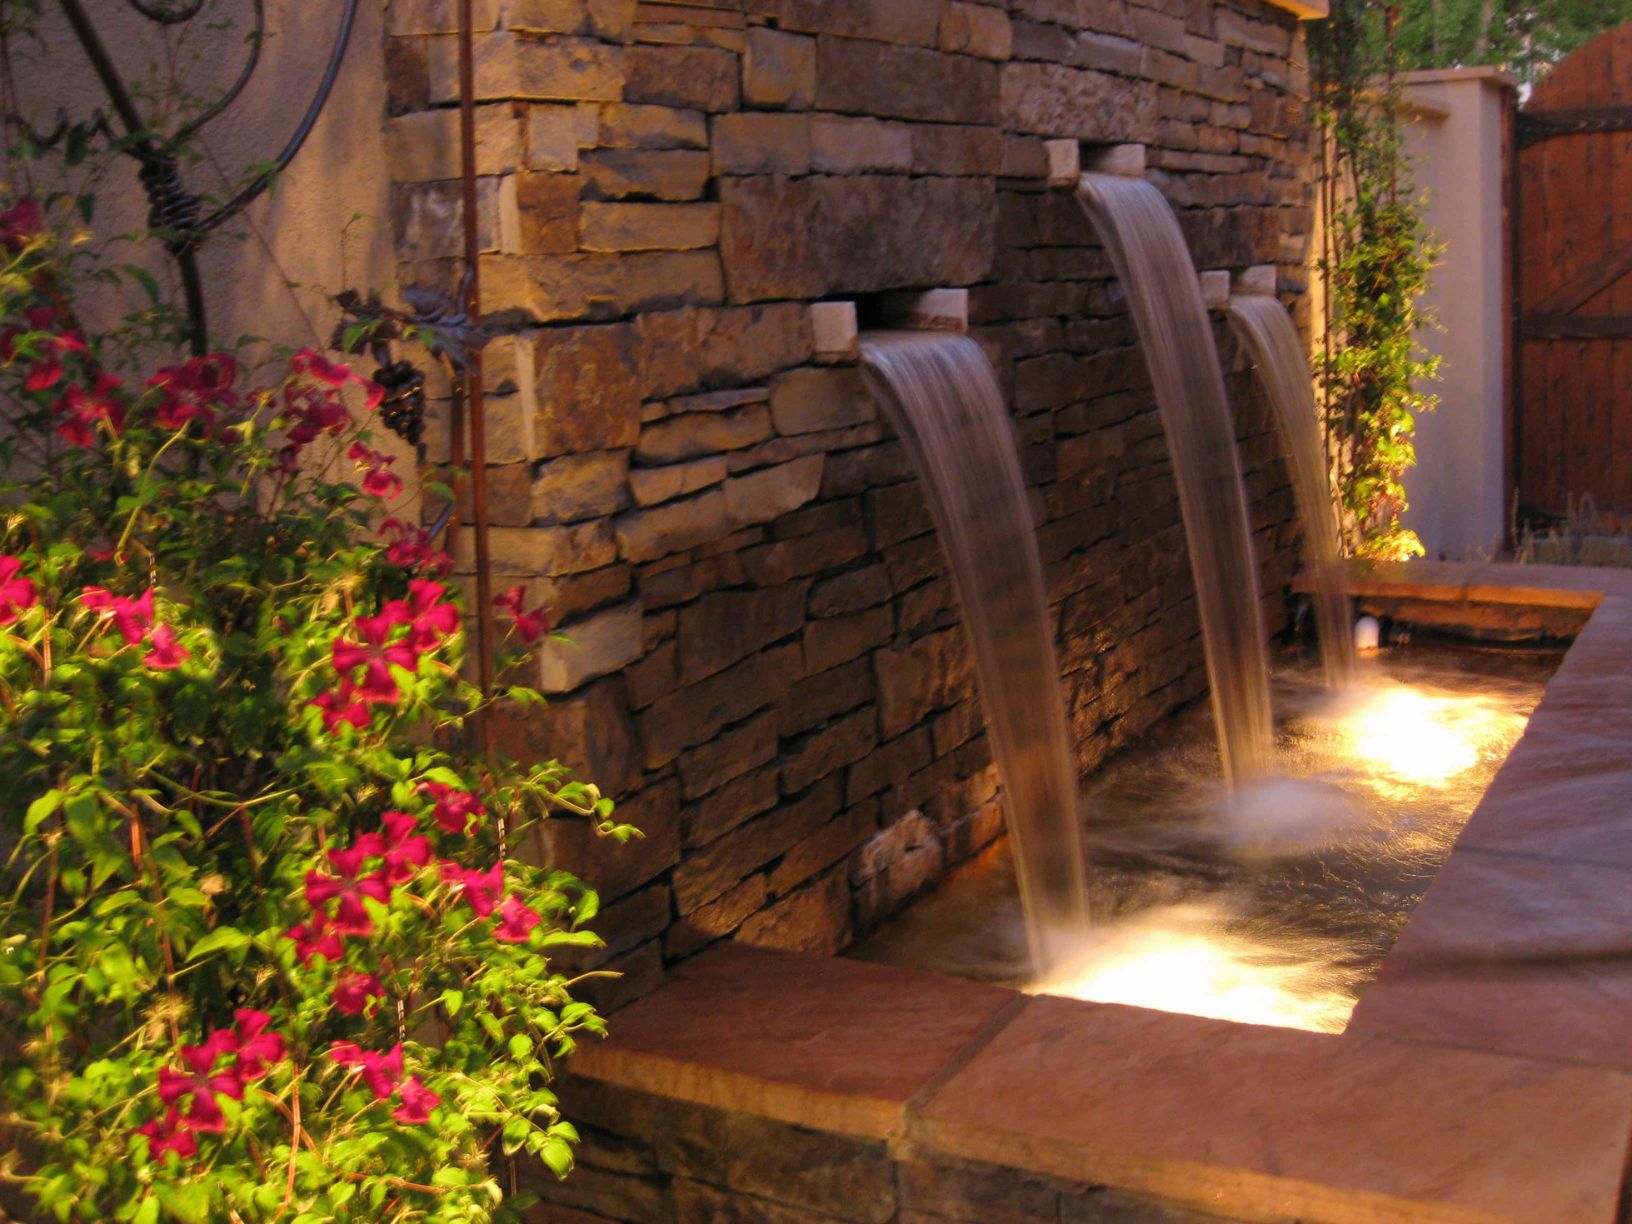
- Add Decorative Elements: Enhance the visual appeal of your wall water fountain by adding decorative elements. Consider placing decorative stones or pebbles around the base of the fountain or incorporating plants or flowers nearby.
- Add Lighting: To create a mesmerizing effect, consider adding lighting fixtures or LED lights to illuminate the water feature. This can be especially stunning in the evening or at night, enhancing the ambiance of your space.
- Monitor and Maintain: Regularly inspect and maintain your wall water fountain. Check the water level, clean the components, and remove any debris or algae as needed to keep it in optimal condition.
- Enjoy Your Wall Water Fountain: Now that your wall water fountain is securely installed and adorned with final touches, take a step back and admire your creation. Sit back, relax, and enjoy the soothing sound and visual allure of your own DIY masterpiece!
Congratulations! You have successfully completed the process of making a wall water fountain. By following these steps and adding your personal touch, you have created a captivating and tranquil feature for your outdoor or indoor space.
Remember to refer back to this guide for any future maintenance or adjustments to your wall water fountain. Enjoy the serenity and beauty that it brings to your environment!
Read more: How To Make A Cat Water Fountain Quieter
Conclusion
Creating your own wall water fountain is a rewarding and fulfilling DIY project that can transform any space into a serene oasis. By following the step-by-step instructions in this guide and infusing your personal touch, you can build a stunning and functional water feature that adds a touch of elegance and tranquility to your garden or indoor area.
Throughout the process, we discussed the materials you need, choosing the right location, preparing the wall, installing the water pump, attaching the water feature components, connecting the water supply, testing and adjusting the water flow, and securing the fountain. Each step plays a crucial role in ensuring a successful outcome, and by paying attention to detail, you can create a wall water fountain that exceeds your expectations.
Remember to regularly monitor and maintain your wall water fountain, checking the water level, cleaning the components, and making any necessary adjustments to ensure its optimal functionality. This will help prolong the life of your fountain and preserve its aesthetic appeal.
So, what are you waiting for? Gather your materials, choose the perfect spot, and embark on this creative journey to build your own wall water fountain. Enjoy the soothing sound of flowing water, the visual allure of the fountain, and the peaceful ambiance it brings to your surroundings.
Get ready to sit back, relax, and revel in the beauty and serenity of your own DIY wall water fountain!
Frequently Asked Questions about How To Make A Wall Water Fountain
Was this page helpful?
At Storables.com, we guarantee accurate and reliable information. Our content, validated by Expert Board Contributors, is crafted following stringent Editorial Policies. We're committed to providing you with well-researched, expert-backed insights for all your informational needs.


0 thoughts on “How To Make A Wall Water Fountain”