Home>Garden Essentials>How To Use Seed Starter Trays
Garden Essentials
How To Use Seed Starter Trays
Modified: March 16, 2024
Learn how to start your garden with seed starter trays. Discover the benefits of using seed trays for successful gardening.
(Many of the links in this article redirect to a specific reviewed product. Your purchase of these products through affiliate links helps to generate commission for Storables.com, at no extra cost. Learn more)
Introduction
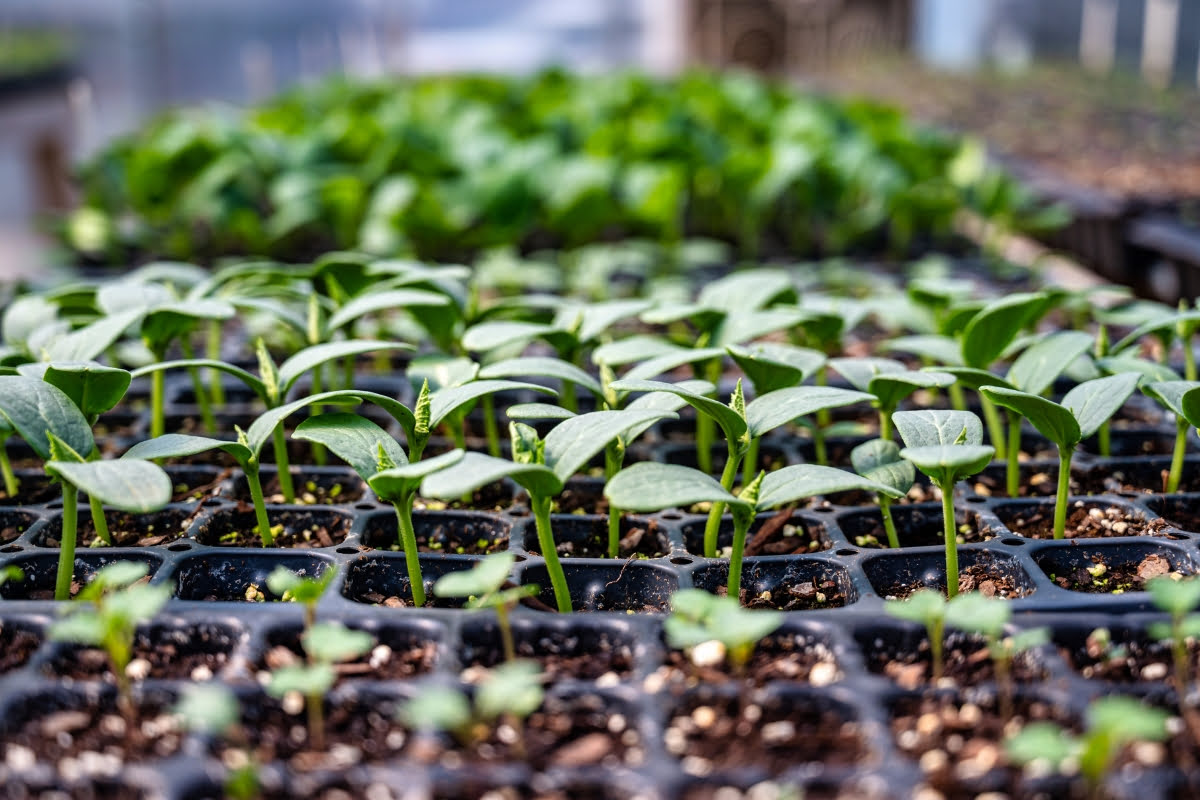
Welcome to the fascinating world of seed starter trays! Whether you’re a seasoned gardener or a beginner with a green thumb, using seed starter trays can significantly enhance your gardening experience. In this article, we will explore the benefits of using these trays, how to choose the right one, and the step-by-step process of starting seeds in them.
Seed starter trays provide an ideal environment for germinating seeds and nurturing seedlings. They are convenient, space-saving, and enable you to have better control over the growing conditions. With these trays, you can grow a wide variety of plants from seeds, including flowers, vegetables, and herbs.
The key to successful seed starting lies in proper planning and preparation. By using seed starter trays, you can start your gardening season early, giving your plants a head start and ensuring a bountiful harvest or a vibrant flower garden.
In the upcoming sections, we will dive deeper into the benefits of using seed starter trays and guide you through the process of choosing the right tray, preparing it, planting seeds, providing care for the seedlings, and eventually transplanting them into larger pots or garden beds. We will also share some useful tips and tricks to help you achieve successful seed starting.
So, let’s get started and uncover the secrets of using seed starter trays to grow healthy, thriving plants!
Key Takeaways:
- Seed starter trays provide a controlled environment for seeds to grow, allowing for an early start to the growing season, cost-effective plant propagation, and a greater variety of plant options.
- Choosing the right seed starter tray, preparing it properly, and providing care for seedlings are essential for successful seed starting. Following tips and tricks can further enhance the seed starting experience.
Read more: How To Use A Seed Starter Tray
Benefits of Using Seed Starter Trays
Seed starter trays offer numerous advantages for gardeners of all levels. Let’s explore some of the key benefits:
- Optimal Growing Conditions: Seed starter trays provide a controlled environment for seed germination and early seedling development. The trays are designed to maintain proper moisture levels, temperature, and ventilation, which are crucial for successful seed starting.
- Early Start to the Growing Season: Using seed starter trays allows you to start planting seeds indoors before the last frost date in your region. This means you can extend your growing season and have well-established seedlings ready for transplanting once the weather becomes favorable.
- Space-Saving: Seed starter trays are compact and take up minimal space. This makes them an ideal choice for gardeners with limited indoor gardening areas, such as apartments or small homes. The trays can be placed on windowsills, countertops, or under grow lights.
- Cost-Effective: Starting seeds in trays is more economical than purchasing young plants from nurseries. With the right techniques, you can grow multiple plants from a single packet of seeds, saving money in the long run.
- Greater Variety: When you start seeds in trays, you have access to a wider selection of plant varieties. This is especially beneficial for heirloom or rare plants that may not be readily available as young transplants.
- Improved Success Rate: Seed starter trays provide a protected environment for seeds, shielding them from harsh weather conditions, pests, and diseases. This increases the chances of seed germination and ensures healthier, sturdier seedlings.
- Easy Monitoring and Labeling: With seed starter trays, it’s easier to keep track of different plant varieties. You can label each cell or tray, ensuring that you know exactly what you’re growing and where. This is particularly useful if you’re starting multiple types of plants simultaneously.
By utilizing seed starter trays, you can take control of your gardening process, maximize your plant selection, and enjoy earlier, more successful harvests. The next section will guide you on how to choose the right seed starter tray for your gardening needs.
Choosing the Right Seed Starter Tray
When it comes to selecting the perfect seed starter tray for your gardening endeavors, there are a few factors to consider. Let’s explore them:
- Size and Capacity: Seed starter trays come in various sizes and cell capacities. Consider the space you have available for growing seedlings and the number of plants you want to grow. Smaller trays with fewer cells may be suitable for home gardeners, while larger trays are ideal for commercial purposes.
- Material: Seed starter trays are commonly made of plastic or biodegradable peat or coir pots. Plastic trays are durable, reusable, and often have better moisture retention. Biodegradable pots can be planted directly into the soil, reducing transplant shock. Choose the material that best fits your needs and sustainability preferences.
- Drainage and Ventilation: Look for seed starter trays with adequate drainage holes to prevent waterlogged soil. Good ventilation is also crucial for healthy seedlings. Opt for trays with adjustable vents or dome covers that can control humidity levels and airflow.
- Dome Covers: Some seed starter trays come with clear plastic dome covers that create a mini greenhouse effect, enhancing seed germination. If you live in a colder climate or want to optimize humidity levels, consider trays with dome covers.
- Quality and Durability: Choose seed starter trays made from durable and sturdy materials that can withstand repeated use. Inferior quality trays may crack or warp over time, compromising their effectiveness.
- Accessibility: Consider seed starter trays that are easy to handle, maneuver, and clean. Trays with convenient features like removable cell inserts or stackable designs are beneficial for efficient seed starting and space utilization.
- Budget: Seed starter trays are available in a range of price points. Set a budget and choose trays that offer the best value for your investment. Remember that durability and functionality are more important than just the initial cost.
Take your time to research and compare different seed starter trays before making a purchase. It’s also a good idea to read reviews from other gardeners to ensure you’re selecting a reliable and suitable tray for your specific gardening needs.
Now that you know how to choose the right seed starter tray, let’s move on to the next step: preparing the tray for planting.
Preparing the Seed Starter Tray
Before you start planting seeds in your chosen seed starter tray, it’s essential to prepare it properly. The following steps will ensure optimal conditions for seed germination and seedling development:
- Clean the Tray: If your seed starter tray is reusable, make sure to clean it thoroughly to remove any dirt, debris, or potential contaminants. Wash the tray with warm, soapy water and rinse it well. Allow it to dry completely before proceeding.
- Disinfect if Necessary: To minimize the risk of diseases or pests, you can disinfect the tray. Use a 10% bleach solution (1-part bleach to 9-parts water) or a hydrogen peroxide solution to soak the tray for about 10 minutes. Rinse it well with clean water and let it dry.
- Fill with Seed Starting Mix: Use a high-quality seed starting mix or a soilless mix specifically designed for optimal seed germination. Fill each cell or compartment of the tray with the mix, ensuring it’s evenly distributed. Gently pat down the soil to remove any air pockets.
- Moisten the Soil: Before planting seeds, moisten the soil to provide the right amount of moisture for germination. Use a misting spray bottle or a watering can with a fine rose attachment to lightly moisten the soil. Be careful not to oversaturate it, as excessively wet soil can lead to rot or fungal issues.
- Create Labels: To identify different plants, create labels for each cell or compartment in the tray. You can use popsicle sticks, small plastic labels, or even tape with written plant names to attach to the tray. This will help you keep track of the seeds you’ve planted.
- Set Up the Tray: Place the seed starter tray in an area that receives indirect sunlight or under grow lights. Ensure that the tray is on a stable surface and that it has proper airflow to prevent mold or fungus growth.
- Optional: Pre-Warm the Soil: If you’re starting seeds that require warmer soil temperatures for germination, you can pre-warm the tray by placing it on a heat mat or in a warm location for a few days before sowing the seeds. Check the seed packet for any specific temperature requirements.
By following these steps, you’ll create an ideal environment for your seeds to sprout and thrive. Now that the seed starter tray is prepared, we can move on to the exciting part: planting the seeds!
Planting Seeds in the Seed Starter Tray
Now that you have a prepared seed starter tray, it’s time to plant the seeds. Follow these steps for successful seed planting:
- Read the Seed Packet: Each type of seed has different requirements for planting depth and spacing. Read the instructions on the seed packet carefully to ensure you’re planting the seeds at the correct depth and distance.
- Make Indentations: Use your finger, a pencil, or a dibber to make small indentations in the soil of each cell or compartment. The depth should match the recommended planting depth for the specific type of seed. Alternatively, you can use a specialized seed dibber tool to create uniform holes.
- Plant the Seeds: Place one or two seeds in each indentation, taking care not to overcrowd the tray. If multiple seeds germinate, you can thin out the weaker seedlings later on. Cover the seeds with a thin layer of seed starting mix or vermiculite, following the recommended planting depth.
- Water the Seeds: Use a misting spray bottle or a watering can with a gentle spray attachment to water the seeds. Make sure to provide enough moisture without saturating the soil. Using a spray bottle can help prevent displacing the seeds while watering.
- Maintain Moisture: Keep the seed starter tray consistently moist, but not soaking wet, throughout the germination period. You can cover the tray with a clear plastic dome cover or loosely place a plastic bag over it to help retain moisture. Check the soil regularly and mist it if it starts to dry out.
- Provide Proper Lighting: Most seeds require light to germinate, but some may require darkness. Refer to the seed packet for specific light requirements. Place the tray in a location that provides the appropriate lighting conditions or use grow lights if necessary.
- Monitor and Wait: Check the seed starter tray daily to monitor the progress of seed germination. Be patient, as some seeds may take longer to sprout than others. Once the seedlings emerge, continue to provide proper care and maintenance.
Remember to label each cell or compartment in the tray to keep track of the seeds you’ve planted. This will help you identify the different plants as they grow.
With proper planting techniques and care, your seeds will soon sprout into healthy seedlings. In the next section, we’ll discuss the essential steps to provide proper care for the seedlings.
When using seed starter trays, make sure to fill each cell with a good quality seed starting mix, plant your seeds at the recommended depth, and water gently to avoid displacing the seeds. Keep the trays in a warm, well-lit area and make sure to water regularly to keep the soil moist but not waterlogged.
Read more: How To Use Chimney Charcoal Starter
Providing Proper Care for Seedlings
Once your seedlings have emerged, it’s crucial to provide them with the right care to ensure their healthy growth and development. Here are the essential steps for caring for your seedlings:
- Watering: Maintain consistent moisture in the seed starter tray by watering the seedlings when the top layer of soil begins to dry out. Use a watering can with a fine rose attachment or a misting spray bottle to water gently. Avoid overwatering, as it can lead to damping off or root rot.
- Lighting: As the seedlings grow, ensure they receive adequate light for healthy photosynthesis. Place the tray in a sunny location or provide artificial grow lights if natural light is limited. Adjust the distance between the lights and the seedlings to keep the plants from becoming leggy or burned.
- Temperature: Maintain an optimal temperature range for your seedlings’ growth, as different plants have varying temperature requirements. Keep the seedlings away from drafts or extreme temperature fluctuations. Ensure they’re not exposed to cold drafts or placed near heating vents.
- Transplanting: As the seedlings grow, they’ll outgrow the seed starter tray and require more space and nutrients. Transplant them into larger pots or garden beds when they have developed a few sets of true leaves. Gently remove the seedlings from the trays, being careful not to damage the delicate roots, and plant them in their new containers or garden beds.
- Fertilization: Once the seedlings have been transplanted, they will benefit from regular feeding. Use a balanced liquid fertilizer or organic compost tea to provide essential nutrients. Follow the recommended application rates on the fertilizer packaging or the instructions for making compost tea.
- Hardening Off: Before permanently moving your seedlings outdoors, gradually expose them to outdoor conditions in a process called hardening off. Begin by placing the seedlings in a sheltered outdoor location for a few hours each day and gradually increase the exposure over a week or two. This helps the seedlings acclimate to outdoor conditions and reduces the risk of transplant shock.
- Pest and Disease Management: Keep an eye out for common pests, such as aphids or fungal diseases, which can damage or kill the seedlings. Implement preventive measures like proper sanitation, maintaining good airflow, and using organic pest management methods to keep your plants healthy.
- Support: Some seedlings, especially those that grow tall or produce heavy fruits, may require support. Use stakes or plant supports to prevent them from falling over or breaking as they grow.
By providing proper care, your seedlings will flourish and be ready for transplanting into your garden or larger containers. In the next section, we’ll discuss the essential steps to transplanting seedlings successfully.
Transplanting Seedlings to Larger Pots or Garden Beds
Once your seedlings have grown and developed several sets of true leaves, it’s time to transplant them into larger pots or garden beds. Follow these steps for a successful transplanting process:
- Choose the Right Timing: Transplant your seedlings when they are strong and healthy, usually when they are about 4-6 weeks old or have reached a size where they have outgrown the seed starter trays.
- Prepare the New Containers or Garden Beds: If you’re transplanting into pots, choose containers that are appropriate for the size of the plants. Ensure the pots have drainage holes to prevent waterlogged soil. For garden beds, prepare the soil by removing any weeds, loosening it with a garden fork or tiller, and incorporating organic matter.
- Water the Seedlings: Before transplanting, water the seedlings thoroughly, which will help ease their removal from the seed starter trays and minimize transplant shock.
- Gently Remove Seedlings from the Trays: Carefully remove the seedlings from the trays, holding them by the leaves or using a spoon or small trowel to lift them out. Avoid pulling them by the stems, as it can cause damage or stress to the plants.
- Plant at the Correct Depth: Dig a hole in the new containers or garden beds that is slightly larger than the root ball of each seedling. Place the seedling in the hole, ensuring that the top of the root ball is level with or slightly below the soil surface. Gently firm the soil around the seedling to provide stability.
- Water the Transplanted Seedlings: Give the newly transplanted seedlings a good watering to settle the soil and eliminate any air pockets around the roots. Water at the base of the plants, avoiding getting the foliage wet, to prevent the risk of fungal diseases.
- Provide Adequate Support: If your seedlings are tall or prone to bending, place stakes or plant supports near them to provide support as they grow. This will help prevent the plants from toppling over or becoming damaged by strong winds.
- Monitor and Adjust: Keep a close eye on the transplanted seedlings and monitor their progress. Make adjustments as needed, such as providing additional water, implementing organic mulch to conserve moisture, and protecting them from pests or extreme weather conditions.
- Gradual Exposure to Full Sun: If the transplanted seedlings were grown indoors or in a partially shaded area, gradually expose them to full sun over a few days to prevent sunburn or stress. Start by placing them in a shaded spot for a few hours and gradually increase their exposure to direct sunlight.
- Continue Care: After transplanting, continue to provide proper care to promote the healthy growth of your seedlings. This includes regular watering, fertilization, pest and weed management, and ongoing monitoring of their overall health.
By following these steps, you can ensure a successful transition for your seedlings from the seed starter trays to their new containers or garden beds. With the right care and attention, your transplanted seedlings will thrive and continue to flourish in their new environment.
In the next section, we’ll share some valuable tips and tricks for successful seed starting to help you achieve even better results in your gardening endeavors.
Tips and Tricks for Successful Seed Starting
When it comes to seed starting, a few helpful tips and tricks can make a significant difference in your success. Here are some valuable tips to enhance your seed starting experience:
- Read and Follow Seed Packet Instructions: Each type of seed has its specific requirements for planting and care. Take the time to read and understand the instructions provided on the seed packet, including planting depth, spacing, and preferred growing conditions.
- Select High-Quality Seeds: Start with fresh, high-quality seeds from a reputable supplier. Look for seeds with good germination rates and choose varieties that are well-suited to your climate and growing conditions.
- Consider Using Seed Starting Heat Mats: For seeds that require warmer soil temperatures for germination, using a seed starting heat mat can help provide the ideal conditions. These mats provide gentle warmth to the soil, promoting faster and more uniform germination.
- Label Everything: As you plant different varieties of seeds, be sure to label each tray, cell, or pot. Use waterproof labels or a permanent marker to avoid confusion as the plants grow.
- Practice Proper Watering: Keep a careful eye on the moisture levels in your seed starter trays. Avoid overwatering, as it can lead to mold, fungal diseases, or root rot. Water gently and evenly to ensure the entire soil surface gets moistened.
- Thin Out Overcrowded Seedlings: If multiple seeds have germinated in a single cell or pot, thin out the weaker seedlings to prevent overcrowding. This allows the remaining seedlings to receive enough nutrients and space to grow into healthy plants.
- Provide Ample Airflow: Good airflow is crucial for preventing fungal diseases and promoting strong, sturdy seedlings. Use a small fan or open windows in the room to enhance air circulation around the seed starter trays.
- Utilize Natural Light or Grow Lights: Place your seedlings in a location where they can receive adequate natural light. If natural light is limited, use grow lights to provide the right spectrum and intensity of light for healthy growth.
- Harden Off Seedlings Gradually: Before moving your seedlings from indoors to outdoors, gradually expose them to outdoor conditions in a process called hardening off. Start with short periods of time outdoors and gradually increase the duration over a week or two to acclimate them to outdoor conditions.
- Maintain a Clean Workspace: Keep your seed starting area clean and organized. Regularly sanitize trays, tools, and equipment to prevent the spread of diseases and pests.
- Keep a Gardening Journal: Maintain a gardening journal to keep track of your seed starting experiences. Document the planting dates, varieties, observations, and any successes or challenges you encounter. This helps you learn from previous seasons and make improvements for future seed starting endeavors.
By implementing these tips and tricks, you’ll increase your chances of successful seed starting and enjoy a more rewarding gardening experience. Remember, seed starting is a learning process, and don’t be discouraged by any setbacks. Take note of what works well for you and adapt your methods as you gain more experience.
Now that you’re armed with valuable tips and tricks, it’s time to put them into practice and enjoy the fruits of your labor. May your seed starting adventures be fruitful and your garden flourish with beautiful, healthy plants!
If you’re interested in learning more about specific plants or gardening techniques, be sure to explore our other articles for further guidance.
Conclusion
Seed starter trays are an invaluable tool for gardeners, offering numerous benefits and opportunities for successful seed starting. With the right tray, proper preparation, and care, you can enjoy the satisfaction of watching your seeds transform into thriving seedlings that will eventually contribute to a bountiful and beautiful garden.
By using seed starter trays, you gain control over the growing conditions, extend your gardening season, and save money by starting plants from seeds. With their space-saving design, seed starter trays are accessible to gardeners of all levels, even those with limited indoor gardening areas.
Choosing the right seed starter tray involves considering factors such as size, material, drainage, ventilation, and durability. Select a tray that suits your needs and aligns with your gardening goals. Remember to prepare the tray by cleaning it thoroughly, filling it with a high-quality seed starting mix, and ensuring proper moisture levels.
Planting seeds in a seed starter tray requires attention to detail. Follow the instructions on the seed packet, create indentations in the soil, and plant the seeds at the correct depth. Provide them with adequate moisture, lighting, and temperature conditions to ensure successful germination and healthy seedling growth.
As the seedlings develop, it’s important to provide proper care. This includes regular watering, maintaining appropriate lighting and temperature conditions, fertilizing, and protecting against pests and diseases. Once the seedlings have outgrown the seed starter trays, transplant them into larger pots or garden beds, taking care to minimize transplant shock.
Lastly, remember to utilize helpful tips and tricks for even better seed starting results. Read seed packet instructions, choose high-quality seeds, label everything, practice proper watering techniques, and provide ample airflow and lighting. Harden off seedlings gradually before moving them outdoors and maintain a clean workspace to prevent the spread of diseases and pests.
Embark on your seed starting journey with confidence, patience, and enthusiasm. Learn from each experience, adapt your methods as needed, and don’t be discouraged by any setbacks. Gardening is a continuous learning process, and each season presents new opportunities for growth and improvement.
So, grab your seed starter tray, select your favorite seeds, and get to planting. With proper care and a touch of green thumb, you’ll witness the miraculous transformation of tiny seeds into thriving plants, bringing joy and beauty to your garden.
Happy seed starting and happy gardening!
Frequently Asked Questions about How To Use Seed Starter Trays
Was this page helpful?
At Storables.com, we guarantee accurate and reliable information. Our content, validated by Expert Board Contributors, is crafted following stringent Editorial Policies. We're committed to providing you with well-researched, expert-backed insights for all your informational needs.


0 thoughts on “How To Use Seed Starter Trays”