Home>Garden Essentials>How To Plant Seed

Garden Essentials
How To Plant Seed
Modified: August 17, 2024
Learn how to plant seeds in your garden with our step-by-step guide. Discover the essentials for successful seed planting and watch your garden thrive.
(Many of the links in this article redirect to a specific reviewed product. Your purchase of these products through affiliate links helps to generate commission for Storables.com, at no extra cost. Learn more)
Introduction
Creating a beautiful and thriving garden starts with one essential step: planting seeds. Whether you’re a seasoned gardener or a beginner, knowing how to properly plant seeds is crucial for successful germination and growth. By following a few simple steps, you can ensure that your seeds have the best possible chance of flourishing into healthy plants.
In this article, we will guide you through the process of planting seeds, from selecting the right ones to providing the proper care. By the end, you’ll have the knowledge and confidence to start your own garden from scratch.
So, put on your gardening gloves and let’s get started!
Key Takeaways:
- Choose the right seeds by considering climate, soil, and sunlight needs. Plan for succession planting to maximize garden productivity and harvest crops at different times.
- Provide proper care by preparing soil, planting seeds at the right depth, and watering consistently. Take care of seedlings by thinning, watering, and protecting from extreme conditions.
Read more: How To Germinate A Plant
Step 1: Choosing the Right Seeds
The first step in planting seeds is selecting the right ones for your garden. When choosing seeds, consider the climate, soil type, and available space in your garden. Here are a few tips to help you make the best choice:
- Know Your Hardiness Zone: Every plant has specific temperature requirements for optimal growth. Familiarize yourself with your hardiness zone, which will help you determine which plants are suitable for your region.
- Determine Your Soil Type: Some plants thrive in sandy soil, while others prefer clay or loam. Test your soil’s pH level and texture to identify the types of plants that will grow best in your garden.
- Consider Sunlight Requirements: Different plants have varying sunlight needs. Check their sunlight requirements to ensure that you have an appropriate area in your garden to accommodate them.
- Research Germination Time: Some seeds take longer to germinate than others. If you’re impatient to see results, choose seeds with shorter germination times. Otherwise, plan your planting schedule accordingly.
- Plan for Succession Planting: To maximize your garden’s productivity, consider succession planting. Choose seeds of plants that have different maturity rates, allowing you to harvest crops at various times throughout the growing season.
By carefully selecting your seeds, you set a strong foundation for healthy and thriving plants. Ensure that you have all the necessary information about their requirements before moving on to the next step.
Step 2: Preparing the Soil
Before you start planting your seeds, it’s crucial to prepare the soil to provide an ideal environment for growth. Here are the steps to prepare your soil:
- Clear the Area: Remove any weeds, rocks, or debris from the planting area. This will prevent competition for nutrients and ensure that your seeds have ample space to grow.
- Loosen the Soil: Use a garden fork or spade to loosen the top few inches of soil. This will improve aeration and drainage, allowing the roots to penetrate the soil more easily.
- Amend the Soil: Depending on your soil type and the needs of your chosen plants, you may need to add organic matter to improve fertility and structure. This can include compost, well-rotted manure, or peat moss. Mix the amendments thoroughly with the existing soil.
- Level and Smooth the Soil: Use a rake to level and smooth the soil surface. This will create an even bed for your seeds and make it easier to water and maintain the garden later on.
- Test the Soil: It’s a good idea to perform a soil test to determine its pH level and nutrient content. This will help you identify any deficiencies and adjust the soil accordingly with the appropriate amendments.
By taking the time to properly prepare your soil, you provide your seeds with the optimal conditions for germination and growth. Remember to follow the specific soil requirements of your chosen plants for the best results.
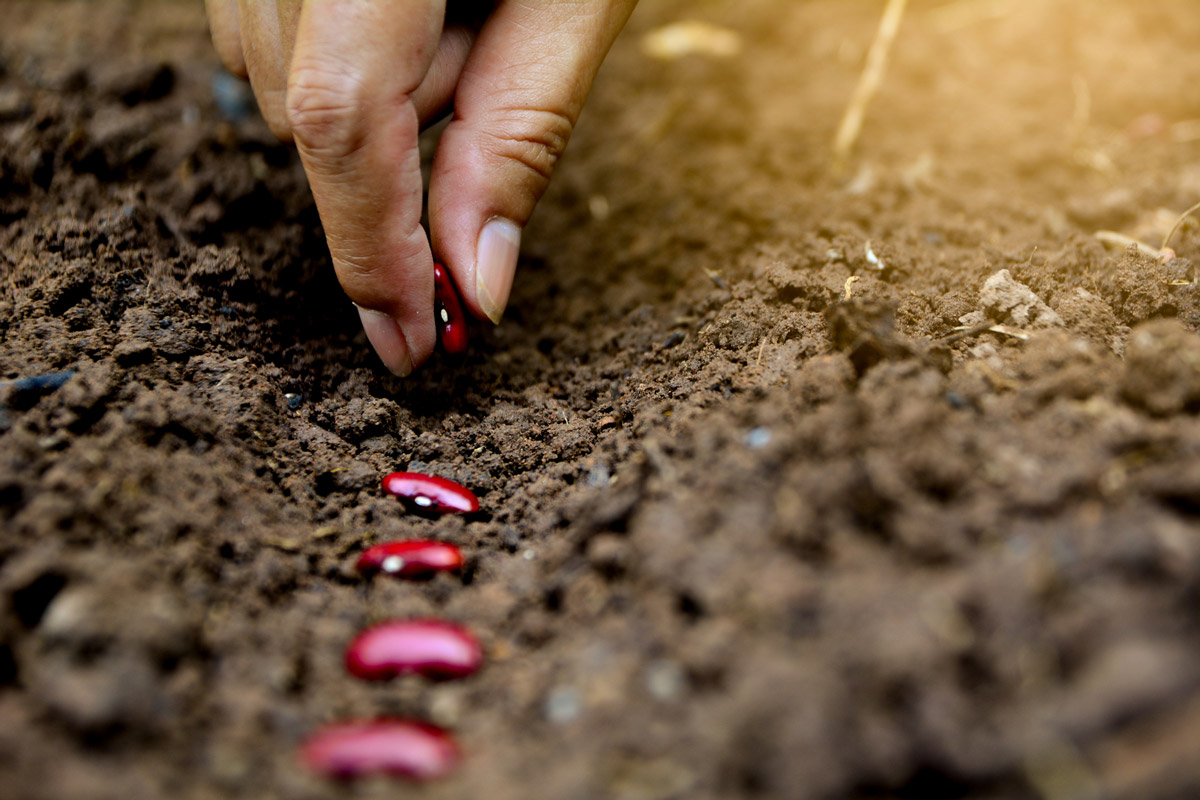
Step 3: Planting the Seeds
Now that you’ve chosen the right seeds and prepared the soil, it’s time to plant them. Properly planting seeds will ensure that they have the best chance of germinating and growing into healthy plants. Follow these steps to plant your seeds:
- Read the Seed Packet: Each seed packet contains valuable information, including planting depth and spacing requirements. Read the instructions carefully to ensure you’re planting the seeds at the appropriate depth and distance.
- Make Planting Holes: Use your finger or a small gardening tool to create small planting holes in the soil. The depth should match the recommendations on the seed packet.
- Plant the Seeds: Place one seed in each planting hole and gently cover it with soil. If the seeds are tiny, you can sprinkle them evenly over the soil surface and lightly press them into the soil.
- Label Your Rows: To keep track of what you’ve planted, label each row with the name of the plant or use plant markers. This will help you identify the seeds as they germinate and grow.
- Water the Seeds: After planting, water the soil gently using a watering can or a gentle mist setting on a hose. Ensure that the soil is evenly moist but not waterlogged, as excessive moisture can lead to rot.
Remember to follow the specific instructions for each type of seed you’re planting. Some seeds may require pre-soaking or stratification before planting. By providing the right planting conditions, you set the stage for successful germination and healthy plant growth.
Step 4: Providing Adequate Watering
Water is a vital element for seed germination and plant growth. Providing your seeds with adequate watering ensures that they stay hydrated and thrive. Here are some important tips to keep in mind when watering your seeds:
- Water Consistently: Once you’ve planted your seeds, it’s crucial to maintain consistent moisture in the soil. Depending on the weather conditions and the specific requirements of your plants, you may need to water them daily or every few days. Avoid letting the soil dry out completely.
- Water at the Right Time: Water your seeds early in the morning or in the late afternoon when the temperatures are cooler. This allows the water to penetrate the soil effectively, minimizing evaporation and providing ample moisture for the roots.
- Use a Gentle Watering Technique: When watering your seeds, use a gentle spray or a watering can with a fine nozzle. Avoid using a strong jet of water, as it can dislodge the seeds or compact the soil around them.
- Water the Soil, Not the Leaves: Direct the water towards the base of the plants, aiming for the soil. Avoid wetting the leaves excessively, as this can promote the growth of fungal diseases.
- Monitor Soil Moisture: Regularly check the soil moisture by inserting your finger about an inch into the soil. If it feels dry, it’s time to water. If it’s still moist, wait a bit longer before watering again.
- Be Mindful of Overwatering: While it’s important to provide adequate moisture, be cautious not to overwater your seeds. Overwatering can lead to root rot, fungal diseases, and poor plant growth. Make sure the soil has good drainage to prevent waterlogging.
Remember, the watering needs of your seeds may vary depending on the plant type, weather conditions, and soil composition. Pay attention to the signs of dehydration or overwatering, and adjust your watering routine accordingly. With proper watering, your seeds will have the hydration they need to flourish into strong, healthy plants.
Read more: How To Plant Seeds Indoors
Step 5: Ensuring Proper Sunlight
Light is an essential factor for plant growth. It provides energy for photosynthesis, which is crucial for the development of healthy and robust plants. To ensure that your seeds receive the right amount of sunlight, follow these steps:
- Identify the Sun Requirements: Different plants have varying sunlight requirements. Some thrive in full sun, while others prefer partial shade. Read the seed packet or do some research to determine the optimal sunlight conditions for your specific plants.
- Observe the Sun Patterns: Spend some time observing your garden throughout the day to identify areas with the most sunlight. Note which areas receive full sun, partial shade, or shade. This will help you decide where to plant your seeds accordingly.
- Position Your Garden Beds: If you have the flexibility, position your garden beds in an area that receives adequate sunlight for the plants you’re growing. Avoid areas that are consistently shaded or receive only a few hours of direct sunlight.
- Consider Sun Exposure Changes: Keep in mind that the sun’s path changes with the seasons. Shade from nearby trees or buildings may affect sunlight availability. Plan your garden layout accordingly to account for these changes.
- Provide Shade for Delicate Seedlings: For some sensitive plants, such as lettuce or certain flowers, excessive sunlight can be harmful. Use shade cloth or plant taller companion plants to provide some shade during the hottest parts of the day.
- Rotate Your Crops: To prevent soil fatigue and pest buildup, consider rotating your crops each growing season. This allows different plants to benefit from the varying sunlight requirements and helps maintain soil health.
Proper sunlight is crucial for the growth and development of your seeds. By ensuring that your seeds receive the appropriate amount of sunlight, you provide them with the energy they need to flourish into healthy and productive plants.
When planting seeds, make sure to follow the instructions on the seed packet for the correct depth and spacing. Keep the soil moist but not waterlogged, and provide plenty of sunlight for healthy growth.
Step 6: Taking Care of Seedlings
Once your seeds have germinated and sprouted into seedlings, it’s important to provide them with the care they need to thrive. These delicate young plants require careful attention to ensure healthy growth. Here’s how to take care of your seedlings:
- Thinning: If you have planted multiple seeds in each hole, it’s essential to thin out the weaker seedlings. Remove the excess seedlings, leaving behind the strongest and healthiest ones. This allows the remaining seedlings to have enough space and resources to grow.
- Watering: Continue to water your seedlings regularly, keeping the soil evenly moist. Be mindful of not overwatering or letting the soil dry out completely. Adjust the frequency of watering based on the specific needs of the plants and the surrounding environmental conditions.
- Fertilizing: Seedlings often benefit from a mild dose of fertilizer when they have developed their first true leaves. Choose a balanced organic fertilizer and apply it according to the manufacturer’s instructions. This will provide the necessary nutrients for healthy growth.
- Support: Some seedlings, especially those with fragile stems, may require support as they grow taller. Use stakes or small plant supports to prevent bending or flopping. Gently tie the seedlings to the supports using soft, flexible ties.
- Protect from Extreme Conditions: Extreme weather conditions like strong winds, heavy rains, or intense heat can harm delicate seedlings. Provide protection by using row covers, cloches, or temporary shade structures when necessary.
- Monitor for Pests and Diseases: Keep a close eye on your seedlings for signs of pests or diseases. Check the undersides of leaves for any pest infestations and promptly take action. Remove any infected or damaged leaves to prevent the spread of diseases.
- Thin Again, if Necessary: As your seedlings grow, they may still require additional thinning to ensure proper spacing. This will prevent overcrowding and allow the remaining seedlings to develop fully.
By providing the appropriate care and attention, you can help your seedlings grow into strong and healthy plants. Remember to follow the specific care instructions for your chosen plant varieties and adjust your practices as needed based on the unique needs of your seedlings.
Step 7: Transplanting the Seedlings
Transplanting seedlings is an important step in the gardening process, as it allows your plants to transition from their initial containers or seed trays to their permanent garden beds or pots. Follow these steps to transplant your seedlings successfully:
- Choose the Right Time: It’s important to transplant your seedlings at the right time to avoid stressing them. Wait until the seedlings have developed their true leaves and the risk of frost has passed, if applicable.
- Prepare the Transplanting Site: Before transplanting, prepare the planting holes in your garden bed or containers. Ensure that the soil is well-prepared, loosened, and amended with organic matter, if necessary.
- Water the Seedlings: Before transplanting, water the seedlings thoroughly. This helps moisten the soil, making it easier to remove them from their containers without damaging the roots.
- Gently Remove the Seedlings: Carefully remove the seedlings from their containers, avoiding any unnecessary disturbance to the roots. If the seedlings are in seed trays, gently push them up from the bottom using a pencil or similar tool.
- Plant the Seedlings: Place each seedling in the prepared hole, ensuring that the top of the root ball is level with or slightly below the soil level. Firmly press the soil around the base of the seedling to secure it in place.
- Water Thoroughly: After transplanting, water the seedlings deeply to help settle the soil around the roots. This promotes healthy establishment and reduces transplant shock.
- Provide Follow-Up Care: Keep a close eye on your transplanted seedlings and provide them with appropriate care. Shield them from extreme weather conditions, water them regularly, and monitor for any signs of stress or pests.
- Gradual Exposure to Sunlight: If your seedlings were grown indoors or in a greenhouse, gradually expose them to direct sunlight over the course of a few days. Start with a few hours of sunlight initially and gradually increase the duration.
- Space Your Transplants: Ensure there is enough space between each transplanted seedling to allow for proper growth and airflow. Follow the recommended spacing guidelines for your specific plants.
Transplanting seedlings can be a critical step in their growth journey. By following these steps and providing them with proper care, you increase their chances of thriving and producing a bountiful garden.
Step 8: Protecting from Pests and Diseases
Protecting your plants from pests and diseases is essential to ensure their health and productivity. By taking preventative measures and implementing effective strategies, you can minimize the risk of infestations and infections. Here are some steps to protect your seedlings and plants:
- Practice Good Garden Hygiene: Regularly clean up your garden by removing fallen leaves, debris, and weeds. This reduces hiding places for pests and eliminates potential disease sources.
- Utilize Companion Planting: Planting certain flowers, herbs, or vegetables together can help deter pests. For example, marigolds can repel aphids, while basil can deter tomato hornworms. Consider companion planting to naturally ward off common garden pests.
- Install Physical Barriers: Use protective barriers like netting or row covers to prevent insects, birds, or other animals from reaching your plants. These barriers can be particularly helpful for seedlings that are more susceptible to damage.
- Encourage Beneficial Insects: Attracting beneficial insects like ladybugs, lacewings, and hoverflies can help control the population of harmful pests. Planting flowers that attract these beneficial insects and avoiding broad-spectrum pesticides can create a more balanced ecosystem in your garden.
- Monitor Regularly: Regularly inspect your plants for any signs of pest infestations or disease symptoms. Look for chewed leaves, holes, discoloration, or wilting. Early detection allows for prompt action and prevents further damage.
- Respond Appropriately: If you identify pests or diseases, take appropriate action based on their nature. This may include handpicking pests, applying organic insecticides, or using cultural practices like pruning infected parts. Research the specific pest or disease and choose the most suitable treatment method.
- Practice Crop Rotation: Rotating your crops each season can help prevent the build-up of pests and diseases that are specific to certain plant families. By moving plants to different locations, you break the cycle and reduce the risk of recurring problems.
- Use Organic and Natural Remedies: Whenever possible, opt for organic and natural remedies to control pests and diseases. This minimizes chemical exposure and helps maintain a more eco-friendly garden. Examples include neem oil, insecticidal soaps, and homemade remedies like garlic or hot pepper sprays.
By implementing these protective measures, you can safeguard your seedlings and plants against pests and diseases. A healthy garden is less prone to issues, allowing your plants to flourish and maximize their potential.
Read more: How To Plant Wheatgrass Seeds
Step 9: Providing Regular Maintenance
A successful garden requires regular maintenance to ensure ongoing health and productivity. By providing consistent care and attention, you can keep your plants thriving throughout the growing season. Here are some essential maintenance tasks to incorporate into your gardening routine:
- Watering: Continue to water your plants regularly, adjusting the frequency based on their specific needs and the weather conditions. Deep, thorough watering is usually more effective than frequent shallow watering.
- Weeding: Regularly remove weeds from your garden beds to prevent competition for nutrients, water, and sunlight. Use proper techniques to avoid disturbing the roots of your plants.
- Feeding: Apply organic fertilizers or compost periodically to replenish the soil’s nutrients. Always follow the recommended application rates and timing specified for your specific plants.
- Pruning and Trimming: Prune your plants as needed to promote healthy growth, remove dead or diseased branches, and shape the plant. Trim back excessive foliage to improve airflow and reduce the risk of pests and diseases.
- Supporting: Install stakes, trellises, or cages to support tall or vining plants that need structural support. Properly securing and training the plants will prevent them from bending or breaking under the weight of their foliage or fruit.
- Harvesting: Regularly harvest vegetables, fruits, and herbs when they are ripe. This encourages continued production and prevents overripening or spoilage. Harvesting also helps to stimulate further growth and development in some plants.
- Mulching: Apply organic mulch such as straw, wood chips, or compost around the base of your plants to help conserve moisture, suppress weed growth, and regulate soil temperatures.
- Monitoring: Keep a close eye on your plants for any signs of pests, diseases, or nutrient deficiencies. Promptly address any issues that arise to prevent further damage and maintain plant health.
- Cleaning: Regularly clean and disinfect your gardening tools, containers, and equipment to prevent the spread of diseases and pests. This helps ensure a healthy growing environment for your plants.
Regular maintenance is crucial for the overall success of your garden. By incorporating these tasks into your routine, you can create a thriving and beautiful garden that will bring you joy and bountiful harvests throughout the growing season.
Conclusion
Congratulations! You’ve now learned the essential steps for planting seeds and nurturing them into healthy plants. By choosing the right seeds, preparing the soil, providing adequate watering and sunlight, taking care of seedlings, transplanting them, protecting from pests and diseases, and providing regular maintenance, you have set yourself up for gardening success.
Gardening is a rewarding and fulfilling experience. It allows you to connect with nature, grow your own food, or create a visually stunning outdoor space. Remember to personalize your garden by selecting plants that resonate with you and suit your specific gardening goals.
As you embark on your gardening journey, don’t be afraid to experiment and learn from your experiences. Each garden is unique, with its own set of challenges and joys. Enjoy the process of nurturing your plants, observing their growth, and celebrating the fruits of your labor.
Finally, let gardening be a mindful and relaxing activity. Take time to appreciate the beauty and wonder of the natural world around you. Share your gardening knowledge and experiences with others, and always be open to learning and growing as a gardener.
Now, armed with the knowledge and skills you’ve gained, it’s time to get out there and start planting those seeds. Happy gardening!
Now that you've got the basics of planting seeds down, why stop there? Elevate your gardening game with innovative garden fence ideas. Whether you're looking to add a touch of style or enhance privacy, these concepts have got you covered. Curious about how quickly your new seeds will sprout? Understanding seed germination times can help manage your gardening expectations and planning. Both guides offer practical advice to help your garden flourish beautifully.
Frequently Asked Questions about How To Plant Seed
Was this page helpful?
At Storables.com, we guarantee accurate and reliable information. Our content, validated by Expert Board Contributors, is crafted following stringent Editorial Policies. We're committed to providing you with well-researched, expert-backed insights for all your informational needs.


0 thoughts on “How To Plant Seed”