Home>Garden Essentials>Garden Storage>How To Make IKEA Pax Wardrobe Look Built In
Garden Storage
How To Make IKEA Pax Wardrobe Look Built In
Modified: May 6, 2024
Discover how to transform your IKEA Pax wardrobe into a seamless built-in storage solution. Create a stylish and organized space with our step-by-step guide.
(Many of the links in this article redirect to a specific reviewed product. Your purchase of these products through affiliate links helps to generate commission for Storables.com, at no extra cost. Learn more)
Introduction
When it comes to home storage solutions, IKEA’s Pax wardrobe is a popular choice for many. With its customizable modules and sleek design, the Pax wardrobe offers functionality and style. While the standalone unit is already impressive, there is a way to take it to the next level and make it look like a built-in wardrobe.
Having a built-in wardrobe can instantly elevate the aesthetics of your space and provide a seamless integration with your existing decor. It not only maximizes storage space but also adds a touch of sophistication to any room. In this article, we will guide you through the process of making your IKEA Pax wardrobe look like a built-in unit.
Before we dive into the steps, it is important to note that this project requires some basic DIY skills and tools. However, with a little patience and attention to detail, you can achieve professional-looking results.
Let’s get started on transforming your Pax wardrobe into a stunning built-in piece that will enhance both the functionality and visual appeal of your space.
Key Takeaways:
- Elevate your space with a custom built-in look for your IKEA Pax wardrobe. Choose the right unit, measure and prepare the space, and add finishing touches for a seamless integration with your room’s design.
- Maximize storage and style with a transformed Pax wardrobe. Assemble with care, install thoughtfully, and customize the interior to create a bespoke storage solution that reflects your personal style and needs.
Read more: How To Build IKEA Pax Wardrobe
Choosing the Right Pax Wardrobe
Before you begin the process of creating a built-in look for your IKEA Pax wardrobe, it is important to choose the right wardrobe unit that suits your needs and space.
The Pax wardrobe series offers a variety of options, including different sizes, configurations, and finishes. Consider your storage requirements and the available space in your room to determine the best fit. Measure the dimensions of your wall carefully to ensure that the wardrobe will fit snugly into the allocated space.
In addition to size, think about the internal organization of the wardrobe. The Pax system allows for customization with interior fittings such as shelves, drawers, and hanging rods. Assess your storage needs for clothing, accessories, and other items to select the appropriate fittings that will maximize your storage space.
Another important consideration is the style and finish of the wardrobe. The Pax series offers a range of finishes, including various wood grains and solid colors. Choose a finish that complements your room’s existing decor and personal style.
Lastly, take into account any additional features or accessories that may enhance the functionality of your wardrobe. For example, consider adding lighting fixtures, soft-close hinges, or extra storage accessories such as shoe racks or jewelry organizers.
By carefully choosing the right Pax wardrobe that meets your storage needs, fits your space, and aligns with your aesthetic preferences, you are setting the foundation for a successful built-in transformation.
Assembling the Pax Wardrobe
Once you have selected the perfect Pax wardrobe for your space, it’s time to assemble the unit. IKEA provides detailed assembly instructions along with the necessary hardware in the packaging. Follow these step-by-step instructions to ensure a sturdy and well-built wardrobe.
Start by clearing the area where you plan to assemble the wardrobe. Lay out all the parts and hardware in an organized manner to easily locate what you need during the assembly process. It’s helpful to have a friend or family member assist you in handling larger pieces and to make the process smoother.
Begin by attaching the side panels to the back panel using the provided screws and dowels. Follow the instructions closely, making sure to align the panels properly. Use a screwdriver or electric drill with the appropriate attachments to secure the screws tightly.
Next, move on to attaching the top panel and bottom panel to the side panels. Ensure that all the panels are flush and level before tightening the screws. It’s important to tighten all the screws evenly to maintain the stability of the wardrobe structure.
Install the shelves and hanging rods according to the desired configuration. The Pax wardrobe provides adjustable shelving options, allowing you to customize the interior layout based on your storage needs. Take your time to carefully place the shelves in their designated positions and secure them in place.
Once the basic structure of the wardrobe is assembled, double-check that all screws are tightened and secure. Gently shake the wardrobe to ensure that it is stable and does not wobble. If any adjustments are needed, make them before proceeding to the next steps.
Finally, attach the doors to the wardrobe following the provided instructions. Pax wardrobes offer a variety of door options, such as hinged doors or sliding doors. Carefully align the doors and hinges to ensure smooth opening and closing. Test the doors to ensure they function properly and securely latch.
Once the assembly is complete, step back and admire your newly assembled Pax wardrobe. It’s now ready to be transformed into a built-in unit that seamlessly blends with your space.
Measuring and Preparing the Space
Before you can install your Pax wardrobe and achieve the desired built-in look, it is crucial to measure and prepare the space where the wardrobe will be placed. Taking accurate measurements and making necessary preparations will ensure a seamless installation process.
Begin by measuring the width, height, and depth of the area where you plan to install the wardrobe. Use a tape measure to get precise measurements. Take into account any baseboard or molding that may affect the fit of the wardrobe against the wall.
Once you have the measurements, transfer them to the floor using painter’s tape or mark them with a pencil. This will help you visualize the positioning of the wardrobe and ensure that it aligns properly with the surrounding walls and other furniture.
After marking the measurements on the floor, it’s time to assess the condition of the wall. Ensure that the wall surface is clean and free from any obstructions such as outlets, switches, or vents. If necessary, remove any wall art or decor that may interfere with the installation process.
If you have carpet or any other flooring material, consider creating a level surface. This can be achieved by placing shims or leveling pads under the legs of the wardrobe, if needed. A level wardrobe will not only look more aesthetically pleasing but will also ensure proper functionality and door alignment.
During the preparation stage, it’s also helpful to gather any additional tools or materials that may be required for installation. This may include a power drill, screws, wall anchors, a level, a stud finder, and a hammer.
By accurately measuring the space, marking the measurements on the floor, assessing the wall, and gathering the necessary tools, you are setting the stage for a smooth and successful installation of your Pax wardrobe, ultimately achieving the desired built-in look.
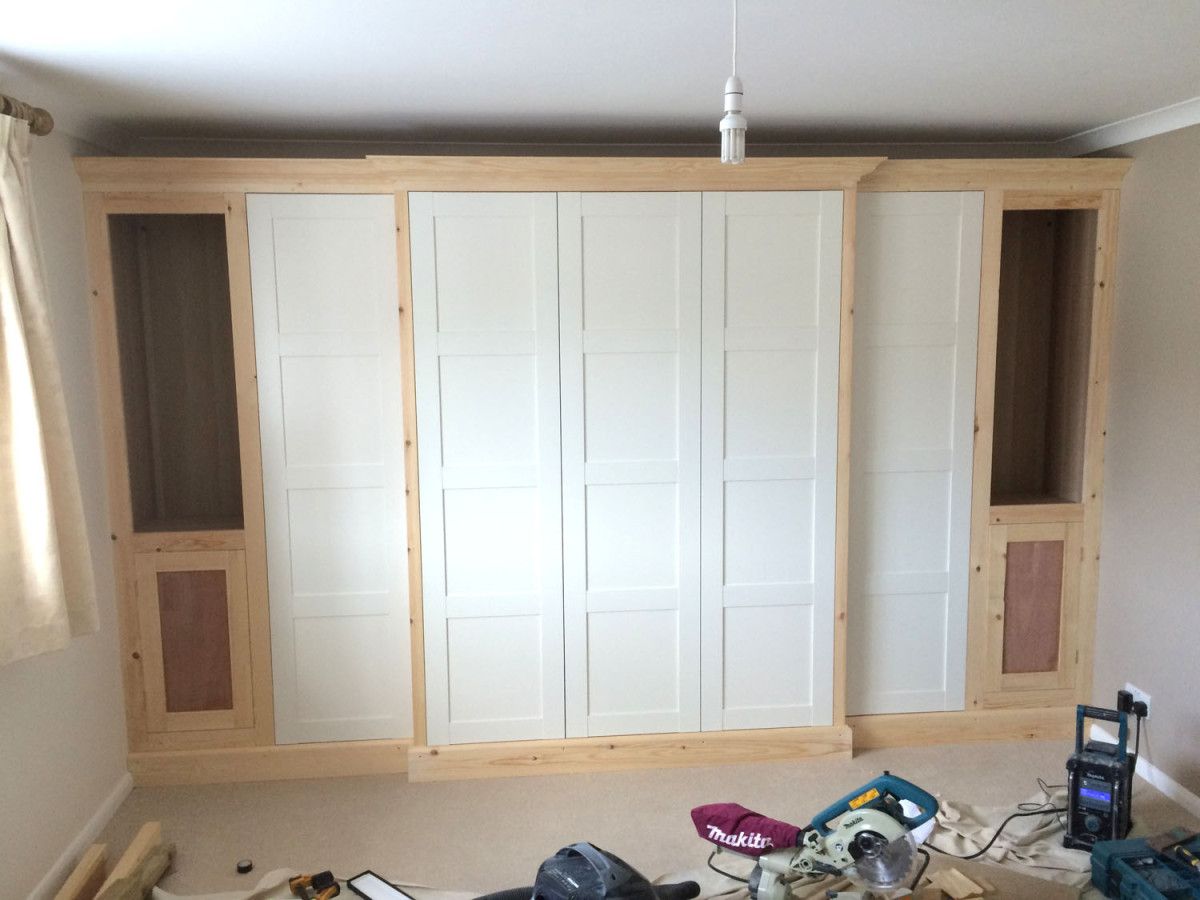
Installing the Pax Wardrobe
Now that you have measured and prepared the space, it’s time to install your Pax wardrobe and bring your vision of a built-in unit to life. The installation process may vary depending on your specific circumstances, but the following steps will provide a general guide:
- Start by positioning the wardrobe in the marked area on the floor. Ensure that it is flush against the surrounding walls and centered in the space. Take measurements and use a level to confirm that the wardrobe is properly aligned.
- If possible, locate the studs in the wall using a stud finder. Attaching the wardrobe to the studs will provide added stability and security. Mark the location of the studs with a pencil or painter’s tape.
- Using a drill and appropriate screws, secure the back panel of the wardrobe to the wall. Ensure that the screws go into the studs for maximum support. If studs are not present in the desired locations, use wall anchors or toggle bolts to securely attach the wardrobe to the wall.
- To connect multiple Pax wardrobe units, use the provided hardware and instructions to join them together. This will create a seamless appearance and ensure stability between the units.
- Once the wardrobe is securely anchored to the wall, utilize any leveling mechanisms provided with your specific Pax wardrobe to ensure that it is level and stable.
- Check that all the doors are aligned properly and adjust hinges or sliding mechanisms if necessary. Ensure that the doors open and close smoothly without any obstructions.
- If desired, add any additional finishing touches such as crown molding at the top or trim pieces along the sides to further enhance the built-in look.
Remember to take your time during the installation process, checking measurements and ensuring that everything is secure and aligned. Don’t hesitate to seek assistance if needed, especially when dealing with heavy wardrobe units or complex installations.
Once the installation is complete, step back and admire your transformed Pax wardrobe. It now blends seamlessly with the surrounding space, giving it a custom, built-in appearance.
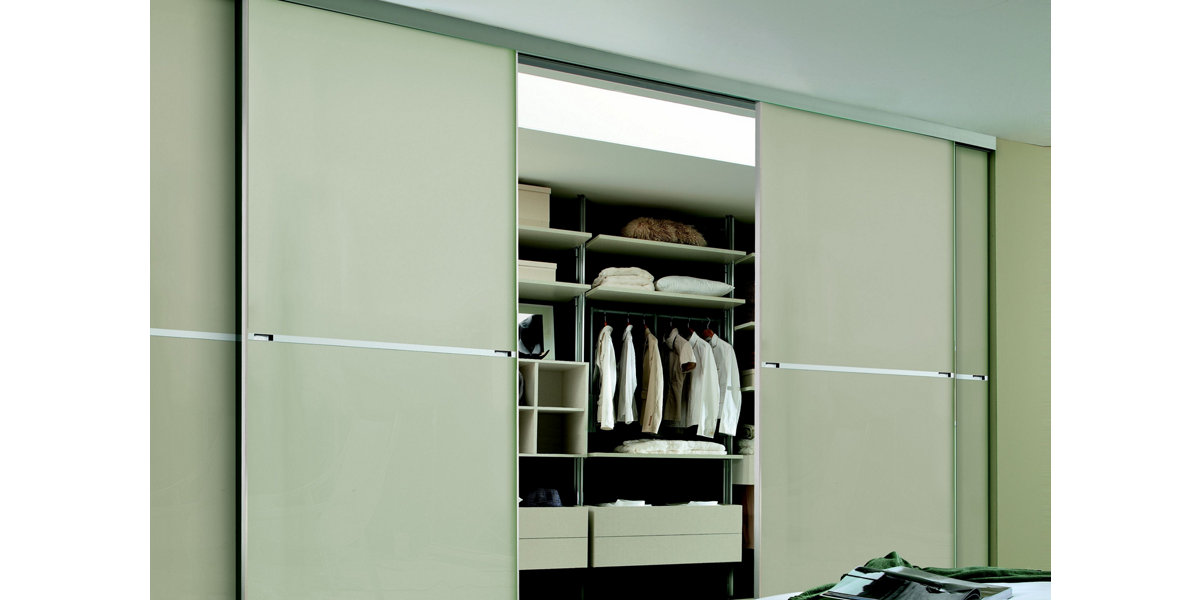
Use trim and molding to create a seamless built-in look for your IKEA Pax wardrobe. Paint the trim the same color as the wardrobe for a cohesive finish.
Read more: How To Make IKEA Bookshelves Look Built In
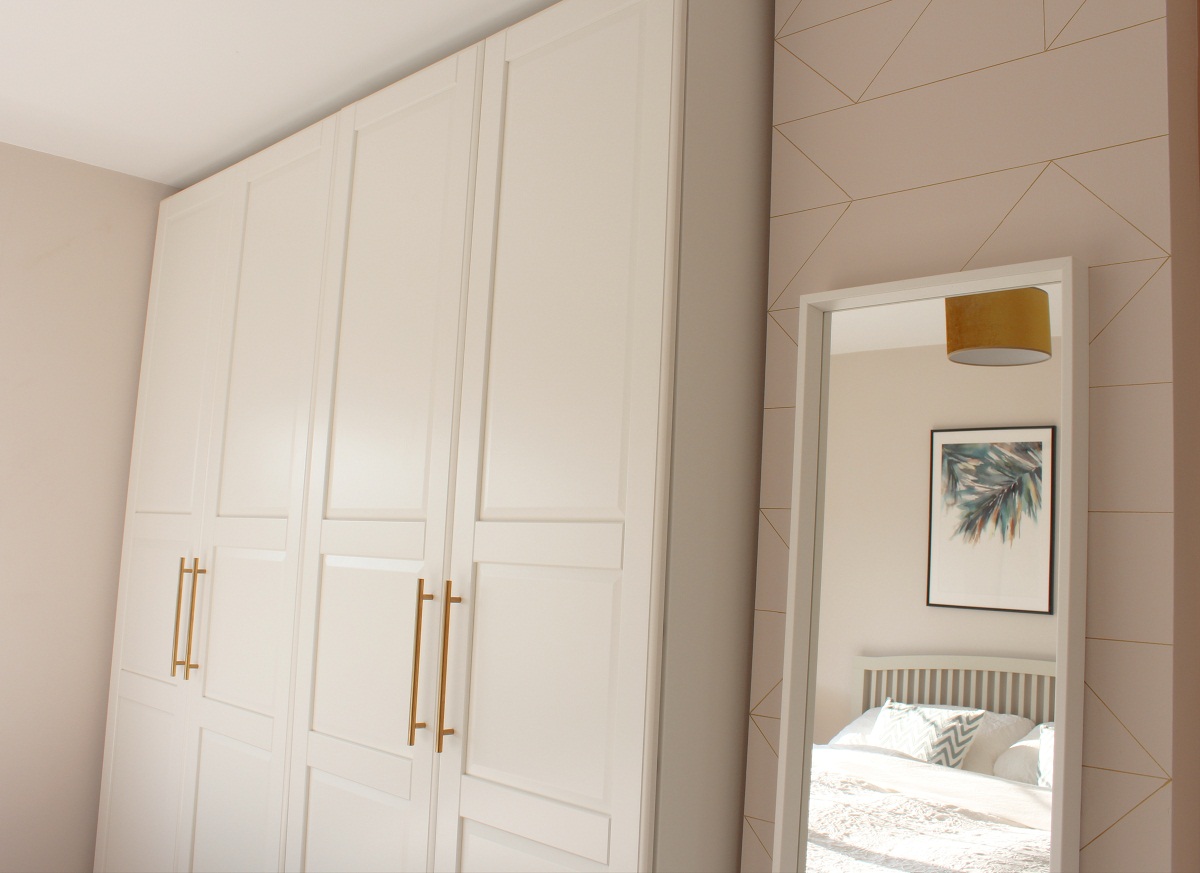
Creating a Built-In Look
Now that your Pax wardrobe is installed, it’s time to take it a step further and create a truly built-in look. With a few additional touches, you can seamlessly integrate the wardrobe into your space, making it appear as if it was custom-built.
One effective way to achieve a built-in look is by adding trim and molding around the wardrobe. This can help bridge the gap between the wardrobe and the surrounding walls, creating a seamless transition. Use crown molding at the top and baseboard molding at the bottom to give the wardrobe a polished and integrated appearance.
Consider painting the trim and molding in the same color as the walls or in a complementary shade. This will help further blend the wardrobe with the surrounding decor and make it appear as if it was always a part of the room.
Another technique to enhance the built-in look is to fill any gaps or seams between the wardrobe and the walls. Use caulking or putty to smooth out any visible spaces, ensuring a seamless connection. This step will give the wardrobe a seamless and cohesive appearance, making it appear as if it was custom-fitted into the space.
You can also consider creating a decorative “valance” or cornice above the wardrobe to unify it with the rest of the room’s design. This can be achieved by simply hanging a fabric-covered board or a decorative molding piece over the top of the wardrobe. The valance can be customized to match the curtains or other elements in the room, further enhancing the built-in aesthetic.
Lastly, pay attention to lighting. By adding integrated lighting within or above the wardrobe, you can create a warm and inviting ambiance. LED strip lights or puck lights can be installed to illuminate the interior of the wardrobe, making it functional and visually appealing. Consider using dimmable lights to adjust the intensity according to your preferences.
By incorporating these techniques, you can transform your Pax wardrobe into a stunning built-in feature that seamlessly integrates with your space, giving it a custom and refined appearance.
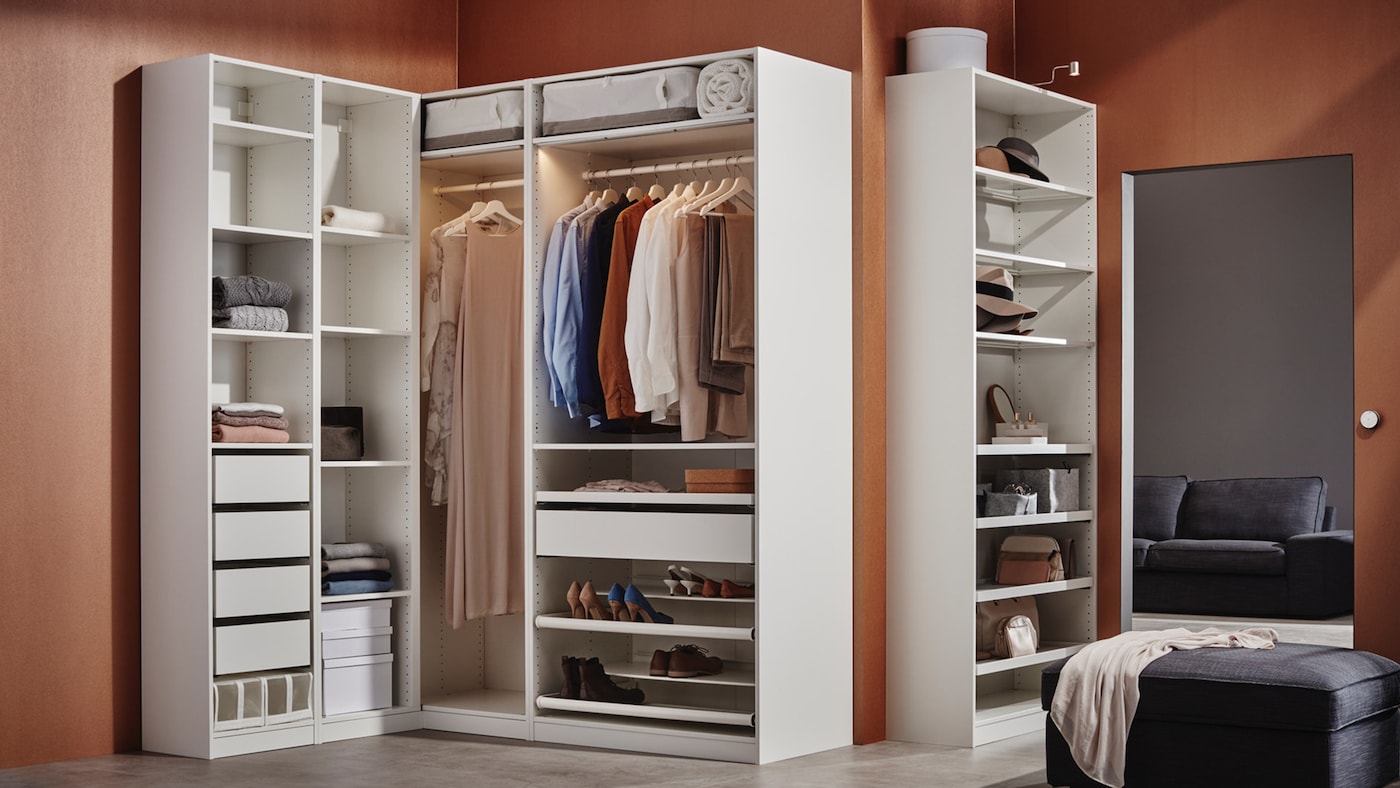
Customizing the Wardrobe Interior
With the external appearance of your Pax wardrobe transformed into a built-in unit, it’s time to focus on customizing the interior to maximize its storage potential and meet your specific needs.
One of the greatest advantages of the Pax wardrobe system is its ability to be customized with a variety of interior fittings. Consider the items you plan to store in the wardrobe and select the appropriate fittings accordingly.
Start by installing adjustable shelves at various heights to accommodate folded clothing, accessories, or other items. This will allow you to maximize vertical space and easily customize the layout for different storage needs.
If you have a collection of shoes, consider adding shoe racks or shelves specifically designed to hold footwear. These inserts will keep your shoes organized and easily accessible while maximizing the use of space.
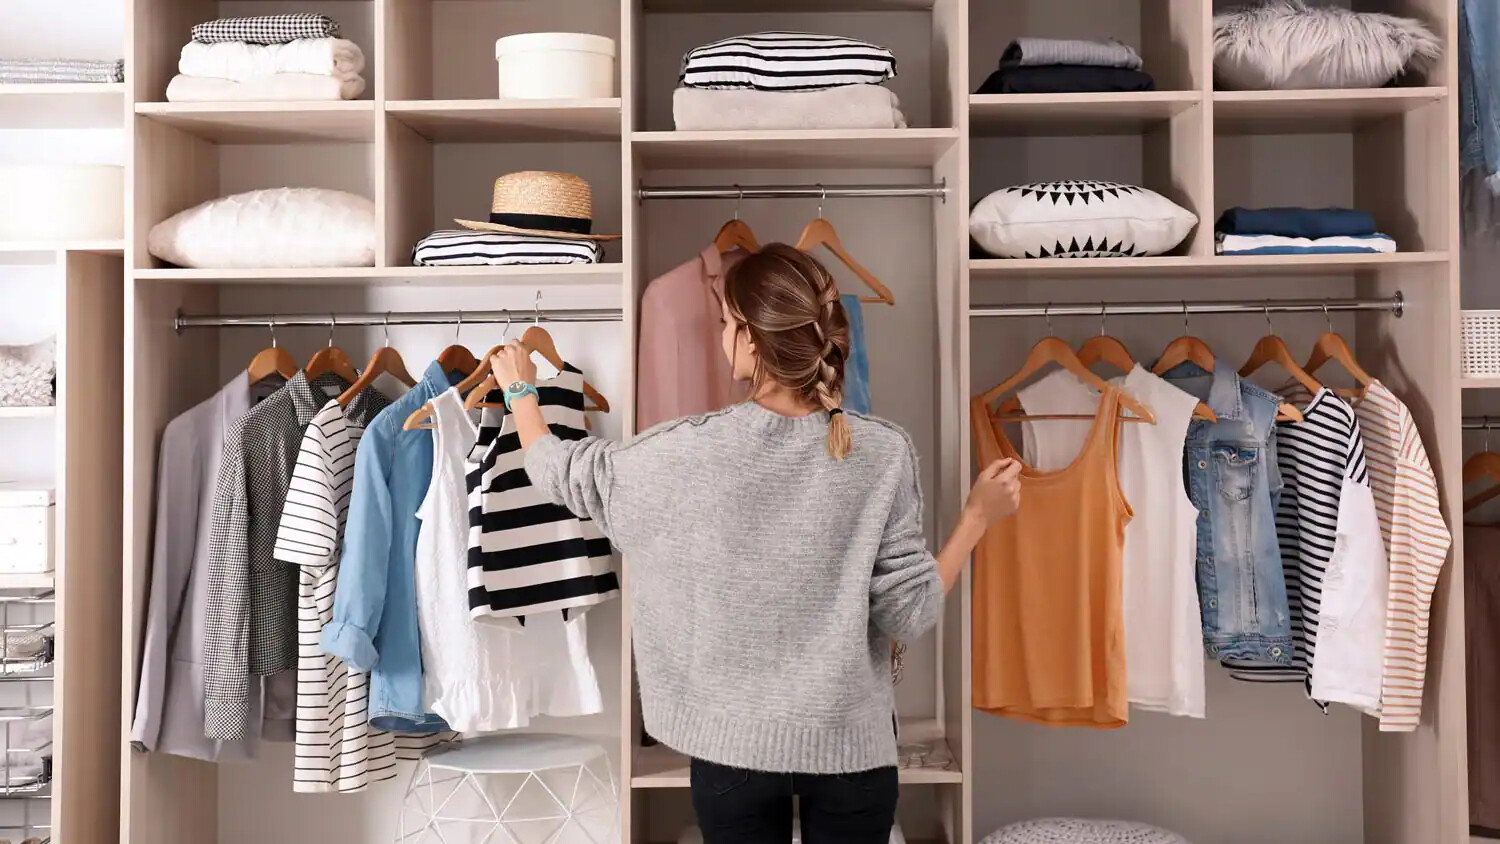
For hanging clothing, install hanging rods at different heights to accommodate various clothing lengths, such as dresses, shirts, and pants. Arrange the rods to facilitate easy access and separate different categories of clothing.
Drawers are another popular option for storing smaller items such as socks, underwear, and accessories. Install drawers within the wardrobe to provide a concealed storage solution that keeps everything organized and out of sight.
Additional interior accessories, such as jewelry organizers, tie racks, or belt holders, can be incorporated to further customize the wardrobe to your specific needs. These accessories will help keep your smaller items neatly organized and easily accessible.
Remember to utilize the available space efficiently. If there are gaps or areas that are not fully utilized, consider adding smaller shelves, hooks, or baskets to make the most of the space.
Finally, don’t forget to personalize the interior of the wardrobe to reflect your own style. You can add decorative touches such as wallpaper, adhesive decals, or fabric inserts to the back or sides of the wardrobe. This will add a unique touch and make the interior more visually appealing.
By customizing the interior fittings of your Pax wardrobe, you can tailor it to accommodate your specific storage needs and optimize its functionality. This customization will make the wardrobe even more efficient and user-friendly.
Adding Finishing Touches
With your Pax wardrobe now transformed into a built-in unit and the interior customized to your liking, it’s time to put the final touches in place to elevate the overall look and functionality of the wardrobe.
One of the simplest yet most effective ways to enhance the appearance of your built-in wardrobe is by adding decorative hardware. Replace the standard drawer and door handles with stylish options that match your room’s aesthetic. This small change can make a big impact and give the wardrobe a more polished and cohesive look.
Consider adding mirrored panels to the wardrobe doors or using mirrored inserts for specific sections. Mirrors not only serve a functional purpose, allowing you to check your outfit, but they also create the illusion of a larger space and reflect light, making the room feel brighter and more spacious.
To enhance the functionality of the wardrobe, you can incorporate additional storage accessories. Install hooks on the sides or inside the wardrobe doors for hanging scarves, belts, or bags. These small additions can help keep accessories organized and easily accessible.
Another finishing touch to consider is the integration of a charging station or outlet within the wardrobe. This will allow you to conveniently charge devices such as smartphones or tablets while keeping them out of sight and eliminating clutter on your nightstand or dresser.
Additionally, you can add a full-length mirror to the exterior of the wardrobe or mount it on an adjacent wall. This will provide a convenient place to check your appearance and visually expand the room.
Lastly, don’t forget to incorporate your personal style by adding decorative elements that complement the overall design. Place potted plants, framed artwork, or decorative baskets on top of the wardrobe or on nearby shelves to add a touch of personality and warmth to the space.
By paying attention to these finishing touches, you can further enhance the overall look and functionality of your built-in Pax wardrobe. These small details will help create a cohesive and well-designed space that you can enjoy for years to come.
Conclusion
Transforming your IKEA Pax wardrobe into a built-in unit is a rewarding and creative project that can greatly enhance the functionality and aesthetics of your space. By following the steps outlined in this article, you can achieve a seamless integration of the wardrobe into your room’s design and make it look like it was custom-built.
From choosing the right Pax wardrobe and assembling it with care, to measuring and preparing the space, and finally installing the wardrobe and customizing its interior, each step is essential in achieving a successful built-in transformation.
Adding finishing touches such as decorative hardware, mirrors, storage accessories, and personal touches will further elevate the look and functionality of the wardrobe, creating a truly bespoke storage solution.
Embracing your creativity and considering your specific needs and style preferences throughout the process will enable you to create a built-in wardrobe that seamlessly blends with your room’s design, maximizes storage space, and makes a statement.
Remember, patience and attention to detail are key in achieving professional-quality results. Take your time, measure accurately, and follow the instructions diligently to ensure a successful outcome.
Whether you’re looking to optimize storage in a bedroom, a hallway, or any other space, transforming your Pax wardrobe into a built-in unit will not only provide practicality but also add a touch of sophistication to your home.
So go ahead, unleash your creativity, and embark on the journey of creating a beautiful and functional built-in wardrobe that will be the envy of all who see it.
Now that you've mastered giving that IKEA Pax wardrobe a built-in flair, why not tackle another organization project? Optimize your living space further by exploring different fabric storage cubes designed to streamline clutter and enhance home organization. These versatile organizers are perfect for any room, helping you maintain a neat and appealing environment effortlessly.
Frequently Asked Questions about How To Make IKEA Pax Wardrobe Look Built In
Was this page helpful?
At Storables.com, we guarantee accurate and reliable information. Our content, validated by Expert Board Contributors, is crafted following stringent Editorial Policies. We're committed to providing you with well-researched, expert-backed insights for all your informational needs.


0 thoughts on “How To Make IKEA Pax Wardrobe Look Built In”