Home>Home Maintenance>How To Make A Portable Air Conditioner

Home Maintenance
How To Make A Portable Air Conditioner
Modified: March 24, 2024
Learn how to make a portable air conditioner at home with our step-by-step guide. Stay cool and beat the heat this summer with this DIY home maintenance project.
(Many of the links in this article redirect to a specific reviewed product. Your purchase of these products through affiliate links helps to generate commission for Storables.com, at no extra cost. Learn more)
Introduction
Welcome to our guide on how to make a portable air conditioner! As the summer heat becomes more intense, staying cool and comfortable becomes a top priority. While central air conditioning systems are a great option, they can be costly to install and maintain. That’s where a portable air conditioner comes in handy, providing a cost-effective and efficient way to beat the heat.
In this article, we will walk you through the process of creating your own portable air conditioner using readily available materials. Not only will this project save you money, but it will also give you the flexibility to move it around your home or even take it on outdoor adventures.
Before we dive into the steps, let’s take a look at the materials you’ll need for this project:
- A cooler (size depends on your preference)
- A small electric fan
- Ice or frozen water bottles
- A PVC pipe or flexible tubing
- Elastomeric insulation foam
- A power supply (such as an extension cord)
Now that we have our materials ready, let’s move on to the step-by-step instructions to create your portable air conditioner.
Key Takeaways:
- Beat the summer heat affordably by making your own portable air conditioner using a cooler, fan, and ice. Stay cool and comfortable without the high cost of central air conditioning systems.
- Enjoy the flexibility of moving your DIY portable air conditioner around your home or taking it on outdoor adventures. Keep cool and beat the heat without breaking the bank.
Read more: How To Drain A Portable Air Conditioner
Materials Needed
Before we start building our portable air conditioner, let’s gather all the necessary materials. Here’s a list of items you’ll need:
- A cooler (size depends on your preference)
- A small electric fan
- Ice or frozen water bottles
- A PVC pipe or flexible tubing
- Elastomeric insulation foam
- A power supply (such as an extension cord)
Now, let’s take a closer look at each item:
A cooler: Look for a cooler that is large enough to hold the necessary components without being too bulky or heavy. You can choose any size that suits your needs, but keep in mind that a larger cooler will have a larger cooling capacity.
A small electric fan: The fan will be responsible for circulating the cool air produced by the portable air conditioner. Choose a small fan that fits well inside the cooler.
Ice or frozen water bottles: These will be used as the cooling medium. Ice will provide immediate relief, while frozen water bottles will ensure continuous cooling. You can use either depending on your preference and availability.
A PVC pipe or flexible tubing: This will be used to create the air duct that connects the fan to the cooling system. Make sure the diameter of the pipe or tubing matches the size of the fan and the cooler’s air vent.
Elastomeric insulation foam: This foam will be used to insulate the air duct, preventing any air leaks and maximizing the cooling efficiency. Make sure to choose a high-quality foam that is suitable for both indoor and outdoor use.
A power supply: You will need a power supply to connect the fan to an electrical outlet. An extension cord is a convenient option to ensure flexibility in positioning your portable air conditioner.
Once you have gathered all the necessary materials, you are ready to start building your portable air conditioner. In the next section, we will guide you through the step-by-step process to create your own cooling oasis.
Step 1: Gathering Supplies
Before you begin building your portable air conditioner, it’s important to gather all the necessary supplies. Having everything ready and organized will make the construction process much smoother. Here’s what you’ll need:
- A cooler (size depends on your preference)
- A small electric fan
- Ice or frozen water bottles
- A PVC pipe or flexible tubing
- Elastomeric insulation foam
- A power supply (such as an extension cord)
Let’s go over each item and its purpose in detail:
A cooler: Choose a cooler that is appropriate for the size of the space you want to cool. A larger cooler will have a greater cooling capacity, but it may also be more difficult to transport. Consider your needs and preferences when selecting a cooler.
A small electric fan: The fan will help circulate the cool air produced by your portable air conditioner. Look for a fan that is small enough to fit comfortably inside the cooler but powerful enough to create sufficient airflow.
Ice or frozen water bottles: These will serve as the cooling medium for your air conditioner. Ice cubes or frozen water bottles will help lower the temperature inside the cooler. You can choose either one, depending on what is more readily available to you.
A PVC pipe or flexible tubing: This will be used to create an air duct to connect the fan to the cooling system. Ensure that the diameter of the pipe or tubing matches the size of the fan and the air vent of the cooler.
Elastomeric insulation foam: Insulation foam will be used to cover the air duct and prevent any air leaks. It will help maintain the cool air temperature and improve the efficiency of the portable air conditioner. Choose high-quality foam that is suitable for both indoor and outdoor use.
A power supply: You will need a power supply, such as an extension cord, to connect the fan to an electrical outlet. Ensure that the power cord is long enough to conveniently position your portable air conditioner.
Gather all the supplies on this list and make sure everything is in good condition. Having everything prepared will help you progress smoothly through the construction process.
Now that you have gathered all the necessary supplies, it’s time to move on to the next step: preparing the cooler.
Step 2: Preparing the Cooler
Now that you have gathered all the necessary supplies, it’s time to prepare the cooler for your portable air conditioner. Follow these steps to ensure the cooler is ready for the construction process:
- Start by cleaning the cooler thoroughly. Remove any dirt, dust, or residue that may be present. This will help maintain a clean and hygienic cooling environment.
- Next, locate the air vent of the cooler. This is where the cool air will be emitted from. Ensure that the vent is clear and unobstructed. If necessary, remove any covers or attachments that may block the airflow.
- Consider creating a hole for the air duct. Depending on the design of your cooler, you may need to create a small hole to accommodate the PVC pipe or flexible tubing. Use a drill or a sharp knife to carefully make the hole. Make sure it is slightly smaller than the diameter of the pipe or tubing to ensure a snug fit.
- Inspect the lid of the cooler. Ensure that it is in good condition and can be securely closed. The lid plays a crucial role in keeping the cool air inside the cooler, so it should fit tightly and have a reliable locking mechanism.
- Check the handle or handles of the cooler. Make sure they are sturdy and capable of supporting the weight of the filled cooler. It’s essential to have a reliable handle for easy transportation and maneuverability.
Once you have completed these steps, your cooler should be clean, free from obstructions, and prepared to house the components of your portable air conditioner. Remember to stay cautious during the preparation process to avoid any potential injuries.
With the cooler ready, we can now move on to the next step: attaching the fan.
Step 3: Attaching the Fan
Now that the cooler is prepared, it’s time to move on to the next step: attaching the fan. Follow these steps to properly secure the fan in the cooler:
- Choose a suitable location inside the cooler to position the fan. The ideal spot is near the air vent so that the cool air can be efficiently circulated throughout the room. Place the fan in this desired location.
- Depending on the design of your fan, you may need to secure it in place. Use zip ties, duct tape, or any other sturdy and reliable materials to affix the fan to the inside of the cooler. Ensure that the fan is stable and won’t move or fall during operation.
- Check the positioning of the fan. Ensure that the blades or the front grille of the fan face towards the air vent. This will allow the fan to draw in the cool air and push it out through the vent.
- Inspect the fan’s power cord. Make sure it is long enough to reach the power supply without any strain. If needed, use an extension cord to extend the reach. Safely secure the power cord to the cooler to prevent any accidents or tripping hazards.
- Ensure the fan’s control buttons or switches are easily accessible from the outside of the cooler. This will allow you to conveniently control the fan’s speed and power without having to open the cooler repeatedly.
Once you have followed these steps, your fan should be securely attached inside the cooler and ready for operation. Make sure to double-check the stability and positioning of the fan before continuing to the next step. Safety should always be a top priority when working with electrical components.
Next, we will move on to step 4: creating the cooling system for your portable air conditioner.
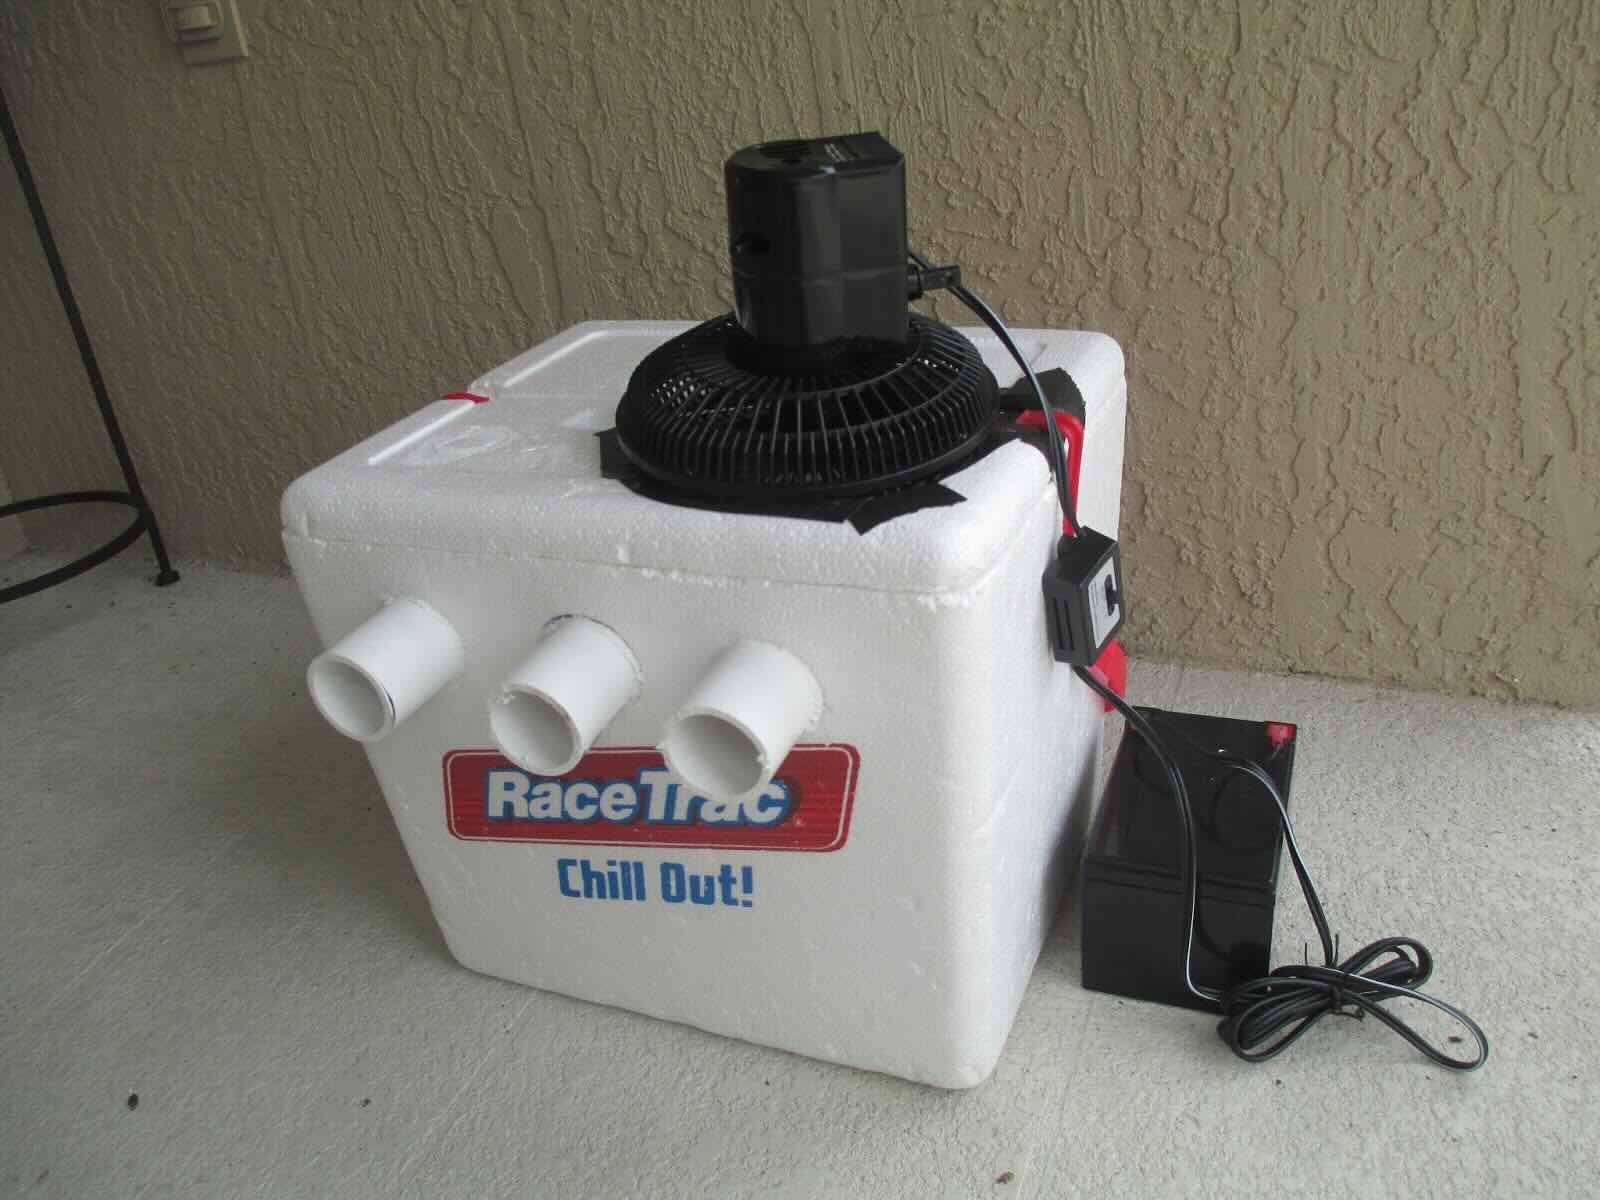
Consider using a cooler, a fan, and ice packs to create a DIY portable air conditioner. Place the ice packs in the cooler, position the fan to blow air over the ice, and enjoy the cool breeze.
Read more: How To Recharge A Portable Air Conditioner
Step 4: Making the Cooling System
Now that the fan is securely attached inside the cooler, it’s time to create the cooling system for your portable air conditioner. Follow these steps to construct the cooling system:
- Take your PVC pipe or flexible tubing and measure the distance between the fan and the air vent on the cooler. Cut the pipe or tubing to the appropriate length using a hacksaw or PVC pipe cutter, ensuring a snug fit.
- Once the pipe or tubing is cut, attach it to the fan’s outlet using zip ties or duct tape. Make sure the connection is secure and airtight to prevent any air leaks.
- Next, position the other end of the pipe or tubing near the air vent hole you created earlier in the cooler. Ensure that it is aligned properly and fits securely into the hole. You can use insulation foam or duct tape to create a tight seal.
- Apply elastomeric insulation foam around the exposed portion of the pipe or tubing. This foam will act as insulation, preventing condensation and maintaining the cool temperature of the air.
- Inspect the cooling system connections and seals to ensure there are no air leaks. Any air leaks can reduce the efficiency of your portable air conditioner and compromise its cooling performance.
By following these steps, you have successfully created the cooling system for your portable air conditioner. The pipe or tubing serves as the air duct, allowing the fan to draw in the cool air from the ice or frozen water bottles and circulate it throughout the room.
Before moving on to the next step, take a moment to double-check the connections and ensure everything is secure and airtight. This will optimize the cooling efficiency and performance of your portable air conditioner.
Now that you have constructed the cooling system, it’s time to proceed to step 5: assembling the portable air conditioner.
Step 5: Assembling the Portable Air Conditioner
With the cooling system in place, it’s time to assemble your portable air conditioner. Follow these steps to complete the assembly:
- Fill the cooler with ice or place frozen water bottles inside. This will serve as the cooling medium and allow the air conditioner to generate cool air.
- Make sure the lid of the cooler is tightly closed to keep the cool air inside and prevent any loss of cooling efficiency.
- Connect the power supply, such as an extension cord, to the fan’s power cord. Ensure that the power source is nearby and easily accessible for convenience.
- Plug the power supply into a standard electrical outlet. Ensure that the power source can handle the electrical requirements of the fan.
- Turn on the fan and adjust the speed settings to your preference. You should start feeling the cool air being circulated within a few minutes.
Once you have completed these steps, your portable air conditioner is fully assembled and ready to use. The fan will draw in the ambient air, pass it through the ice or frozen water bottles inside the cooler, and then release the cooled air through the air vent.
Remember to monitor the ice or frozen water levels inside the cooler and replace them as needed to maintain optimal cooling performance. Additionally, keep the portable air conditioner in a well-ventilated area for better airflow and maximum cooling efficiency.
Congratulations! You have successfully assembled your own portable air conditioner. Now you can enjoy the cool air and beat the summer heat without breaking the bank.
Now, let’s move on to the final step: testing and using your portable air conditioner.
Step 6: Testing and Using the Portable Air Conditioner
After assembling your portable air conditioner, it’s time to test it and start enjoying the cool air. Follow these steps to ensure proper testing and usage:
- Ensure that the power supply is securely plugged into an electrical outlet.
- Turn on the fan and adjust the speed settings to your preference.
- Observe the airflow from the air vent of the portable air conditioner. You should feel a steady stream of cool air being expelled.
- Monitor the temperature of the room and determine if the portable air conditioner is providing sufficient cooling. Adjust the amount of ice or frozen water bottles in the cooler to achieve the desired temperature.
- If the cooling performance is not satisfactory, check for any air leaks in the connections or seals. Inspect the insulation foam and make sure it is properly covering the air duct to prevent condensation and maintain cool air temperature.
- Use the portable air conditioner as needed to stay cool and comfortable. You can move it to different rooms or even take it outdoors for outdoor gatherings or camping trips.
Remember to periodically check the ice or frozen water levels in the cooler and replenish them as necessary to maintain the cooling capacity of the portable air conditioner.
Keep in mind that while a portable air conditioner is a cost-effective alternative to central air conditioning, it may not provide the same level of cooling for larger spaces. Adjust expectations accordingly based on the size of the room or area you are trying to cool.
Enjoy the cool air and relief from the summer heat with your homemade portable air conditioner. Experiment with different fan speeds and ice quantities to find the perfect balance for your comfort.
With proper maintenance and regular cleaning, your portable air conditioner will continue to provide you with cool and refreshing air for many summers to come.
That concludes our guide on how to make a portable air conditioner. Stay cool and beat the heat!
Conclusion
Congratulations on completing your homemade portable air conditioner! With just a few materials and some simple steps, you have created a cost-effective and efficient way to stay cool during the hot summer months.
By following this guide, you’ve learned how to gather the necessary supplies, prepare the cooler, attach the fan, construct the cooling system, and assemble the portable air conditioner. The final step of testing and using your creation ensures that you’ll be able to enjoy the cool air and beat the heat.
Remember to monitor the ice or frozen water levels inside the cooler and replace them as needed to maintain optimal cooling performance. Regularly check for any air leaks and ensure that the insulation foam is properly covering the air duct. These small maintenance tasks will help maximize the efficiency of your portable air conditioner.
While your homemade solution may not provide the same cooling power as a central air conditioning system, it offers a cost-effective alternative for smaller spaces and gives you the flexibility to move it around your home or take it on outdoor adventures.
As the summer heat intensifies, you can now enjoy a cool and comfortable environment without breaking the bank. Share your creation with friends and family, and spread the joy of staying cool during the hottest days of the year.
We hope this guide has been informative and helpful in your journey to create a portable air conditioner. Stay cool, stay comfortable, and beat the heat with your DIY cooling solution!
Frequently Asked Questions about How To Make A Portable Air Conditioner
Was this page helpful?
At Storables.com, we guarantee accurate and reliable information. Our content, validated by Expert Board Contributors, is crafted following stringent Editorial Policies. We're committed to providing you with well-researched, expert-backed insights for all your informational needs.
