Home>Interior Design>How To Make Pomander Balls And A Gorgeous Display Idea
Interior Design
How To Make Pomander Balls And A Gorgeous Display Idea
Modified: October 19, 2024
Learn how to make pomander balls and get inspired with a stunning interior design display idea. Enhance your space with this beautiful DIY project and indulge in creative home decor.
(Many of the links in this article redirect to a specific reviewed product. Your purchase of these products through affiliate links helps to generate commission for Storables.com, at no extra cost. Learn more)
Introduction
Welcome to the world of pomander balls! These delightful creations have a rich history dating back centuries and are a beloved element in traditional interior design. Pomander balls are not only visually captivating, but they also emit a lovely fragrance that can enhance any room. In this article, we will guide you through the process of making your own pomander balls using fresh fruit and cloves. We will also provide a fantastic display idea that will showcase your homemade pomander balls in all their splendor.
Pomander balls have been used for various purposes throughout history. Originally, they were created to ward off unpleasant smells and disease-carrying insects. They were often carried by people during the Middle Ages to protect against the foul odors and potential illnesses associated with crowded cities and unsanitary living conditions. Over time, pomander balls evolved into decorative items, adorning homes and adding an element of charm and elegance.
The beauty of making pomander balls is that they require minimal materials and can be easily customized to suit your personal taste and style. By following a few simple steps, you can create unique and aromatic pomander balls that will add a touch of sophistication to your home décor.
But before we dive into the process, let’s gather all the materials we will need to embark on this exciting DIY project.
Key Takeaways:
- Elevate your home decor with DIY pomander balls using fresh fruit and cloves. Add a personal touch and create a stunning display to showcase your aromatic creations.
- Infuse your space with elegance and fragrance by crafting pomander balls. Choose the perfect fruit, insert cloves, and assemble a captivating display to delight your senses.
Read more: How To Make Outdoor Christmas Balls
Materials Needed
Before you begin making your pomander balls, it’s essential to gather all the necessary materials. Here’s what you’ll need:
- Fresh fruit: Choose fruits that are firm and have a relatively smooth surface. Good options include oranges, lemons, limes, or apples. The choice of fruit will depend on personal preference and availability.
- Cloves: These aromatic spice buds are the key ingredient for creating the intricate designs on the pomander balls. Opt for whole cloves to have more control over the pattern.
- Toothpick or skewer: A toothpick or skewer will be useful for creating small holes in the fruit to insert the cloves.
- Ribbon or twine: Select a ribbon or twine of your choice to create a hanger for the pomander balls or to add a decorative touch.
- Additional decorations (optional): If you want to take your pomander balls to the next level, consider incorporating additional decorative elements such as dried flowers, cinnamon sticks, or festive ribbons.
Once you have gathered all the necessary materials, you’re ready to proceed to the next step: choosing the right fruit for your pomander balls.
Step 1: Choosing the Right Fruit
The first step in creating stunning pomander balls is to select the perfect fruit. While oranges are the most commonly used fruit for making pomander balls, feel free to experiment with other options like lemons, limes, or even apples. The choice of fruit will not only impact the appearance of your pomander balls but also contribute to their fragrance.
When selecting your fruit, look for ones that are firm and have a relatively smooth surface. Avoid fruits with blemishes or soft spots, as they may not hold up well during the making process. It’s also a good idea to choose fruits that are slightly larger in size, as they will provide more space for inserting the cloves and decorations.
Consider the overall aesthetic you want to achieve. Oranges, with their vibrant orange color, are classic and visually striking. Lemons and limes, on the other hand, offer a refreshing burst of yellow and green hues. Apples can add a rustic charm with their natural shades of red, green, or yellow.
Additionally, think about the fragrance you want your pomander balls to emit. Oranges tend to have a sweet and citrusy aroma, while lemons and limes offer a zesty and invigorating scent. Apples can provide a crisp and earthy fragrance.
Ultimately, the choice of fruit comes down to personal preference and the desired aesthetic and fragrance you want to achieve. Once you have selected your fruit, it’s time to move on to the next step: preparing the fruit for the creation of your pomander balls.
Step 2: Preparing the Fruit
Now that you have chosen your fruit, it’s time to prepare it for the pomander ball creation process. Follow these steps to ensure your fruit is ready for the next stages:
- Wash the fruit thoroughly: Start by washing your fruit under running water to remove any dirt or residue. Dry it gently using a paper towel or a clean cloth.
- Optional: Soak the fruit in warm water: For firmer fruits like apples, you can soak them in warm water for a few minutes to slightly soften the skin. This will make it easier to insert the cloves later on.
- Pat the fruit dry: After soaking (if applicable), pat the fruit completely dry with a paper towel or clean cloth. It’s important to remove excess moisture to ensure the cloves adhere well to the fruit’s surface.
By following these steps, you’ll have a clean and dry fruit that is primed for the next step: inserting the cloves into the fruit to create the distinctive pomander ball design.
Step 3: Inserting the Cloves
Now that your fruit is prepared, it’s time to start creating the intricate design on your pomander balls by inserting cloves. Here’s how to do it:
- Decide on a pattern: Before you begin inserting the cloves, it’s helpful to have a design or pattern in mind. This could be a simple spiral, a geometric shape, or even a monogram. This step is where you can let your creativity shine.
- Use a toothpick or skewer: Take a toothpick or skewer and use it to create small holes in the fruit’s skin where you want to insert the cloves. Insert the toothpick at an angle and twist it gently to create a hole without piercing through the fruit entirely.
- Insert the cloves: Take a whole clove and press it firmly into one of the prepared holes. Repeat this process for the remaining holes, following your chosen pattern. The cloves should fit snugly into the fruit’s skin.
- Continue until complete: Work your way around the fruit, adding cloves until you have covered the entire pomander ball. Take your time and be patient to ensure the cloves are evenly spaced and the design looks visually appealing.
Remember to take breaks if needed, as inserting cloves into the fruit can be a meticulous task. Don’t worry about making mistakes or adjusting the cloves as you go along. It’s all part of the creative process!
By the end of this step, your fruit should be adorned with a beautiful pattern created by the cloves. The next step is optional but can add an extra touch of elegance to your pomander balls: adding additional decorations.
Tip: Use a mix of whole cloves and dried flowers to create a fragrant and visually appealing pomander ball. Display them in a decorative bowl or hang them from a ribbon for a stunning centerpiece.
Read more: How To Make A Bird Seed Ball
Step 4: Adding Additional Decorations (optional)
Once you have inserted the cloves and created the intricate design on your pomander balls, you have the option to enhance their visual appeal by adding additional decorations. This step allows you to personalize your pomander balls and make them even more unique. Here are some ideas:
- Dried flowers: Gather small dried flowers, such as lavender buds or rose petals, and gently tuck them into the gaps between the cloves. This will add a pop of color and an enchanting touch to your pomander balls.
- Cinnamon sticks: Wrap a small piece of ribbon or twine around a cinnamon stick and secure it to the top of the pomander ball. Not only will this add a decorative element, but it will also infuse your pomander balls with a warm and inviting cinnamon aroma.
- Festive ribbons: Tie a festive ribbon around the center of the pomander ball, creating a bow or a simple knot. Choose a ribbon color that complements the fruit and adds a celebratory touch to your pomander balls.
- Other ornamental elements: Get creative and explore other decorative elements such as miniature ornaments, miniature pinecones, or small beads. Whatever you choose, make sure it adds to the overall appeal of your pomander balls.
Remember that adding additional decorations is optional, and you can choose to keep your pomander balls simple and elegant with just the cloves. The goal is to create pomander balls that reflect your personal style and enhance the overall aesthetic of your space.
After adding any desired decorations, you’re ready to move on to the next step: letting the pomander balls dry.
Step 5: Letting the Pomander Balls Dry
After all the necessary decorations have been added to your pomander balls, it’s important to allow them to dry properly. This step ensures that the fruit and cloves are fully dried, preserving the integrity of the pomander balls. Follow these guidelines to ensure optimal drying:
- Select a drying area: Choose a well-ventilated area with good air circulation to dry your pomander balls. Avoid humid environments as they can cause moisture buildup and affect the drying process.
- Place the pomander balls on a drying rack: Set up a drying rack or place a wire mesh on a tray. This will prevent the pomander balls from touching any surface and allow air to circulate around them.
- Leave the pomander balls undisturbed: Allow the pomander balls to dry naturally without touching or moving them. This can take anywhere from a few days to a couple of weeks, depending on the size and moisture content of the fruit.
- Check for dryness: To ensure your pomander balls are completely dried, gently press on the fruit’s surface. If it feels firm and there is no moisture or give, then they are ready.
It’s important to note that the drying process may cause some shrinkage in the fruit, and the cloves may appear looser. This is normal and adds to the unique charm of your homemade pomander balls.
Once your pomander balls are thoroughly dried, it’s time to move on to the final step: assembling a beautiful display to showcase your creations.
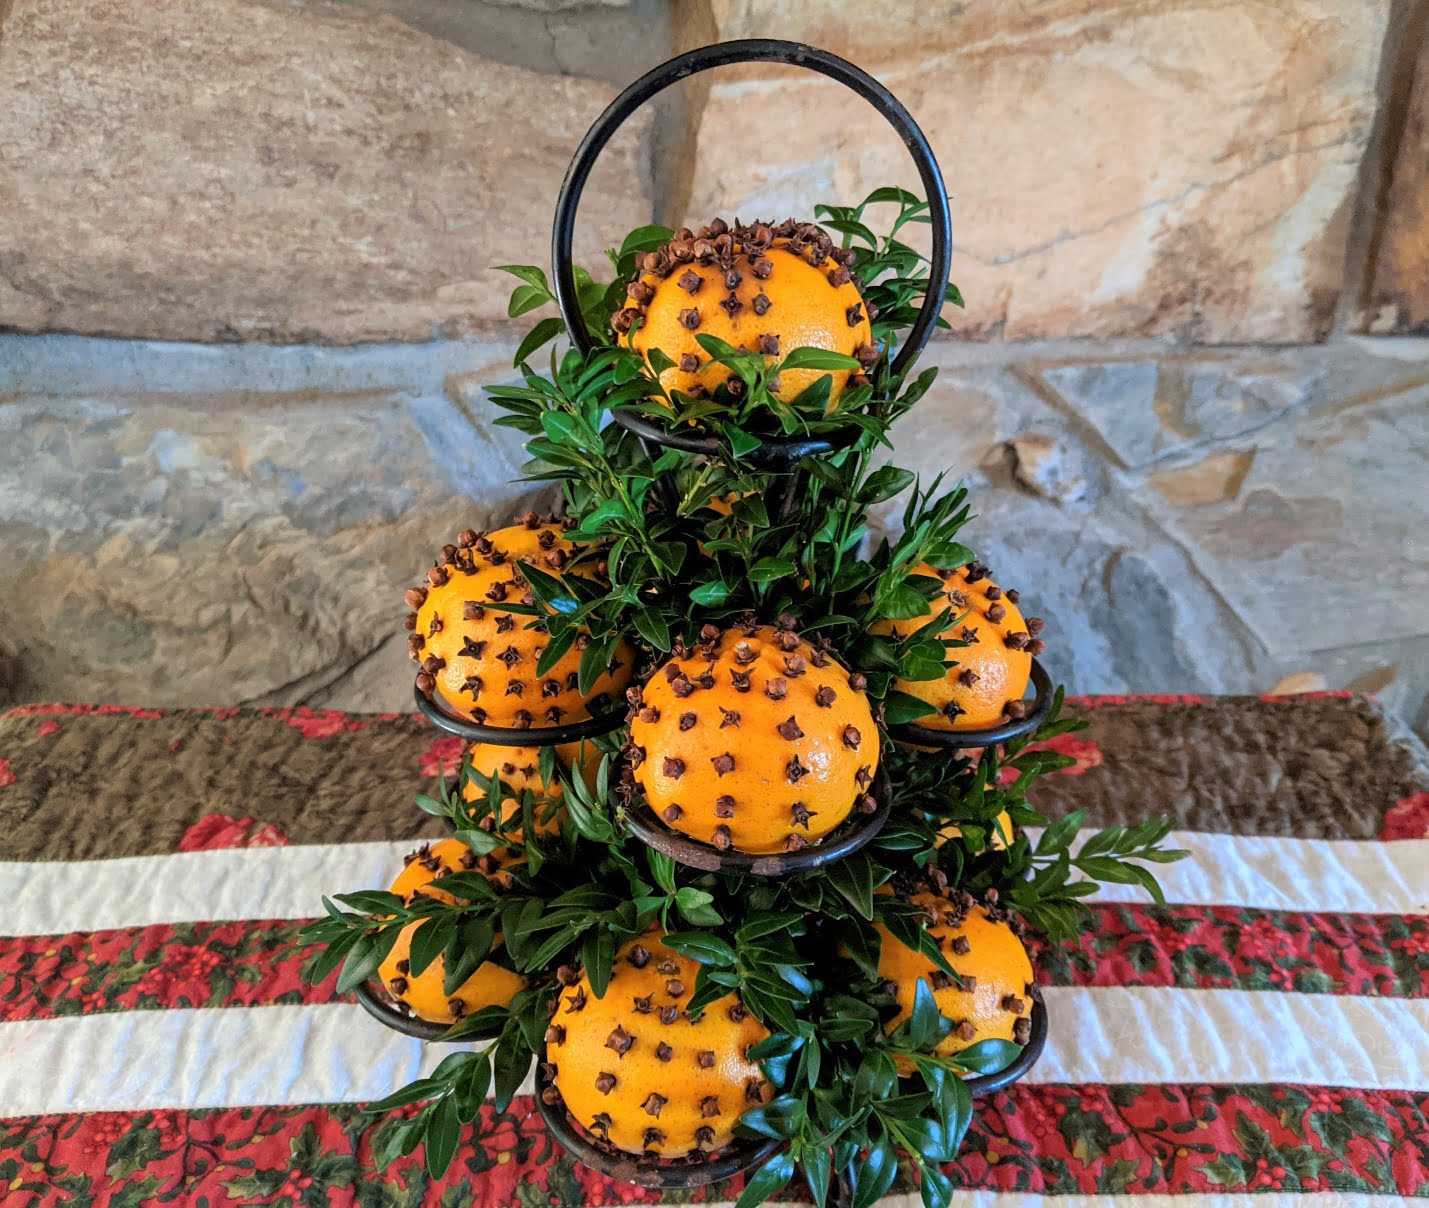
Step 6: Assembling the Display
Now that your pomander balls are dry and ready to be showcased, it’s time to assemble a stunning display that highlights their beauty. Follow these steps to create a captivating arrangement:
- Select a display container: Choose a decorative bowl, platter, or tray as the base for your display. Consider the size and style that will best complement your pomander balls and the overall aesthetic of your space.
- Add a natural element: Consider adding a layer of moss, dried flowers, or foliage to the base of your display container. This will create a visually appealing backdrop for your pomander balls.
- Arrange the pomander balls: Place the pomander balls in the display container, arranging them in a visually pleasing way. Play with different heights, spacing, and patterns to create an eye-catching arrangement.
- Optional: Incorporate candles or other decorative elements: If desired, you can further enhance the display by adding small candles, seasonal accents, or other decorative elements around the pomander balls. These additions can create a warm ambiance and add extra charm to the overall arrangement.
- Find a prominent location: Choose a prominent spot in your home to showcase your pomander ball display. It could be on a mantel, dining table, entryway console, or any other area where they can be admired and enjoyed.
Remember, the goal is to create a display that not only showcases your beautiful pomander balls but also complements the overall aesthetic of your space. Get creative and personalize the display to reflect your style and taste.
Congratulations! You have successfully completed all the steps to create your own beautiful pomander balls and assemble a stunning display. These aromatic creations will add a touch of elegance, charm, and fragrance to your home decor.
Happy crafting and enjoy the delightful presence of your homemade pomander balls!
Conclusion
Creating your own pomander balls is a delightful DIY project that adds a touch of charm and elegance to your home decor. These beautiful and fragrant creations are not only visually appealing but also carry a rich history and tradition. By following the steps outlined in this guide, you can easily make your own pomander balls using fresh fruit and cloves.
From choosing the right fruit to inserting the cloves and adding additional decorations, each step allows you to infuse your personal style and creativity into the process. Whether you opt for classic oranges, zesty lemons, or vibrant apples, the choice of fruit and the design you create with cloves is entirely up to you.
Throughout the journey of making pomander balls, it is important to let them dry thoroughly in a well-ventilated area to preserve their integrity. Once dry, you can assemble a stunning display that showcases your beautiful creations. Whether you choose to incorporate candles, natural elements, or other decorative touches, the display should reflect your personal style and enhance the overall aesthetic of your space.
As you introduce your homemade pomander balls into your home, anticipate the delightful fragrance they will emit, adding a refreshing or warm aroma depending on the fruit and additional elements you choose. These charming creations not only provide visual appeal but also fill the air with a gentle scent that will enhance the ambiance of any room.
So why not embark on this wonderful DIY project and experience the joy of making your own pomander balls? Let your creativity soar and enjoy the process of handcrafting these beautiful decorative pieces. Whether you adorn your home with them or gift them to your loved ones, pomander balls will undoubtedly bring a touch of elegance and sophistication to any space.
Now, gather your materials, unleash your creativity, and create your own stunning pomander balls and enjoy the delightful presence they bring to your home.
Frequently Asked Questions about How To Make Pomander Balls And A Gorgeous Display Idea
Was this page helpful?
At Storables.com, we guarantee accurate and reliable information. Our content, validated by Expert Board Contributors, is crafted following stringent Editorial Policies. We're committed to providing you with well-researched, expert-backed insights for all your informational needs.


0 thoughts on “How To Make Pomander Balls And A Gorgeous Display Idea”