Home>Renovation & DIY>DIY Projects & Ideas>DIY Projects For Kids: How To Make Your Own Dollhouse With Instructions
DIY Projects & Ideas
DIY Projects For Kids: How To Make Your Own Dollhouse With Instructions
Modified: January 6, 2024
Discover fun and creative DIY projects for kids with step-by-step instructions. Learn how to make your own dollhouse and inspire your child's imagination. Perfect for hands-on learning and quality family time.
(Many of the links in this article redirect to a specific reviewed product. Your purchase of these products through affiliate links helps to generate commission for Storables.com, at no extra cost. Learn more)
Introduction
Welcome to the exciting world of do-it-yourself (DIY) projects for kids! In this guide, we will embark on a delightful journey to create a one-of-a-kind dollhouse. Crafting a dollhouse is not only a fantastic way to unleash your creativity, but it also provides a platform for learning valuable skills such as design, construction, and decoration. Whether you are a parent looking for a fun activity to engage your child or a young DIY enthusiast eager to dive into a hands-on project, this step-by-step guide will equip you with the knowledge and inspiration to bring your miniature dream home to life.
As we venture into the realm of DIY dollhouse construction, we will explore the process from start to finish, covering everything from designing the layout to adding the finishing touches. By following the detailed instructions and unleashing your imagination, you will have the opportunity to personalize every aspect of the dollhouse, making it a reflection of your unique style and preferences.
Throughout this journey, we will emphasize the joy of creating something from scratch, instilling a sense of accomplishment and pride in the finished masterpiece. So, gather your creativity, enthusiasm, and a few essential materials, and let's embark on this delightful DIY adventure to construct a charming dollhouse that will be cherished for years to come.
Key Takeaways:
- Designing and building a dollhouse is a fun and creative DIY project that allows you to unleash your imagination, learn valuable skills, and create a personalized miniature world filled with charm and character.
- Involving your child in the process fosters collaboration, shared accomplishment, and a sense of pride in the finished dollhouse, making it a delightful and meaningful bonding experience.
Materials Needed
Before diving into the construction of your DIY dollhouse, it’s essential to gather the necessary materials. This project offers ample room for flexibility and personalization, allowing you to tailor the materials to your preferences and budget. Here’s a comprehensive list of the basic materials you’ll need to get started:
- Cardboard or plywood sheets for the structure
- Craft knife or scissors for cutting the materials
- Wood glue or hot glue gun for assembly
- Ruler and pencil for precise measurements
- Paints, brushes, and decorative paper for customization
- Miniature furniture and accessories for embellishment
- Decorative elements such as beads, buttons, or fabric scraps
- Imagination and creativity to infuse your personal touch
These materials serve as the foundation for your DIY dollhouse project. Feel free to explore additional embellishments and decorative items to enhance the visual appeal of your creation. As you gather the materials, consider involving your child in the selection process, fostering a sense of ownership and excitement about the upcoming project.
Now that we’ve assembled the necessary materials, it’s time to delve into the exhilarating process of designing your dollhouse, where your imagination will take center stage in shaping the unique character of your miniature dream home.
Step 1: Designing Your Dollhouse
Designing your dollhouse sets the stage for a captivating and personalized creation. This step allows you to unleash your creativity and envision the unique features and layout of your miniature dream home. Whether you opt for a traditional two-story house, a modern loft, or a whimsical fairy tale cottage, the design phase is where your imagination takes flight. Here are the key considerations for this crucial step:
- Layout and Structure: Begin by sketching out the layout of your dollhouse. Consider the number of rooms, their arrangement, and any additional features such as balconies or porches. This is the stage where you can let your creativity run wild, envisioning the unique architectural elements that will make your dollhouse stand out.
- Size and Scale: Determine the overall size and scale of your dollhouse. This decision will influence the dimensions of the materials you’ll need and the level of detail you can incorporate into the design. Whether you prefer a compact cottage or a sprawling mansion, the scale will set the stage for the construction phase.
- Personal Touch: Infuse your dollhouse design with personal touches that reflect your style and preferences. Consider color schemes, decorative elements, and thematic inspirations that resonate with your imagination. This is an opportunity to create a miniature world that brings joy and inspiration to both the creator and the eventual inhabitants.
As you navigate the design phase, encourage your child to actively participate in the decision-making process, fostering a sense of ownership and pride in the project. Embrace the freedom to experiment with different design ideas, knowing that each choice contributes to the unique character of your dollhouse. Once the design is finalized, you’re ready to embark on the next step: gathering and preparing the materials for construction.
With the design in place, the exciting journey of bringing your dollhouse to life gains momentum, leading us to the next phase of the project: gathering and preparing the materials for construction.
Step 2: Gathering and Preparing Materials
With the design of your dollhouse firmly in place, it’s time to gather and prepare the materials that will bring your vision to life. This step is essential for ensuring a smooth and efficient construction process, allowing you to focus on the creative aspects of the project. Here’s a detailed guide to help you navigate this crucial phase:
- Acquiring Structural Materials: Based on your design, acquire the necessary cardboard or plywood sheets for constructing the basic structure of the dollhouse. Consider the dimensions and quantity required to bring your design to fruition. Ensure that the materials are of suitable quality and thickness to provide stability and durability to the dollhouse.
- Tools and Adhesives: Gather essential tools such as a craft knife or scissors for cutting the materials with precision. Additionally, procure wood glue or a hot glue gun for efficient assembly. A ruler and pencil will aid in accurate measurements and markings during the construction process.
- Decorative Elements: Explore a variety of paints, brushes, and decorative paper to add a personalized touch to your dollhouse. Consider the color scheme and patterns that align with your design vision. Additionally, browse through miniature furniture, accessories, and decorative elements such as beads, buttons, or fabric scraps to enhance the aesthetic appeal of your creation.
Once you’ve acquired the necessary materials, it’s time to prepare them for construction. Lay out the structural materials and carefully measure and mark the dimensions based on your design. Use the craft knife or scissors to cut the materials with precision, ensuring that they align with your layout and structural requirements. As you prepare the materials, involve your child in the process, fostering a sense of collaboration and shared excitement about the upcoming construction phase.
With the materials gathered and prepared, you’re now poised to embark on the exhilarating phase of building the structure of your dollhouse, where your design and creativity will materialize into a tangible and enchanting miniature home.
When building a dollhouse with kids, use non-toxic glue and paint, and ensure sharp tools are used by adults only. Safety first!
Step 3: Building the Structure
As you transition into the construction phase of your DIY dollhouse project, the excitement of bringing your design to life reaches its peak. Building the structure forms the backbone of your miniature masterpiece, laying the foundation for the enchanting details and decorations that will follow. Here’s a comprehensive guide to help you navigate this pivotal stage:
- Assembling the Foundation: Begin by assembling the base and walls of the dollhouse using the prepared cardboard or plywood sheets. Apply wood glue or use a hot glue gun to securely join the components, ensuring that the structure is stable and aligned with your design. Exercise precision and patience during this phase to achieve a sturdy and well-proportioned foundation.
- Creating Room Divisions: Utilize additional cardboard or thin plywood to create internal room divisions based on your design layout. Carefully measure and cut the materials to form walls and partitions, delineating the individual rooms within the dollhouse. This step sets the stage for the functional and aesthetic segmentation of the interior space.
- Adding Doors and Windows: Enhance the realism and charm of your dollhouse by incorporating doors and windows. Utilize the craft knife to carefully cut out openings for doors and windows, ensuring precise dimensions and alignment. You can further embellish these features with decorative elements such as miniature doorknobs and window frames to infuse character into the structure.
Throughout the construction process, involve your child in assembling the structure, fostering a sense of collaboration and shared accomplishment. Encourage them to participate in tasks such as applying glue, positioning components, and contributing creative ideas to enhance the design. This collaborative approach not only enhances the bonding experience but also instills a sense of pride and ownership in the project.
With the foundational structure in place, you’ve set the stage for the next captivating phase: decorating your dollhouse. This stage will unleash your creativity as you infuse the interior and exterior of the dollhouse with personalized touches, transforming it into a captivating and enchanting miniature abode.
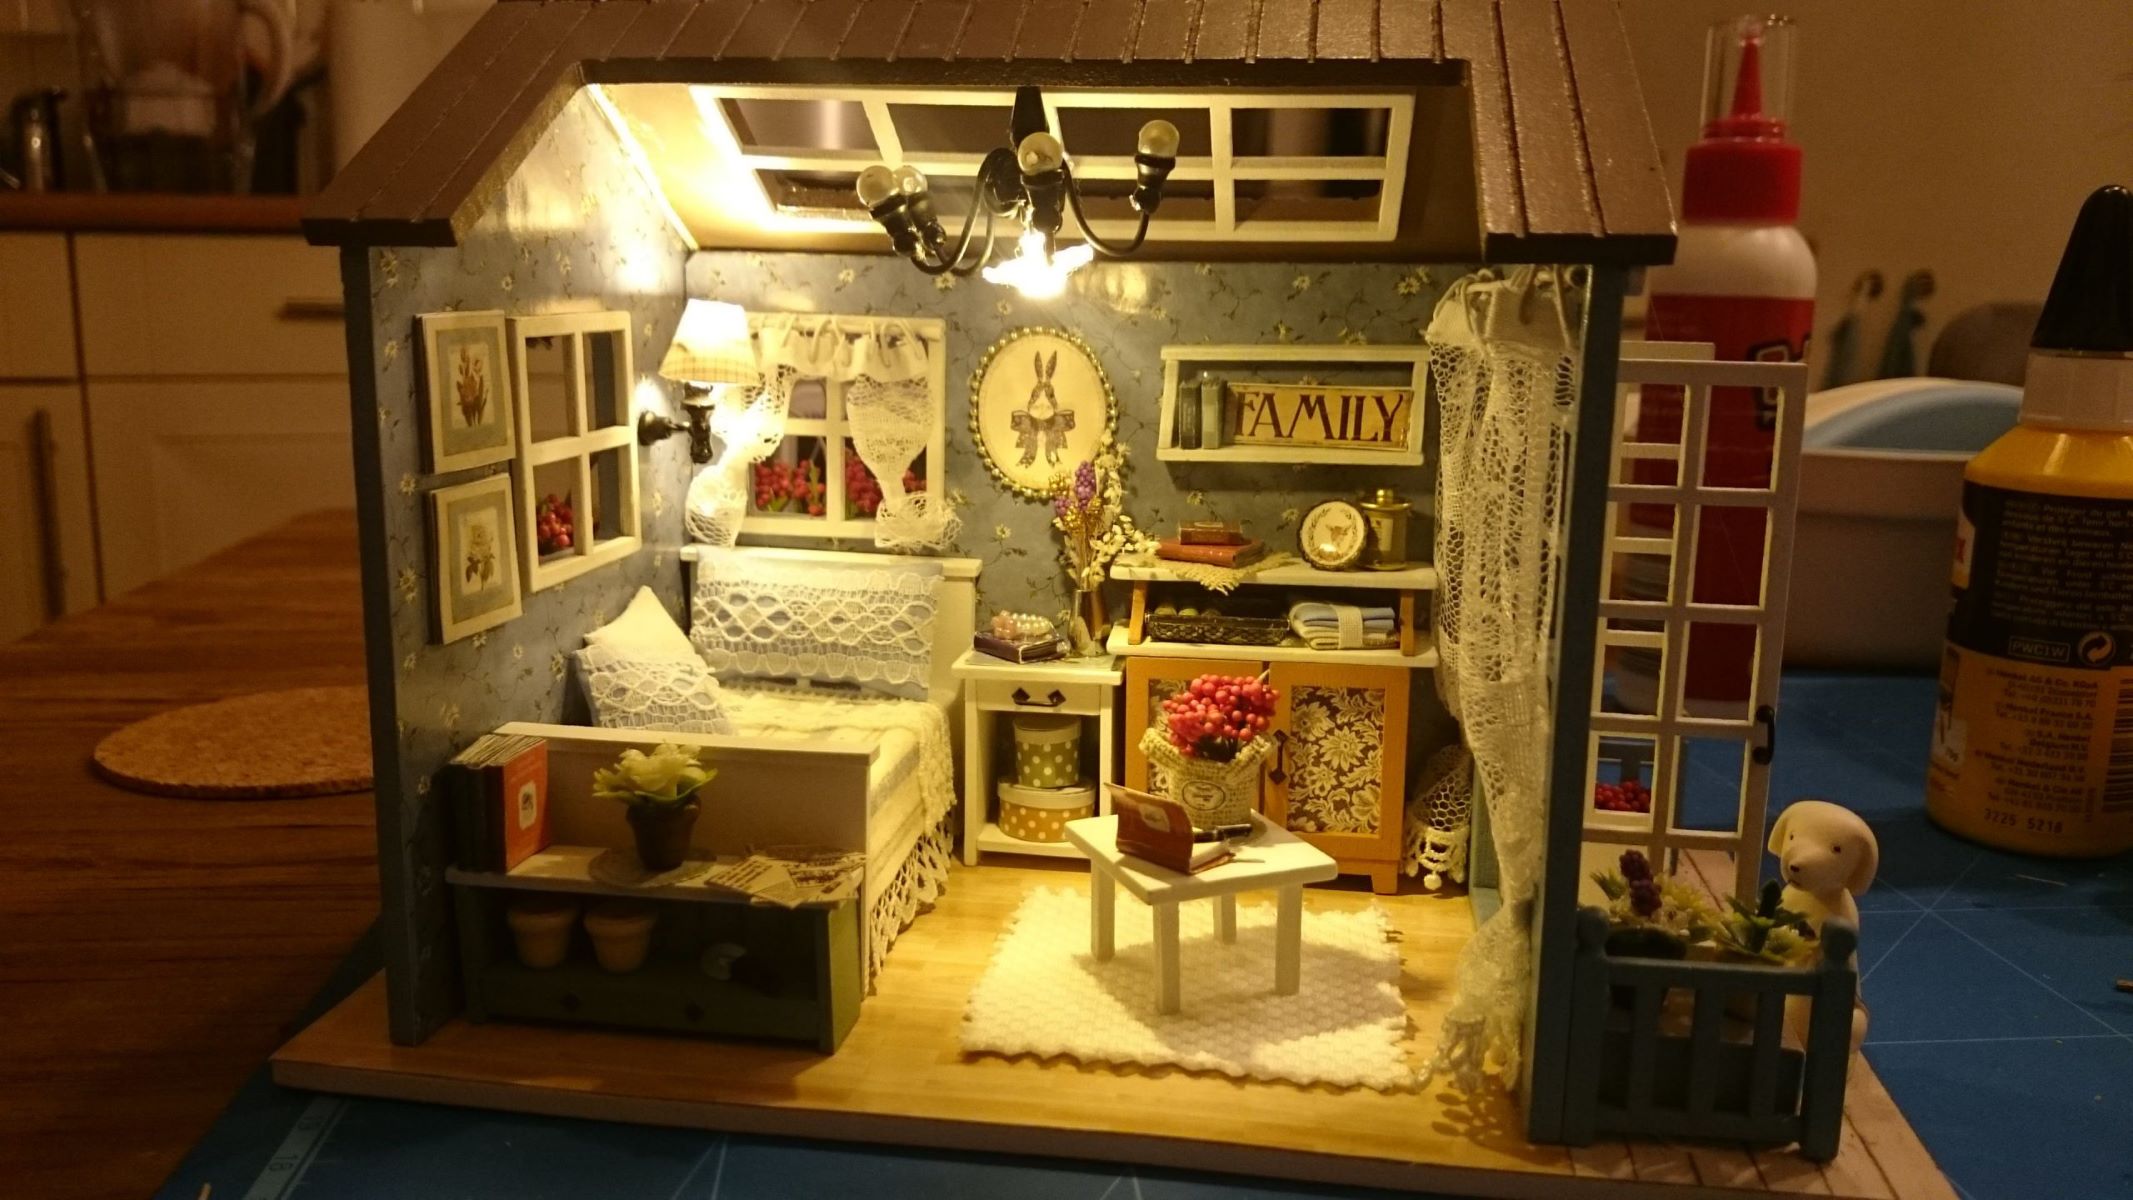
Step 4: Decorating Your Dollhouse
As you transition into the decoration phase of your DIY dollhouse project, the opportunity to infuse your creativity and personal style into the miniature home takes center stage. Decorating the dollhouse elevates its charm and character, transforming it into a captivating and enchanting space. Here’s a comprehensive guide to help you navigate this delightful stage:
- Interior Design Magic: Begin by painting the walls and adding decorative paper to create unique interior spaces within the dollhouse. Let your imagination guide the color schemes and patterns, infusing each room with its distinct personality. Consider creating wallpaper, flooring, and other details to bring the interior spaces to life.
- Exterior Flourishes: Extend your creative touch to the exterior of the dollhouse by painting and embellishing the facade. Add whimsical details such as window boxes, climbing vines, or a welcoming front door to enhance the curb appeal. Embrace the opportunity to personalize the exterior to reflect the style and ambiance of your miniature dream home.
- Magical Miniature Details: Delight in the process of adding miniature furniture, accessories, and decorative elements to each room. Select furniture pieces that complement the design aesthetic and scale of the dollhouse. Incorporate charming details such as tiny rugs, artwork, and potted plants to infuse warmth and character into the miniature spaces.
Throughout the decoration phase, encourage your child to actively participate in the creative process, fostering a sense of ownership and pride in the dollhouse. Embrace the opportunity to collaborate on design decisions, allowing your child to contribute ideas and preferences that align with their imagination.
With the interior and exterior spaces adorned with personalized touches, the dollhouse begins to exude its unique charm and character. The next phase of the project invites you to add the final enchanting touches: incorporating furniture and accessories to bring the miniature world to life.
Step 5: Adding Furniture and Accessories
As you enter the final phase of your DIY dollhouse project, the addition of furniture and accessories breathes life into the miniature spaces, infusing them with warmth, character, and a delightful sense of realism. This step allows you to curate the interior of the dollhouse, creating inviting and personalized settings within each room. Here’s a comprehensive guide to help you navigate this enchanting stage:
- Furniture Selection: Begin by selecting miniature furniture pieces that align with the design aesthetic and scale of each room in the dollhouse. Consider the functionality and arrangement of furniture to create cozy and well-appointed spaces. Embrace the opportunity to mix and match styles, from elegant Victorian pieces to modern and eclectic furnishings.
- Arranging the Spaces: Place the furniture within the rooms, carefully considering the layout and flow of each space. Create inviting seating areas, cozy bedrooms, and charming dining nooks, infusing each room with a sense of comfort and livability. Encourage your child to contribute ideas for arranging the furniture, fostering a collaborative and imaginative approach to interior design.
- Enchanting Accessories: Enhance the ambiance of the dollhouse by adding delightful accessories such as miniature rugs, lighting fixtures, artwork, and decorative accents. These details contribute to the storytelling aspect of the miniature world, infusing the spaces with personality and charm. Encourage creativity in selecting and placing accessories to create captivating vignettes within the dollhouse.
As you add furniture and accessories, invite your child to actively participate in the process, fostering a sense of collaboration and shared accomplishment. Embrace the opportunity to engage in imaginative play, envisioning the stories and adventures that will unfold within the enchanting spaces of the dollhouse.
With the furniture and accessories in place, your DIY dollhouse comes to life as a captivating and personalized miniature world. The journey of creating this enchanting abode culminates in a sense of pride and joy, celebrating the collaborative efforts and creativity that have shaped this delightful project.
Conclusion
Congratulations on completing your DIY dollhouse project! This enchanting journey has been a testament to creativity, collaboration, and the joy of bringing imagination to life. As you admire the captivating miniature world you’ve crafted, take a moment to reflect on the fulfilling experience and the valuable skills honed throughout the process.
Building a dollhouse from scratch has provided a platform for hands-on learning, allowing you to explore design, construction, and interior decoration in a delightful and engaging manner. The project has fostered a sense of creativity and ingenuity, empowering you to transform basic materials into a charming and personalized miniature home.
Throughout this journey, you’ve embraced the joy of collaboration and shared accomplishment, inviting your child to actively participate in the various stages of the project. This collaborative approach has not only strengthened bonds but also instilled a sense of ownership and pride in the creation of the dollhouse.
As you marvel at the intricately decorated rooms, the carefully arranged furniture, and the whimsical accessories, take pride in the unique character and charm infused into every detail of the dollhouse. This miniature world is a testament to your creativity, imagination, and the joy of crafting something truly special.
As you embark on future DIY projects, may the spirit of creativity and collaboration continue to inspire your endeavors, fostering a sense of accomplishment and delight in every creation. Whether it’s crafting miniature wonders or exploring new creative pursuits, may the joy of DIY projects enrich your life with endless opportunities for imaginative expression.
With your DIY dollhouse standing as a testament to creativity and collaboration, may it serve as a cherished centerpiece, sparking joy and inspiration for years to come.
Frequently Asked Questions about DIY Projects For Kids: How To Make Your Own Dollhouse With Instructions
Was this page helpful?
At Storables.com, we guarantee accurate and reliable information. Our content, validated by Expert Board Contributors, is crafted following stringent Editorial Policies. We're committed to providing you with well-researched, expert-backed insights for all your informational needs.


0 thoughts on “DIY Projects For Kids: How To Make Your Own Dollhouse With Instructions”