Home>Storage Ideas>Kitchen Storage>How To Clean Coils On A Fridge: 5 Expert Steps To Cut Energy Costs
Kitchen Storage
How To Clean Coils On A Fridge: 5 Expert Steps To Cut Energy Costs
Modified: October 20, 2024
Learn how to clean coils on your fridge and save energy costs with these 5 expert steps. Check out our top kitchen storage ideas.
(Many of the links in this article redirect to a specific reviewed product. Your purchase of these products through affiliate links helps to generate commission for Storables.com, at no extra cost. Learn more)
How to Clean Coils on a Fridge: 5 Expert Steps to Cut Energy Costs
Keeping your fridge clean and well-maintained is essential to ensure its optimal performance and energy efficiency. One crucial maintenance task is cleaning the coils, which can become clogged with dust, dirt, and debris over time. In this article, we will outline five expert steps to help you clean the coils on your fridge and cut down on energy costs.
Key Takeaways:
- Regularly cleaning your fridge coils improves energy efficiency, extends the appliance’s lifespan, and contributes to a greener home environment. Make it a habit to clean the coils at least twice a year for optimal performance.
- When cleaning fridge coils, ensure safety by disconnecting the power, wear protective gear, and use gentle cleaning methods. Test the fridge’s performance after cleaning to ensure it runs smoothly and efficiently.
Step 1: Gather the Necessary Tools
Before starting the coil cleaning process, gather the following tools:
- Vacuum cleaner with a brush attachment
- Coil brush (available at appliance stores)
- Microfiber cloth
Additionally, make sure to disconnect the fridge from the power source to ensure safety.
Step 2: Locate the Coils
The coils are typically located either at the back or at the bottom of the fridge. In some models, you may need to remove a panel to access them. Refer to your fridge’s manual for exact instructions on locating the coils.
Step 3: Prepare the Area
Clear the area around the fridge to create enough space for easy access to the coils. Remove any debris or objects that may hinder the cleaning process. It is also advisable to wear gloves and safety goggles to protect yourself from any dust or debris.
Step 4: Cleaning the Coils
There are two primary methods for cleaning fridge coils:
- Using a vacuum cleaner: Attach the brush attachment to your vacuum cleaner. Start by gently running the brush along the coils to loosen any dust or debris. Then, use the vacuum cleaner to remove the loosened dirt. Be careful not to apply too much pressure to avoid damaging the coils.
- Using a coil brush: If your fridge’s coils have stubborn dirt or debris, use a coil brush. Carefully insert the brush between the coils and gently brush away the buildup. It’s important to be gentle to avoid damaging the delicate coils.
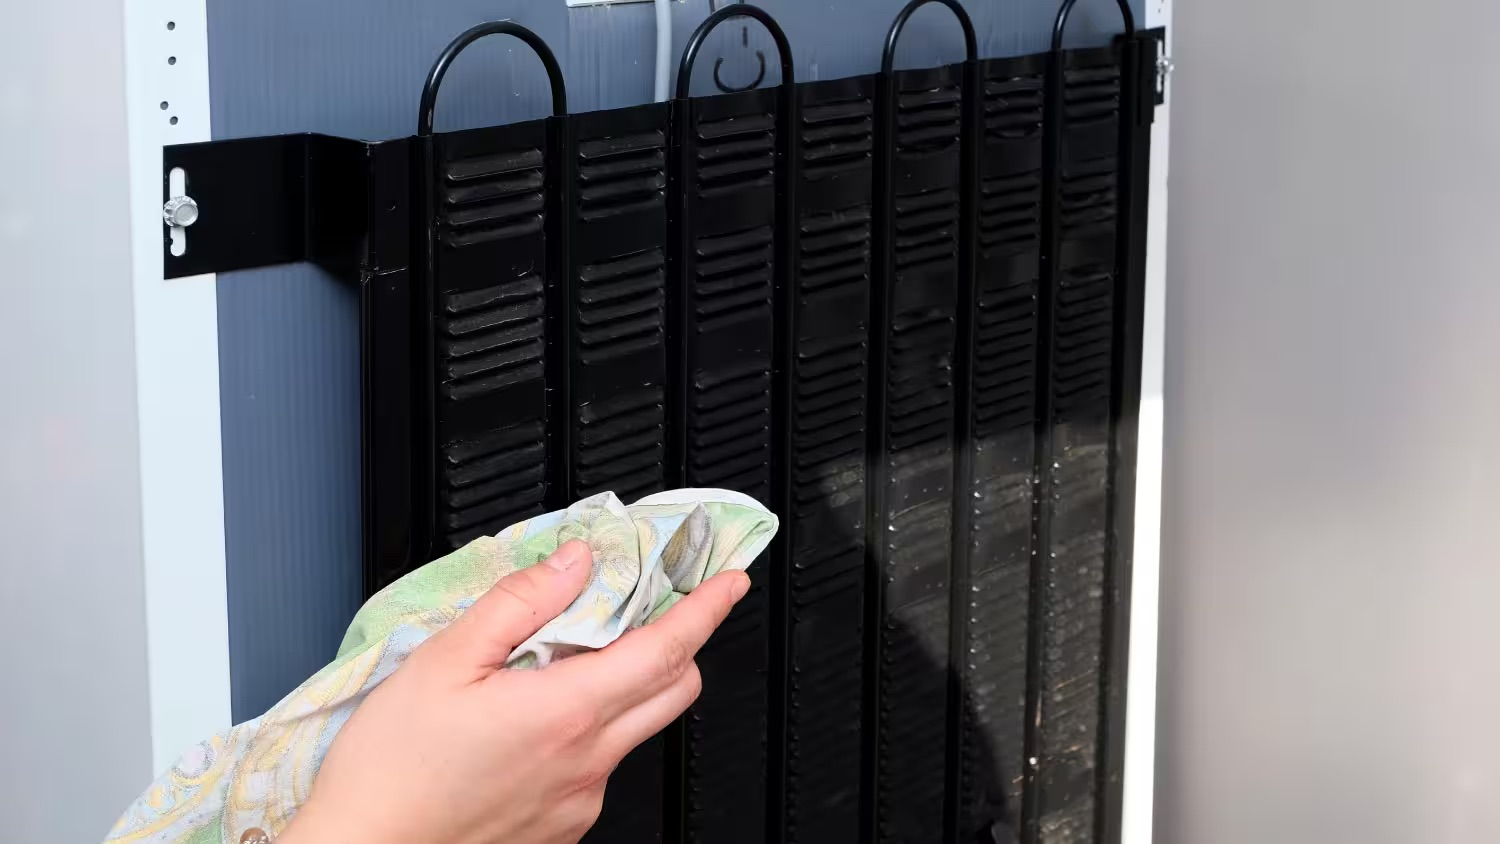
For hard-to-reach areas, you can use a microfiber cloth to wipe away any remaining dirt. Be thorough in your cleaning to ensure optimal performance.
Step 5: Reconnect and Test the Fridge
After completing the cleaning process, reconnect the fridge to the power source. Give it a few minutes to get back to the optimal temperature. Then, check if the fridge is running smoothly and quietly. If you notice any unusual noises or issues, consult a professional technician.
Regularly cleaning the coils on your fridge is crucial to maintain its energy efficiency and prolong its lifespan. By cutting down on energy costs, you not only save money but also reduce your carbon footprint. Make it a habit to clean the coils at least twice a year or more frequently if you have pets or live in a dusty environment.
Remember to consult your fridge’s manual for specific instructions or consult a professional if you’re unsure about the cleaning process. By following these expert steps, you can ensure that your fridge remains in top-notch condition, saving energy and money in the long run.
Introduction: Importance of Cleaning Fridge Coils – Benefits of Cleaning Coils for Energy Efficiency
When it comes to maintaining your fridge’s performance and keeping energy costs in check, cleaning the coils on a regular basis is a task that should not be overlooked. The coils, located either at the back or bottom of the fridge, play a vital role in the cooling process. Over time, these coils can become clogged with dust, dirt, and debris, hindering their ability to efficiently dissipate heat. In this introduction, we will explore the importance of cleaning fridge coils and the benefits it brings to energy efficiency.
One of the primary reasons for cleaning fridge coils is to ensure that the appliance operates at its optimum level. When the coils are dirty and blocked, the fridge has to work harder to maintain the desired temperature, leading to increased energy consumption. As a result, your energy bills can soar, putting a strain on your wallet.
By regularly cleaning the coils, you can significantly improve the energy efficiency of your fridge. When the coils are clean and free from debris, they can effectively release heat, allowing the fridge to cool more efficiently. This means that the compressor, which is responsible for regulating the temperature, doesn’t have to work as hard, resulting in reduced energy consumption.
Another benefit of cleaning the coils is the extended lifespan of your fridge. When the coils are clogged, the compressor has to work overtime, leading to additional wear and tear. Over time, this can cause the compressor to malfunction and ultimately shorten the lifespan of the appliance. By keeping the coils clean, you can help prolong the life of your fridge, saving you from having to replace it prematurely.
Additionally, cleaning the coils can contribute to a healthier and safer home environment. Over time, dust and dirt accumulation on the coils can become a breeding ground for bacteria and allergens, which can negatively impact indoor air quality. By regularly cleaning the coils, you can reduce the presence of these pollutants, promoting a cleaner and healthier living space for you and your family.
Investing some time and effort into cleaning the coils on your fridge is a small task that yields significant rewards. Not only does it improve the energy efficiency of the appliance, saving you money in the long run, but it also helps extend its lifespan and contributes to a cleaner and healthier home environment. So, make it a part of your routine maintenance to clean the coils at least twice a year, or more frequently if recommended by the manufacturer or if you notice a decrease in the fridge’s performance.
In the following steps of this article, we will delve into the detailed process of cleaning fridge coils, providing you with expert guidance to ensure you do it effectively and safely. Let’s get started on maximizing the energy efficiency of your fridge while cutting down on your utility bills.
Use a vacuum with a brush attachment to gently remove dust and debris from the coils. Be sure to unplug the fridge first for safety.
Step 1: Gather the Necessary Tools – List of Tools Required for Cleaning Fridge Coils – Importance of Disconnecting the Fridge Before Cleaning
Before you begin the process of cleaning the coils on your fridge, it’s essential to gather the necessary tools and take some precautions to ensure a safe and effective cleaning process. In this step, we will provide you with a list of tools you’ll need and emphasize the importance of disconnecting the fridge before cleaning.
Here is a list of tools you’ll need for cleaning fridge coils:
- Vacuum cleaner with a brush attachment: A vacuum cleaner with a brush attachment is an excellent tool for removing loose debris and dust from the coils.
- Coil brush: A coil brush is specifically designed to clean the tight spaces between the coils. It helps in dislodging stubborn dirt and dust.
- Microfiber cloth: A microfiber cloth is useful for wiping away any remaining dirt or grime after using the vacuum cleaner or coil brush.
With these tools in hand, you’ll be well-equipped to effectively clean your fridge coils and improve its energy efficiency.
Before starting the cleaning process, it’s crucial to disconnect the fridge from the power source. This step is important for your safety, as it ensures that there is no risk of electric shock while working on the coils. To disconnect the fridge, locate the power cord and unplug it from the wall socket.
Keep in mind that some refrigerators have a dedicated power switch, so make sure to turn that off as well. By disconnecting the fridge, you eliminate the risk of any electrical accidents and ensure a safe cleaning process.
Remember, safety should always be a top priority when performing any maintenance task on your appliances.
Before moving on to the next step, take a moment to ensure that you have all the necessary tools on hand, and double-check that the fridge is properly disconnected from the power source. This preparation will set the stage for a seamless and safe cleaning process.
In the next step, we will guide you on how to locate the coils on your fridge, as their placement may vary depending on the model. Stay tuned for detailed instructions on accessing and cleaning the coils to enhance energy efficiency.
Step 2: Locate the Coils – Explanation of Where to Find the Coils on a Fridge – Different Types of Coil Placements in Various Fridge Models
In this step, we will guide you on how to locate the coils on your fridge. Finding the coils is essential for effective cleaning and improving the energy efficiency of your appliance. It’s important to note that the exact location of the coils may vary depending on the model of your fridge.
Before we dive into the details, it’s essential to understand the purpose of the coils. The coils in a fridge are responsible for removing heat from the appliance, helping to keep the interior cool. There are typically two types of coils in a fridge: condenser coils and evaporator coils.
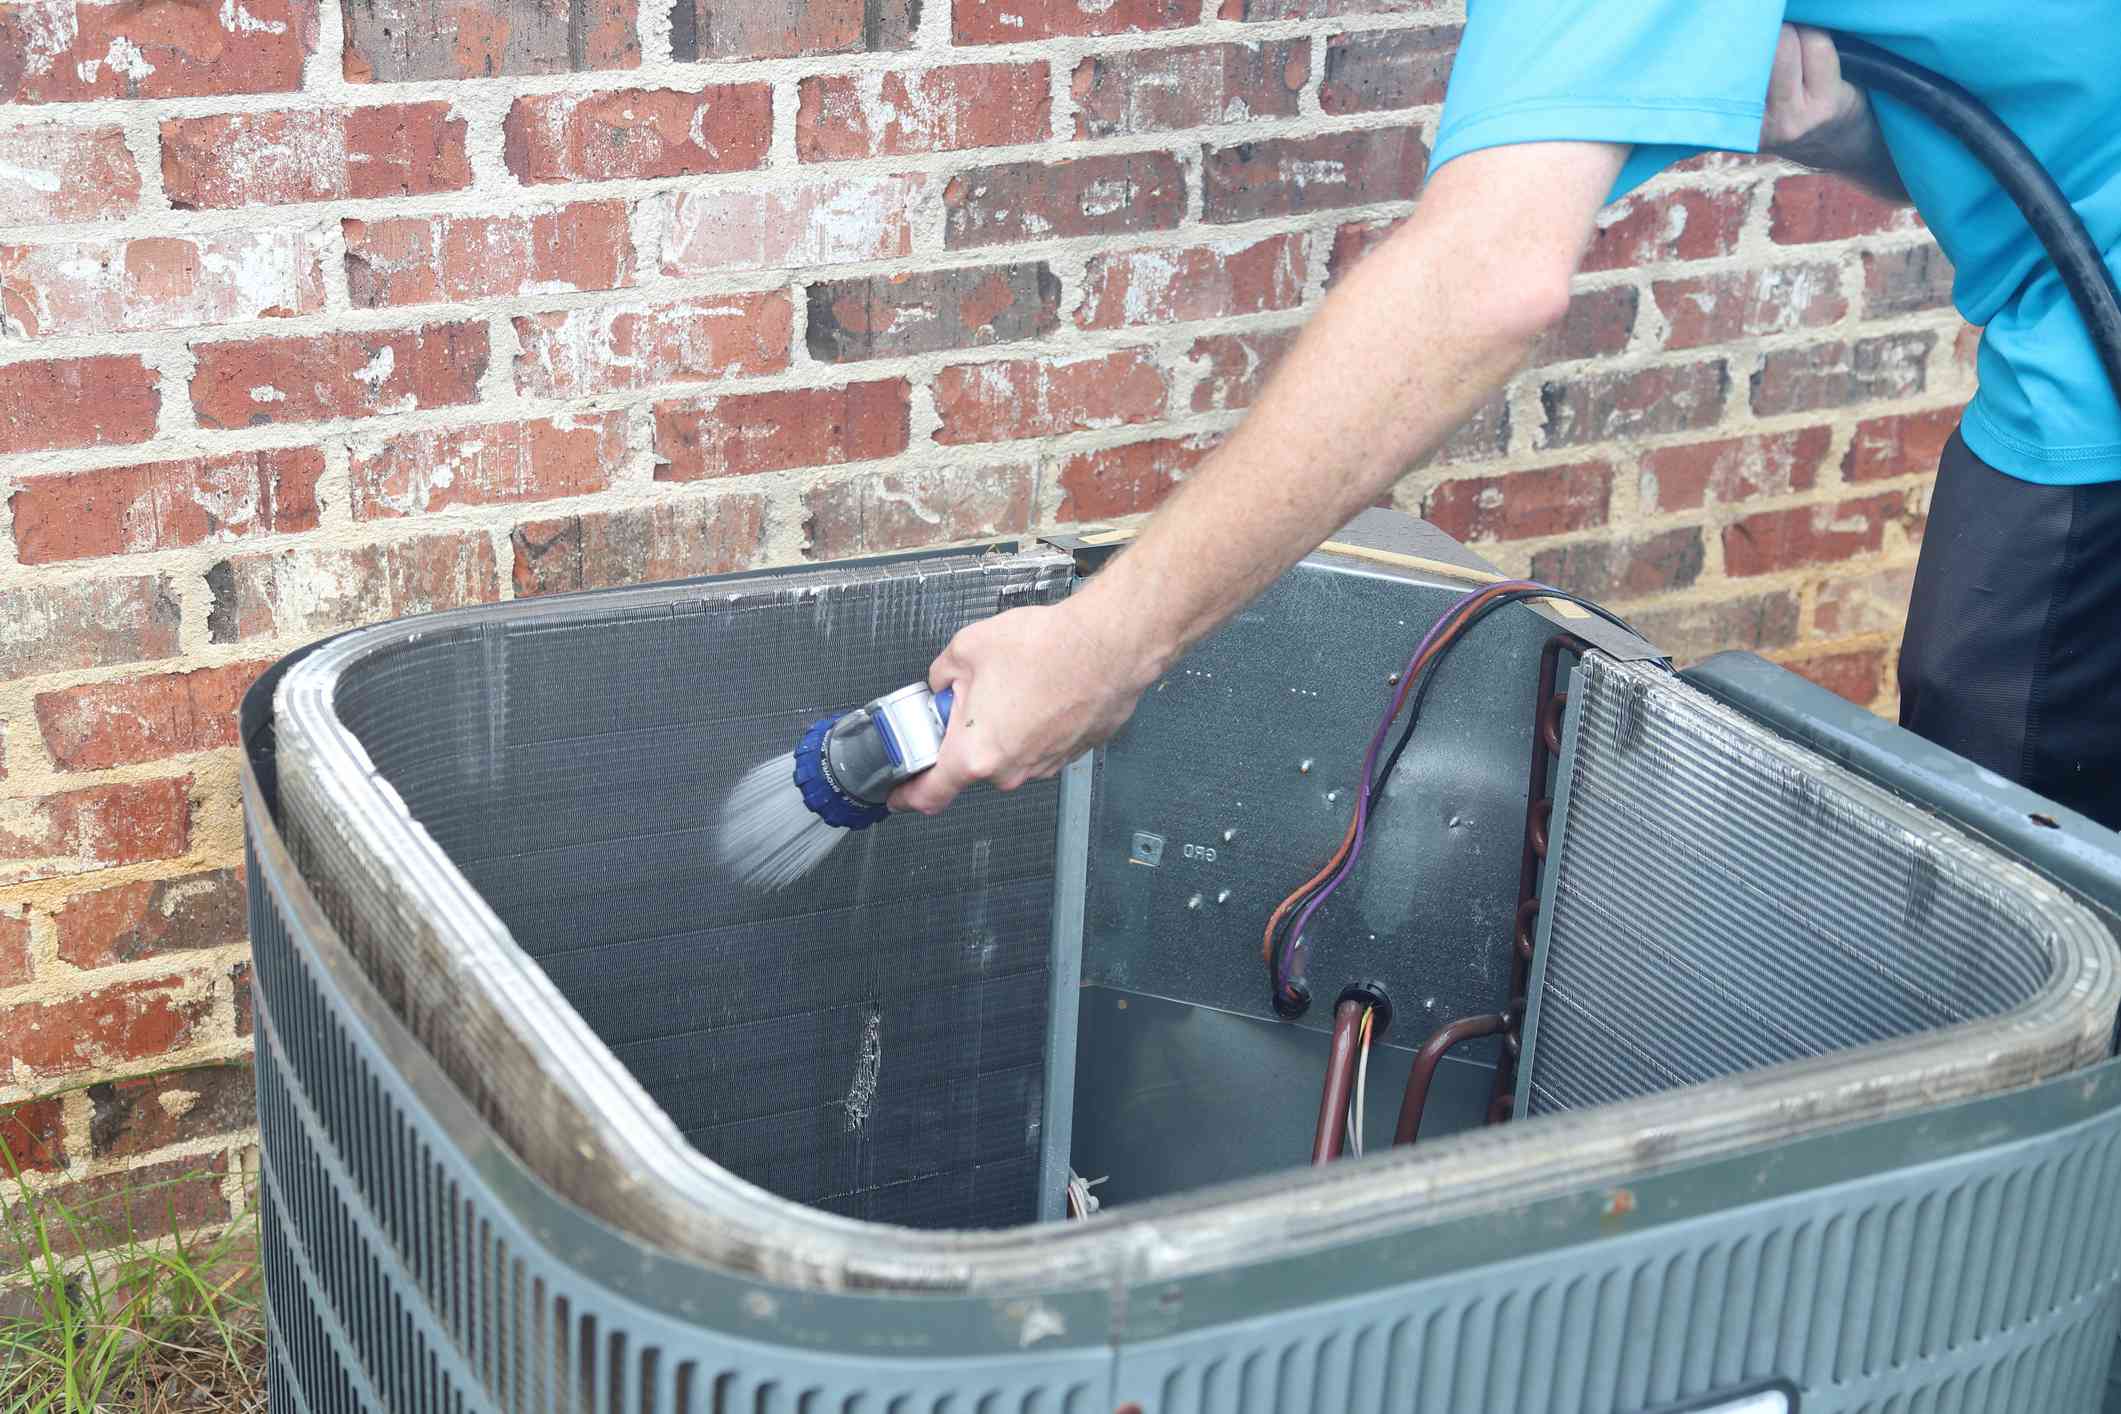
The condenser coils are usually located on the back of the fridge. They are responsible for releasing the heat that has been extracted from the interior of the fridge. These coils are often exposed, making them more susceptible to collecting dust and debris.
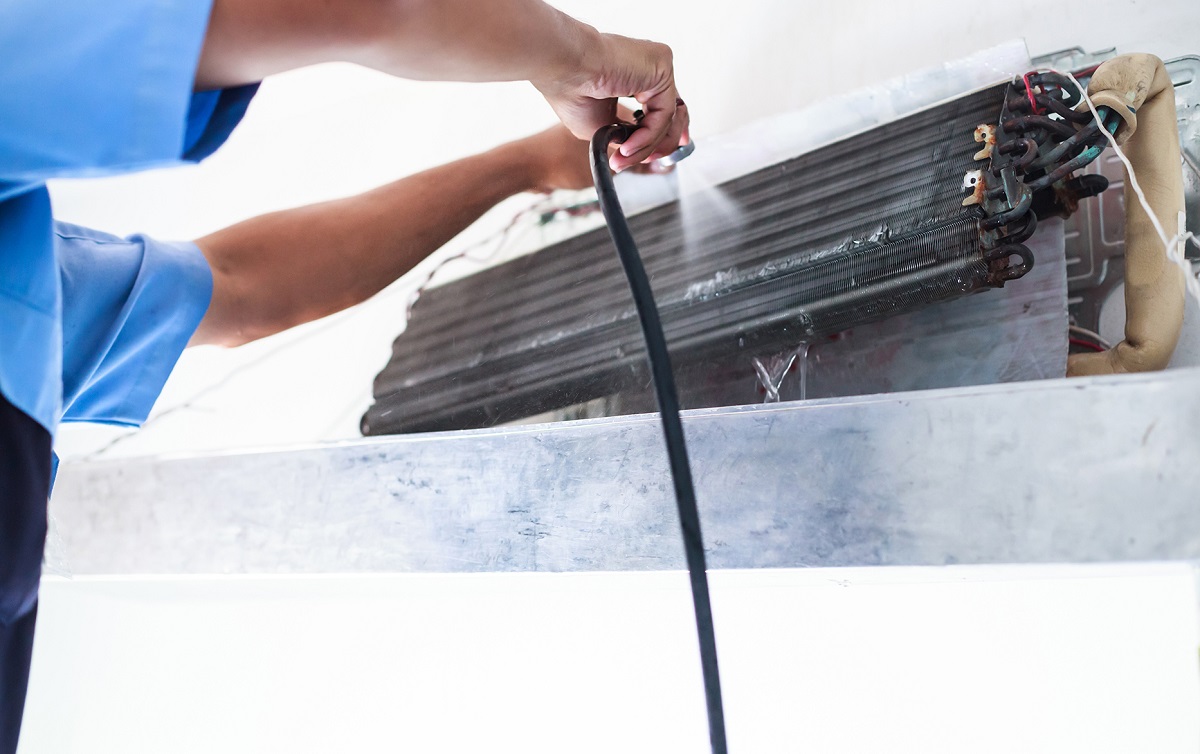
The evaporator coils, on the other hand, are typically located inside the fridge, behind the freezer compartment. Their primary function is to absorb heat from the interior and keep the fridge cool. These coils are usually hidden from plain sight and require a different cleaning approach.
To locate the coils on your fridge, start by checking the back of the appliance. If the coils are located there, you’ll likely see a set of parallel tubes or a metal grid. This indicates the presence of the condenser coils. Keep in mind that some fridge models may have a removable panel covering the coils, so you may need to remove it to access the coils for cleaning.
If you don’t find the coils at the back of the fridge, check the bottom front of the appliance. Some newer fridge models have the coils located in the front, behind a grille or kick plate. In this case, you may need to remove the grille or kick plate to access the coils for cleaning.
Once you locate the coils, it’s important to note that cleaning the condenser coils and evaporator coils may require different cleaning methods. Condenser coils are more exposed and easily accessible, making them easier to clean with tools like a vacuum cleaner or coil brush. On the other hand, cleaning evaporator coils may require professional assistance or a more complex process, as they are usually hidden behind panels or inside the fridge.
Consult your fridge’s manual for specific instructions on accessing and cleaning the coils based on your model. If you’re unsure or uncomfortable with the process, it’s always best to seek professional help to ensure proper cleaning and maintenance.
Now that you know where to find the coils on your fridge, it’s time to prepare the area before you begin the cleaning process. In the next step, we will guide you on how to clear the area and take necessary safety precautions to ensure a smooth and safe cleaning experience.
Step 3: Prepare the Area – Clearing the Area Around the Fridge for Easy Access – Safety Precautions and Necessary Protective Measures
In this step, we will focus on preparing the area around the fridge before you start cleaning the coils. Proper preparation will ensure easy access to the coils and help you carry out the cleaning process safely and effectively.
The first step in preparing the area is to clear any objects or debris that may hinder your access to the coils. Move any items, such as kitchen utensils, cleaning supplies, or food containers that are around or on top of the fridge. By creating a clear workspace, you will have better visibility and maneuverability during the cleaning process.
Next, consider the safety precautions and protective measures you should take during the coil cleaning process. Here are some important guidelines:
- Disconnect the fridge: Ensure that the fridge is properly disconnected from the power source before you proceed. This will eliminate the risk of electric shock and protect your safety throughout the cleaning process.
- Wear protective gear: It’s a good practice to wear gloves and safety goggles when cleaning the coils. This will protect your hands from dust, debris, and any cleaning agents you may use. Safety goggles will shield your eyes from potential debris dislodged during cleaning.
- Beware of sharp edges: Be cautious when working around the coils as they may have sharp edges. Take care not to cut or injure yourself during the cleaning process. If necessary, use a tool like a brush or vacuum cleaner with an extended attachment to reach deeper or narrower spaces.
- Avoid using excessive force: Be gentle when cleaning the coils to avoid damaging them. Apply just enough pressure to remove dirt and debris without bending or distorting the coils. If you encounter stubborn or hard-to-reach dirt, consider using a coil brush or a vacuum cleaner with a brush attachment.
- Use approved cleaning agents: Avoid using harsh chemicals or abrasive cleaners on the coils, as they can damage the delicate components. Stick to mild, non-abrasive cleaning agents if necessary, and ensure that they are safe for use on the specific material of your fridge coils.
- Work in a well-ventilated area: If you’re using any cleaning agents, make sure the area is well-ventilated to prevent inhaling fumes. Open windows or turn on a fan to circulate fresh air during the cleaning process.
By following these safety precautions and protective measures, you can minimize the risks and ensure a safe coil cleaning process.
With the area prepared and the necessary precautions in place, you are now ready to move on to the next step: cleaning the coils. In the following step, we will provide you with detailed instructions on how to effectively clean the coils to enhance the energy efficiency of your fridge.
Step 4: Cleaning the Coils – How to Clean the Coils Using a Vacuum Cleaner or a Coil Brush – Tips for Reaching Narrow Spaces and Removing Stubborn Dirt
In this step, we will focus on the process of cleaning the coils on your fridge. A clean set of coils is crucial for optimal energy efficiency and performance. We will discuss two primary methods for cleaning the coils: using a vacuum cleaner or a coil brush. Additionally, we will provide some helpful tips for reaching narrow spaces and removing stubborn dirt.
Method 1: Using a Vacuum Cleaner
Using a vacuum cleaner with a brush attachment is an effective way to remove loose debris and dust from the coils. Follow these steps:
- Ensure that the fridge is disconnected from the power source for safety.
- Attach the brush attachment to the vacuum cleaner hose.
- Gently run the brush along the coils, moving in back-and-forth or up-and-down motions. The brush bristles will help dislodge any loose dirt or debris.
- As you vacuum, pay special attention to areas that appear more heavily soiled or blocked. Spend extra time on these areas to ensure thorough cleaning.
- Aim to cover the entire surface area of the coils, moving the brush in a methodical manner.
- Once you have gone over all the coils, remove the vacuum cleaner and assess the cleanliness of the coils. If necessary, repeat the process to remove any remaining dirt or debris.
Method 2: Using a Coil Brush
If the coils have stubborn dirt or debris, using a coil brush can help dislodge and remove it. Follow these steps:
- Ensure that the fridge is disconnected from the power source for safety.
- Insert the coil brush gently between the coils, starting from one end.
- Use a gentle motion to brush away the dirt and debris. Be careful not to apply excessive force to avoid damaging the coils.
- Work methodically, moving from one section of the coils to another, until you have covered the entire surface area.
Tips for Reaching Narrow Spaces and Removing Stubborn Dirt
When cleaning the coils, it’s common to encounter narrow spaces or areas with stubborn dirt. Here are some tips to help you address these challenges:
- Use a coil brush with a long handle: A coil brush with a long handle can help you reach deeper or narrower spaces between the coils.
- Use a vacuum cleaner with an extended attachment: If your vacuum cleaner has an extended attachment, it can be useful for reaching areas that are difficult to access.
- Apply gentle pressure: When using a coil brush or vacuum cleaner, be mindful not to use excessive force. Applying gentle pressure is sufficient to clean the coils effectively without damaging them.
- Consider using a microfiber cloth: If there is stubborn dirt or debris that does not get removed with a vacuum cleaner or brush, use a microfiber cloth to wipe it away. Be thorough in wiping and inspect the coils for cleanliness.
By following these cleaning methods and tips, you can effectively remove dirt and debris from the coils, improving energy efficiency and extending the life of your fridge. In the next step, we will discuss how to reconnect the fridge and test its performance after cleaning the coils.
Step 5: Reconnect and Test the Fridge – Instructions for Reconnecting the Fridge to Power – Importance of Testing the Fridge’s Performance After Cleaning
In this final step, we will guide you through the process of reconnecting the fridge to power and highlight the importance of testing the fridge’s performance after cleaning the coils. Following these instructions will ensure that your fridge is back up and running smoothly, and that the cleaning process has positively impacted its energy efficiency.
Instructions for Reconnecting the Fridge to Power
- With the coil cleaning completed and the coils free from dirt and debris, you can now proceed to reconnecting the fridge to power.
- Locate the power cord of the fridge and plug it securely into a functioning wall socket. Ensure that the plug fits snugly and that there are no loose connections.
- If your fridge has a dedicated power switch, turn it on to restore power to the appliance.
- Allow the fridge a few minutes to get back to its optimal temperature. During this time, the compressor, which regulates the temperature, will kick back into action.
Importance of Testing the Fridge’s Performance After Cleaning
After reconnecting the fridge to power, it’s crucial to test its performance to ensure that everything is in working order. Here’s why it’s important:
- Temperature stability: After cleaning the coils, the fridge should be able to maintain a consistent temperature. Monitor the temperature gauge or setting to ensure that it remains stable.
- Cooling efficiency: Clean coils allow for better heat dissipation, leading to improved cooling efficiency. Observe how quickly the fridge reaches and maintains the desired temperature for your food and beverages.
- Operating noises: A clean fridge should operate quietly, with minimal noises. Listen for any unusual or excessive noises that may indicate an issue and, if necessary, consult a professional technician.
By testing the fridge’s performance, you can ensure that the cleaning process has positively impacted its energy efficiency and overall functionality. Should you notice any issues or abnormalities, it’s wise to consult a professional technician who can address any underlying problems.
Congratulations! You have completed the five expert steps to clean the coils on your fridge and cut down on energy costs. Regularly cleaning the coils will help maintain your fridge’s energy efficiency, prolong its lifespan, and contribute to a greener and more sustainable kitchen.
Remember to mark your calendar for regular coil cleaning sessions, ideally at least twice a year, or more frequently if you have pets or live in a dusty environment. By incorporating this maintenance task into your routine, you can enjoy an efficiently running fridge and save on energy expenses over time.
We hope this guide has been informative and helpful. Feel free to refer back to these steps whenever you need to clean the coils on your fridge. Happy cleaning!
Conclusion – Recap of the Importance of Regular Coil Cleaning for Energy Efficiency – Final Tips for Maintaining a Clean and Energy-Efficient Refrigerator
Congratulations! You have successfully learned how to clean the coils on your fridge and cut down on energy costs. Let’s recap the importance of regular coil cleaning for energy efficiency and provide you with some final tips to maintain a clean and energy-efficient refrigerator.
Importance of Regular Coil Cleaning for Energy Efficiency
Regularly cleaning the coils on your fridge is essential for several reasons:
- Improved energy efficiency: Clean coils allow for better heat transfer, enabling the fridge to cool more efficiently. This results in reduced energy consumption and lower electricity bills.
- Extended lifespan: When the coils are free from dirt and debris, the compressor doesn’t have to work as hard, reducing wear and tear on the appliance and prolonging its lifespan.
- Eco-friendliness: By maintaining an energy-efficient fridge, you minimize your carbon footprint and contribute to a more sustainable environment.
Final Tips for Maintaining a Clean and Energy-Efficient Refrigerator
Here are some additional tips to help you maintain a clean and energy-efficient refrigerator:
- Regular cleaning schedule: Make it a habit to clean the coils on your fridge at least twice a year. Set reminders or mark your calendar to ensure you don’t forget this important maintenance task.
- Keep the surrounding area clean: Regularly sweep or vacuum the area around the fridge to prevent dust and debris from accumulating and potentially clogging the coils.
- Minimize heat sources: Keep your fridge away from heat sources such as ovens, stoves, and direct sunlight. Excessive heat can make the fridge work harder, leading to increased energy consumption.
- Organize your food: Properly organize your food inside the fridge to maximize airflow and avoid overcrowding. This allows for better circulation of cool air and helps the fridge maintain an optimal temperature more effectively.
- Check the door seals: Regularly inspect and clean the door seals to ensure they are intact and seal tightly. Damaged or loose seals can allow cool air to escape, leading to inefficiencies in cooling.
- Monitor temperature settings: Keep an eye on the temperature settings of your fridge. Adjust them as needed to maintain the ideal temperature for your specific food storage requirements.
By following these tips and incorporating regular coil cleaning into your maintenance routine, you can maintain a clean and energy-efficient refrigerator, saving both energy and money in the long run.
Remember, if you have any concerns or are unsure about the cleaning process, it’s always a good idea to consult the fridge’s manual or seek professional assistance. Proper cleaning techniques and maintenance will ensure that your fridge operates optimally and remains in good condition for years to come.
Thank you for taking the time to learn about cleaning fridge coils and the importance of energy efficiency. By implementing these practices, you are contributing to a more sustainable and eco-friendly kitchen. Enjoy the benefits of a clean and energy-efficient refrigerator!
Frequently Asked Questions about How To Clean Coils On A Fridge: 5 Expert Steps To Cut Energy Costs
Was this page helpful?
At Storables.com, we guarantee accurate and reliable information. Our content, validated by Expert Board Contributors, is crafted following stringent Editorial Policies. We're committed to providing you with well-researched, expert-backed insights for all your informational needs.


0 thoughts on “How To Clean Coils On A Fridge: 5 Expert Steps To Cut Energy Costs”