Home>Storage Ideas>Living Room Storage>How To Clean Walls To Remove Scuffs And Stains
Living Room Storage
How To Clean Walls To Remove Scuffs And Stains
Modified: January 19, 2024
Learn how to clean your walls effectively to get rid of scuffs and stains. Get expert tips on removing marks and maintaining a clean living room with proper storage solutions.
(Many of the links in this article redirect to a specific reviewed product. Your purchase of these products through affiliate links helps to generate commission for Storables.com, at no extra cost. Learn more)
Introduction
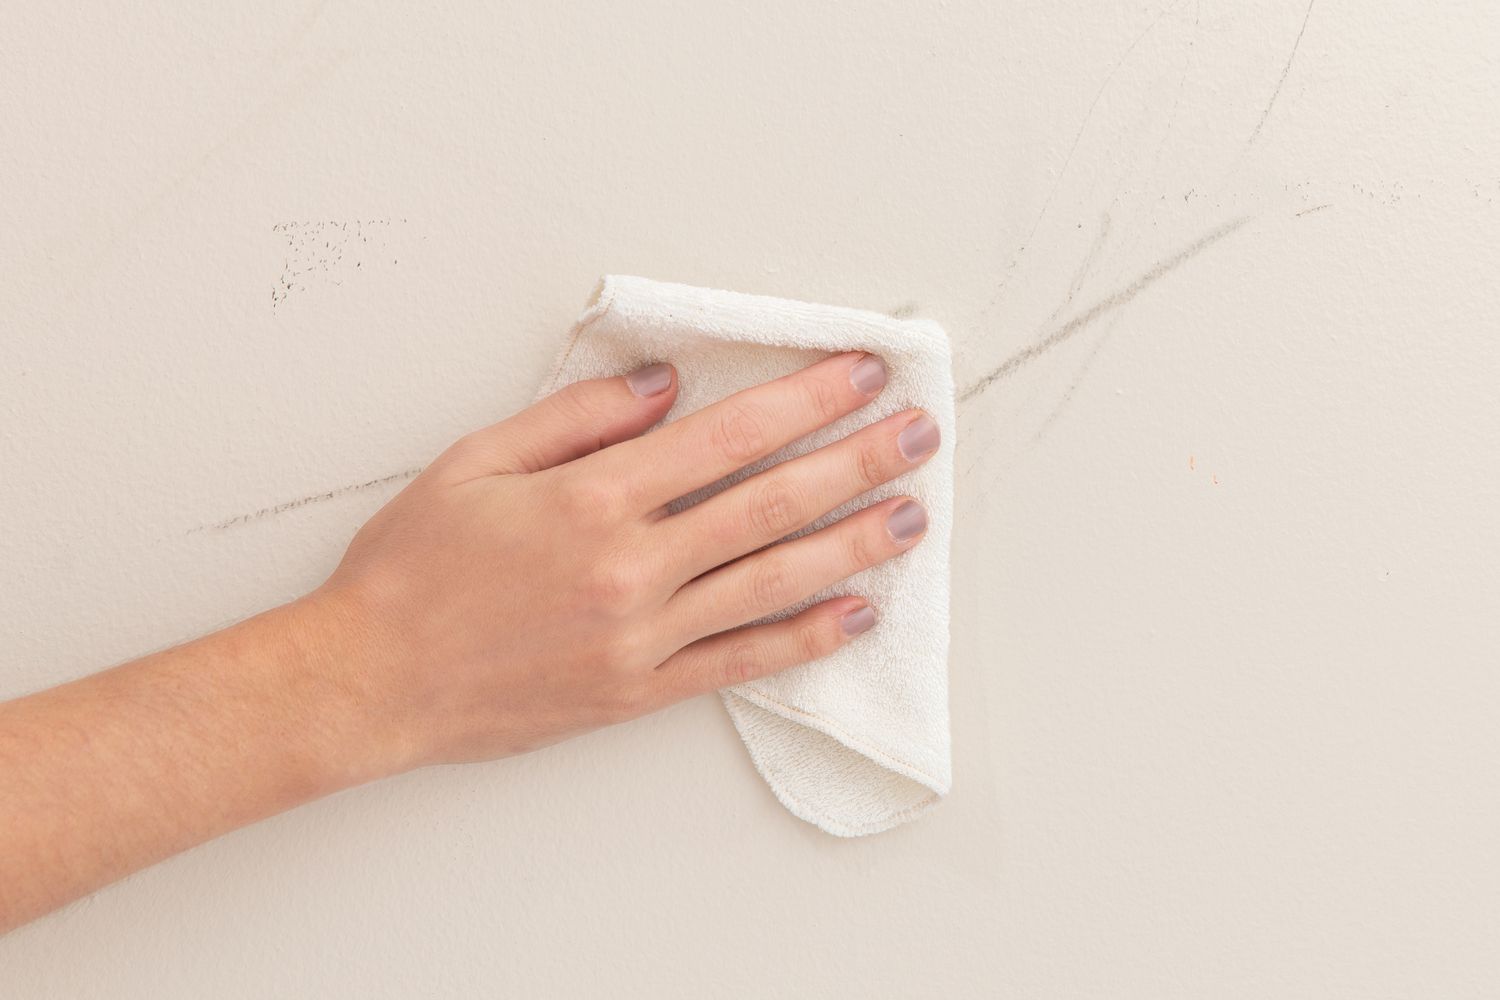
Welcome to our comprehensive guide on how to clean walls to remove scuffs and stains. Over time, our walls can accumulate dirt, grime, fingerprints, and other unsightly marks that can detract from the appearance of our living spaces. Cleaning the walls not only helps to restore their original beauty but also promotes a healthier environment by removing allergens and bacteria.
In this article, we will explore various methods and techniques for effectively cleaning walls. Whether you are dealing with minor scuffs, stubborn stains, or general dirt and grime, we have you covered. By following these steps and using the right supplies, you can achieve spotless and refreshed walls.
Before we dive into the cleaning process, it’s important to gather the necessary supplies and prepare the area to ensure a smooth and efficient cleaning experience. Let’s take a look at what you’ll need.
Key Takeaways:
- Easily restore your walls’ beauty and promote a healthier environment by following our comprehensive guide on removing scuffs and stains. Gather the right supplies, prepare the area, and choose the best cleaning solution for spotless walls.
- Whether using a magic eraser, baking soda, vinegar, or dish soap, our methods offer unique benefits for tackling various wall marks. Remember to test cleaning solutions, work in small sections, and protect yourself for an efficient and effective cleaning process.
Read more: How To Remove Scuff Marks From Floor
Supplies Needed
Before you begin cleaning your walls, it’s essential to gather the right supplies to ensure an effective and hassle-free process. Here is a list of items you will need:
- Microfiber cloths or soft sponges: These are gentle on walls and won’t cause any damage while cleaning.
- Bucket or cleaning container: This will be used to mix and hold the cleaning solution.
- Water: You’ll need water for diluting cleaning solutions and rinsing off the walls.
- Cleaning solutions: Depending on the method you choose, you may need specific cleaning solutions such as a magic eraser, baking soda, vinegar, or dish soap.
- Ladder or step stool: These are necessary if you need to reach higher areas of the wall.
- Protective gloves: It’s a good idea to wear gloves to protect your skin from harsh cleaning chemicals.
- Protective eyewear: Safety goggles or glasses will safeguard your eyes from any splashes or drips.
- Drop cloths or plastic sheets: These will protect your floors and furniture from any potential drips or spills.
- Vacuum cleaner or broom: Use a vacuum or broom to remove any loose dirt or cobwebs before cleaning.
Having these supplies readily available will make the wall cleaning process smoother and more efficient. Now that you have everything you need, let’s move on to preparing the area before cleaning.
Preparing the Area
Before diving into the cleaning process, it’s important to take a few steps to prepare the area. This will ensure that you have a smooth and effective wall cleaning experience. Here’s what you should do:
- Remove any furniture or decorations near the walls: Clear the area as much as possible to provide easy access to the walls and prevent any accidental damage to your belongings.
- Protect your floors and furniture: Cover the floor with drop cloths or plastic sheets to avoid any potential drips or spills from the cleaning solutions. Move furniture away from the walls or cover them with sheets or plastic to protect them from any splashes.
- Remove dust and cobwebs: Use a vacuum cleaner with a soft brush attachment or a broom to remove any loose dirt, dust, or cobwebs from the walls. This will prevent them from spreading or smearing during the cleaning process.
- Check for any damages: Inspect the walls for any damages such as cracks, peeling paint, or holes. It’s best to address these issues before cleaning to avoid further damage. If necessary, consult a professional for repairs.
- Test cleaning solutions: If you’re using a new cleaning solution, it’s a good idea to test it on a small, inconspicuous area of the wall first. This will help ensure that there are no adverse reactions or discoloration on your walls.
By preparing the area properly, you can minimize any potential damage and ensure a more efficient cleaning process. Once you have completed these steps, you’re ready to move on to the next section where we will explore various cleaning solutions to remove scuffs and stains from your walls.
Cleaning Solutions
When it comes to cleaning walls, there are several effective solutions you can use to remove scuffs and stains. The choice of cleaning solution will depend on the severity of the marks and your preference. Let’s explore some popular options:
- Magic Eraser: A magic eraser is a versatile cleaning tool that works wonders on scuffs. These erasers are made of a melamine foam material that effectively lifts and removes marks without the need for additional cleaning solutions.
- Baking Soda and Water: Baking soda is a natural cleaning agent that is gentle on walls. Mix baking soda with water to create a paste-like consistency. This solution can be used to remove stubborn stains, grease, and crayon marks.
- Vinegar and Water: Vinegar is another excellent natural cleaning solution. Mix equal parts vinegar and water in a spray bottle. This solution is effective at removing grime, dirt, and mildew stains.
- Dish Soap and Water: A mild dish soap solution can be used for general cleaning of walls. Mix a few drops of dish soap with warm water. This solution is ideal for removing fingerprints, dirt, and light stains.
Remember, it’s important to test any cleaning solution on a small, inconspicuous area of the wall before applying it to the entire surface. This will help ensure that there are no adverse reactions or discoloration.
Now that we’ve explored various cleaning solutions, let’s move on to the methods of using these solutions to effectively clean your walls.
Method 1: Using a Magic Eraser
A Magic Eraser is a convenient and effective tool for removing scuffs and marks from walls. Here’s how you can use it:
- Moisten the Magic Eraser: Wet the Magic Eraser with water to activate it.
- Gently rub the scuffed area: Apply light pressure to the scuffed or marked area and gently scrub in a circular motion. Be careful not to scrub too vigorously as this may remove paint or damage the wall surface.
- Rinse with water: Once you’ve removed the scuff, rinse the wall with clean water. Use a damp cloth or sponge to remove any residue.
- Dry the wall: Use a clean, dry cloth or towel to pat dry the wall. This will prevent any water spots or streaks from forming.
The Magic Eraser is particularly effective for removing scuffs and marks on painted walls. However, be cautious when using it on delicate or wallpapered surfaces, as it may cause damage.
Now that you’ve learned about using a Magic Eraser, let’s explore another method using baking soda and water to clean your walls.
Use a mild detergent and water solution to gently scrub scuffs and stains on walls. For stubborn marks, try a baking soda paste or a magic eraser. Always test in an inconspicuous area first.
Read more: How To Remove Scuffs From White Towel Bar
Method 2: Using Baking Soda and Water
Baking soda is a versatile and gentle cleaning agent that can effectively remove stubborn stains from walls. Here’s how you can use it:
- Create a paste: In a small bowl, mix equal parts baking soda and water to create a paste-like consistency. The paste should be thick enough to adhere to the wall.
- Apply the paste: Use a clean cloth, sponge, or your fingers to apply the baking soda paste to the stained area. Gently rub the paste onto the stain, covering it completely.
- Let it sit: Allow the baking soda paste to sit on the stain for about 10-15 minutes. This will give the baking soda time to penetrate and break down the stain.
- Gently scrub: After the allotted time, use a clean cloth or sponge to gently scrub the stained area in a circular motion. Apply moderate pressure but avoid scrubbing too aggressively to prevent damage to the wall surface.
- Rinse with water: Once you’ve scrubbed the stain, rinse the wall with clean water. Use a damp cloth or sponge to remove any residue from the baking soda paste.
- Dry the wall: Finally, use a clean, dry cloth or towel to pat dry the wall. This will prevent any water spots or streaks from forming.
Using baking soda and water is an effective and non-abrasive method for removing stubborn stains from walls. However, it’s always a good idea to test this solution on a small, inconspicuous area of the wall before applying it to the entire surface.
Now that you’ve learned how to use baking soda and water, let’s move on to another method using vinegar and water.
Method 3: Using Vinegar and Water
Vinegar is a natural and effective cleaning agent that can tackle dirt, grime, and mildew stains on walls. Here’s how you can use vinegar to clean your walls:
- Mix vinegar and water: In a spray bottle, mix equal parts white vinegar and water. You can adjust the ratio depending on the severity of the stains.
- Spray the solution: Spray the vinegar and water solution onto the stained areas of the wall. Be sure to cover the entire affected area.
- Let it sit: Allow the solution to sit on the wall for a few minutes. This will give the vinegar time to break down the stains and loosen dirt and grime.
- Gently scrub: Use a soft sponge or cloth to gently scrub the stained areas in a circular motion. Apply moderate pressure but avoid scrubbing too hard to prevent damage to the wall surface.
- Rinse with water: Once you’ve scrubbed the stains, rinse the wall with clean water. You can use a damp cloth or sponge to remove any leftover vinegar solution.
- Dry the wall: Use a clean, dry cloth or towel to pat dry the wall. This will prevent water spots or streaks from forming.
Vinegar is an excellent natural cleaner that is safe to use on most wall surfaces. However, it’s always a good idea to test the vinegar and water solution on a small, inconspicuous area of the wall before applying it to the entire surface.
Now that you’ve learned how to use vinegar and water, let’s move on to another method using dish soap and water.
Method 4: Using Dish Soap and Water
Dish soap is a mild yet effective cleaner that can be used to remove fingerprints, dirt, and light stains from walls. Here’s how you can use dish soap and water to clean your walls:
- Mix dish soap and water: In a bucket or cleaning container, mix a few drops of dish soap with warm water. Stir the solution gently to create suds.
- Dampen a sponge or cloth: Dip a soft sponge or cloth into the soapy water solution. Make sure it is thoroughly dampened but not soaked.
- Wipe the walls: Starting from the top and working your way down, gently wipe the walls using the damp sponge or cloth. Pay extra attention to areas with visible dirt, fingerprints, or stains.
- Rinse with clean water: Once you’ve wiped the walls, rinse out your sponge or cloth with clean water. Wring out any excess water and use it to rinse off the soapy residue from the walls.
- Dry the wall: Finally, use a clean, dry cloth or towel to pat dry the wall. This will prevent any water spots or streaks from forming.
Dish soap is a gentle option for general wall cleaning. It effectively removes light stains and dirt without causing damage to most wall surfaces. However, as always, test the dish soap and water solution on a small, inconspicuous area of the wall before applying it to the entire surface.
Now that you’ve learned how to use dish soap and water, let’s move on to additional tips and tricks to help you achieve the best results when cleaning your walls.
Additional Tips and Tricks
Here are some additional tips and tricks to help you achieve the best results when cleaning your walls:
- Work in small sections: Instead of trying to clean the entire wall at once, work in small sections. This will ensure that you can thoroughly clean each area without the cleaning solution drying out.
- Use gentle motions: When scrubbing or wiping the walls, use gentle motions to avoid damaging the paint or wall surface. Applying excessive pressure can lead to paint removal or wall texture alteration.
- Start from the top: Begin cleaning from the top of the wall and work your way down. This will prevent any drips or streaks from forming on lower portions of the wall.
- Change cleaning solution when necessary: If you notice that the cleaning solution is becoming dirty or ineffective, change it for a fresh batch. Using a dirty solution can leave streaks or residue on the walls.
- Dry the wall thoroughly: After cleaning, make sure to dry the wall completely to prevent any water spots or streaks. Use a clean, dry cloth or towel and gently pat dry the surface.
- For tough stains, be patient: Some stains may require extra effort and time to remove. If a stain is not coming off easily, apply the cleaning solution and let it sit for a few minutes before gently scrubbing again.
- Protect yourself: Wear protective gloves to safeguard your hands from cleaning solutions, and consider wearing goggles or glasses to protect your eyes from any splashes or drips.
- If unsure, consult a professional: If you are unsure about cleaning specific types of wall surfaces or dealing with stubborn stains, it’s always best to consult a professional for advice or assistance.
By following these additional tips and tricks, you can ensure a more effective and efficient wall cleaning process. Now, let’s wrap up everything we’ve learned.
Conclusion
Cleaning your walls to remove scuffs and stains doesn’t have to be a daunting task. With the right supplies, techniques, and a little bit of patience, you can restore your walls to their original beauty. Whether you choose to use a magic eraser, baking soda and water, vinegar and water, or dish soap and water, each method offers unique benefits and can effectively tackle various types of marks.
Remember to always test any cleaning solution on a small, inconspicuous area of the wall before applying it to the entire surface. This will help ensure that there are no adverse reactions or damage to your walls.
Additionally, taking the time to properly prepare the area, gather the necessary supplies, and protect your floors and furniture will make the cleaning process smoother and more efficient.
Keep in mind the additional tips and tricks mentioned, such as working in small sections, using gentle motions, and thoroughly drying the walls to achieve the best results.
By following these guidelines and techniques, you can maintain clean and fresh-looking walls that enhance the overall appearance of your living space.
So go ahead, roll up your sleeves, and give your walls the attention they deserve. With these methods, your walls will be scuff and stain-free, creating a clean and inviting atmosphere in your living room.
Frequently Asked Questions about How To Clean Walls To Remove Scuffs And Stains
Was this page helpful?
At Storables.com, we guarantee accurate and reliable information. Our content, validated by Expert Board Contributors, is crafted following stringent Editorial Policies. We're committed to providing you with well-researched, expert-backed insights for all your informational needs.


0 thoughts on “How To Clean Walls To Remove Scuffs And Stains”