Home>Storage Ideas>Living Room Storage>How To Clean Your Humidifier—Plus An Important Step To Take Daily
Living Room Storage
How To Clean Your Humidifier—Plus An Important Step To Take Daily
Modified: October 20, 2024
Keep your living room clutter-free with these smart storage solutions. Maximize space and keep your belongings organized with our living room storage ideas.
(Many of the links in this article redirect to a specific reviewed product. Your purchase of these products through affiliate links helps to generate commission for Storables.com, at no extra cost. Learn more)
Introduction
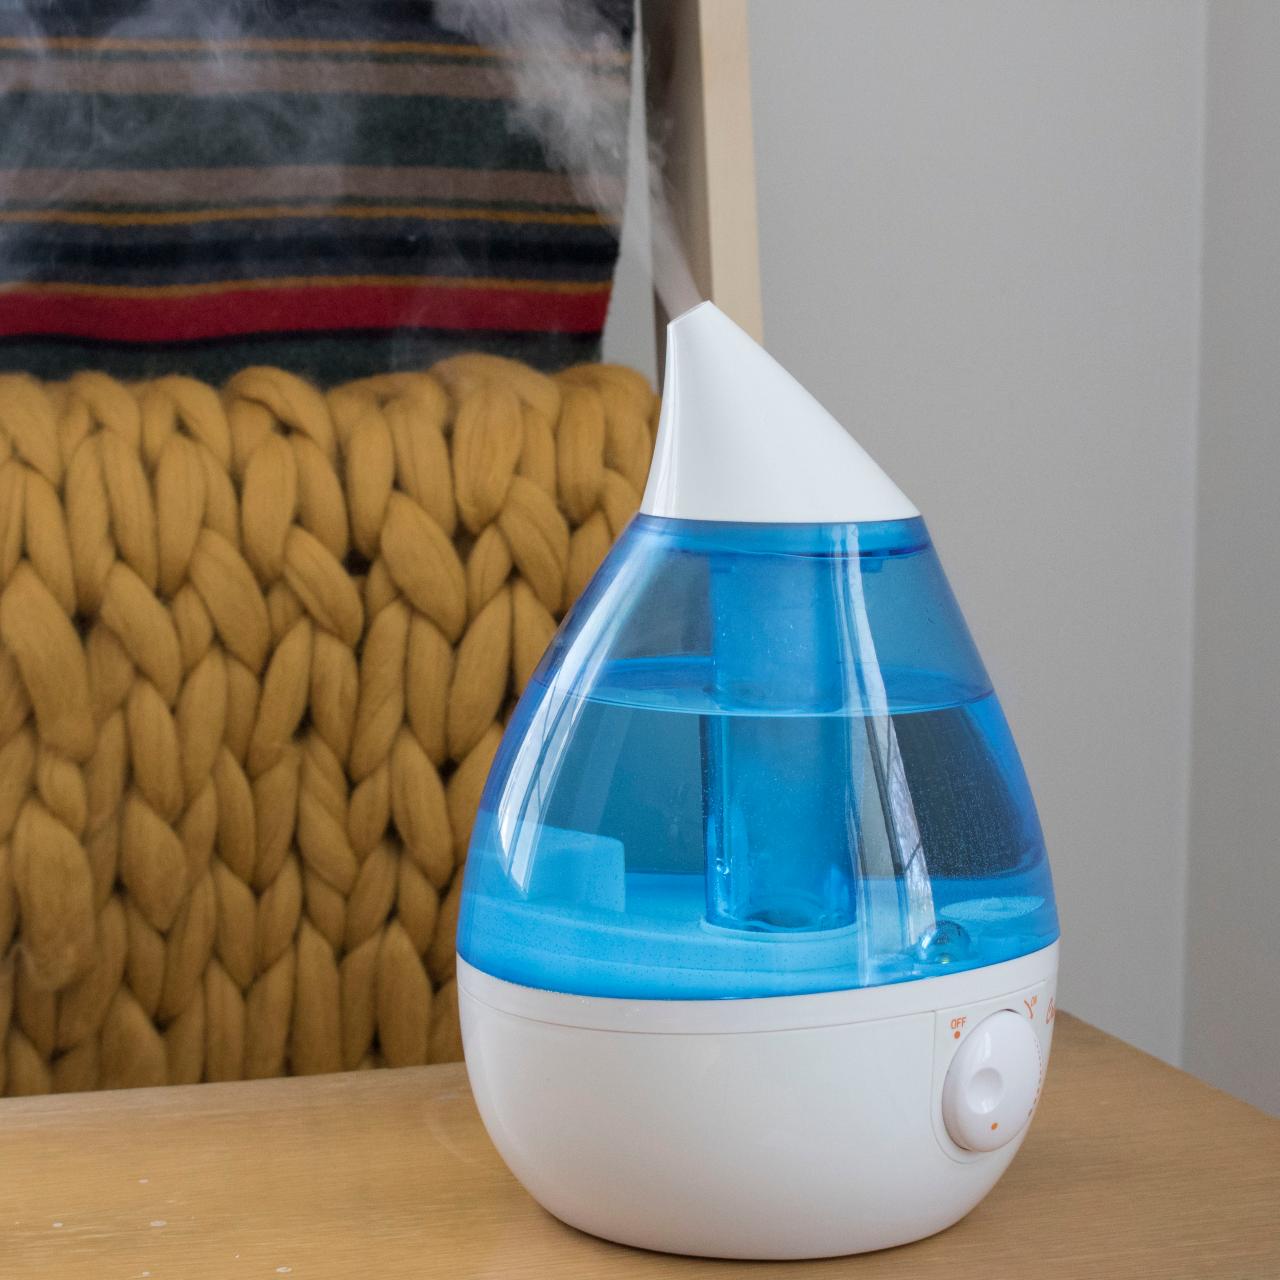
Welcome to our guide on how to clean your humidifier! As the seasons change and the air becomes drier, many of us turn to humidifiers to add moisture and improve the comfort of our living spaces. However, it’s crucial to remember that regular cleaning and maintenance are essential for the optimal functioning of your humidifier and to ensure clean air quality in your home.
Humidifiers work by emitting water vapor into the air, which can create a breeding ground for bacteria, mold, and mineral deposits if not properly cleaned. These impurities can then be released into the air, potentially causing health issues and diminishing the performance of your device. By incorporating a regular cleaning routine into your humidifier care, you can enjoy the benefits of clean, moist air while avoiding these common pitfalls.
In this article, we will walk you through the step-by-step process of cleaning your humidifier, as well as highlight an important daily step to take for optimal maintenance. So, let’s dive in and learn how to properly clean your humidifier to ensure healthy air quality and prolong its lifespan.
Key Takeaways:
- Regular cleaning and disinfection of your humidifier is crucial to prevent bacterial growth, mineral deposits, and odors, ensuring clean and healthy air quality in your living space.
- Incorporating a daily disinfection step into your routine helps control bacteria and mold, prolonging the lifespan of your humidifier and maintaining optimal air quality.
Read more: How To Fix E2 Error In A Washing Machine
Why Cleaning Your Humidifier is Important
Regular cleaning of your humidifier is of utmost importance to maintain a healthy living environment and ensure the longevity of your device. Here are some key reasons why keeping your humidifier clean is crucial:
- Prevention of Bacterial Growth: Stagnant water in your humidifier’s tank and base can provide a perfect breeding ground for bacteria, mold, and other microorganisms. These contaminants can then be released into the air you breathe, potentially causing respiratory issues, allergies, and other health problems. By cleaning your humidifier regularly, you can prevent the growth of harmful bacteria and ensure that the air you breathe is clean and safe.
- Mineral Deposit Prevention: If you live in an area with hard water, mineral deposits can build up in your humidifier over time. These deposits can clog the device’s filters, nozzles, and other components, reducing its effectiveness and potentially leading to costly repairs. Regular cleaning helps remove these mineral deposits and prevents their accumulation, ensuring optimal performance and extending the lifespan of your humidifier.
- Elimination of Odors: Over time, a humidifier can develop unpleasant odors due to the growth of bacteria and mold. These odors can be carried into your living space, making the air less pleasant to breathe. By cleaning your humidifier regularly, you can eliminate these odors and enjoy fresh, clean-smelling air throughout your home.
- Improved Humidifier Performance: A clean humidifier functions more efficiently and effectively. When the device is free from mineral deposits and impurities, it can more effectively add moisture to the air, helping to alleviate dry skin, irritated sinuses, and other discomforts associated with dry air. Regular cleaning ensures that your humidifier continues to operate at its best, providing optimal moisture levels for your comfort.
- Extended Lifespan: By properly cleaning and maintaining your humidifier, you can significantly extend its lifespan. Neglecting to clean your humidifier can lead to the buildup of mineral deposits, clogged filters, and other issues that can cause the device to malfunction. Regular cleaning ensures that your humidifier remains in good working condition, providing you with years of reliable service.
By understanding the importance of regular humidifier cleaning, you can create a healthier and more comfortable living environment for yourself and your family. Now that you know why cleaning your humidifier is vital, let’s move on to the necessary supplies you’ll need for the cleaning process.
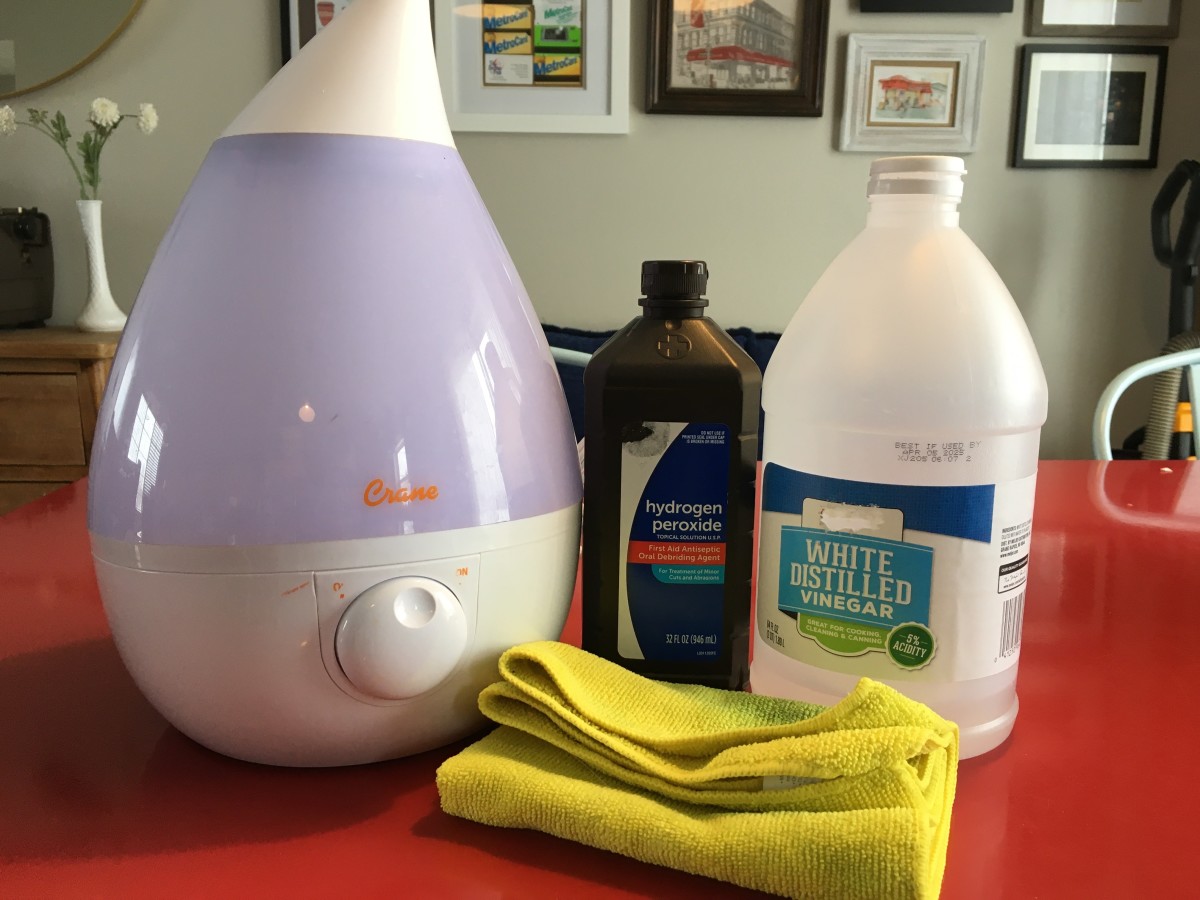
Necessary Supplies
Before you begin the process of cleaning your humidifier, it’s essential to gather the necessary supplies. Having the right tools and cleaning agents on hand will ensure a thorough and efficient cleaning. Here are the essential supplies you’ll need:
- Vinegar: Vinegar is a versatile and effective cleaning agent that helps remove mineral deposits, kill bacteria, and eliminate odors. White distilled vinegar is commonly used for cleaning humidifiers.
- Water: You’ll need clean water for rinsing and diluting the vinegar solution. Distilled water is recommended to avoid mineral buildup, especially if you have hard water.
- Mild dish soap: A mild dish soap can be used for general cleaning, especially for parts that come in contact with water. Choose a gentle soap without harsh chemicals or fragrances.
- Soft-bristle brush: A soft-bristle brush, such as a toothbrush or a small cleaning brush, will come in handy for scrubbing hard-to-reach areas and removing stubborn deposits.
- Clean cloth or sponge: A clean cloth or sponge is useful for wiping down surfaces and drying components after cleaning.
- Disposable gloves: It’s always a good idea to wear disposable gloves while cleaning to protect your hands from any cleaning agents or bacteria present in the humidifier.
Having these supplies readily available will ensure that you can clean your humidifier effectively and efficiently. With your supplies in hand, let’s move on to the step-by-step process of cleaning your humidifier.
Step 1: Disconnect and Empty the Humidifier
The first step in the process of cleaning your humidifier is to disconnect it from the power source and empty out any remaining water. By doing this, you’ll ensure your safety and make it easier to access and clean the various components.
Follow these steps:
- Turn Off and Unplug: Before handling your humidifier, make sure it is turned off and unplugged from the electrical outlet. This will prevent any accidents or electrical shocks during the cleaning process.
- Drain the Water: Next, carefully remove the water tank from the humidifier and pour out any remaining water. Be cautious to avoid spilling water on yourself or any electronic parts of the unit.
- Inspect for Mold or Mildew: Take a moment to inspect the water tank and the internal components for signs of mold or mildew. If you notice any growth, make a note to thoroughly clean and disinfect those areas later in the process.
- Remove the Water Tray and Filter (if applicable): Depending on the type of humidifier you have, you may need to remove the water tray and the filter. Remove these components according to the manufacturer’s instructions and set them aside for cleaning.
Congratulations! You’ve completed the first step in cleaning your humidifier. By disconnecting it and emptying the water, you’ve made it safer and easier to proceed with the cleaning process. Now, let’s move on to step 2: disassembling the humidifier.
Step 2: Disassemble the Humidifier
In this step, we will guide you through the process of disassembling your humidifier. Taking apart the various components of your humidifier will allow for a thorough and efficient cleaning. Follow these steps:
- Refer to the Manufacturer’s Instructions: Every humidifier may have a slightly different disassembly process, so it’s important to consult the manufacturer’s instructions specific to your model. These instructions will provide guidance on which parts are removable and how to safely detach them.
- Remove the Cap or Lid: If your humidifier has a cap or lid on the water tank, remove it according to the manufacturer’s instructions. This will open up the tank and allow for easier cleaning.
- Detach Other Removable Parts: Depending on the design of your humidifier, there may be other removable parts such as mist nozzles, wick filters, or water trays. Carefully detach these components according to the manufacturer’s instructions. If you’re unsure how to remove a specific part, refer to the user manual or contact the manufacturer for assistance.
- Keep Track of Small Pieces: As you disassemble your humidifier, be mindful of any small screws, washers, or other pieces that may come loose. It’s a good idea to keep these items in a safe place or a small container so that they don’t get lost during the cleaning process.
- Avoid Forceful Removal: While disassembling your humidifier, avoid applying excessive force or pulling forcefully on any components. If a part seems stuck, refer to the manufacturer’s instructions or seek assistance to avoid damaging your humidifier.
By disassembling your humidifier properly, you’ll have better access to all the components that require cleaning. This will ensure that you can eliminate any built-up mineral deposits, remove bacteria, and maintain optimal performance. Now, let’s move on to step 3: cleaning the water tank.
Step 3: Clean the Water Tank
Now that you have successfully disassembled your humidifier, it’s time to clean the water tank. The water tank is a crucial component that requires regular maintenance to prevent the buildup of bacteria, mineral deposits, and unpleasant odors. Follow these steps:
- Prepare a Cleaning Solution: Create a cleaning solution by mixing equal parts of white vinegar and water in a basin or sink. The vinegar will help break down any mineral deposits and neutralize bacteria and odors.
- Submerge the Tank: Carefully submerge the water tank in the cleaning solution, ensuring that it is completely covered. Allow it to soak for about 30 minutes. This will help loosen any residue, making it easier to clean.
- Scrub the Tank: After soaking, use a soft-bristle brush or sponge to scrub the interior of the water tank. Pay special attention to areas with mineral deposits or stubborn stains. Gently scrub in a circular motion to remove any buildup. Avoid using abrasive materials that can scratch the tank’s surface.
- Rinse Thoroughly: Once you have adequately scrubbed the tank, rinse it thoroughly with clean water. Make sure to remove all traces of the cleaning solution.
- Inspect for Remaining Deposits: After rinsing, inspect the interior of the water tank for any remaining mineral deposits. If you notice any stubborn deposits, consider using a small amount of distilled white vinegar and a brush or sponge to target those areas. Rinse again to remove any vinegar residue.
- Dry Completely: Before reassembling the humidifier, ensure that the water tank is completely dry. Use a clean cloth or towel to gently dry the tank, both inside and outside. Pay special attention to any crevices or hard-to-reach areas where moisture might linger.
Cleaning the water tank is a vital step in maintaining the cleanliness of your humidifier. By regularly cleaning the tank, you can prevent the growth of bacteria, remove mineral deposits, and eliminate any unpleasant odors. With the water tank now clean and dry, let’s proceed to step 4: cleaning the humidifier base.
Step 4: Clean the Humidifier Base
Now that you have cleaned the water tank, it’s time to focus on cleaning the humidifier base. The base of your humidifier houses various components and can accumulate mineral deposits, mold, and bacteria over time. By thoroughly cleaning the base, you will ensure optimal performance and maintain a healthy living environment. Follow these steps:
- Create a Cleaning Solution: Prepare a cleaning solution by mixing equal parts of water and white vinegar in a basin or sink. This solution will help remove mineral deposits and kill bacteria.
- Submerge Removable Parts: If your humidifier base has removable parts such as mist nozzles or water trays, submerge them in the cleaning solution and let them soak for about 30 minutes. This will help loosen any buildup and make them easier to clean.
- Clean the Base: Dip a soft-bristle brush or sponge into the cleaning solution and gently scrub the interior of the base. Pay close attention to areas with mineral deposits or visible stains. Ensure that you clean all nooks and crannies where bacteria or mold may accumulate.
- Rinse Thoroughly: After scrubbing, rinse the base thoroughly with clean water to remove any traces of the cleaning solution. Make sure to rinse all the removable parts as well.
- Dry Completely: It’s important to dry the base and the removable components thoroughly before reassembling the humidifier. Use a clean cloth or towel to wipe off any excess moisture. Pay extra attention to areas that tend to retain water.
By cleaning the humidifier base, you’ll remove any mineral deposits, bacteria, and mold that can negatively impact the efficiency and air quality of your humidifier. Once the base is clean and dry, let’s move on to step 5: removing mineral deposits (if applicable).
To keep your humidifier clean, use distilled water to prevent mineral buildup. Regularly clean and disinfect the tank and other components to avoid mold and bacteria growth.
Step 5: Remove Mineral Deposits (If Applicable)
If you live in an area with hard water, you may find that your humidifier develops mineral deposits over time. These deposits can clog the device and affect its performance. In this step, we will guide you through the process of removing mineral deposits from your humidifier. Follow these steps:
- Refer to the Manufacturer’s Instructions: Different humidifiers have different methods for removing mineral deposits. It’s important to consult the manufacturer’s instructions specific to your model to ensure you follow the correct procedure.
- Vinegar Soaking: A common method for removing mineral deposits is to soak the affected parts in white vinegar. If applicable, detach the parts that have mineral deposits and place them in a container filled with undiluted white vinegar. Let them soak for a couple of hours or overnight, depending on the severity of the deposits.
- Scrubbing: After soaking, use a soft-bristle brush or cloth to scrub away the loosened mineral deposits. Be gentle yet thorough to avoid damaging the parts.
- Rinse Thoroughly: Once you have scrubbed off the mineral deposits, rinse the parts under clean water to remove any remaining vinegar or loosened deposits.
- Dry Completely: Before reassembling the humidifier, ensure that all the parts, including the ones with mineral deposits, are completely dry. Use a clean cloth or towel to remove any moisture.
- Reassemble the Humidifier: Once all the parts are clean and dry, carefully reassemble your humidifier, following the manufacturer’s instructions. Make sure that all parts are securely in place.
Removing mineral deposits will help restore your humidifier’s efficiency and prevent any clogs that can impact its performance. By following these steps, you can ensure that your humidifier continues to work optimally for a clean and comfortable living environment. Now, let’s move on to step 6: rinsing and drying the components thoroughly.
Step 6: Rinse and Dry Thoroughly
Now that you have cleaned the different components of your humidifier, it’s important to rinse them thoroughly and ensure they are completely dry before reassembling the unit. This step will help remove any remaining cleaning solution, minerals, or debris, and prevent the growth of bacteria or mold. Follow these steps to rinse and dry the components effectively:
- Rinse with Clean Water: Rinse each component of the humidifier under clean running water to remove any traces of cleaning solution. Make sure to rinse both the interior and exterior surfaces.
- Check for Residue: Once you have rinsed the components, inspect them to ensure there is no residue or remaining debris. Pay close attention to hard-to-reach areas or crevices where debris may accumulate.
- Allow Air Drying: After rinsing, it’s important to allow the components to air dry completely. Place them on a clean towel or drying rack in a well-ventilated area. Avoid wiping them dry, as this can introduce lint or other contaminants.
- Patience is Key: Depending on the humidity level in your home, the drying time may vary. It’s crucial to be patient and allow the components to dry naturally. Rushing the process can lead to moisture buildup and potentially affect the performance of your humidifier.
- Ensure a Complete Dryness: Before you proceed to reassemble the humidifier, double-check that all the components are completely dry. This is particularly important for the water tank, the base, and any removable parts that were soaked or rinsed.
Rinsing and drying your humidifier components thoroughly will ensure that they are free from any cleaning solution residue or debris. This step is crucial in maintaining the hygiene and functionality of your humidifier. With your components now cleaned and fully dry, let’s move on to step 7: reassembling the humidifier.
Step 7: Reassemble the Humidifier
Now that you have thoroughly cleaned, rinsed, and dried all the components of your humidifier, it’s time to reassemble them. Proper reassembly is crucial to ensure that your humidifier functions optimally and safely. Follow these steps to reassemble your humidifier:
- Refer to the Manufacturer’s Instructions: Consult the manufacturer’s instructions specific to your humidifier model for guidance on reassembling the device. Different models may have varying assembly procedures.
- Identify and Organize: Take a moment to identify and organize all the cleaned components. This will help you ensure that you have everything you need and that nothing is missing.
- Start with the Base: Begin by placing the cleaned base of the humidifier in a stable and secure position. Make sure it is properly aligned and seated according to the manufacturer’s instructions.
- Reattach Removable Parts: If your humidifier has any removable parts that were soaked or detached for cleaning, such as mist nozzles, water trays, or filters, carefully reattach them following the manufacturer’s instructions.
- Securely Fasten: Ensure that all the components are securely fastened and properly aligned. Double-check that there are no loose or misplaced parts that could affect the functionality or safety of the humidifier.
- Verify Connections: If your humidifier has any electrical or water connections, such as power cords or hoses, verify that they are properly connected and secure.
- Double-Check Reassembly: Once you have reassembled the humidifier, take a moment to double-check that all the components are in their correct positions and that everything is securely in place.
Proper reassembly of your humidifier is crucial for its effective and safe operation. By following the manufacturer’s instructions and ensuring that all components are securely and correctly assembled, you can enjoy the benefits of a clean and optimally functioning humidifier. With your humidifier reassembled, let’s move on to step 8: refilling and restarting the unit.
Step 8: Refill and Restart the Humidifier
With your humidifier now fully cleaned, reassembled, and ready to go, it’s time to refill and restart the unit. Follow these steps to ensure a proper refill and restart process:
- Choose Clean Water: For optimal performance and to prevent the buildup of minerals, use clean water to refill your humidifier. Distilled water is recommended, especially if you have hard water in your area.
- Refill the Water Tank: Carefully fill the water tank with the clean water you have chosen. Be mindful not to overfill, as this can cause water to spill during operation.
- Reinsert the Water Tank: Place the filled water tank back into its designated spot in the humidifier base. Ensure that it is properly positioned and securely in place.
- Connect to Power: Plug the power cord of your humidifier into a nearby electrical outlet. Make sure the power cord is not damaged, and the outlet is in good working condition.
- Adjust the Settings: Set your desired humidity level or any other preferred settings on your humidifier, if applicable. Refer to the manufacturer’s instructions for guidance on adjusting the settings.
- Check for Proper Functioning: Once you have refilled and restarted the humidifier, listen and observe for any unusual noises or leaks. Ensure that the mist or vapor is being emitted properly and that the humidifier is functioning as expected.
- Monitor and Maintain: As your humidifier operates, periodically check the water level, refill as needed, and continue to monitor its performance. Regular maintenance and cleaning will be necessary to keep your humidifier in optimal condition.
By following the proper refill and restart process, you can enjoy the benefits of clean, moist air in your living space. Regular monitoring and maintenance will ensure that your humidifier continues to perform optimally and provide you with the desired humidity levels. Now that your humidifier is refilled and restarted, let’s move on to an important daily step: disinfecting the humidifier.
Important Daily Step: Disinfecting the Humidifier
In addition to regular cleaning and maintenance, it’s crucial to incorporate daily disinfection into your humidifier care routine. Disinfecting the humidifier helps to eliminate any bacteria or mold that might accumulate between cleanings and ensures that the air you breathe remains clean and healthy. Follow these steps for daily disinfection:
- Turn Off and Unplug: Before disinfecting your humidifier, make sure it is turned off and unplugged from the electrical outlet. This will prevent any accidents or electrical shocks during the disinfection process.
- Empty the Water Tank: Carefully remove the water tank from the humidifier and pour out any remaining water. Discard any water that has been sitting stagnant for an extended period.
- Prepare Disinfecting Solution: Fill the water tank halfway with clean water and add a few drops of bleach or hydrogen peroxide. These agents have disinfecting properties that help eliminate bacteria and mold.
- Swirl and Soak: Gently swirl the water tank to mix the disinfecting solution. Let the solution sit in the water tank for about 15 minutes, allowing it to thoroughly disinfect the interior surfaces.
- Rinse Thoroughly: After the disinfection period, empty the disinfecting solution from the water tank and rinse it thoroughly with clean water. Make sure to remove all traces of the bleach or hydrogen peroxide.
- Dry Completely: Before refilling the water tank and using the humidifier again, ensure that the tank is completely dry. Use a clean cloth or towel to gently dry the tank, both inside and outside. Make sure there is no moisture left that could promote the growth of bacteria or mold.
- Refill and Restart: Once the water tank is dry, fill it with clean water and place it back in the humidifier base. Plug in the power cord and restart the humidifier, adjusting the settings to your desired level of humidity.
- Repeat Daily: Make disinfecting your humidifier a daily habit to ensure continued cleanliness and optimal air quality. By incorporating this step into your routine, you can enjoy the benefits of a clean and healthy environment.
By disinfecting your humidifier daily, you can effectively control the growth of bacteria and mold, ensuring that the air you breathe is fresh and clean. This step, when coupled with regular cleaning and maintenance, will help prolong the lifespan of your humidifier and maintain optimal performance. With this important daily step in mind, you now have a comprehensive guide to cleaning and maintaining your humidifier for improved air quality and comfort.
Remember, always refer to the manufacturer’s instructions for specific guidance on cleaning and disinfecting your particular humidifier model. Happy humidifier maintenance!
Conclusion
Cleaning and maintaining your humidifier is essential for both your health and the optimal functioning of the device. By following the step-by-step guide we’ve provided, you can ensure that your humidifier remains clean, free from bacteria and mold, and continues to provide you with clean, moist air.
Regular cleaning of the water tank, base, and any removable parts will help prevent the buildup of mineral deposits, eliminate odors, and extend the lifespan of your humidifier. Remember to use vinegar as a natural cleaning agent and to rinse all components thoroughly to remove any traces of cleaning solution.
Additionally, don’t forget the daily disinfection step, which is critical for eliminating bacteria and mold that may accumulate between cleanings. By incorporating this daily step into your routine, you can enjoy clean and healthy air quality on a consistent basis.
Keep in mind that each humidifier model may have specific cleaning instructions and recommendations, so referring to the manufacturer’s instructions is always helpful and important.
By taking the time to clean, disinfect, and maintain your humidifier regularly, you’ll ensure that it operates at its best, providing you with optimal comfort and a healthier living environment.
So, go ahead and implement the cleaning and maintenance tips we’ve provided, and enjoy the benefits of fresh, clean air from your well-maintained humidifier!
Frequently Asked Questions about How To Clean Your Humidifier—Plus An Important Step To Take Daily
Was this page helpful?
At Storables.com, we guarantee accurate and reliable information. Our content, validated by Expert Board Contributors, is crafted following stringent Editorial Policies. We're committed to providing you with well-researched, expert-backed insights for all your informational needs.


0 thoughts on “How To Clean Your Humidifier—Plus An Important Step To Take Daily”