Home>Storage Ideas>Storage Baskets>How To Change Ski Pole Baskets
Storage Baskets
How To Change Ski Pole Baskets
Modified: January 6, 2024
Learn how to easily change ski pole baskets with our step-by-step guide. Find the best storage baskets for your skiing equipment.
(Many of the links in this article redirect to a specific reviewed product. Your purchase of these products through affiliate links helps to generate commission for Storables.com, at no extra cost. Learn more)
Introduction
Welcome to our comprehensive guide on how to change ski pole baskets! Ski pole baskets are an essential part of your skiing equipment, as they help to provide stability and control while you glide down the slopes. Over time, these baskets can wear out or become damaged, necessitating their replacement. Fortunately, changing ski pole baskets is a simple process that can be done at home with the right tools and materials.
In this article, we will walk you through the step-by-step process of changing ski pole baskets, provide you with a list of tools and materials you will need, share some tips and tricks to make the replacement process smoother, and answer some frequently asked questions.
Skiing is a thrilling and exhilarating sport that allows you to enjoy the beauty of snowy landscapes. However, worn-out or damaged ski pole baskets can affect your overall skiing experience, making it less enjoyable and potentially compromising your safety on the slopes. By learning how to change ski pole baskets and regularly maintaining your equipment, you can ensure that you have a seamless and enjoyable skiing experience every time.
Whether you are a seasoned skier or a beginner looking to take up this exciting sport, this guide will provide you with all the necessary information to confidently replace your ski pole baskets. So, let’s dive in and explore the process of changing ski pole baskets!
Key Takeaways:
- Ensure optimal skiing performance and safety by regularly changing ski pole baskets to maintain stability, prevent accidents, and personalize your equipment for a stylish and enjoyable skiing experience.
- With the right tools, materials, and know-how, anyone can confidently replace ski pole baskets at home, enhancing their skiing performance and ensuring a seamless and safe experience on the slopes.
Read more: How To Put Snow Baskets On Trekking Poles
Why Change Ski Pole Baskets
Before we delve into the step-by-step guide for changing ski pole baskets, let’s first understand why it is crucial to replace them when necessary.
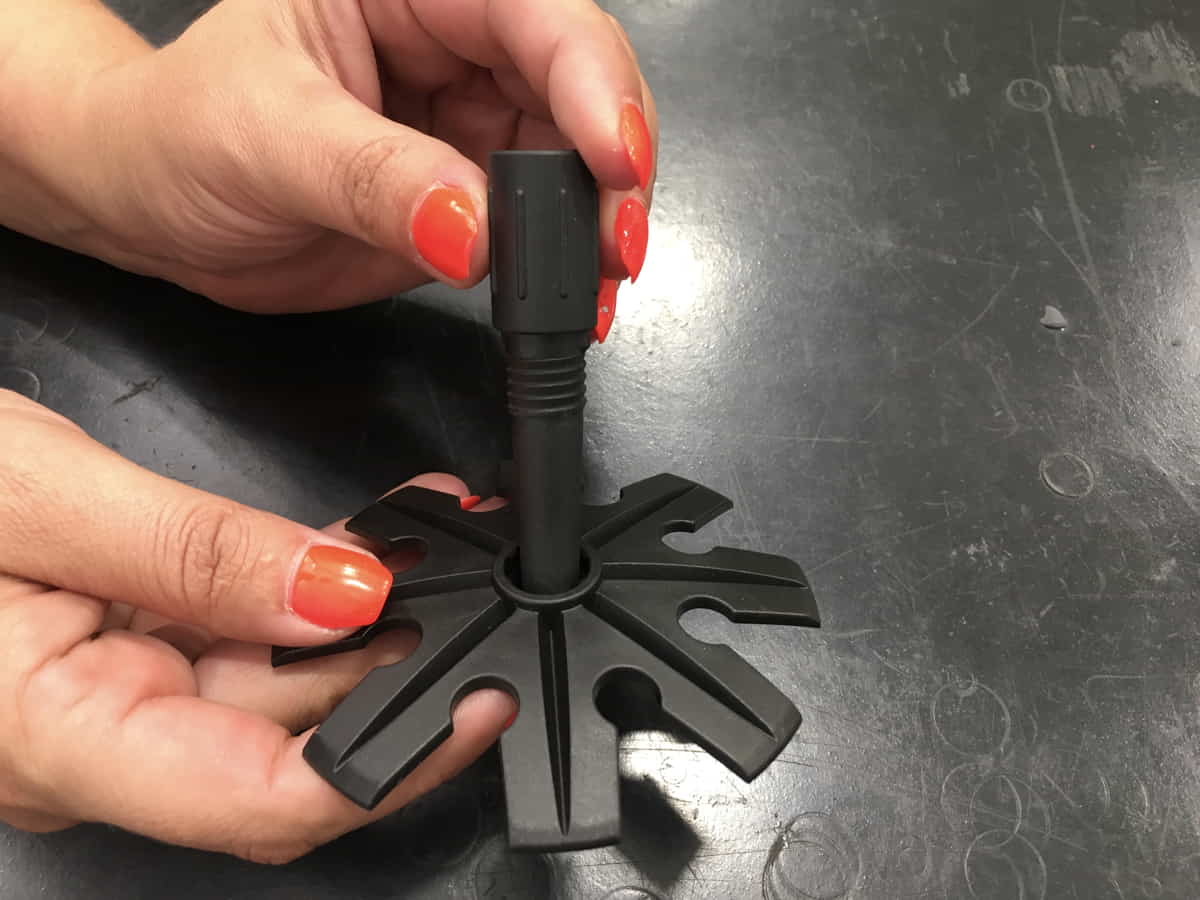
Ski pole baskets are the round, disk-shaped attachments at the bottom of your ski poles. They help prevent your poles from sinking too deep into the snow and provide stability and support while skiing. Over time, these baskets can wear out due to continuous use or become damaged due to accidents or rough terrain. Here are a few reasons why it is important to change ski pole baskets:
- Improved Performance: Worn-out or damaged ski pole baskets can affect your skiing performance. If the basket is too worn, it may not effectively prevent your pole from sinking into deep snow, causing instability and reduced control. By replacing the baskets, you can restore the original functionality of your ski poles and enhance your overall performance on the slopes.
- Enhanced Safety: Ski pole baskets play a crucial role in providing stability and balance while skiing. If the baskets are damaged or missing, it can result in loss of control, increased risk of accidents, and potential injuries. By maintaining your ski pole baskets in good condition, you can ensure a safer skiing experience for yourself and others around you.
- Compatibility: Ski pole baskets come in various sizes and designs, depending on the type of skiing you do. For example, powder baskets are larger and designed for deep snow, while hard snow baskets are smaller and suitable for groomed slopes. If you regularly switch between different skiing conditions, it may be necessary to change your ski pole baskets to ensure optimal performance and compatibility.
- Aesthetics: Skiing is not just about performance; it is also about enjoying the experience and looking good on the slopes. Ski pole baskets can add a stylish touch to your overall skiing attire. By changing your ski pole baskets, you can personalize your equipment and make a fashion statement while enjoying your favorite winter sport.
Now that we understand the importance of changing ski pole baskets, let’s move on to the essential tools and materials you will need for the replacement process.
Tools and Materials Needed
Before you begin the process of changing ski pole baskets, it is essential to gather the necessary tools and materials. Having everything ready beforehand will ensure a smooth and hassle-free replacement process. Here is a list of the tools and materials you will need:
- New Ski Pole Baskets: Make sure you have a pair of new ski pole baskets that are compatible with your ski poles. Consider the type of skiing you do and the terrain you will be skiing on to choose the appropriate size and design of the baskets.
- Heat Source: You may need a heat source, such as a heat gun, hairdryer, or boiling water, to soften the plastic on the ski pole grips. This will make it easier to remove the old baskets and install the new ones.
- Protective Gloves: Since you will be working with heat and possibly sharp edges, it is important to wear protective gloves to avoid burns or injuries to your hands.
- Flathead Screwdriver or Ski Pole Grip Removal Tool: A flathead screwdriver or a specialized ski pole grip removal tool can be useful for prying off the old baskets. Be careful not to damage the ski pole grips during this process.
- Rubbing Alcohol: Rubbing alcohol can help remove any residue or adhesive left behind after removing the old baskets. It will also clean the ski pole grips, ensuring a secure bond with the new baskets.
- Towel or Cloth: A towel or cloth is handy for wiping down the ski pole grips and ensuring they are clean and dry before installing the new baskets.
- Adhesive or Epoxy: If the new ski pole baskets do not come with adhesive pads, you may need to use adhesive or epoxy to securely attach them to the ski pole grips. Make sure to choose a strong and durable adhesive suitable for the materials of your ski poles.
- Optional: Ski Pole Basket Removal Tool: If you have trouble removing the old baskets using a screwdriver or ski pole grip removal tool, you may consider investing in a specialized ski pole basket removal tool. This tool can help make the removal process easier and less likely to damage the ski pole grips.
By having these tools and materials ready, you will be well-prepared to change your ski pole baskets efficiently and effectively. Now that we have everything we need, let’s move on to the step-by-step guide for changing ski pole baskets!
Step-by-Step Guide to Changing Ski Pole Baskets
Now that you have gathered all the necessary tools and materials, it’s time to dive into the step-by-step process of changing ski pole baskets. Follow these instructions carefully to ensure a successful replacement:
- Prepare the Ski Pole Grips: If your ski pole grips are made of plastic, you will need to soften them before removing the old baskets. Use a heat source, such as a heat gun, hairdryer, or boiling water, to warm up the grips. Be cautious not to overheat the plastic – a few seconds of heat should suffice.
- Remove the Old Baskets: Once the ski pole grips are warm, use a flathead screwdriver or a specialized ski pole grip removal tool to pry off the old baskets. Start at the edge of the basket and gently work your way around, loosening it from the grip. Be careful not to damage the grips in the process. If necessary, apply more heat to make the plastic more pliable.
- Clean the Ski Pole Grips: After removing the old baskets, wipe down the ski pole grips with a towel or cloth to remove any residue. If there is adhesive remaining, use rubbing alcohol to clean and remove it. Ensure the grips are dry and free from any debris before proceeding to the next step.
- Attach the New Baskets: Take the new ski pole baskets and align them with the ski pole grips. If the baskets have adhesive pads, remove the backing and carefully press them onto the grips, applying light pressure to ensure a secure bond. If there are no adhesive pads, apply a small amount of adhesive or epoxy to the grip and press the basket firmly into place. Follow the manufacturer’s instructions for the specific adhesive you are using.
- Allow Proper Bonding: After attaching the new baskets, allow them to bond properly with the ski pole grips. Follow any recommended curing time provided by the adhesive manufacturer to ensure a strong and durable bond.
- Test the Ski Poles: Once the adhesive has cured, give the ski poles a gentle shake and ensure that the baskets are securely attached. If there is any movement or instability, reapply adhesive as needed or seek professional assistance if the issue persists.
- Repeat the Process for the Second Ski Pole: If you have a pair of ski poles, repeat the above steps for the second pole to ensure both ski pole baskets are replaced.
Congratulations! You have successfully changed the ski pole baskets and are now ready to hit the slopes with confidence. But before you do, let’s explore some tips and tricks that can make the replacement process smoother and address some commonly asked questions.
When changing ski pole baskets, make sure to match the new baskets with the correct size for your poles. Use a heat gun to soften the old glue before removing the old baskets, and then apply new epoxy glue to attach the new ones securely.
Tips and Tricks for a Smooth Replacement Process
Changing ski pole baskets can be a straightforward process with the right approach. Here are some tips and tricks to help you have a smooth replacement process:
- Choose the Right Baskets: Before purchasing new ski pole baskets, make sure they are compatible with your ski poles. Consider the type of skiing you do and the terrain you will be skiing on to choose the appropriate size and design of the baskets.
- Measure the Ski Pole Grips: Before removing the old baskets, measure the diameter of your ski pole grips to ensure the new baskets will fit properly. Baskets that are either too loose or too tight may affect your skiing experience.
- Use Heat Wisely: When softening the ski pole grips, be cautious not to overheat the plastic. Excessive heat can damage the grips or deform them, making it difficult to attach the new baskets. Use short bursts of heat and test the pliability of the plastic before proceeding.
- Apply Adhesive Properly: If your new baskets require adhesive or epoxy to attach them to the ski pole grips, follow the instructions provided by the manufacturer. Apply the adhesive sparingly and evenly, ensuring full coverage and a secure bond. Avoid using excessive adhesive that could seep out from the edges of the baskets.
- Check for Stability: After attaching the new baskets, give the ski poles a gentle shake to check for stability. If there is any movement or instability, reapply adhesive or seek professional assistance to ensure the baskets are securely attached.
- Maintain Your Ski Pole Baskets: Regularly inspect your ski pole baskets for signs of wear or damage. Replace them as needed to maintain optimal performance and safety on the slopes. This will also prevent further damage to your ski poles or the baskets themselves.
- Seek Professional Help: If you encounter any difficulties or are unsure about the replacement process, don’t hesitate to seek assistance from a professional ski technician. They can provide expert guidance and ensure that your ski pole baskets are replaced correctly.
By following these tips and tricks, you can ensure a smoother and more successful ski pole basket replacement process. Now, let’s address some frequently asked questions to provide you with additional insights and clarity.
Read more: How To Store Skis At Home
Frequently Asked Questions (FAQs)
Here are answers to some commonly asked questions about changing ski pole baskets:
- Can I change the ski pole baskets myself?
Yes, changing ski pole baskets is a relatively simple process that can be done at home with the right tools and materials. Just follow the step-by-step guide provided in this article to replace them effectively. - How often should I change my ski pole baskets?
The frequency of changing ski pole baskets depends on how frequently you ski and the terrain you ski on. If you ski often or in rough conditions, it is recommended to inspect your baskets regularly for signs of wear or damage and replace them as needed. Generally, it is a good idea to replace them every one to two seasons of regular use. - What size of ski pole baskets do I need?
The size of ski pole baskets you need depends on the type of skiing you do and the terrain you will be skiing on. For deep snow or powder conditions, larger baskets are usually preferred to prevent the poles from sinking too deep. For groomed slopes or hard snow, smaller baskets are more suitable. Consult with a ski expert or check the manufacturer’s guidelines to determine the appropriate size for your skiing needs. - Can I reuse the adhesive pads on my old ski pole baskets?
It is generally not recommended to reuse adhesive pads from old ski pole baskets. The adhesive properties may have deteriorated over time, compromising the secure bond between the new baskets and the ski pole grips. It is best to use fresh adhesive pads or apply a new adhesive or epoxy for a strong and reliable attachment. - Do I need any specialized skills to change ski pole baskets?
No, changing ski pole baskets does not require specialized skills. However, it does require a certain level of manual dexterity and caution to avoid damaging the ski pole grips or injuring yourself. By following the step-by-step guide and using the recommended tools and materials, you should be able to successfully replace your ski pole baskets.
If you have any other questions or concerns about changing ski pole baskets, feel free to consult with a ski equipment professional or refer to the manufacturer’s guidelines for additional information.
Now that you’re equipped with the knowledge and understanding of how to change ski pole baskets, you can confidently maintain your skiing equipment and enjoy a seamless and safe skiing experience. Get out there, hit the slopes, and have a blast while showcasing your stylish new ski pole baskets!
Conclusion
Changing ski pole baskets is a simple yet essential task to ensure optimal performance and safety while skiing. By following the step-by-step guide, gathering the necessary tools and materials, and using the tips and tricks provided, you can confidently replace your ski pole baskets and enhance your skiing experience.
Regularly inspecting and maintaining your ski pole baskets is crucial to prevent diminished performance and minimize the risk of accidents on the slopes. Whether you’re a seasoned skier or just starting out, understanding how to change ski pole baskets empowers you to take control of your equipment and tailor it to your specific skiing needs.
Remember to choose the appropriate size and design of the baskets based on the type of skiing and terrain you’ll encounter. Properly applying adhesive or epoxy and ensuring a secure bond between the new baskets and the ski pole grips is key to long-lasting and reliable performance.
If you have any doubts or difficulties during the replacement process, don’t hesitate to seek assistance from a professional ski technician. They have the expertise to guide you and ensure that your ski pole baskets are replaced correctly and efficiently.
Now that you have the knowledge and tools, it’s time to put them into action. Enjoy the exhilaration of gliding down the slopes with confidence, knowing that your ski pole baskets are in top condition. Happy skiing!
Frequently Asked Questions about How To Change Ski Pole Baskets
Was this page helpful?
At Storables.com, we guarantee accurate and reliable information. Our content, validated by Expert Board Contributors, is crafted following stringent Editorial Policies. We're committed to providing you with well-researched, expert-backed insights for all your informational needs.
0 thoughts on “How To Change Ski Pole Baskets”