Home>Gardening & Outdoor>Outdoor Structures>How To Build Pole Shed Plans
Outdoor Structures
How To Build Pole Shed Plans
Modified: August 20, 2024
Learn how to build pole shed plans for durable outdoor structures. Get step-by-step guidance and tips for constructing your own pole shed. Ideal for DIY enthusiasts and outdoor enthusiasts.
(Many of the links in this article redirect to a specific reviewed product. Your purchase of these products through affiliate links helps to generate commission for Storables.com, at no extra cost. Learn more)
Introduction
So, you've decided to build a pole shed. Congratulations! This versatile outdoor structure is a fantastic addition to any property, offering a wide range of uses from storage to workshop space. Whether you're a seasoned DIY enthusiast or embarking on your first building project, constructing a pole shed can be a rewarding and cost-effective endeavor.
In this comprehensive guide, we'll walk you through the essential steps to build a pole shed from scratch. From selecting the perfect location to adding the finishing touches, we'll cover everything you need to know to bring your pole shed plans to life. So, grab your tool belt and let's dive into the exciting world of pole shed construction!
Key Takeaways:
- Choosing the right location for your pole shed is crucial for its functionality and longevity. Consider factors like land lay, accessibility, and local building codes to ensure a successful construction project.
- Gathering the right materials, tools, and safety equipment is essential for a smooth pole shed construction process. Pay attention to detail and preparation to set the stage for a successful and efficient build.
Read more: How To Build A Pole Shed
Choosing the Right Location
Before you start gathering materials and swinging hammers, it’s crucial to carefully consider the location of your pole shed. The right placement can make a significant difference in the shed’s functionality and longevity.
First and foremost, assess the lay of your land. Look for a spot that is relatively level and well-drained to prevent water from pooling around the shed. This helps to safeguard the structure against potential water damage and ensures a stable foundation.
Additionally, take into account the accessibility of the location. If you plan to use the shed for storing equipment or machinery, easy access for vehicles is essential. Consider the flow of traffic on your property and choose a location that allows for convenient entry and exit.
Furthermore, think about the shed’s proximity to other structures. While you may want the shed to be easily accessible, it’s also important to ensure that it doesn’t obstruct the functionality or aesthetics of your property. Take note of sightlines, sunlight exposure, and how the shed will fit into the overall landscape.
Lastly, be mindful of local building codes and regulations when selecting the location. Ensure that the chosen spot complies with any zoning restrictions and setback requirements in your area. This proactive approach can save you from potential headaches down the road and ensure a smooth building process.
By carefully considering these factors, you can choose a location that sets the stage for a successful pole shed construction project. With the perfect spot selected, you’re ready to move on to the next steps in bringing your pole shed plans to fruition.
Gathering Materials and Tools
With the location chosen, it’s time to gather the materials and tools necessary to bring your pole shed to life. Planning and preparation are key to a smooth construction process, so take the time to create a comprehensive list of everything you’ll need.
First and foremost, consider the materials for the shed’s frame. Typically, pole sheds are constructed using treated lumber for the posts and trusses, as well as galvanized steel for the roof and siding. Ensure that you have the appropriate quantity of each material based on your shed’s dimensions and design.
Next, gather the essential tools for the project. This may include a level, tape measure, circular saw, drill, post hole digger, and a hammer. Depending on the complexity of your design, you may also need specialized tools for cutting and shaping the materials.
Don’t forget about the hardware and fasteners needed to assemble the shed. Nails, screws, and brackets are essential for securing the frame and attaching the roofing and siding. It’s essential to have the right type and size of fasteners to ensure the structural integrity of the shed.
If you plan to add windows and doors to your pole shed, make sure to include them in your materials list. Additionally, consider any finishing touches such as paint or sealant to protect the shed from the elements and enhance its aesthetic appeal.
Lastly, safety equipment should not be overlooked. Ensure that you have the appropriate personal protective gear, including gloves, safety glasses, and hearing protection. Safety should always be a top priority throughout the construction process.
By meticulously gathering the necessary materials and tools, you’ll set the stage for a successful and efficient pole shed construction project. With everything at your fingertips, you’re ready to move on to the next steps and bring your vision to fruition.
Creating a Foundation
With the materials and tools at the ready, it’s time to lay the groundwork for your pole shed by creating a solid foundation. The foundation plays a critical role in supporting the structure and ensuring its long-term stability.
One of the most common methods for pole shed foundations is the use of concrete piers or posts. These provide a sturdy base for the shed while allowing for efficient water drainage and reducing the risk of wood rot. Before digging, it’s essential to consult local building codes and regulations to ensure compliance with depth and spacing requirements for the footings.
Once the locations for the piers or posts are marked, use a post hole digger to excavate the holes to the specified depth. It’s important to ensure that the holes are uniform in size and depth to maintain consistency across the foundation.
After the holes are prepared, it’s time to set the piers or posts in place. This may involve pouring concrete into the holes to create a solid base or using precast concrete piers for added convenience. Ensure that the piers or posts are properly aligned and leveled to provide a stable foundation for the shed.
With the piers or posts in position, it’s essential to allow sufficient time for the concrete to cure and set. This typically takes several days, so exercise patience to ensure that the foundation achieves optimal strength and stability.
Once the foundation is set, it’s time to move on to the next phase of construction, which involves erecting the pole shed frame. A well-constructed foundation sets the stage for a sturdy and durable structure, ensuring that your pole shed stands the test of time.
By meticulously following these steps, you’ll establish a reliable foundation for your pole shed, laying the groundwork for the next stages of construction.
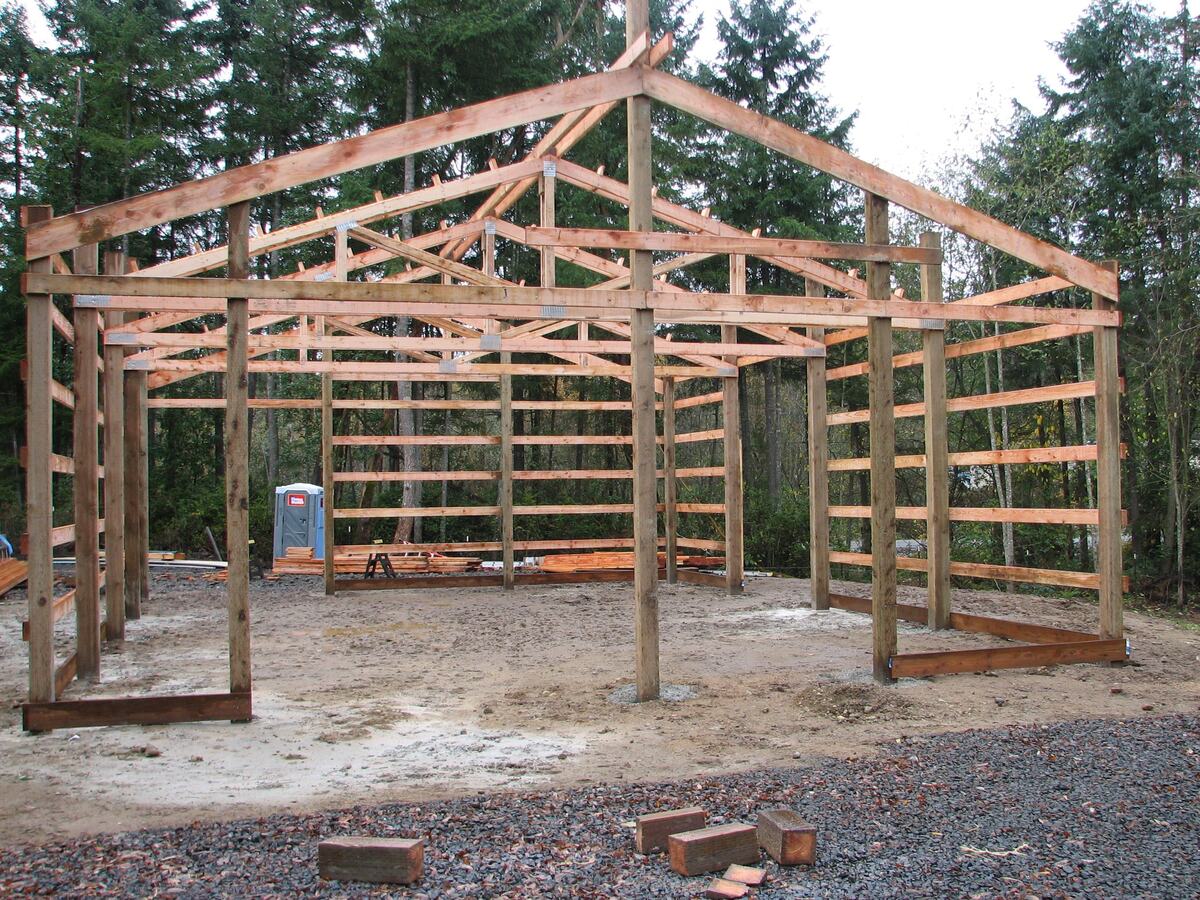
Constructing the Pole Shed Frame
With the foundation in place, it’s time to embark on the exciting phase of constructing the pole shed frame. The frame serves as the backbone of the structure, providing support for the roof, walls, and overall stability of the shed.
Begin by positioning the treated lumber posts in the pre-determined locations on the foundation. These posts form the vertical supports of the frame and are essential for bearing the weight of the shed’s structure. It’s crucial to ensure that the posts are plumb and securely anchored to the foundation to maintain the structural integrity of the frame.
Once the posts are in position, it’s time to install the horizontal girts and trusses. Girts are placed horizontally between the posts, providing additional support for the walls and roof. Trusses, on the other hand, form the framework for the roof, supporting the roof’s weight and distributing it evenly across the structure.
As you assemble the frame, pay close attention to the alignment and spacing of the components to ensure a uniform and sturdy structure. Use a level and measuring tape to verify the accuracy of the frame’s construction, making adjustments as needed to achieve precision and consistency.
Additionally, consider bracing the frame to enhance its stability, especially in areas prone to high winds or heavy snow loads. Diagonal bracing can be added to reinforce the frame, minimizing the risk of swaying or shifting during adverse weather conditions.
Once the frame is fully assembled and braced, take a moment to admire the progress you’ve made. The pole shed is beginning to take shape, and the frame serves as a testament to your dedication and craftsmanship. With the frame in place, you’re ready to move on to the next steps in bringing your pole shed plans to fruition.
By meticulously following these steps, you’ll establish a reliable foundation for your pole shed, laying the groundwork for the next stages of construction.
When building pole shed plans, make sure to properly space and set the poles to provide adequate support for the structure. Use pressure-treated lumber for the poles to prevent rot and prolong the life of the shed.
Read more: How To Plan For Pole Barn Construction
Adding Roofing and Siding
With the pole shed frame standing tall, it’s time to focus on enclosing the structure by adding roofing and siding. These elements not only provide protection from the elements but also contribute to the shed’s overall durability and aesthetic appeal.
When it comes to roofing, metal is a popular choice for pole sheds due to its durability and low maintenance requirements. Begin by measuring and cutting the metal roofing panels to fit the dimensions of the shed’s roof. Ensure that the panels overlap correctly to prevent water infiltration and create a watertight seal.
Once the panels are sized and aligned, secure them to the trusses using appropriate fasteners, such as screws with rubber washers to prevent leaks. Pay close attention to the spacing and placement of the fasteners to ensure that the roofing is securely anchored and can withstand wind and weather conditions.
As for the siding, galvanized steel panels are a common and practical choice for pole sheds. Similar to the roofing process, measure and cut the siding panels to fit the dimensions of the shed’s walls, ensuring proper alignment and overlap for effective weatherproofing.
Once the siding panels are ready, attach them to the frame using the designated fasteners, ensuring that they are securely affixed and provide a seamless exterior for the shed. Take care to align the panels uniformly and maintain consistent spacing for a professional and polished appearance.
As you add the roofing and siding, take pride in seeing your pole shed transform into a fully enclosed and weather-resistant structure. These elements not only shield the shed’s interior from the elements but also contribute to its visual appeal, making it a standout feature on your property.
With the roofing and siding in place, your pole shed is well on its way to becoming a functional and attractive addition to your property. The next steps involve adding doors, windows, and finishing touches to complete the construction process.
By meticulously following these steps, you’ll establish a reliable foundation for your pole shed, laying the groundwork for the next stages of construction.
Installing Doors and Windows
As your pole shed nears completion, the installation of doors and windows adds the finishing touches while enhancing the functionality and aesthetics of the structure. Properly placed doors and windows not only provide access and ventilation but also contribute to the shed’s overall visual appeal.
When selecting doors for your pole shed, consider the intended use of the structure. If the shed will be used for storing large equipment or machinery, a wide, sturdy roll-up door may be the best option. For a workshop or storage space, a traditional hinged door provides convenient access while maintaining security.
Once the type of door is chosen, carefully measure and install it in the designated opening. Ensure that the door is plumb and operates smoothly, making any necessary adjustments to the frame or hinges to achieve a perfect fit. Additionally, consider adding weather-stripping to the door to prevent drafts and maintain the shed’s interior climate.
Windows not only allow natural light to illuminate the shed’s interior but also contribute to ventilation and air circulation. When selecting windows, opt for durable, weather-resistant designs that complement the shed’s overall aesthetic. Consider the size and placement of the windows to maximize natural light while maintaining the shed’s structural integrity.
Similar to the door installation process, carefully measure and cut an opening for the window, ensuring a precise fit. Once the window is in place, secure it using appropriate fasteners and seal the perimeter to prevent water infiltration and drafts. Consider adding a protective grille or screen to the exterior of the window for added security and functionality.
As you install the doors and windows, envision the transformation of your pole shed into a fully functional and inviting space. These elements not only enhance the shed’s usability but also contribute to its visual appeal, making it a valuable asset on your property.
With the doors and windows installed, your pole shed is now ready for the final touches that will bring the project to completion. The last steps involve adding finishing touches and considering ongoing maintenance to ensure the shed’s longevity and functionality.
By meticulously following these steps, you’ll establish a reliable foundation for your pole shed, laying the groundwork for the next stages of construction.
Finishing Touches and Maintenance
As your pole shed construction project nears completion, it’s time to add the finishing touches that will elevate the functionality, durability, and visual appeal of the structure. Additionally, considering ongoing maintenance is essential to ensure that your pole shed remains in top condition for years to come.
One crucial aspect of the finishing touches is applying a protective finish to the exterior surfaces of the shed. This may involve painting or sealing the wood and metal components to safeguard them from the elements and prevent deterioration. Choose a high-quality exterior paint or sealant that offers durability and weather resistance, enhancing the shed’s longevity.
Additionally, consider adding gutters and downspouts to the shed to manage water runoff from the roof. Proper drainage helps to prevent water pooling around the foundation, reducing the risk of water damage and maintaining the shed’s structural integrity. Ensure that the gutters are securely attached and direct water away from the shed’s immediate vicinity.
Inside the shed, organizing and optimizing the space adds functionality and convenience. Consider adding shelving, hooks, and storage solutions to keep tools, equipment, and supplies neatly arranged and easily accessible. This not only enhances the shed’s usability but also contributes to a tidy and efficient workspace.
When it comes to maintenance, regular inspections and upkeep are essential to ensure that your pole shed remains in optimal condition. Check for signs of wear, water damage, or pest infestations, addressing any issues promptly to prevent them from escalating. Additionally, perform routine maintenance tasks such as cleaning the gutters, inspecting the roofing, and reapplying protective finishes as needed.
By adding these finishing touches and establishing a maintenance routine, you’re setting the stage for a well-maintained and functional pole shed that will serve you for years to come. Your attention to detail and proactive approach to maintenance will ensure that your pole shed remains a valuable asset on your property.
With the finishing touches complete and a maintenance plan in place, your pole shed construction project is now a resounding success. You’ve brought your vision to life and created a versatile and durable outdoor structure that will serve your needs for years to come.
By meticulously following these steps, you’ve established a reliable foundation for your pole shed, ensuring its longevity and functionality for the long haul.
Conclusion
Congratulations on completing your pole shed construction journey! From selecting the perfect location to adding the finishing touches, you’ve embarked on a rewarding and fulfilling project that has transformed your vision into a tangible reality. As you stand back and admire the sturdy and versatile structure that now graces your property, it’s evident that your dedication and craftsmanship have yielded a valuable addition to your outdoor space.
Building a pole shed is not just about creating a functional storage or workspace; it’s about embracing the satisfaction of hands-on construction and the pride of creating something with lasting value. Your pole shed stands as a testament to your creativity, resourcefulness, and commitment to enhancing your property.
As you enjoy the benefits of your newly constructed pole shed, whether it be for storing equipment, pursuing DIY projects, or simply having a dedicated space for your hobbies, remember the journey that brought it to fruition. The careful planning, precise construction, and attention to detail have culminated in a structure that will serve your needs for years to come.
Furthermore, your pole shed serves as a versatile canvas, ready to adapt to your evolving needs and aspirations. Whether you choose to customize the interior, add amenities, or expand its functionality, your pole shed stands as a flexible and enduring asset that can grow and adapt alongside you.
Finally, as you revel in the completion of your pole shed construction project, take pride in the skills you’ve acquired, the challenges you’ve overcome, and the valuable addition you’ve made to your property. Your pole shed stands as a testament to your ingenuity and determination, a tangible reflection of your vision and dedication.
With the construction journey behind you, your pole shed now stands as a symbol of accomplishment and a testament to the possibilities that unfold when creativity meets craftsmanship. As you embark on new endeavors and cherish the functionality of your pole shed, may it continue to inspire and serve as a reminder of the remarkable journey that brought it to life.
Now that you've mastered building your own pole shed, why not dive deeper into the world of DIY and craftsmanship? Discover the joys and practical benefits of DIY Projects, and see how taking projects into your own hands can be incredibly rewarding. If your interest in crafting with wood has been sparked, don't miss our guide on the latest trends in Woodworking set to dominate 2024. For those who love enhancing their outdoor space, our insights on unique Outdoor Structures will certainly inspire new ideas for your next project.
Frequently Asked Questions about How To Build Pole Shed Plans
Was this page helpful?
At Storables.com, we guarantee accurate and reliable information. Our content, validated by Expert Board Contributors, is crafted following stringent Editorial Policies. We're committed to providing you with well-researched, expert-backed insights for all your informational needs.


0 thoughts on “How To Build Pole Shed Plans”