Home>Technology>Smart Home Devices>How To Connect To A Wireless Printer On A Mac

Smart Home Devices
How To Connect To A Wireless Printer On A Mac
Modified: January 9, 2024
Learn how to easily connect your smart home devices to a wireless printer on your Mac. Follow our step-by-step guide for seamless printing.
(Many of the links in this article redirect to a specific reviewed product. Your purchase of these products through affiliate links helps to generate commission for Storables.com, at no extra cost. Learn more)
Introduction
Welcome to the world of wireless printing with your Mac! Connecting your Mac to a wireless printer can significantly enhance your printing experience by eliminating the hassle of dealing with tangled cables and allowing you to print from any room in your home or office. Whether you’re a student needing to print assignments, a professional working from home, or a creative individual bringing your digital designs to life, learning how to connect to a wireless printer on your Mac can streamline your printing process and boost your productivity.
In this comprehensive guide, we’ll walk you through the step-by-step process of connecting your Mac to a wireless printer. By the end of this tutorial, you’ll be equipped with the knowledge and confidence to seamlessly set up your wireless printing system and start enjoying the convenience it offers.
Key Takeaways:
- Connecting your Mac to a wireless printer is easy! Just check your printer’s compatibility, connect it to Wi-Fi, add it to your Mac, and start printing wirelessly for a convenient and efficient experience.
- With wireless printing, you can print from anywhere in your home or office without being tied down by cables. Embrace the freedom and convenience of wireless technology for seamless printing.
Read more: How To Connect Mac To Epson Printer
Step 1: Check Your Printer
Before you begin the process of connecting your wireless printer to your Mac, it’s crucial to ensure that your printer is compatible with wireless connectivity. Most modern printers are equipped with wireless capabilities, but it’s always wise to double-check. Look for the Wi-Fi symbol or check the printer’s manual to verify that it supports wireless connections. If you’re unsure, you can also visit the manufacturer’s website or contact their customer support for assistance.
Next, make sure that your wireless printer is turned on and properly set up. Ensure that it is within the range of your Wi-Fi network and that the Wi-Fi signal is strong in the printer’s location. This step is essential for seamless communication between your Mac and the printer.
Additionally, confirm that the printer has ink or toner and that there is paper loaded in the paper tray. This may seem obvious, but it’s an easy step to overlook, and ensuring that the printer is ready to print will save you time and frustration later in the process.
By checking these initial requirements, you’ll lay a solid foundation for the successful connection of your wireless printer to your Mac, setting the stage for a smooth and efficient printing experience.
Step 2: Connect Your Printer to Wi-Fi
Now that you’ve confirmed that your printer is compatible with wireless connectivity and is in proper working condition, it’s time to connect it to your Wi-Fi network. The specific steps for this process may vary depending on the make and model of your printer, but the general principles remain consistent.
Start by accessing your printer’s control panel or display screen. Look for the “Settings” or “Network” option, which will allow you to initiate the wireless setup. Once you’ve located the appropriate menu, select the “Wi-Fi Setup” or “Wireless Setup” option to begin the process of connecting your printer to your Wi-Fi network.
Follow the on-screen instructions provided by your printer to select your Wi-Fi network from the available options. You will likely be prompted to enter your Wi-Fi network’s password to establish the connection. This step is crucial for ensuring secure and seamless communication between your printer and your Mac over the wireless network.
After entering the Wi-Fi network password, your printer will initiate the connection process. This may take a few moments, during which your printer will establish a secure connection to your Wi-Fi network. Once the connection is successfully established, your printer will display a confirmation message, indicating that it is now connected to your Wi-Fi network.
With your printer successfully connected to your Wi-Fi network, it is now ready to communicate with your Mac and other devices on the same network, paving the way for effortless and convenient wireless printing.
By following these steps, you’ll ensure that your printer is seamlessly integrated into your Wi-Fi network, setting the stage for the next phase of the setup process – adding the printer to your Mac.
To connect to a wireless printer on a Mac, go to “System Preferences” and select “Printers & Scanners.” Click the “+” button to add the printer, and select the wireless printer from the list. Follow the prompts to complete the setup.
Step 3: Add the Printer to Your Mac
With your wireless printer successfully connected to your Wi-Fi network, the next step is to add the printer to your Mac. macOS offers a user-friendly interface for adding printers, making the process straightforward and accessible for all users.
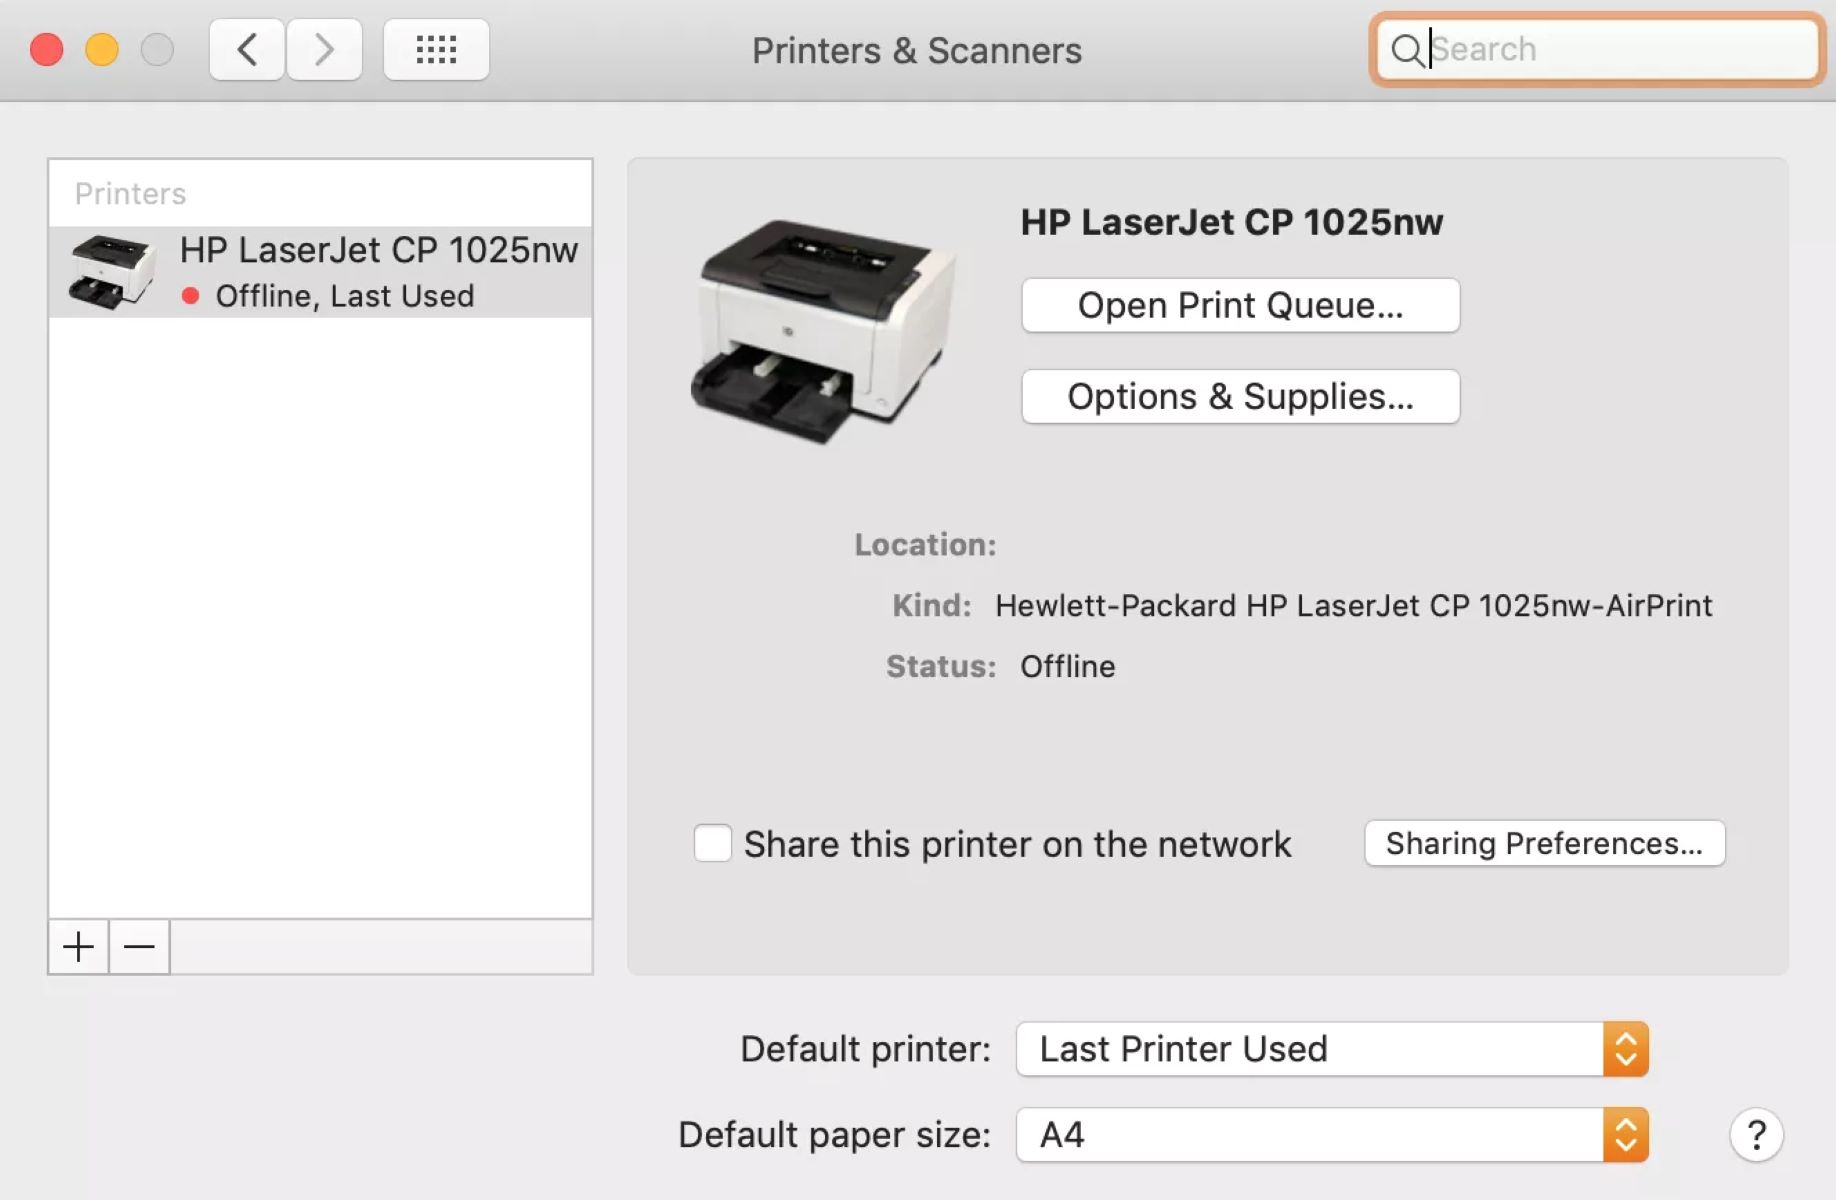
Begin by clicking on the Apple menu in the top-left corner of your screen and selecting “System Preferences.” Within System Preferences, locate and click on the “Printers & Scanners” icon. This will open the Printers & Scanners preferences window, where you can manage your printing devices.
Once the Printers & Scanners window is open, click on the “+” (plus) button located below the list of printers on the left-hand side. This will initiate the process of adding a new printer to your Mac.
Your Mac will then search for available printers on your network. When your wireless printer appears in the list of available devices, select it and click “Add.” Your Mac will proceed to install the necessary drivers and software for the printer, ensuring seamless compatibility and functionality.
After the installation process is complete, your wireless printer will be added to the list of available printers in the Printers & Scanners preferences window. You can customize the printer’s settings, such as default paper size and print quality, by selecting the printer and clicking on “Options & Supplies.”
Once the printer is successfully added to your Mac, you can begin using it for all your printing needs. Whether you’re printing documents, photos, or creative projects, your wireless printer is now fully integrated into your Mac’s printing system, ready to deliver high-quality results with the convenience of wireless connectivity.
By following these simple steps, you’ll seamlessly incorporate your wireless printer into your Mac’s printing environment, unlocking the full potential of wireless printing and enhancing your overall productivity.
Step 4: Test the Connection
After adding your wireless printer to your Mac, it’s essential to verify the connection and ensure that your Mac can communicate effectively with the printer. Testing the connection will allow you to confirm that the setup process was successful and that you can start printing without any issues.
To test the connection, open a document, image, or web page that you’d like to print. With the file or content displayed on your screen, click on the “File” menu and select “Print.” Alternatively, you can use the keyboard shortcut Command + P to initiate the printing process.
Your Mac will display the Print dialog, allowing you to select the printer you want to use. Ensure that your wireless printer is selected from the list of available printers. You can also access the printer’s settings and preferences from this dialog to customize the print job according to your specific requirements.
Once you’ve configured the print settings, click on the “Print” button to send the print job to your wireless printer. Your Mac will communicate with the printer over the Wi-Fi network, initiating the printing process. If the connection is successful, your printer will receive the print job and begin printing the document or image.
As the printer processes the print job, listen for the sound of the printer’s mechanisms and observe the printing progress. Once the printing is complete, retrieve the printed document from the printer’s output tray and inspect the quality of the printout. Ensure that the content is accurately reproduced and that the print quality meets your expectations.
If the printout meets your satisfaction and the entire process proceeds without any issues, congratulations – your wireless printer is successfully connected to your Mac, and you’re now ready to enjoy the convenience of wireless printing for all your needs.
By testing the connection and initiating a print job, you’ll gain confidence in the reliability and functionality of your wireless printing setup, empowering you to harness the full potential of wireless technology for seamless and efficient printing.
Read more: How To Connect To HP Printer On Mac
Conclusion
Congratulations on successfully connecting your wireless printer to your Mac! By following the step-by-step process outlined in this guide, you’ve unlocked the convenience and flexibility of wireless printing, enhancing your overall printing experience and streamlining your workflow.
With your wireless printer seamlessly integrated into your Mac’s printing system, you now have the freedom to print from any room in your home or office, without being tethered to a physical connection. Whether you’re printing documents, photos, or creative projects, the wireless connectivity of your printer offers unparalleled convenience and accessibility.
By checking your printer’s compatibility, connecting it to your Wi-Fi network, adding it to your Mac, and testing the connection, you’ve established a reliable and efficient printing setup that aligns with the seamless functionality of your Mac. This integration empowers you to harness the full potential of your wireless printer, enabling you to produce high-quality printouts with ease.
As you continue to explore the capabilities of your wireless printer, consider leveraging advanced features such as mobile printing and cloud connectivity to further enhance your printing experience. Additionally, stay informed about software updates and maintenance tasks to ensure that your wireless printing system remains optimized and reliable for all your printing needs.
Embrace the freedom and convenience of wireless printing on your Mac, and enjoy the seamless integration of technology into your daily routine. Whether you’re a student, professional, or creative enthusiast, the power of wireless printing offers a valuable tool for bringing your digital content to life in physical form.
Thank you for joining us on this journey to connect your wireless printer to your Mac. We hope this guide has equipped you with the knowledge and confidence to make the most of your wireless printing capabilities, enhancing your productivity and creativity in the process.
Frequently Asked Questions about How To Connect To A Wireless Printer On A Mac
Was this page helpful?
At Storables.com, we guarantee accurate and reliable information. Our content, validated by Expert Board Contributors, is crafted following stringent Editorial Policies. We're committed to providing you with well-researched, expert-backed insights for all your informational needs.




0 thoughts on “How To Connect To A Wireless Printer On A Mac”