Home>Technology>Smart Home Devices>How To Remove Printer On Mac
Smart Home Devices
How To Remove Printer On Mac
Published: January 10, 2024
Learn how to remove a printer on your Mac and streamline your smart home devices with our easy step-by-step guide. Simplify your setup today!
(Many of the links in this article redirect to a specific reviewed product. Your purchase of these products through affiliate links helps to generate commission for Storables.com, at no extra cost. Learn more)
Introduction
Welcome to the world of smart home devices, where convenience and innovation intersect to transform the way we interact with our living spaces. In this comprehensive guide, we will delve into the realm of smart home devices, exploring their functionalities, benefits, and the seamless integration they offer within modern homes. From intelligent thermostats that adapt to your preferences to voice-activated assistants that simplify daily tasks, the array of smart home devices available continues to expand, offering endless possibilities for enhancing comfort, security, and efficiency within your home.
As technology advances, the concept of the smart home has evolved from a futuristic notion to a tangible reality. Today, smart home devices encompass a diverse range of products, including smart speakers, smart thermostats, smart lighting, smart security systems, and much more. These devices are designed to streamline tasks, provide valuable insights, and offer personalized experiences tailored to individual preferences.
The integration of smart home devices not only elevates the convenience of everyday living but also contributes to energy efficiency and cost savings. With the ability to monitor and control various aspects of your home remotely, smart devices empower users to optimize energy consumption, reduce waste, and minimize environmental impact.
Furthermore, the interconnected nature of smart home devices enables seamless communication and coordination between different components, fostering a cohesive and harmonious ecosystem within the home. Whether it's synchronizing lighting with music, automating temperature adjustments based on occupancy, or receiving instant alerts about potential security concerns, the interconnectedness of smart devices enhances overall functionality and responsiveness.
In this guide, we will explore the diverse categories of smart home devices, highlighting their unique features, practical applications, and the ways in which they can elevate the modern living experience. Additionally, we will delve into the considerations for integrating and optimizing smart home devices, ensuring a smooth and tailored experience that aligns with your specific needs and preferences.
Join us on this enlightening journey through the realm of smart home devices, where innovation meets everyday living, and discover how these intelligent technologies can revolutionize your home environment in ways you never imagined. Let's embark on an exploration of the possibilities and potential that smart home devices bring to the forefront of modern living.
Key Takeaways:
- Removing a printer from your Mac is as easy as navigating to System Preferences, selecting “Printers & Scanners,” and clicking the “minus” or “delete” button next to the printer you want to remove.
- By confirming the removal and conducting thorough verification checks, you can ensure that your Mac’s printing and scanning configurations have been optimized to align with your specific needs and preferences.
Read more: How To Find A Printer On A Mac
Step 1: Open System Preferences
Before embarking on the process of removing a printer from your Mac, it is essential to navigate to the System Preferences, which serves as the central hub for managing various settings and configurations on your device. System Preferences provides a user-friendly interface that allows you to customize and control different aspects of your Mac, including printers and scanners.
To begin, ensure that your Mac is powered on and unlocked, granting you access to the desktop and the top menu bar. At the top-left corner of the screen, you will find the Apple logo. Click on the Apple logo to reveal a dropdown menu, where you will see the option for “System Preferences.” Click on “System Preferences” to initiate the next step in the process.
Alternatively, you can access System Preferences by clicking on the “Finder” icon located on the dock, followed by navigating to the “Applications” folder. Within the “Applications” folder, you will find the “System Preferences” icon. Click on this icon to launch the System Preferences application.
Upon launching System Preferences, you will be greeted with a visually intuitive interface, featuring a collection of icons representing the various settings and configurations available for customization. These icons are categorized into sections such as “Personal,” “Hardware,” “Internet & Wireless,” and more, providing a structured layout for easy navigation.
With System Preferences now open and ready for use, you are one step closer to removing the printer from your Mac. This initial step sets the stage for accessing the specific settings related to printers and scanners, enabling you to manage and modify the devices connected to your Mac with ease and precision.
By familiarizing yourself with the System Preferences interface, you gain the ability to tailor your Mac’s settings to suit your preferences, ensuring a personalized and optimized computing experience. With System Preferences as your gateway to customization, you are poised to navigate through the subsequent steps of removing the printer, empowering you to streamline your device’s configurations effortlessly.
Step 2: Select Printers & Scanners
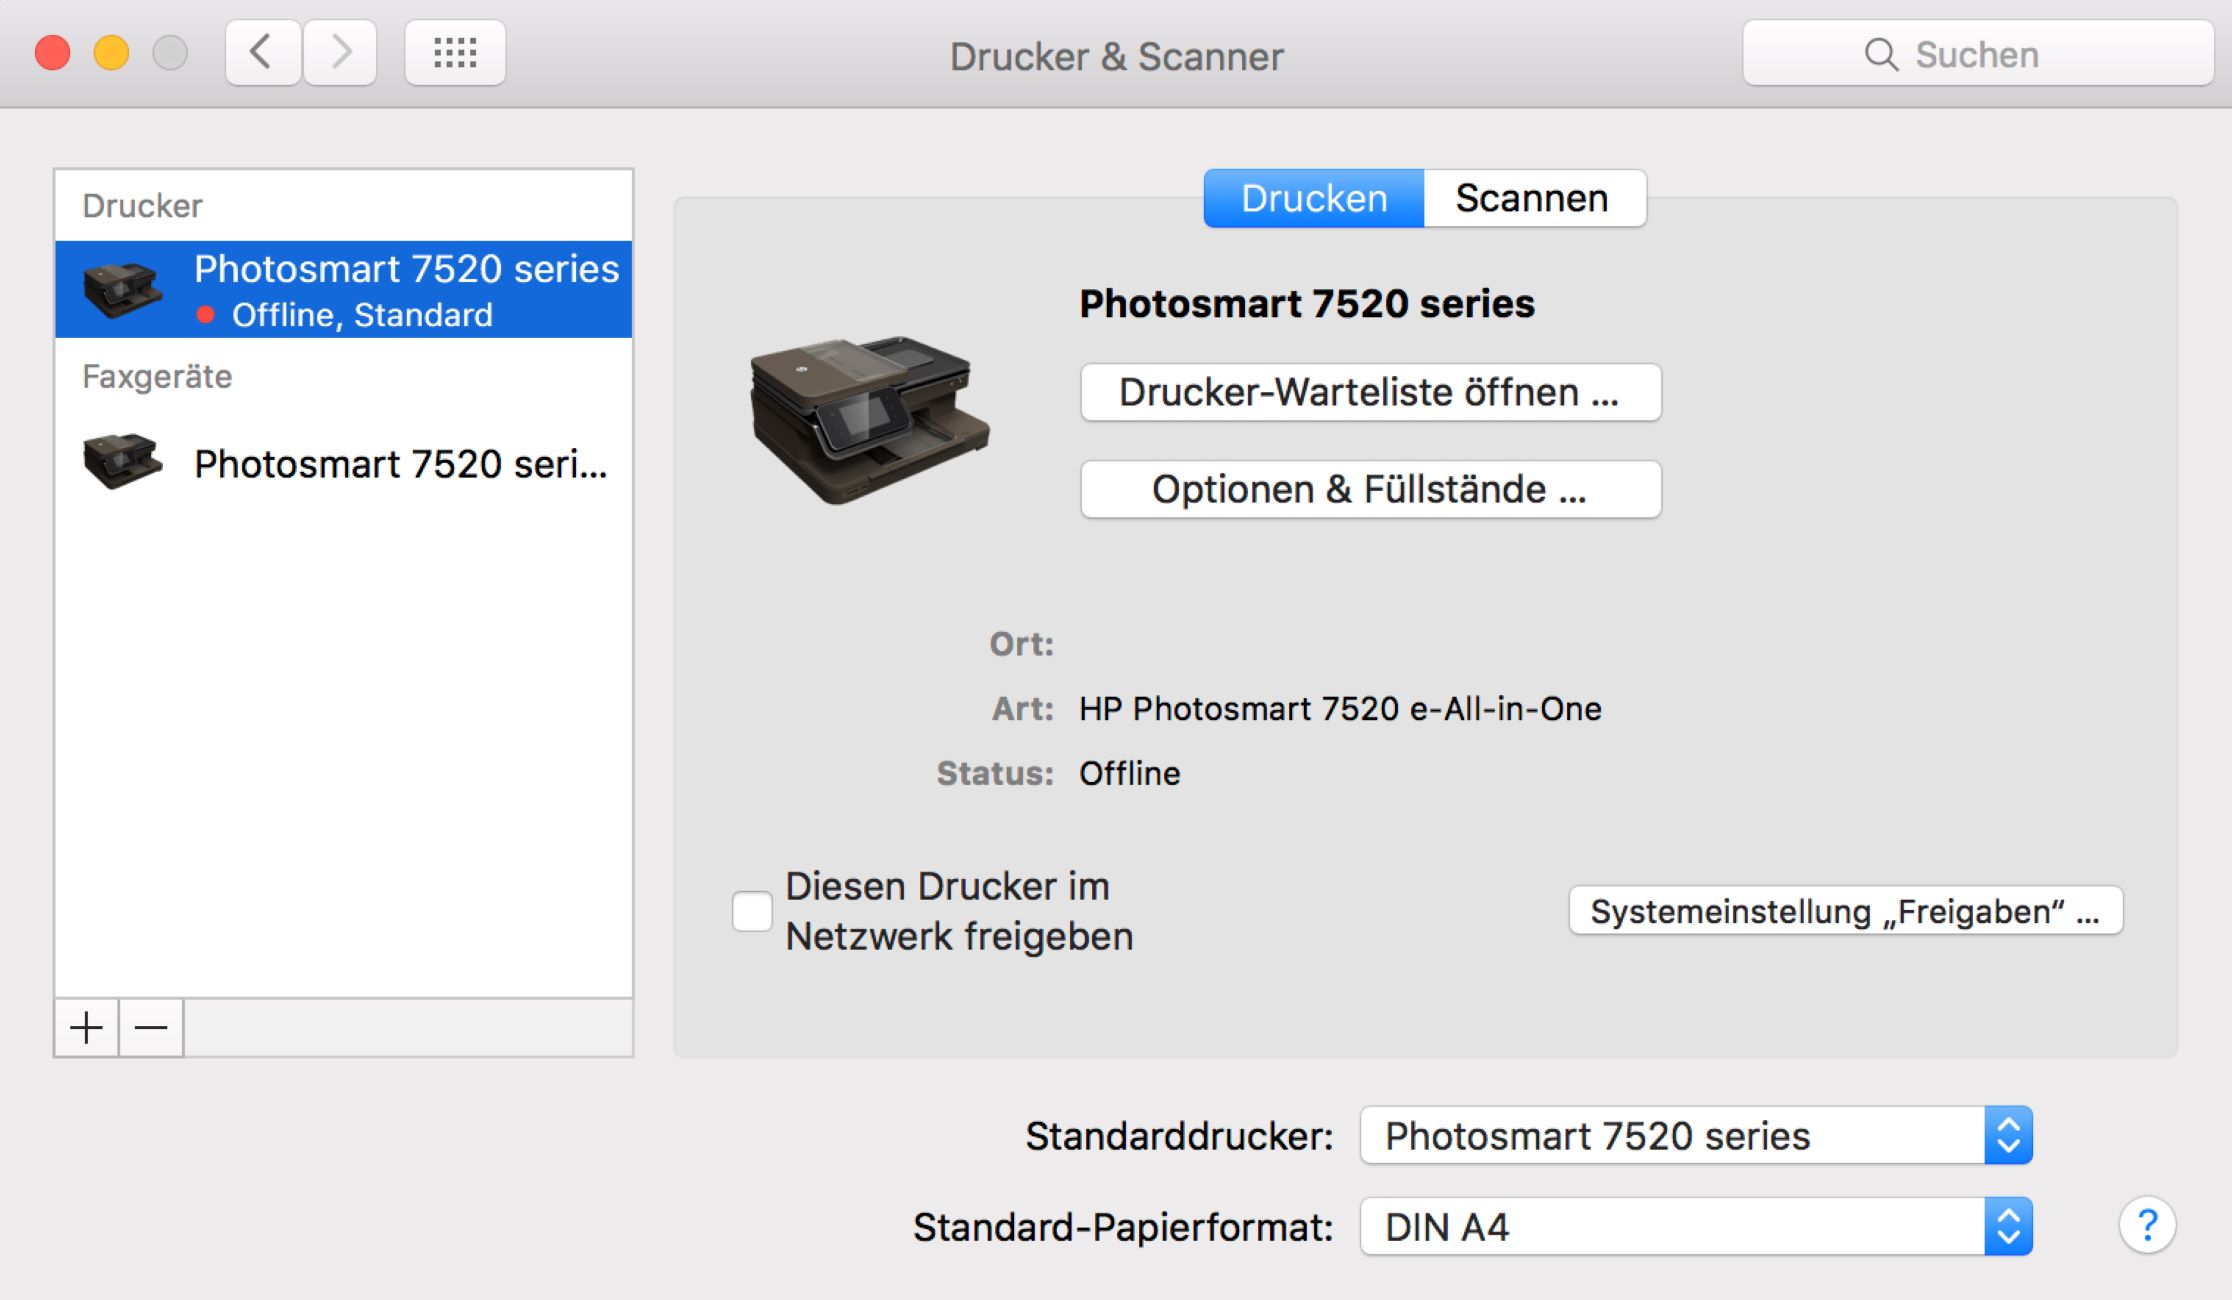
Having accessed the System Preferences on your Mac, the next crucial step in the process of removing a printer involves navigating to the “Printers & Scanners” section. This pivotal area within System Preferences provides a comprehensive overview of the printers and scanners connected to your Mac, allowing you to manage and configure these devices according to your preferences.
Once inside the System Preferences interface, you will encounter a grid of icons representing the various settings categories. Among these icons, you will find “Printers & Scanners,” which is the gateway to managing the printing and scanning devices linked to your Mac. Click on the “Printers & Scanners” icon to delve into the specific configurations and options associated with these essential peripherals.
Upon selecting “Printers & Scanners,” the interface will transition to display a detailed overview of the connected printers and scanners, presenting a clear and organized layout that facilitates seamless management and customization. Here, you will find a list of the devices currently configured for use with your Mac, along with pertinent details such as device names, status indicators, and available actions.
Within the “Printers & Scanners” section, you have the ability to add new printers, remove existing ones, adjust printing preferences, and manage the printing queue. This centralized hub empowers you to maintain full control over your printing and scanning devices, ensuring that they align with your specific requirements and operational needs.
By selecting “Printers & Scanners” within System Preferences, you gain access to a wealth of options and functionalities that enable you to streamline the management of your printing and scanning peripherals. Whether you are looking to remove a printer, modify its settings, or troubleshoot potential issues, this section serves as the cornerstone for overseeing and optimizing the printing and scanning capabilities of your Mac.
As you navigate through the “Printers & Scanners” interface, you are positioned to proceed with the subsequent steps for removing the printer from your Mac, leveraging the intuitive features and controls available within this section to facilitate a seamless and efficient process.
With “Printers & Scanners” selected, you are ready to embark on the next phase of removing the printer from your Mac, harnessing the power of System Preferences to tailor your device’s configurations to your exact specifications.
To remove a printer on a Mac, go to System Preferences, then Printers & Scanners. Select the printer you want to remove, then click the “-” button. Confirm the removal when prompted.
Step 3: Remove the Printer
With the “Printers & Scanners” section accessed within System Preferences, you are now poised to initiate the process of removing the printer from your Mac. This pivotal step involves identifying the specific printer you wish to remove and executing the necessary actions to eliminate its presence from your device.
Upon entering the “Printers & Scanners” interface, you will encounter a comprehensive list of the printers and scanners currently configured for use with your Mac. Scan through the list to locate the printer that you intend to remove. Each entry will display essential details such as the device name, status, and available options for customization.
Once you have identified the printer to be removed, select the respective entry within the “Printers & Scanners” interface. This action will highlight the chosen printer, signaling your intent to perform modifications or remove the device from your Mac. By selecting the printer, you set the stage for executing the next crucial steps in the removal process.
After highlighting the printer that you wish to remove, look for the “minus” or “delete” button within the “Printers & Scanners” interface. This button is specifically designed to facilitate the removal of printers from your Mac, providing a streamlined and intuitive method for eliminating unwanted or obsolete devices from the system.
Click on the “minus” or “delete” button associated with the selected printer to initiate the removal process. Upon clicking this button, a confirmation prompt may appear, requesting verification of your decision to remove the printer. Confirm your intent to proceed with the removal by acknowledging the prompt, thereby signaling your definitive action to eliminate the printer from your Mac.
By executing these steps within the “Printers & Scanners” interface, you effectively remove the selected printer from your Mac, streamlining the device configurations and decluttering the list of connected peripherals. This action paves the way for optimizing your printing and scanning environment, ensuring that only relevant and actively utilized devices remain integrated with your Mac.
With the printer successfully removed, you have taken a significant stride in refining the operational landscape of your Mac, aligning the device’s configurations with your specific requirements and preferences. This streamlined approach to managing printers and scanners within System Preferences empowers you to maintain a tailored and efficient computing environment, free from unnecessary clutter and complexity.
Having completed the removal of the printer, you are now ready to proceed with the final steps to confirm the removal and conclude the process with confidence and clarity.
Step 4: Confirm Removal
Following the successful execution of the steps to remove the printer from your Mac within the “Printers & Scanners” interface, the final phase involves confirming the removal to solidify the changes and ensure that the selected printer is effectively disassociated from your device. This crucial confirmation step provides reassurance that the removal process has been completed as intended, allowing you to proceed with confidence and clarity.
Upon removing the printer from the “Printers & Scanners” section, take a moment to verify that the selected printer has been successfully eliminated from the list of configured devices. Scan through the list to ensure that the printer entry no longer appears, confirming that the removal process has effectively decluttered your device’s printing and scanning configurations.
As you confirm the removal of the printer, it is advisable to perform a quick test to validate that the device has been disassociated from your Mac. Attempt to initiate a printing task and verify that the removed printer no longer appears as an available option. By conducting this quick test, you can ascertain that the removal has been executed seamlessly, reflecting the updated status of your device’s printing capabilities.
Additionally, navigate to any applications or documents where the removed printer was previously utilized and ensure that the device is no longer listed as an available printing option. This comprehensive verification process helps to affirm that the removal has been successfully implemented across all relevant areas of your Mac’s operating environment.
Furthermore, take a moment to review the “Printers & Scanners” interface once more to confirm that the list of connected devices accurately reflects the updated status following the removal. By conducting this final check, you can gain peace of mind knowing that the removal process has been thorough and comprehensive, aligning your device’s configurations with your specific preferences.
With the removal of the printer confirmed and validated, you have successfully streamlined your Mac’s printing and scanning environment, ensuring that only relevant and actively utilized devices remain integrated with your device. This proactive approach to managing printers and scanners within System Preferences empowers you to maintain a tailored and efficient computing environment, free from unnecessary clutter and complexity.
By confirming the removal of the printer and conducting thorough verification checks, you conclude the process with confidence, knowing that your Mac’s printing and scanning configurations have been optimized to align with your specific requirements and preferences.
With the removal process confirmed and validated, you have successfully navigated through the essential steps to remove a printer from your Mac, leveraging the intuitive features and controls available within System Preferences to facilitate a seamless and efficient process.
Read more: How To Connect Mac To Epson Printer
Conclusion
Congratulations on successfully completing the process of removing a printer from your Mac! By navigating through the intuitive interface of System Preferences and accessing the “Printers & Scanners” section, you have demonstrated a proactive approach to managing and optimizing your device’s printing and scanning configurations.
As you embark on your journey to streamline your Mac’s operational landscape, it is essential to recognize the significance of maintaining a tailored and efficient computing environment. The removal of the printer signifies a deliberate step towards decluttering your device’s configurations, ensuring that only relevant and actively utilized devices remain integrated with your Mac.
By leveraging the user-friendly features within System Preferences, you have gained valuable insights into the seamless management of printers and scanners, empowering you to align your device’s configurations with your specific requirements and preferences. This proactive approach reflects your commitment to optimizing the functionality and responsiveness of your Mac, fostering an environment that is tailored to your unique needs.
Furthermore, the successful removal of the printer exemplifies your adeptness in navigating through essential settings and configurations, showcasing your ability to execute precise and impactful modifications to your Mac’s operational landscape. This proficiency underscores your dedication to maintaining an efficient and personalized computing environment, free from unnecessary clutter and complexity.
As you reflect on the process of removing the printer from your Mac, take pride in the proactive steps you have taken to refine and optimize your device’s printing and scanning environment. Your conscientious approach to managing and customizing your Mac’s configurations exemplifies your commitment to harnessing the full potential of smart home devices, ensuring that they seamlessly integrate into your living space.
With the printer successfully removed from your Mac, you have set the stage for a streamlined and efficient printing and scanning experience, tailored to your specific preferences and operational needs. This proactive approach to managing printers and scanners within System Preferences empowers you to maintain a computing environment that aligns with your unique requirements, fostering productivity and convenience within your digital realm.
As you continue to explore the diverse functionalities and capabilities of your Mac, remember that the intuitive interface of System Preferences serves as your gateway to customization, enabling you to tailor your device’s settings to suit your preferences seamlessly. By leveraging the power of System Preferences, you can navigate through essential configurations with confidence and precision, ensuring that your Mac remains optimized to enhance your digital experience.
With the printer successfully removed from your Mac, you have demonstrated a proactive and adept approach to managing your device’s configurations, setting the stage for a refined and efficient computing environment that aligns with your specific needs and preferences. Armed with the knowledge and skills gained from this process, you are well-equipped to navigate through future configurations and optimizations, ensuring that your Mac remains tailored to your unique requirements.
Frequently Asked Questions about How To Remove Printer On Mac
Was this page helpful?
At Storables.com, we guarantee accurate and reliable information. Our content, validated by Expert Board Contributors, is crafted following stringent Editorial Policies. We're committed to providing you with well-researched, expert-backed insights for all your informational needs.


0 thoughts on “How To Remove Printer On Mac”