Articles
How Do I Texture A Ceiling
Modified: May 6, 2024
Discover helpful articles on how to texture a ceiling. Expert tips and step-by-step guides to achieve a professional-looking finish.
(Many of the links in this article redirect to a specific reviewed product. Your purchase of these products through affiliate links helps to generate commission for Storables.com, at no extra cost. Learn more)
Introduction
Welcome to our comprehensive guide on how to texture a ceiling! Adding texture to a ceiling can completely transform the look and feel of a room. Whether you want to create a subtle, elegant texture or a more dramatic, eye-catching effect, the process can be a fun and rewarding DIY project.
In this article, we will walk you through the step-by-step process of texturing a ceiling, from gathering the necessary materials to applying the texture compound. We will also provide tips and techniques for achieving different textures, as well as important considerations for drying and finishing touches.
Textured ceilings not only add visual interest and character to a space but can also help to hide imperfections or create a more intimate atmosphere. With a bit of patience and the right tools, you can achieve professional-looking results that will enhance the overall aesthetic of your room.
Before we dive into the technical aspects of texturing a ceiling, let’s first go over the materials you will need for this project.
Key Takeaways:
- Transform your space with a textured ceiling using popular techniques like knockdown, stippling, comb, feathering, and stenciling. Embrace creativity and personalize your room with unique texture effects.
- Achieve professional-looking results by following step-by-step instructions, from choosing the right texture to proper preparation, application, drying, and finishing touches. Enjoy the process and create a personalized, visually appealing space.
Read more: How To Remove A Textured Ceiling
Materials Needed
Before you begin texturing your ceiling, make sure you have gathered all the necessary materials. Here is a list of items you will need:
- Drop cloths or plastic sheeting to protect floors and furniture from any potential mess
- Painter’s tape to cover edges and protect walls from texture overspray
- Safety goggles and a dust mask to protect your eyes and lungs from dust particles
- Sturdy ladder or scaffold to reach the ceiling comfortably and safely
- Putty knife or taping knife for applying and smoothing the texture compound
- Texture compound or joint compound, depending on your desired texture type
- Texture sprayer or hopper gun for applying the texture compound evenly
- Paint roller or brush for touch-ups and finishing touches
- Sanding sponge or sandpaper for smoothing rough areas or correcting mistakes
- Primer and paint for covering the textured ceiling, if desired
It’s important to have all of these materials ready before you begin, as it will streamline the process and prevent unnecessary interruptions. Now that you have everything you need, let’s move on to the next step: preparing the ceiling.
Preparing the Ceiling
Before you can start texturing your ceiling, it’s essential to properly prepare the surface. Here are the steps to follow:
- Clean the ceiling: Remove any dust, dirt, or cobwebs from the ceiling using a broom or vacuum cleaner with a brush attachment. This will ensure a smooth and even texture application.
- Repair any damages: Inspect the ceiling for any cracks, holes, or imperfections. Use a spackling compound or joint compound to fill in these areas, and gently sand them once dry to create a smooth surface.
- Protect surrounding areas: Cover the floors and any furniture with drop cloths or plastic sheeting to prevent them from getting damaged or dirty during the texturing process.
- Tape off edges: Use painter’s tape to cover the edges where the ceiling meets the walls. This will protect the walls from texture overspray and ensure clean, crisp lines.
- Turn off power and remove fixtures: If there are any light fixtures, ceiling fans, or other permanent fixtures, turn off the power and remove them before starting the project. This will make it easier to work on the ceiling without any obstructions.
By completing these preparation steps, you will create an ideal surface for applying the texture compound. Remember to take your time and pay attention to detail during this stage, as it will greatly impact the final result. Once the ceiling is properly prepared, you can move on to choosing the texture you want to apply.
Choosing the Texture
When it comes to texturing a ceiling, there are various options to choose from. The texture you select will depend on your personal preference and the overall style of the room. Here are a few popular texture options:
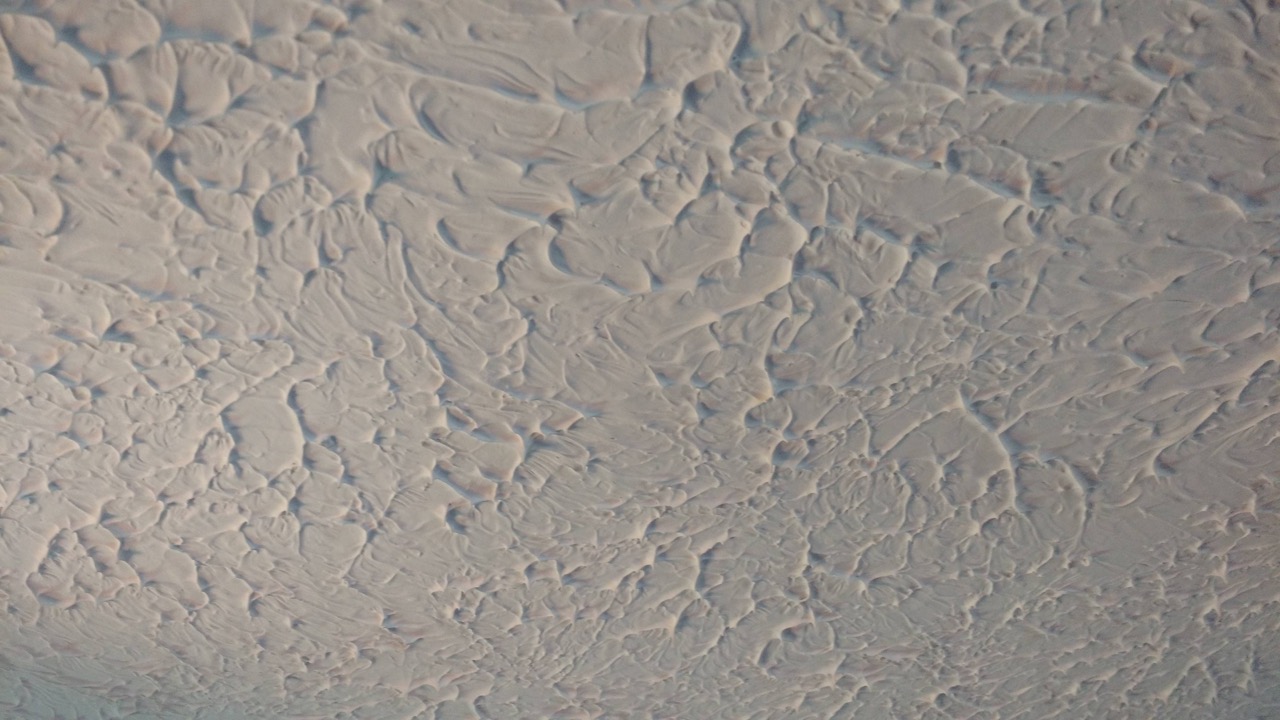
- Popcorn Texture: Also known as acoustic or cottage cheese texture, popcorn texture is a classic choice. It is applied using a texture sprayer and creates a bumpy, textured surface that helps to absorb sound. This texture is commonly found in older homes and adds a unique, retro look.
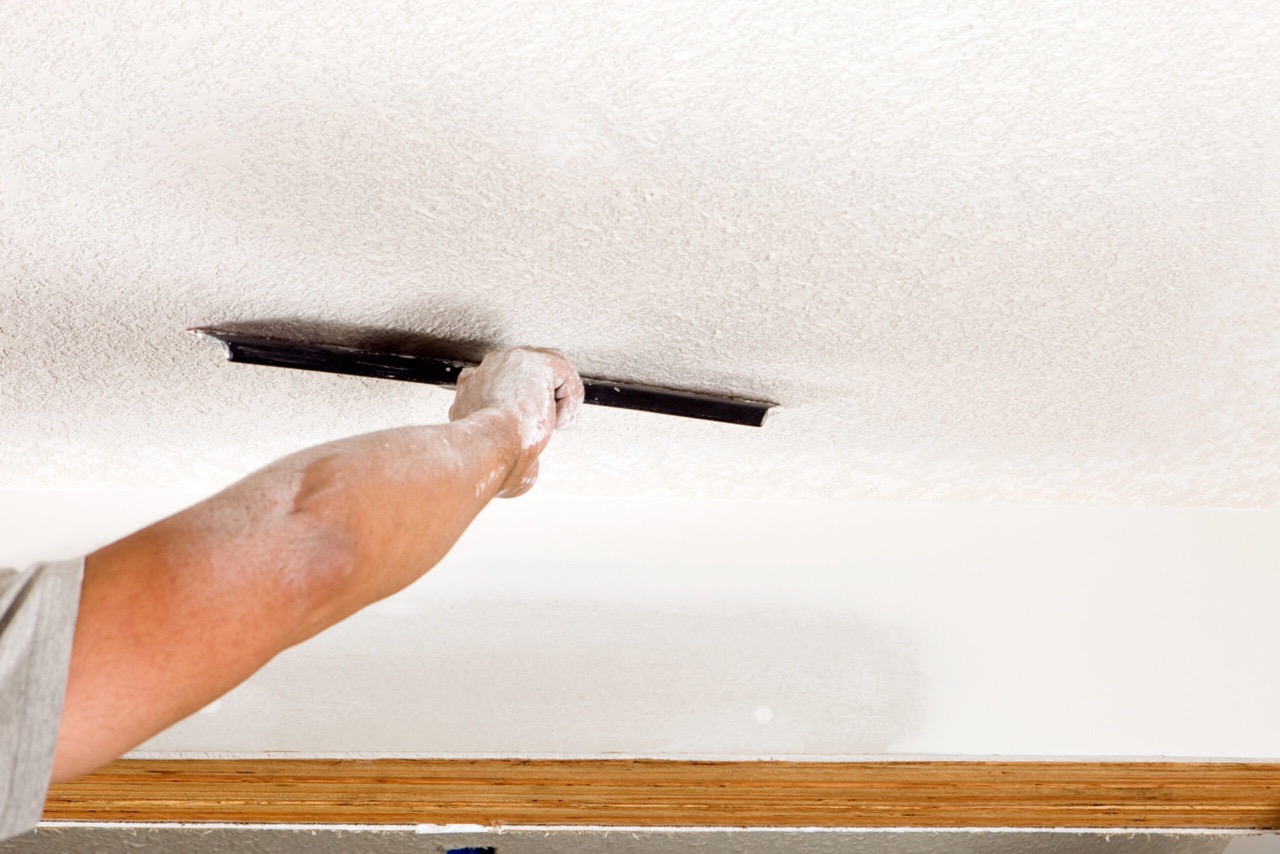
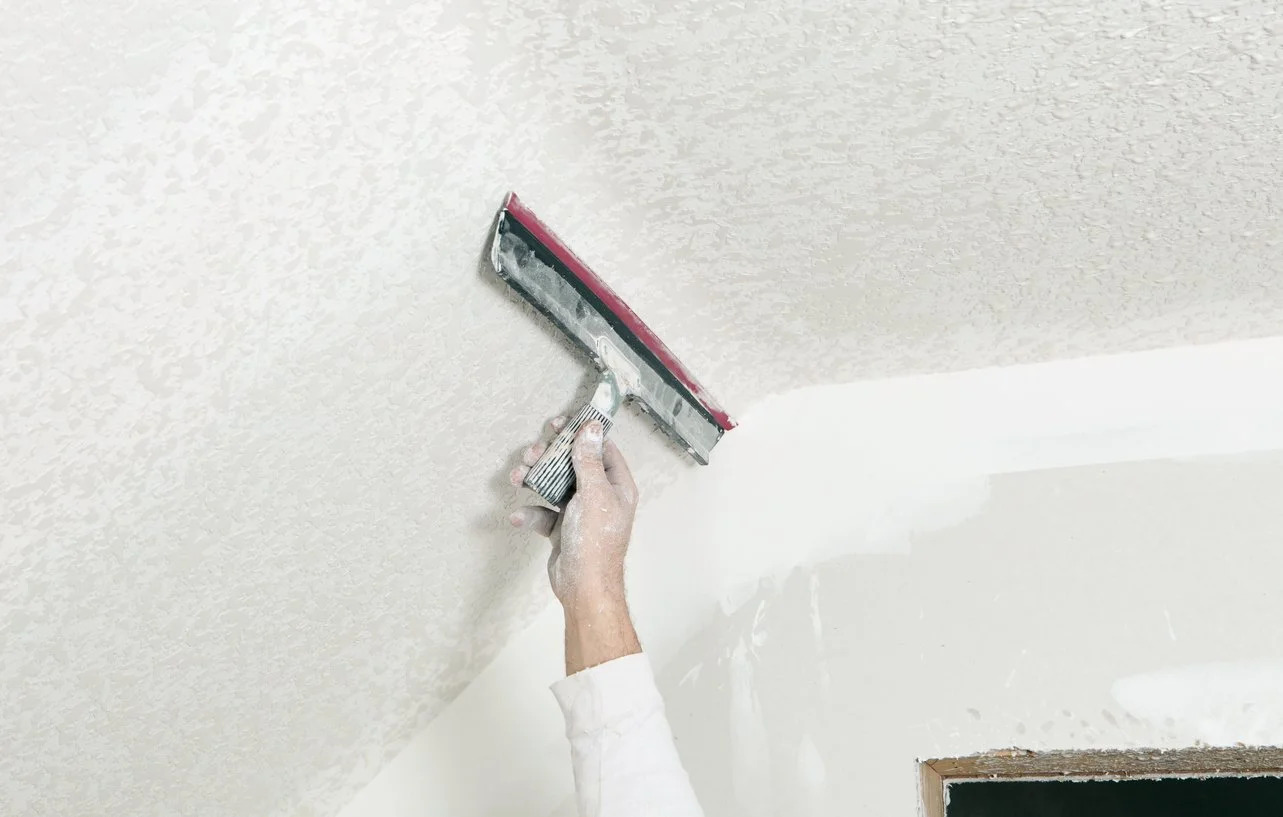
- Knockdown Texture: Knockdown texture is created by spraying on a texture compound and then “knocking down” the bumps with a trowel or putty knife. This technique creates a flattened texture with small, random patterns. It provides a subtle, elegant look that works well in modern or traditional spaces.
- Orange Peel Texture: Similar to knockdown texture, orange peel texture is also achieved through spraying the texture compound and then lightly flattening it. However, instead of creating distinct patterns, it creates a fine, dimpled surface that resembles the texture of an orange peel. This texture is versatile and suitable for a wide range of room styles.
- Skip Trowel Texture: Skip trowel texture involves applying a thinned texture compound and then dragging a trowel across the surface, creating a subtle, irregular texture. It produces a soft, textured look that adds depth and character to a ceiling. This texture works well in rustic or Mediterranean-themed rooms.
Take into consideration the overall aesthetics of the room, as well as your personal style preferences, when selecting the texture. You can also consult with professionals or browse through design magazines and websites for inspiration.
Once you have chosen the texture you want to apply, it’s time to move on to the next step: mixing the texture compound.
Mixing the Texture Compound
Now that you have chosen the texture for your ceiling, it’s time to mix the texture compound. The process for mixing may vary depending on the type of compound you are using. Here are some general guidelines:
- Read the instructions: Before you start mixing, carefully read the instructions on the texture compound packaging. Different compounds may have specific mixing ratios and instructions, so it’s important to follow them accordingly.
- Add water gradually: Start by pouring the texture compound into a clean bucket or container. Then, add water gradually while stirring continuously. The amount of water needed will depend on the desired consistency of the mixture.
- Mix thoroughly: Use a mixing paddle or a drill with a mixing attachment to blend the texture compound and water together. Make sure there are no lumps or dry spots in the mixture. Consistency-wise, you want the texture compound to be creamy but still hold its shape.
- Check the consistency: To test the consistency of the texture compound, scoop a small amount onto a putty knife or trowel. If it easily spreads and holds its shape, without being too runny or too stiff, then you have achieved the right consistency.
Remember, it’s always better to start with a slightly thicker texture compound mixture and gradually add more water if needed. This will give you more control over the texture application. If you accidentally add too much water and the mixture becomes too thin, you can compensate by adding a bit more texture compound to thicken it back up.
Once your texture compound mixture is ready, you can move on to the exciting part: applying the texture to your ceiling!
Consider using a textured paint roller or a stomp brush to add texture to your ceiling. These tools can create a variety of patterns and textures, such as stippling or swirls, to add visual interest to the space.
Read more: How To Swirl Texture A Ceiling
Applying the Texture
With your texture compound mixed and prepared, it’s time to start applying the texture to your ceiling. Follow these steps for a successful application:
- Load the texture sprayer or hopper gun: If you are using a texture sprayer or hopper gun, fill it with the prepared texture compound. Make sure to follow the manufacturer’s instructions for loading and adjusting the sprayer.
- Test the spray pattern: Before you begin, test the spray pattern on a piece of cardboard or scrap material. This will help you adjust the nozzle or gun settings to achieve the desired spray pattern and texture consistency.
- Begin spraying: Start at one corner of the room and work your way across the ceiling in small sections. Hold the sprayer or hopper gun at a consistent distance from the ceiling and apply the texture compound in a steady, even motion.
- Overlap each pass: To ensure complete coverage, overlap each pass of the texture compound slightly with the previous one. This will help to create a seamless and uniform texture across the entire ceiling.
- Work in sections: It’s best to work in smaller sections rather than trying to cover the entire ceiling at once. This will allow you to maintain control over the texture application and make any necessary adjustments as you go.
- Check for consistency: Periodically pause and step back to assess the consistency and appearance of the texture. Make any adjustments to the sprayer settings or technique to ensure a consistent and desired texture throughout.
- Allow time to dry: Once you have finished applying the texture, allow it to dry according to the instructions provided with the texture compound. This typically takes a few hours or even overnight.
It’s important to note that applying texture to a ceiling can be messy, so make sure to wear protective goggles and a dust mask to prevent any debris from entering your eyes or lungs. Also, be mindful of overspray and protect the surrounding areas with drop cloths or plastic sheeting.
Once the texture is dry, you can move on to the exciting part of choosing techniques to create different texture effects. Let’s explore some popular techniques for creating unique and eye-catching textures on your ceiling.
Techniques for Different Textures
Creating different textures on your ceiling can add depth and visual interest to the space. Here are some techniques you can use to achieve various texture effects:
- Knockdown Technique: After spraying the texture compound, wait for it to partially dry. Then, use a trowel or putty knife to gently “knock down” the peaks, creating a flattened texture.
- Stippling Technique: Apply the texture compound using a roller or brush, and then use a stippling brush to create a random pattern by dabbing or twisting the bristles. This technique works well for achieving a subtle, textured effect.
- Comb Technique: Spray the texture compound onto the ceiling, and then use a comb or trowel to create grooves or lines for a more defined texture. Experiment with different comb patterns to achieve the desired look.
- Feathering Technique: Start by applying a thicker layer of texture compound onto the ceiling. Then, use a trowel or putty knife to smooth out the edges and feather the texture towards the surrounding area. This creates a gradual transition from textured to smooth.
- Stencil Technique: Use stencils to create specific patterns or designs on your textured ceiling. Place the stencil onto the surface and apply the texture compound over it. Once the texture is dry, carefully remove the stencil to reveal the pattern.
Remember to practice these techniques on a scrap piece of material or a small section of the ceiling before applying them to the entire surface. This will allow you to refine your technique and ensure you achieve the desired texture effect.
Once you are satisfied with the texture, let it dry completely before moving on to the next step: drying and finishing touches.
Drying and Finishing Touches
After you have applied the texture to your ceiling and used various techniques to create the desired effect, it’s important to allow the texture to dry completely. Here are some steps to ensure proper drying and add finishing touches to your textured ceiling:
- Check the drying time: Refer to the instructions provided with the texture compound to determine how long it needs to dry. Typically, it may take a few hours to overnight for the texture to fully dry and set.
- Avoid touching or disturbing the texture: During the drying process, it’s crucial to avoid touching or disturbing the texture. This can cause it to smudge or lose its desired texture pattern. It’s best to let it dry undisturbed for the specified amount of time.
- Inspect for any touch-ups: Once the texture is dry, carefully inspect the ceiling for any areas that may require touch-ups. Use a putty knife or sanding sponge to smooth out any rough spots or imperfections. You can also reapply texture to any areas that may appear uneven or sparse.
- Apply primer and paint, if desired: If you wish to paint your textured ceiling, it’s recommended to first apply a coat of primer to seal the texture and provide a smooth base. Once the primer is dry, apply your chosen paint color using a roller or brush. This will enhance the overall appearance of the texture and complete the finished look of your ceiling.
Remember to follow the manufacturer’s instructions for the drying time and any other recommended steps specific to the texture compound you have used. Taking the time to properly dry and add any necessary finishing touches will ensure a professional and polished look for your textured ceiling.
Once you have completed these steps, you can move on to the final stage: cleaning up.
Cleaning Up
Once you have finished texturing your ceiling and completed any necessary touch-ups or painting, it’s time to clean up the area. Here are some steps to follow for a hassle-free clean-up process:
- Clear the work area: Remove any drop cloths, plastic sheeting, or protective coverings that were used to protect the floors and furniture. Shake them off outside to remove any excess texture compound or dust.
- Dispose of waste materials: Properly dispose of any leftover texture compound, empty containers, and other waste materials. Follow local guidelines and regulations for disposing of construction waste to ensure environmentally responsible practices.
- Clean your tools: Thoroughly clean your tools, such as the sprayer or hopper gun, putty knife, and mixing paddle, using warm water and mild detergent. Rinse them well and allow them to dry completely before storing them for future use.
- Remove painter’s tape: Carefully remove the painter’s tape from the edges of the ceiling and walls. Pull it off slowly and at a downward angle to avoid damaging the freshly painted surfaces.
- Clean the surrounding area: Wipe down the walls and adjacent surfaces with a damp cloth to remove any overspray or stray texture compound. Pay attention to corners and crevices where dust and debris may accumulate.
- Vacuum or sweep the floors: Use a vacuum cleaner or broom to clean up any dust or debris that may have fallen onto the floors during the texturing process. Ensure that the area is tidy and free of any loose particles.
By thoroughly cleaning up after your texturing project, you will not only maintain a neat and tidy workspace but also prevent any potential hazards or damage to surrounding areas.
Congratulations! You have successfully textured your ceiling and completed the clean-up process. Stand back and admire your newly textured and personalized space. Your efforts have surely added character and visual appeal to the room.
Remember, texturing a ceiling may require practice and experimentation to achieve your desired outcome. Don’t be afraid to try different techniques or consult with professionals for guidance. Enjoy the process and embrace the unique texture that you have created!
If you have any further questions or need additional assistance, feel free to reach out. Happy texturing!
Read more: How To Knockdown Texture A Ceiling
Conclusion
Adding texture to a ceiling can be a transformative and creative endeavor that enhances the overall aesthetic of a room. By following the step-by-step process outlined in this comprehensive guide, you can successfully texture your ceiling and achieve professional-looking results.
We started by discussing the materials needed for this project, emphasizing the importance of proper preparation and protection. We then delved into the process of choosing the texture that aligns with your personal style and the room’s overall look and feel.
We explained how to mix the texture compound to achieve the desired consistency and shared techniques for applying the texture to the ceiling. We explored popular techniques such as the knockdown technique, stippling technique, comb technique, feathering technique, and stencil technique.
After applying the texture, we advised allowing it to dry thoroughly before proceeding with any necessary touch-ups or applying primer and paint, if desired. We stressed the importance of a clean and tidy workspace and offered guidance on properly cleaning up the area and storing your tools for future use.
Texture can truly transform a ceiling, adding depth, character, and visual interest. The techniques you choose and the texture you create will be unique to your personal style and the atmosphere you want to create in your space.
Remember, texturing a ceiling may require practice, patience, and experimentation. Don’t be afraid to explore different techniques and seek inspiration from various sources. With time, you’ll develop your own style and proficiency in texturing ceilings.
We hope that this comprehensive guide has provided you with valuable insight and knowledge on how to texture a ceiling. Now it’s time to roll up your sleeves, gather your materials, and embark on this exciting DIY project. Enjoy the process, and may your textured ceiling bring beauty and charm to your space for years to come!
Ready to give your ceilings a fresh new look? Don't stop now! If you're interested in a classic style, our guide on how to do a popcorn ceiling will show you simple steps to achieve this textured favorite. For those curious about enhancing sound quality while maintaining style, our article on acoustic ceilings offers a wealth of information on selection and installation. Dive into these reads to continue transforming your space with style and function.
Frequently Asked Questions about How Do I Texture A Ceiling
Was this page helpful?
At Storables.com, we guarantee accurate and reliable information. Our content, validated by Expert Board Contributors, is crafted following stringent Editorial Policies. We're committed to providing you with well-researched, expert-backed insights for all your informational needs.


0 thoughts on “How Do I Texture A Ceiling”