Articles
How To Swirl Texture A Ceiling
Modified: September 1, 2024
Learn the step-by-step process of adding swirl texture to your ceiling with our informative articles. Achieve a stunning textured look with ease.
(Many of the links in this article redirect to a specific reviewed product. Your purchase of these products through affiliate links helps to generate commission for Storables.com, at no extra cost. Learn more)
Overview
Swirling texture on a ceiling can add a touch of elegance and visual interest to any room. This technique involves applying a plaster or drywall texture compound to the ceiling and creating beautiful swirling patterns. It may seem like a daunting task, but with the right materials and techniques, you can achieve a professional-looking finish.
In this article, we will guide you through the process of swirling texture a ceiling, from preparing the surface to applying the texture and adding the swirling patterns. Let’s dive in!
Before you begin, it’s important to gather all the necessary materials and tools:
- Drop cloths or plastic sheeting to protect the floor and furniture.
- Tape and plastic film to cover light fixtures and other areas you don’t want textured.
- Painter’s tape to protect walls and corners.
- Texture compound, either premixed or dry mix that you can mix yourself.
- A texture sprayer or a trowel and a texture brush.
- A ladder or scaffolding to reach the ceiling.
- A bucket and a mixing paddle for mixing the texture compound.
- Sandpaper or a sanding sponge for smoothing rough spots.
- A paint roller or a brush for priming and painting the textured ceiling.
Now that you have everything you need, let’s move on to the next step: preparing the ceiling.
Key Takeaways:
- Transform your space with elegance by swirling texture on your ceiling. Follow our guide for a professional finish and enjoy the unique focal point it creates in any room.
- Gather the right materials, prepare the surface, and master the swirling technique to achieve a stunning textured ceiling. With patience and practice, you can elevate your space with this elegant touch.
Read more: How To Remove A Textured Ceiling
Materials and tools needed
Before you start swirling texture on your ceiling, make sure you have all the necessary materials and tools. Here’s a list of what you’ll need:
- Drop cloths or plastic sheeting: These are essential for protecting your floor and furniture from any spills or splatters during the texture application process.
- Tape and plastic film: You’ll need these to cover light fixtures, electrical outlets, and other areas that you don’t want to get textured.
- Painter’s tape: This is used to protect the walls and corners from the texture compound. It ensures clean lines and prevents any drips or smudges on the adjacent surfaces.
- Texture compound: You can choose between premixed texture compound or a dry mix that you can mix yourself. Make sure you have enough to cover the entire ceiling area.
- Texture sprayer or trowel and texture brush: Depending on your preference and skill level, you can use a texture sprayer to evenly apply the texture compound or opt for a more hands-on approach using a trowel and texture brush.
- Ladder or scaffolding: Since you’ll be working on the ceiling, you’ll need a stable platform to reach the surface. Make sure you have a sturdy ladder or scaffolding that allows you to work comfortably at different heights.
- Bucket and mixing paddle: If you’re using a dry mix texture compound, you’ll need a bucket to mix it with water. A mixing paddle or a drill with a paddle attachment will help you achieve a smooth and consistent texture mixture.
- Sandpaper or sanding sponge: After applying the texture compound, you may need to sand down any rough spots or imperfections. A fine-grit sandpaper or sanding sponge will help you achieve a smooth finish.
- Paint roller or brush: Once the texture is dry, you’ll need a paint roller or brush to prime and paint the ceiling. Choose a paint color that complements the overall aesthetic of the room.
By gathering these materials and tools beforehand, you’ll ensure a smooth and efficient texture application process. Now that you’re well-equipped, let’s move on to preparing the ceiling.
Preparing the ceiling
Before you can begin swirling texture on your ceiling, it’s important to properly prepare the surface. Here are the steps to follow:
- Clear the room: Remove all furniture, decorations, and fixtures from the room, or at least cover them with drop cloths or plastic sheeting to protect them from dust and texture compound splatters.
- Cover the floor: Lay down drop cloths or plastic sheeting to protect the floor from any spills or drips. Secure the edges of the cloths with tape to prevent them from moving as you work.
- Prepare the ceiling surface: Make sure the ceiling is clean and free from any dust, dirt, or loose debris. Use a broom or vacuum cleaner to remove any loose particles. If there are any stains or marks on the ceiling, clean them thoroughly before proceeding.
- Repair any damage: Inspect the ceiling for any cracks, holes, or other damages. Use spackle or joint compound to fill in any imperfections. Smooth out the repairs with a putty knife and let them dry completely.
- Sand the ceiling: If the surface of the ceiling is rough or uneven, lightly sand it with fine-grit sandpaper or a sanding sponge. This will create a smoother surface for the texture compound to adhere to.
- Apply primer: Before applying the texture compound, it’s recommended to apply a coat of primer to the ceiling. This will help the texture adhere better and ensure a more even application. Use a roller or brush to apply the primer and let it dry according to the manufacturer’s instructions.
By properly preparing the ceiling, you’ll create a clean and smooth surface for the texture application. This will ensure a professional-looking finish and help the texture compound adhere effectively. Once the ceiling is prepped and the primer is dry, you’re ready to mix the texture compound. Let’s move on to the next step.
Mixing the texture compound
Now that you have prepared the ceiling, it’s time to mix the texture compound. Whether you are using a premixed texture compound or a dry mix, here’s how to get the right consistency:
- Read the instructions: Check the packaging or container of the texture compound for specific mixing instructions. Different brands may have different ratios of water to compound, so it’s important to follow the manufacturer’s guidelines.
- Prepare the mixing area: Find a clean and spacious area where you can mix the texture compound. Lay down a drop cloth or plastic sheeting to protect the floor.
- If using a premixed compound: If you’re using a premixed texture compound, it’s typically ready to use right out of the container. However, you may still need to stir it gently with a mixing paddle or a trowel to ensure a uniform consistency. Avoid over-mixing to prevent introducing air bubbles.
- If using a dry mix compound: If you’re using a dry mix texture compound, follow the manufacturer’s instructions for the water-to-compound ratio. Start by pouring the dry mix into a clean bucket.
- Add water gradually: Slowly add water to the dry mix while stirring continuously with a mixing paddle or a drill with a paddle attachment. This will help prevent lumps and ensure a smooth texture mixture.
- Achieve the desired consistency: Add water gradually until you reach the desired consistency. The texture compound should be thick enough to hold its shape when applied to the ceiling but still thin enough to spread easily.
Remember, it’s always better to start with less water and gradually add more if needed. This will give you more control over the consistency of the texture mixture. Once you have achieved the desired consistency, it’s time to move on to applying the texture to the ceiling. Let’s proceed to the next step.
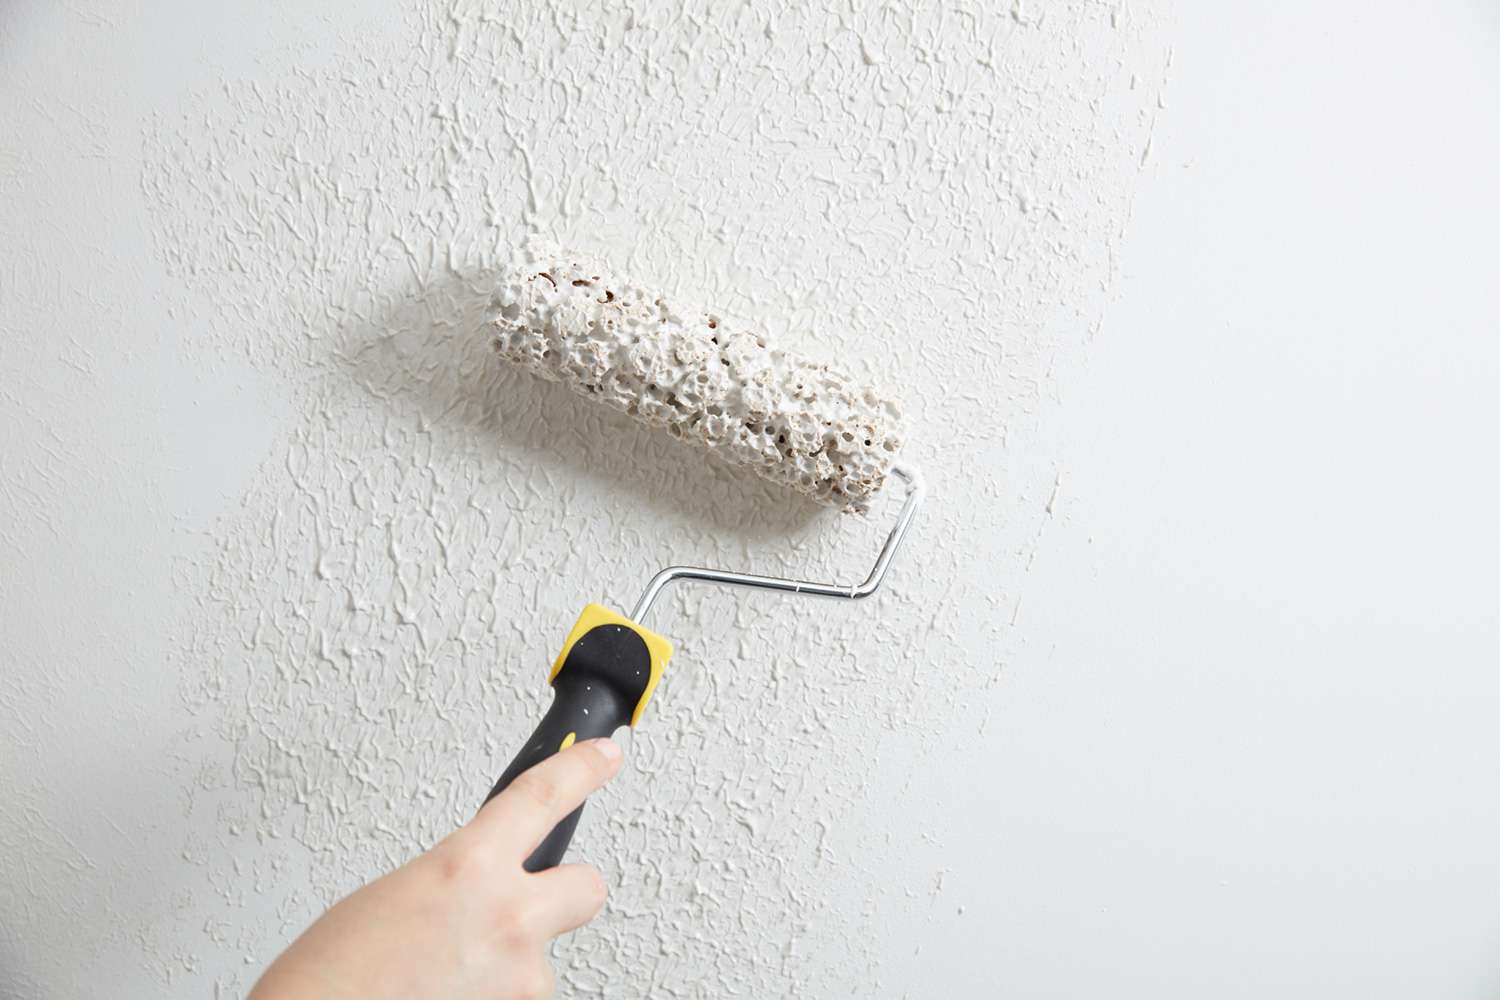
When swirling texture on a ceiling, use a thick-nap roller to apply the joint compound in a random, circular motion. Work in small sections and practice on a spare piece of drywall first.
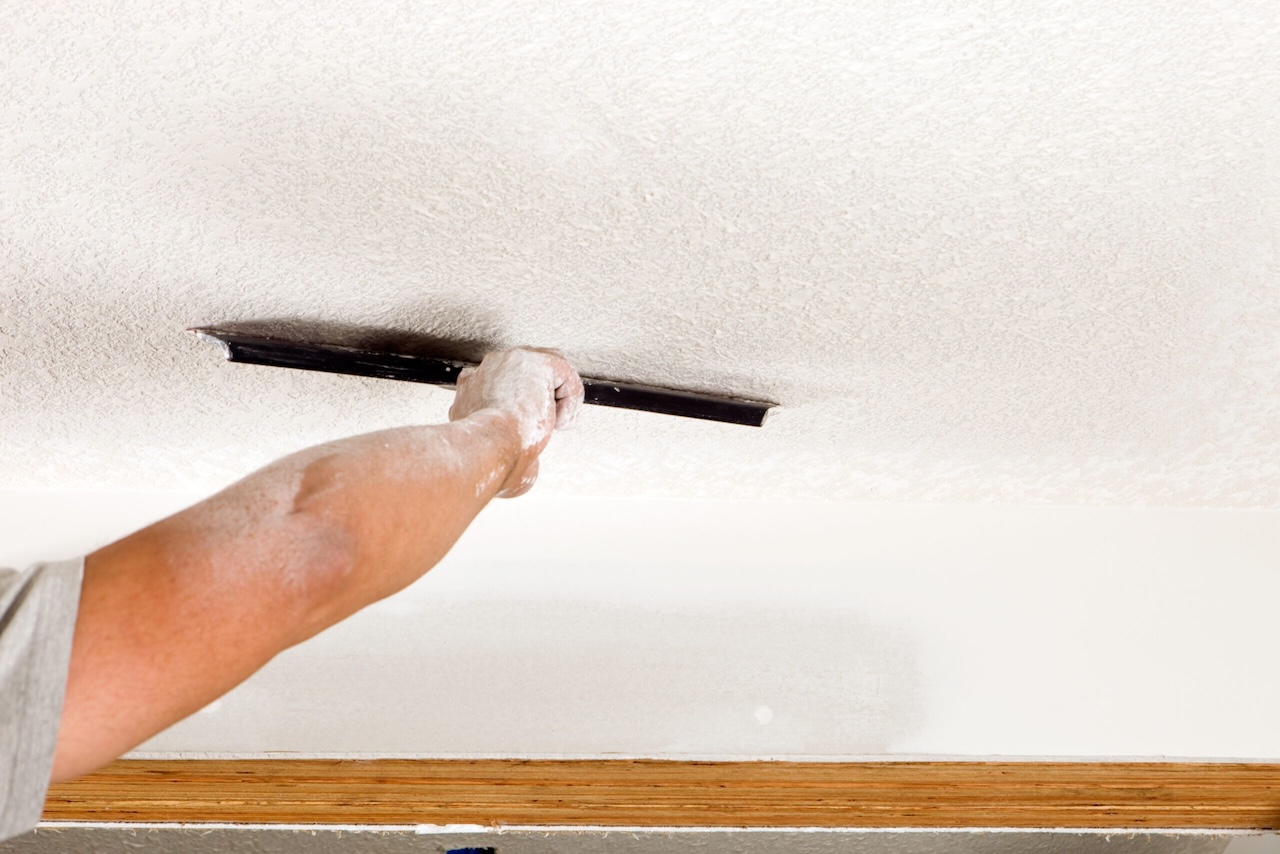
Applying the texture to the ceiling
With the texture compound mixed to the right consistency, it’s time to apply it to the ceiling. Here’s a step-by-step guide on how to do it:
- Start with a small section: Begin by working on a small section of the ceiling, about a 2×2-foot area. This will allow you to practice your technique and ensure that you’re comfortable with the process.
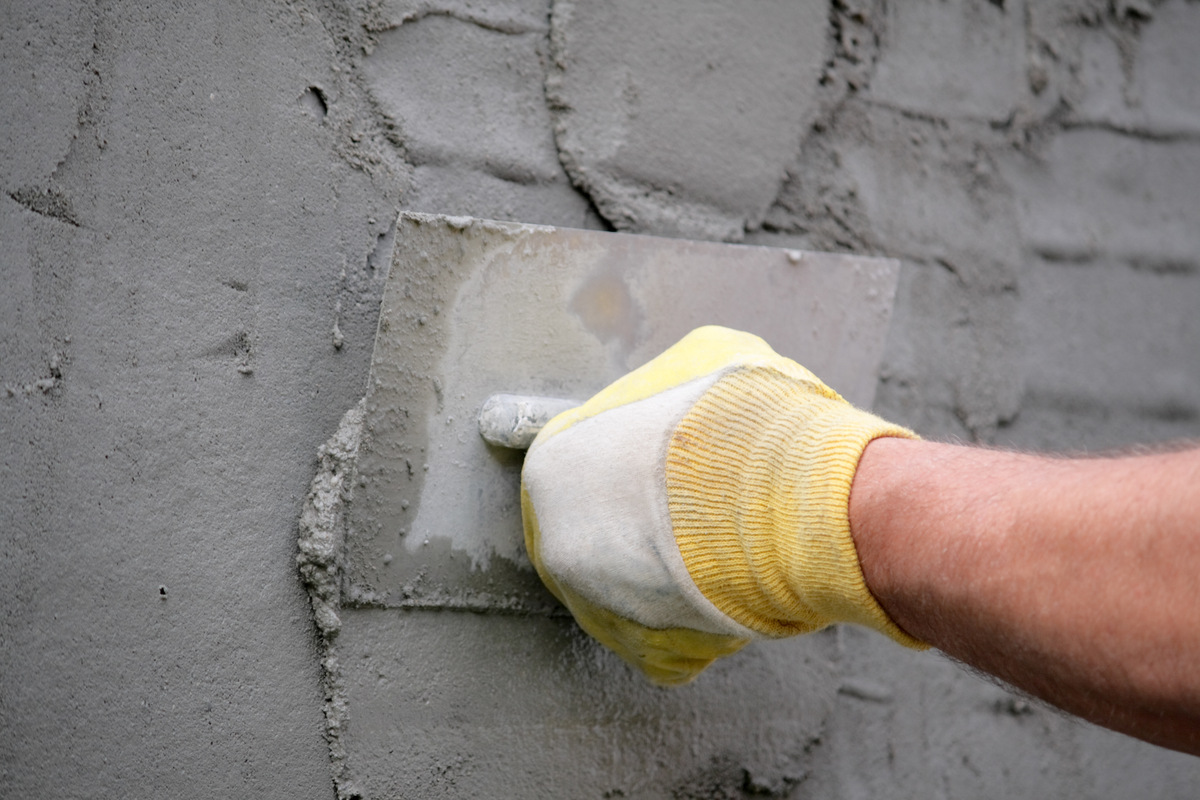
- Load the texture sprayer or trowel: If you’re using a texture sprayer, fill it with the texture compound. Adjust the nozzle according to the desired spray pattern. If you’re using a trowel, scoop a generous amount of the texture compound onto the trowel and hold it at a slight angle.
- Apply the texture compound: Start at one corner of the ceiling section and work your way across, applying the texture compound in a consistent and even manner. If using a sprayer, hold it at a distance of about 12-18 inches from the ceiling. If using a trowel, spread the compound using broad, overlapping strokes.
- Work in small sections: Divide the entire ceiling into smaller sections and work on them one at a time. This will ensure that the texture compound doesn’t dry out before you have a chance to swirl it.
- Spread and level the texture: Use a trowel or a textured brush to spread and level the texture compound on the ceiling. This will help create a smooth and even surface for swirling.
- Continue applying the texture: Repeat the process of applying and spreading the texture compound across each section of the ceiling until the entire surface is covered.
Remember to maintain a consistent texture thickness as you apply the compound. Take breaks as needed to refill the sprayer or reload the trowel with more texture compound. Once the texture compound is evenly applied, you’re ready to move on to the next step: swirling the texture.
Before proceeding, allow the texture compound to set and firm up slightly. This usually takes around 10-15 minutes, but refer to the instructions on the packaging for specific drying times. Once the compound is no longer wet but still slightly tacky, it’s time to create those beautiful swirling patterns. Let’s move on!
Read more: How To Knockdown Texture A Ceiling
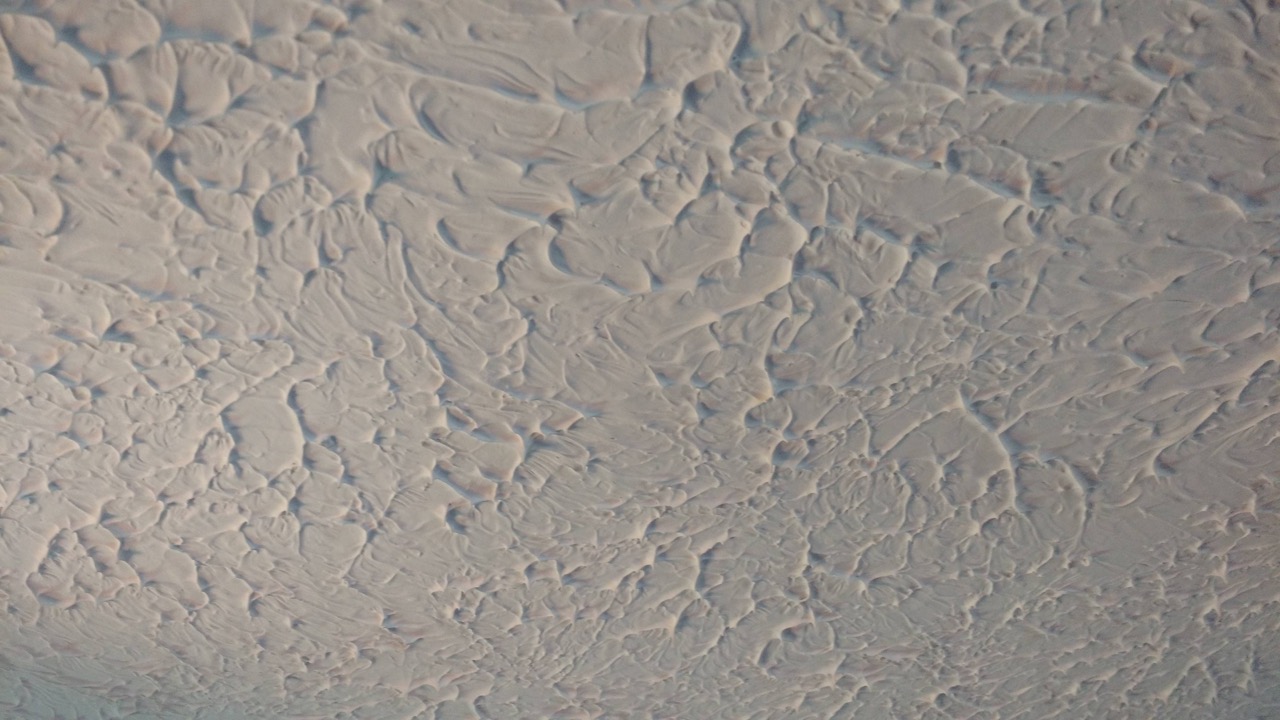
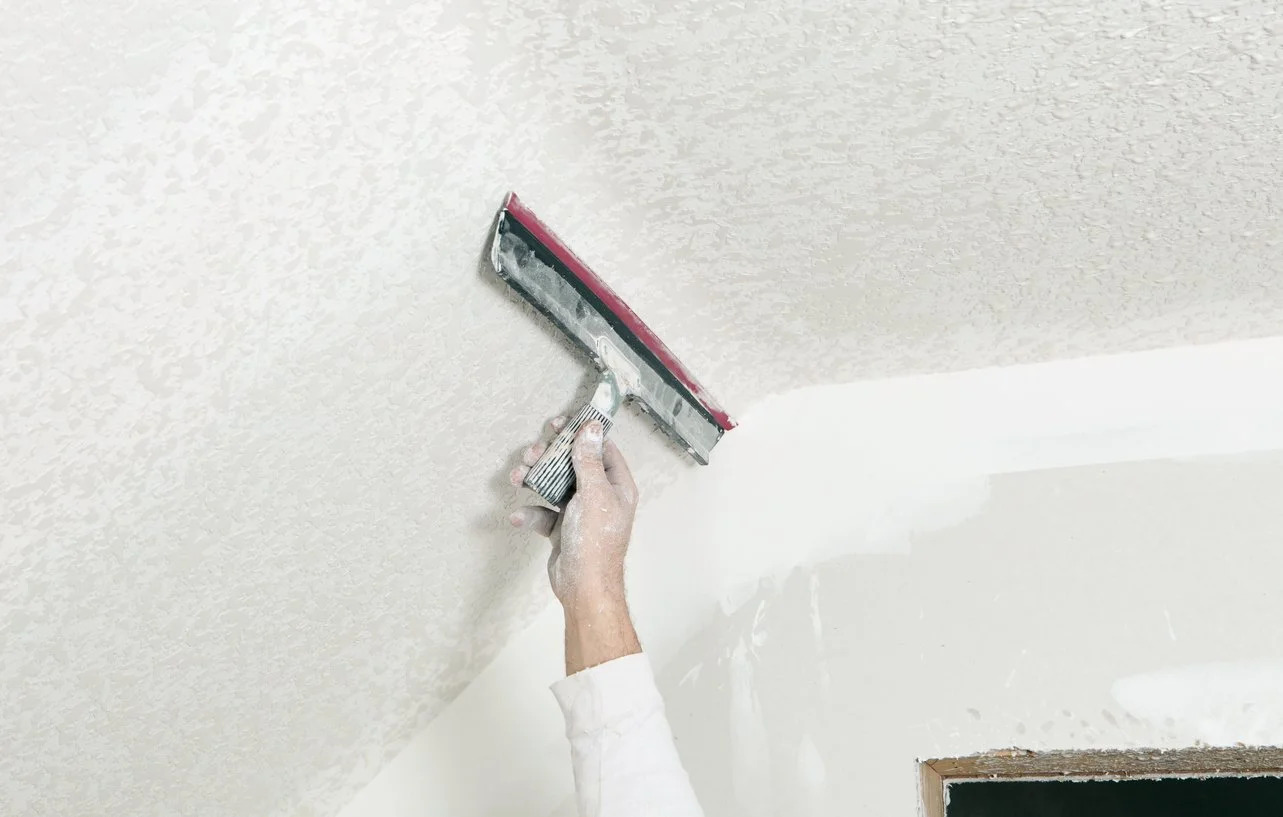
Swirling the texture
Creating swirling patterns in the texture compound takes a bit of practice, but with the right technique, you can achieve beautiful and unique designs on your ceiling. Here’s how to swirl the texture:
- Choose your swirling tool: There are several tools you can use to create the swirling effect, such as a texture brush, a trowel, or even a whisk broom. Experiment with different tools to find the one that creates the desired pattern.
- Hold the tool at an angle: Hold the swirling tool at a slight angle, approximately 30-45 degrees, to the ceiling surface. This will allow the tool to make contact with the texture compound and create the swirling motion as you move it across the surface.
- Start swirling: Begin swirling the tool in a circular or figure-eight motion. Apply gentle and consistent pressure to create the desired depth and design in the texture. You can vary the size and shape of the swirls to add visual interest.
- Blend the swirls: As you swirl, make sure to blend the edges of each swirl into the surrounding texture to create a seamless appearance. This will result in a cohesive and professional-looking finish.
- Work in small sections: Work on one section of the ceiling at a time to ensure that the texture compound is still malleable enough for swirling. Avoid going back to previously swirled sections as this can disrupt the pattern and texture.
- Step back and assess: After swirling a section, step back and take a look at the overall pattern. Make any adjustments or modifications as needed to achieve the desired effect. Remember, practice makes perfect, so don’t be afraid to experiment with different techniques.
Continue swirling the texture across the entire ceiling, working in small sections and maintaining a consistent swirling motion. Take breaks as needed to rest your arm and evaluate the progress. Once you’re happy with the swirling pattern, it’s time to let the texture dry and finish the process.
Note that drying times can vary depending on the texture compound used and the climate conditions. Follow the manufacturer’s instructions for specific drying times. While waiting for the texture to dry, let’s move on to the next step: drying and finishing the texture.
Drying and finishing the texture
After swirling the texture on your ceiling, it’s essential to allow it sufficient time to dry and set. Here’s what you need to know about drying and finishing the texture:
- Check the drying time: Refer to the instructions provided by the texture compound manufacturer to determine the recommended drying time. This can vary depending on factors such as humidity, temperature, and the type of texture compound used.
- Avoid touching the texture: While the texture is drying, avoid touching or disturbing it. This can lead to unwanted marks or smudges on the surface and disrupt the overall appearance of the texture.
- Ensure proper ventilation: Open windows or use fans to promote air circulation in the room. This can help speed up the drying process by allowing moisture to evaporate more quickly.
- Monitor the drying progress: Keep an eye on the texture to ensure that it is drying evenly and without any signs of cracking or unevenness. If you notice any issues, consult the manufacturer’s instructions or seek professional advice.
- Inspect for imperfections: Once the texture is completely dry, inspect the ceiling for any rough spots or inconsistencies in the texture. Use sandpaper or a sanding sponge to gently smooth out any imperfections, taking care not to damage the surrounding texture.
- Prime and paint the textured ceiling: After the texture is dry and any necessary touch-ups are done, it’s time to prime and paint the ceiling. Apply a primer coat to ensure proper adhesion of the paint, and then proceed with your chosen paint color. Use a roller or brush to apply the paint evenly, following the manufacturer’s instructions.
Once the paint is dry, step back and admire your newly textured and painted ceiling. The swirling texture adds visual interest and depth to the room, creating a unique focal point.
Congratulations! You have successfully learned how to swirl texture a ceiling. With practice and patience, you can master this technique and transform the look and feel of any space. Enjoy your newly textured ceiling for years to come!
Now it’s time to clean up and put away your materials. Let’s move on to the final step: cleaning up.
Cleaning up
After completing the swirling texture on your ceiling, it’s important to clean up the work area and properly store your materials. Here’s a step-by-step guide on how to clean up:
- Remove drop cloths and plastic sheeting: Carefully remove the drop cloths or plastic sheeting from the floor and furniture. Shake them outside to remove any excess texture compound or dust. Fold or roll them up for easy storage.
- Dispose of any leftover texture compound: If you have any leftover texture compound, follow the manufacturer’s instructions for proper disposal. Some compounds can be disposed of in the trash, while others may require special handling due to their chemical composition.
- Clean texture tools: Rinse texture sprayers, trowels, texture brushes, or other tools used in the process. Remove any dried texture compound and clean them thoroughly with warm soapy water. Rinse and dry them before storing them away.
- Discard used materials: If you used disposable materials such as paint rollers, brushes, or plastic film, dispose of them appropriately according to local waste management guidelines.
- Clean the surrounding area: Sweep or vacuum the room to remove any dust or debris that may have accumulated during the texturing process. Pay attention to the walls, baseboards, and other surfaces that may have been affected.
- Touch-up paint if necessary: Inspect the walls and adjacent areas for any splatters or marks caused by the texturing process. Use touch-up paint to cover any blemishes and restore a clean and uniform appearance.
- Organize and store materials: Properly organize and store your texture materials, such as unused compound, brushes, or trowels, in a dry and secure location. This will ensure they remain in good condition for future use.
By following these steps, you’ll leave your workspace clean and organized, ready to enjoy your newly textured ceiling without any mess or clutter. Take a moment to appreciate your hard work and the transformation you have achieved.
Remember, practicing proper cleanup not only maintains a tidy working environment but also helps preserve your tools and materials for future projects. Enjoy the beauty and charm that the swirling texture brings to your space!
Thank you for following this guide on how to swirl texture a ceiling. We hope you found it helpful and that you’re proud of the results. Happy swirling!
Excited about your newly textured ceiling? Don't stop there! Dive into our comprehensive guide on achieving various textured ceiling styles that can transform any room's ambiance. Mastering ceiling textures isn't just about the aesthetics; it's also about creating a vibe that reflects your unique style. Whether you're looking to add subtle elegance or dramatic flair, our detailed guide provides all the insights you need. Ready to elevate your home's decor? Check out our next article on creating beautiful, textured ceilings.
Frequently Asked Questions about How To Swirl Texture A Ceiling
Was this page helpful?
At Storables.com, we guarantee accurate and reliable information. Our content, validated by Expert Board Contributors, is crafted following stringent Editorial Policies. We're committed to providing you with well-researched, expert-backed insights for all your informational needs.


0 thoughts on “How To Swirl Texture A Ceiling”