Home>Articles>How To Brew Coffee In A Percolator On A Stove Top
Articles
How To Brew Coffee In A Percolator On A Stove Top
Modified: December 7, 2023
Learn the art of brewing coffee in a percolator on a stove top with our informative articles. Master the technique and enjoy a perfect cup of joe every time.
(Many of the links in this article redirect to a specific reviewed product. Your purchase of these products through affiliate links helps to generate commission for Storables.com, at no extra cost. Learn more)
Introduction
Welcome to the world of coffee lovers! There’s just something about the aroma and taste of a freshly brewed cup of coffee that can awaken the senses and set the tone for a great day. While there are several methods for brewing coffee, one classic and time-honored method is brewing coffee in a percolator on a stove top.
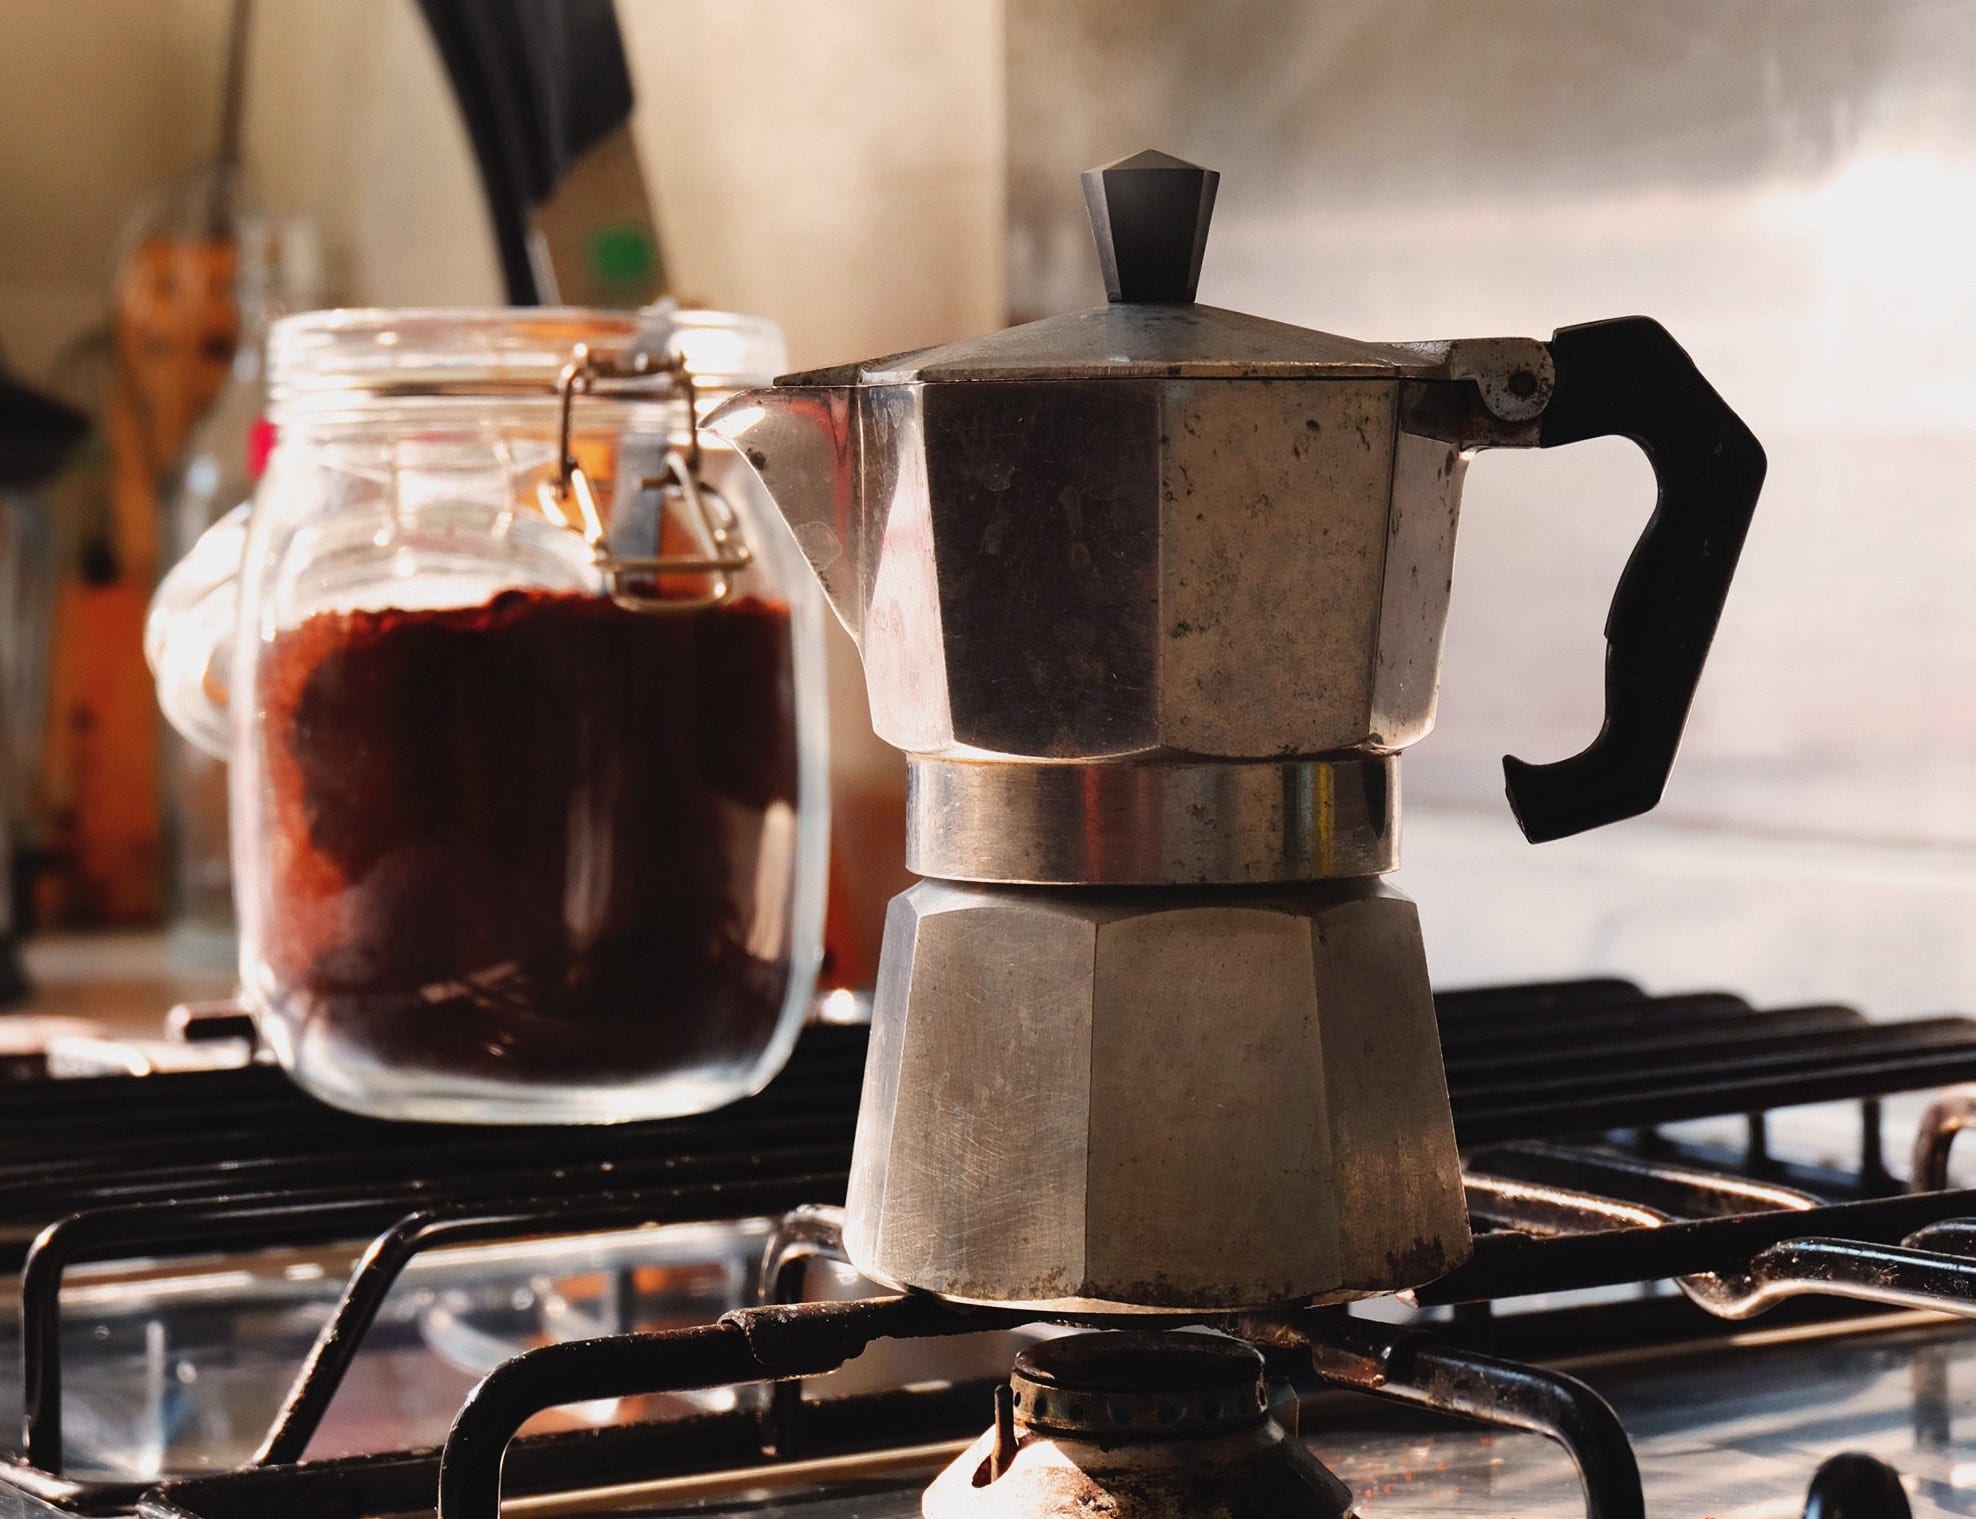
A percolator is a coffee pot specifically designed to brew coffee by cycle of boiling water up through a tube and then back down over the coffee grounds repeatedly. The result is a flavorful and robust cup of coffee that can rival any gourmet brew. Whether you’re a seasoned coffee enthusiast looking to venture into a new brewing method or a beginner eager to learn, brewing coffee in a percolator on a stove top is a rewarding experience.
In this article, we will take you through the step-by-step process of brewing coffee in a percolator on a stove top. From choosing the right percolator to selecting the perfect coffee beans and mastering the art of brewing, we’ve got you covered. So grab your favorite mug, put on your barista hat, and let’s get started on our coffee brewing adventure!
Key Takeaways:
- Brewing coffee in a percolator on a stove top is a delightful and rewarding experience that involves choosing the right percolator, selecting quality coffee beans, and carefully monitoring the brewing process to achieve a well-extracted and flavorful cup of coffee.
- By incorporating tips such as using freshly roasted beans, experimenting with ratios, and preheating the percolator, you can elevate your percolator-brewed coffee to perfection and enjoy the wonderful world of coffee flavors.
Read more: How To Make Coffee On The Stove Top
Choosing the Right Percolator
When it comes to choosing the right percolator for your coffee brewing needs, there are a few factors to consider. First and foremost, you’ll want to decide between a stovetop percolator and an electric percolator.
Stovetop percolators are the classic option and offer a nostalgic and hands-on brewing experience. They are typically made of stainless steel or aluminum and are placed directly on the stove for heating. Electric percolators, on the other hand, require an electrical outlet and offer the convenience of automatic temperature control.
Next, consider the size of the percolator. Percolators come in various sizes, typically measured in cups. Keep in mind that these cup measurements are smaller than a standard coffee cup, usually around 4-5 ounces per cup. If you’re brewing for a large group or family, opt for a larger percolator to avoid multiple brewing cycles.
Another important factor to consider is the material of the percolator. Stainless steel percolators are durable, resist staining, and often retain heat better than aluminum percolators. However, aluminum percolators may be more affordable and lighter in weight.
Finally, look for features that suit your preferences. Some percolators have clear glass knobs on the lid, allowing you to monitor the brewing progress without having to lift the lid. Others may have heat-resistant handles or detachable cords for easy serving and cleaning. Consider these features based on your brewing and serving preferences.
By taking these factors into account, you can choose the right percolator that suits your brewing style and ensures a delightful coffee brewing experience.
Selecting the Right Coffee Beans
When it comes to brewing coffee in a percolator on a stove top, selecting the right coffee beans is crucial to achieving a rich and flavorful brew. The type and quality of the coffee beans can greatly influence the taste and aroma of your cup of coffee. Here are some points to consider when selecting the right coffee beans:
1. Freshness: Opt for freshly roasted coffee beans as they have a more vibrant flavor and aroma compared to those that have been sitting on the shelf for a while. Look for the roast date on the package or choose beans from a local coffee shop that roasts their beans on-site.
2. Roast Level: Determine your preferred roast level – whether it’s light, medium, or dark. Each roast level has its distinct flavor profile, with light roast offering a brighter and more acidic taste, medium roast providing a balance of acidity and richness, and dark roast delivering a bold and smoky flavor.
3. Whole Bean or Ground: For the freshest cup of coffee, it’s best to choose whole bean coffee and grind it right before brewing. However, if you don’t have access to a coffee grinder, you can still achieve a good cup of coffee by opting for pre-ground coffee beans. Just make sure to store the ground coffee in an airtight container to maintain its freshness.
4. Single-origin or Blend: Decide whether you prefer single-origin coffee, which is sourced from a specific region, or a blend that combines beans from different regions. Single-origin coffee offers unique flavors and characteristics from the specific region, while blends offer a harmonious balance of flavors.
5. Experimentation: Don’t be afraid to try different types of coffee beans to discover your personal preferences. Explore different origins, varietals, and roast levels to find the flavors that resonate with you.
By considering these factors and experimenting with different coffee beans, you can find the perfect beans that will elevate your percolator-brewed coffee to new heights of flavor and enjoyment.
Preparing the Percolator
Before you begin the coffee brewing process, it’s essential to properly prepare your percolator to ensure a clean and smooth brewing experience. Here are the steps to prepare your percolator:
1. Clean the Percolator: Start by thoroughly cleaning your percolator to remove any residue or stale coffee flavors from previous uses. Disassemble the percolator and wash all the components with warm soapy water. Rinse them thoroughly and dry them completely before reassembling.
2. Check the Seals: Inspect the rubber seals and gaskets of your percolator. If you notice any damage or wear, replace them to ensure a proper seal to prevent leaks during brewing.
3. Polish the Percolator: If your percolator is made of stainless steel, you may want to give it a quick polish to restore its shine. Use a stainless steel cleaner or a mixture of vinegar and water to remove any stains or tarnishes. Rinse and dry the percolator after polishing.
4. Season the Percolator: Some coffee aficionados swear by “seasoning” their percolator before brewing. To do this, fill the percolator with water, add a few tablespoons of coffee grounds, and let it run a cycle without heat. This process can help remove any residual flavors and improve the taste of future brews.
5. Check the Filters: Depending on your percolator model, you may need to use a built-in filter or a separate coffee filter. Ensure that the filter is in good condition and fits securely in its place. If using a separate coffee filter, wet it slightly before placing it in the filter basket to prevent it from sticking to the sides during brewing.
By properly preparing your percolator, you can ensure a clean and efficient brewing process, leading to a delicious and enjoyable cup of coffee.
Measuring the Water and Coffee
Accurately measuring the water and coffee is a crucial step in achieving a well-balanced and delicious cup of coffee when brewing in a percolator on a stove top. Here’s how to measure the water and coffee for your brew:
1. Determine the Ratio: The general rule of thumb for brewing coffee is to use a ratio of 1 to 2 tablespoons of coffee grounds per 6 ounces of water. However, this can be adjusted based on your preference for a stronger or milder cup of coffee. Experiment with different ratios to find the perfect balance for your taste buds.
2. Calculate the Water Amount: Start by determining how many cups of brewed coffee you want to make. Keep in mind that a cup in coffee measurements is typically around 4-5 ounces, which is smaller than a standard coffee cup. To calculate the water amount, multiply the number of coffee cups by 6 (for example, 4 cups would be 24 ounces of water).
3. Measure the Coffee: Based on your desired coffee strength and the ratio mentioned earlier, measure the appropriate amount of coffee grounds. Using a coffee scoop or tablespoon, measure 1 to 2 tablespoons of coffee grounds per 6 ounces of water. Adjust this measurement based on your personal preference.
4. Grind the Coffee (if using whole beans): If you’re using whole bean coffee, it’s crucial to grind the beans just before brewing to ensure the best flavor. Use a coffee grinder and adjust the grind level based on your brewing method. For percolators, a medium-coarse grind is generally recommended.
5. Adjust for Percolator Strength: Percolators tend to produce stronger coffee compared to other brewing methods. If you prefer a milder cup of coffee, you can slightly reduce the amount of coffee grounds used or increase the water ratio to achieve your desired taste.
By carefully measuring the water and coffee, you can achieve a well-balanced and flavorful cup of coffee that perfectly suits your taste preferences.
Read more: How Long To Perk Coffee On The Stove Top
Assembling and Placing on the Stove
Now that you’ve measured the water and coffee, it’s time to assemble your percolator and place it on the stove for brewing. Follow these steps to ensure a proper setup:
1. Assemble the Percolator: Start by placing the base of the percolator on a heat-resistant surface. Attach the percolator stem, which is the long tube with the filter at the bottom, to the base. If there is a filter basket, insert it securely onto the stem.
2. Add Water: Pour the desired amount of water into the percolator pot. Make sure not to exceed the maximum fill line, which is typically marked inside the pot. Avoid filling the pot to the brim to prevent overflowing during the brewing process.
3. Add Coffee Grounds: Take the measured coffee grounds and add them into the filter basket or directly into the percolator pot, depending on your percolator model. For a consistent and even extraction, distribute the grounds evenly.
4. Secure the Lid: Place the lid securely on top of the percolator pot. Ensure that it fits tightly to prevent any steam or coffee from escaping during brewing. Some percolators may have a glass knob on the lid, allowing you to monitor the brewing process without lifting the lid.
5. Place on the Stove: Carefully place the assembled percolator on the stove burner. Make sure to center it properly and align it with the heat source for even and efficient brewing. If you have a gas stove, adjust the flame to a medium setting. For an electric stove, set the burner to medium heat.
6. Heat and Brew: Turn on the stove burner and allow the water to come to a gentle boil. As the water boils, it will travel up the stem, brewing the coffee grounds on its way. This continuous cycle of boiling water will extract the flavors and aromas from the coffee grounds, resulting in a rich and robust cup of coffee.
By following these steps, you can properly assemble your percolator and place it on the stove for a successful brewing session. Now, sit back and enjoy the delightful aroma that fills your kitchen as your coffee begins to brew.
When brewing coffee in a percolator on a stovetop, make sure to use coarse ground coffee to prevent grounds from seeping into the final brew.
Brewing Process
The brewing process in a percolator involves a cycle of boiling water that travels up through the stem, over the coffee grounds, and then back down into the pot. This cycle continues until the desired strength of coffee is achieved. Follow these steps to ensure a successful brewing process:
1. Heat Adjustment: Once the percolator is on the stove and the water starts to boil, it’s important to adjust the heat to maintain a gentle boil. Too high of a heat can result in over-extraction and a bitter taste, while too low of a heat can lead to under-extraction and a weak brew. Find the right balance by monitoring the water’s movement and adjusting the heat as needed.
2. Brewing Time: The brewing time in a percolator varies depending on your taste preference and the desired strength of the coffee. As a general guideline, allow the coffee to brew for around 7 to 10 minutes. However, taste along the way to determine when the coffee has reached your desired level of flavor and strength.
3. Brewing Sights and Sounds: When the brewing process is in full swing, you will notice the water bubbling up through the stem and percolating over the coffee grounds. This can be accompanied by a gentle hissing or gurgling sound. These sights and sounds are indicators that the brewing process is underway.
4. Monitoring the Color: Keep an eye on the color of the coffee as it brews. At the beginning of the process, the coffee will be clear, but as it progresses, it will darken to a rich, deep color. The darker the color, the stronger the brew will be. Remember, taste is the ultimate determinant of the brewing process, so rely on your taste buds to make the final judgment.
5. Testing for Strength: To check the strength of the coffee, carefully remove the percolator lid and use a ladle or spoon to pour a small amount of the brewed coffee into a glass or cup. Take a sip and assess the taste. If it’s too weak, you can continue the brewing process for a bit longer. If it’s too strong, you can dilute it with hot water.
By carefully monitoring the brewing process and adjusting the heat and brewing time to suit your taste preferences, you can ensure a flavorful and satisfying cup of coffee.
Checking the Brewing Progress
Checking the brewing progress in a percolator is an important step to ensure that you extract the desired flavors and strengths from your coffee grounds. Here are some ways to check the brewing progress:
1. Visual Assessment: One of the simplest ways to check the brewing progress is by visually inspecting the color of the coffee as it percolates. As the water travels up through the stem and over the coffee grounds, it will gradually darken. Keep an eye on the color change to gauge the strength of the brew. Darker colors indicate a stronger brew, while lighter colors suggest a milder taste.
2. Aroma Evaluation: Another way to assess the brewing progress is by smelling the aroma of the coffee. As the coffee grounds steep in hot water, it releases delightful coffee aromas. Lift the lid slightly and take a gentle sniff to gauge the intensity of the aroma. A strong and rich aroma indicates a well-extracted brew.
3. Taste Testing: The most reliable way to check the brewing progress is through taste testing. Carefully remove the percolator from the heat source and use a ladle or spoon to pour a small amount of the brewed coffee into a glass or cup. Allow it to cool for a moment and take a sip. Assess the strength, flavor, and overall balance of the coffee. If it’s too weak, you can continue brewing for a bit longer. If it’s too strong or too bitter, you can dilute it with hot water.
4. Adjusting Brewing Time: If you find that the coffee is not reaching your desired strength after the initial brewing time, you have the option to continue the brewing process for a bit longer. Return the percolator to the heat source and allow it to percolate for a few additional minutes. Periodically check the brewing progress until the desired strength is achieved.
By visually assessing the color, evaluating the aroma, and conducting taste tests, you can effectively check the brewing progress in your percolator and make adjustments as necessary, to achieve a perfect cup of coffee that meets your personal preferences.
Removing and Serving the Coffee
Once your coffee has finished brewing in the percolator, it’s time to remove it from the heat source and serve it to enjoy its rich flavors. Follow these steps to safely remove and serve your freshly brewed coffee:
1. Turn off the Heat: Before removing the percolator from the stove, ensure that the heat source is turned off or the burner is switched off in the case of an electric stove. This prevents any accidents and ensures your safety.
2. Allow for Settling: After turning off the heat, give the coffee a few moments to settle in the percolator. This allows any remaining coffee grounds to settle at the bottom and prevents them from ending up in your cup when pouring.
3. Remove the Lid: Carefully lift the lid of the percolator, being mindful of the steam that may escape. Set the lid aside in a safe place where it won’t be accidentally knocked over or misplaced.
4. Pouring the Coffee: When pouring the coffee from the percolator, use a slow and steady motion to minimize any turbulence that could disturb the settled coffee grounds. Aim for a controlled and smooth pour to ensure a clean and enjoyable cup of coffee.
5. Serve Immediately: Freshly brewed coffee is best enjoyed immediately after brewing. Pour the coffee into preheated cups or mugs to retain its heat and full flavors. If you’re serving multiple people, you can use a coffee carafe to keep the coffee warm for a longer period of time.
6. Add Your Preferred Additions: Customize your cup of coffee to your liking by adding sugar, milk, cream, or any other desired additions. Stir gently to incorporate the flavors, and enjoy the aromatic and flavorful cup of percolator-brewed coffee.
7. Clean the Percolator: After serving, it’s essential to clean the percolator to maintain its performance and keep the flavors of your future brews untainted. Disassemble the percolator, discard the used coffee grounds, and wash the components thoroughly with warm soapy water. Rinse them well and dry them completely before storage.
By following these steps, you can safely remove and serve your percolator-brewed coffee, allowing you to savor every sip of its delectable flavors. Cheers to a delightful coffee experience!
Read more: How Does A Stove Top Espresso Maker Work
Tips and Tricks for a Perfect Brew
While brewing coffee in a percolator on a stove top is a straightforward process, there are some tips and tricks that can help elevate your brew to perfection. Here are some handy tips to keep in mind:
1. Use Freshly Roasted Beans: For the best flavor, always use freshly roasted coffee beans. Look for the roast date on the package or purchase beans from a local coffee shop that roasts their own. Fresher beans will yield a more vibrant and delicious cup of coffee.
2. Grind Just Before Brewing: If using whole bean coffee, grind the beans just before brewing to maximize freshness and flavor. Invest in a quality burr grinder and choose a medium-coarse grind for percolator brewing.
3. Experiment with Ratios: The coffee-to-water ratio will ultimately determine the strength of your brew. Feel free to experiment and adjust the ratio to suit your taste preferences. Remember, a rough guideline is 1 to 2 tablespoons of coffee grounds per 6 ounces of water, but feel free to adjust to your liking.
4. Preheat the Percolator: Preheating the percolator before adding the water can ensure a more even extraction and better temperature control. Simply pour hot water into the percolator and let it sit for a few minutes before discarding the water and adding fresh water for brewing.
5. Control the Heat: Adjust the heat on your stove to maintain a gentle boil throughout the brewing process. Avoid high heat, as it can lead to over-extraction and a bitter taste. Keep the heat at a medium setting to achieve the best results.
6. Monitor the Brew Time: While a general brewing time of 7 to 10 minutes is a good starting point, taste along the way to determine when your coffee has reached the desired strength. Remember that brewing time can vary based on personal preference, coffee type, and percolator model.
7. Remove from Heat Promptly: Once the coffee has finished brewing, promptly remove the percolator from the heat to stop the brewing process. Letting it sit on the heat for too long can lead to over-extraction and a bitter taste.
8. Clean and Maintain: Regularly clean and maintain your percolator to keep it in optimal condition. Disassemble the percolator after each use, wash the components thoroughly, and dry them completely before storage. This helps prevent any residue buildup or off flavors in future brews.
9. Enjoy Immediately: Percolator-brewed coffee is best enjoyed immediately after brewing. The flavors and aromas are at their peak during this time. Avoid letting the coffee sit for too long as it can become stale and lose its vibrant qualities.
10. Experiment and Have Fun: Finally, don’t be afraid to experiment with different coffee beans, roasts, ratios, and brewing techniques to find your perfect cup of percolator-brewed coffee. Embrace the journey and have fun exploring the wonderful world of coffee flavors!
By incorporating these tips and tricks into your percolator brewing routine, you’ll be well on your way to enjoying a consistently delicious and satisfying cup of coffee every time.
Conclusion
Brewing coffee in a percolator on a stove top is a timeless and rewarding method that allows you to savor the rich flavors and aromas of a perfectly brewed cup of coffee. By choosing the right percolator, selecting quality coffee beans, properly preparing the percolator, and measuring the water and coffee accurately, you can set the stage for a delightful brewing experience.
Assembling the percolator, placing it on the stove, and carefully monitoring the brewing process allows for a well-extracted and flavorful cup of coffee. Checking the brewing progress through visual cues, aroma evaluation, and taste tests ensures that you achieve your desired strength and taste. Once the brewing is complete, removing the percolator from the heat and serving the coffee immediately allows you to enjoy its full flavors while they are at their freshest.
Remember, these tips and tricks are meant to guide you, but don’t be afraid to experiment and customize your brewing process to suit your personal preferences. Adjust the ratios, brewing time, and other variables to create a cup of coffee that brings you joy and satisfaction.
With each brewing session, you’ll refine your skills and develop a deeper appreciation for the art of percolator brewing. So grab your percolator, choose your favorite coffee beans, and embark on a journey of experiencing the joy and satisfaction of brewing coffee in a percolator on a stove top. Happy brewing!
Frequently Asked Questions about How To Brew Coffee In A Percolator On A Stove Top
Was this page helpful?
At Storables.com, we guarantee accurate and reliable information. Our content, validated by Expert Board Contributors, is crafted following stringent Editorial Policies. We're committed to providing you with well-researched, expert-backed insights for all your informational needs.


0 thoughts on “How To Brew Coffee In A Percolator On A Stove Top”